GRID DIP METER
Short description
Appliances
Hull Match
Schematics
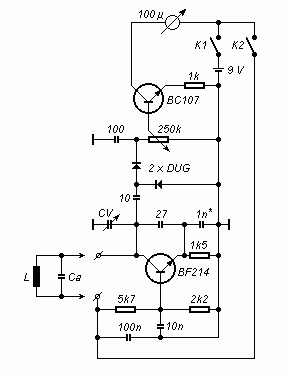
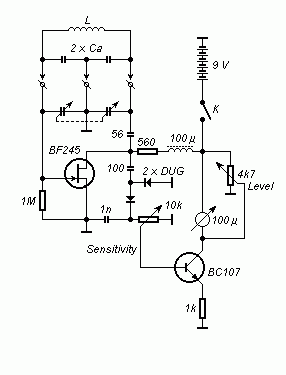
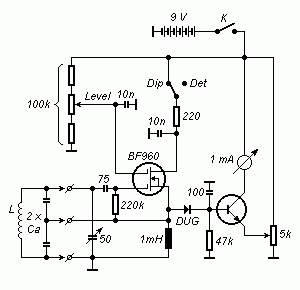
Using bipolar tranzistors
- Resonance measurements for LC circuits
- That's the most common use of a GDM. Close de GDM coil to the testing circuit. Turn the scale until the mA-meter will show a dip. Read the value and then move away the dipper turning the scale close around until you'll have a low dip. Here is the right resonance frequency.

- Q factor measurements
- Every operator had point out that a sharp dip answer to a high Q level.
- For those who want a numeric value:
- Having the mA-meter pointer at the end of the scale, close the dipper coil to the tested circuit. Note the resonance frequency as F1.
- Re-tune the dipper, at the same couple, to have a value of pointer by 70,7%. Note the new frequency as F2

- Absorbtion wave meter
- The tuned L-Ca-CV group capture the RF energy that is straight by the 2 x DUG, then is show a high at the mA-meter.
- For low level signals, having the oscillator turned on, the pointer to minimum and using the headphones, close the coil to the oscillator. At detection, the pointer will show a little increase of it or in the headphones could be heard a signal.
- For high levels, at transmitters, turn off the oscilator, and close the dipper to it. At resonance, the mA-meter will show that.
- Field detector
- An asbsorbtion wavemeter using a short wire (abt. 1 m) connected to the oscillant circuit.
- Signal generator
- Switch on the dipper, tuned it on the choose frequency and place it to the room corner. Simple, isn't?
- Inductance and capacitors measurements
- For this case must to have a known inductance or a capacitor (under 5% tolerance). Proceed as at the resonance measurements and use one of the below math formula:


- For shielded coils, if the dipper has a external connector for RF, then connect it through a low capacitor (1 - 5 pF) to the tested circuit.
- For a toroidal coil use a link:

- Determination the resonance frequency of an antenna
- An antenna is a resonant circuit isn't? So, must to find a way to couple the dipper to it.
- The correct way for this is to do this at the feed point of it using a turn, before to place it in the final position. Sometimes, to avoid the debase of results due to proximity is necessary to do this using a inductive link, even through the feeder. It is a solution, but the answer will include and the feeder dates, thus, in time, when the feeder parameters will be debase, all will be changed.
- Feeder measurements
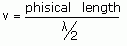
- To construct and tune an antenna, is necessary to know the wave length of the feeder. The physical length could be easy to determinate but the electrical length is something else because of the velocity factor.
- For a l/4 wavelength line, cut a little more than the calculated length (including the velocity factor). Shortcut it one of the extremities using a loop to link the dipper. Step by step, cut to adjust the line to the resonance. So you can have any odd multiple of l/4.
- For a l/2 wavelength line, proceed as the precedent, but now its necessary to shotcut and the other extremity. So you will have shortcut to the both sides.

- Velocity factor of feeders
- To determine this parameter will need an impedance-meter or a Z-meter.
- Generally speaking, the impedance of coaxial feeder is 0.66. In case of an unknown or an urcertain one use this way. Take a piece at a known length and couple it at a Z-meter. Shortcut the opposite edge. The dipper will induce the RF through a coil by 2-3 turns. Close the couple that the pointer of Z-meter to touch the end of the scale. Use the dipper to look a deep of Z-meter pointer. Note the frequency. Calculate the l/2. The velocity factor is :
- Neutralizer indicator
- For a tubes power amplifier, a correct neutralization will exonerate by a lot of troubles. In this case, bring close the dipper to the anodic circuit (cut off the high-voltage) and tune the grid circuit to avoid a sharp dip.

Calibration
- Using a calibrate receiver, turning the scale, listen the frequencies, and note them on the dipper's scale; to avoid a wrong answer because of harmonics, determine the lower that.
- Use another dipper, turned on as wavemeter, or as dipper, close the coils and...
- Wire 2-3 turns over plug-in coil and link to a frequency counter. An unfailing method.
Links about dip-meter
by Talino Tribuzio, IZ7ATH