This is an extract from kg6haf on how to tune a Kenwood 520S - tnx Ward


Transmitter Controls

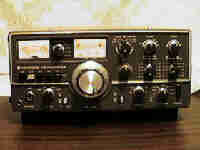
H.SW This is the heater switch for the tubes. This must be in "ON" position or you will get no output, but the receiver will work normally. When turned "ON" a filament will heat the cathodes in the 12BY7A driver and 6146B finals and electrons will bake off into the vacuum and start to fly to the plate. This switch is on the rig for mobile/battery operation, since less power is used if the tubes are not being heated. There seems to be some debate about whether turning off the heaters when you're not going to be transmitting prolongs the life of the tubes or not. Some argue the thermal shock of repeated heating and cooling is worse than just heating all the time. There are also arguments about how long you should let the tubes warm up before you start transmitting. I've seen folks advocate everything from 30 seconds to 3 minutes. The reality is you'll probably flip it on in a panic when you realize it is off and you want to transmit right now. I've gone as little as 15 seconds in this situation and it seems to work...
CAR Carrier Control. Adjusts the amount of signal applied to the final amplifier. Clockwise to increase. Though it seems obvious to me now, it took me a while to figure out this is the "output power control" when using CW. (The "mic" control in the center does the same thing for SSB.) Bad news is that it goes from full power to nothing with a tiny amount of counter-clockwise turn and can be tricky to twiddle with on the fly. The Kenwood manual wants you to start tune up with this control at 12 O'clock. I usually have it at about 9 O'Clock. It has to be up a little or the S-Meter won't give a reading when you try to peak the drive (see below).
Drive Resonates/peaks (tunes) the grid (input) of the final amplifier, and also the receiver input. Proper setting will always be somewhere in the middle of the knob setting. A proper setting for receive will also be right for transmit and vice-versa. Adjust for loudest static on receive and you'll be in the ballpark for the band and frequency. You are adjusting the operation of the 12BY7A DRIVEr tube. I think!
Plate Resonates the 6146B power amp tubes -- which means minimum current is coming off the plate and you're not frying them!
Load Jim writes: Adjusts the amount of loading of the final amplifier. Minimum loading = minimum power = knob turned ccw (to the left). I'm not sure what he means. As I wrote above, the CAR control varies the CW output power. My understanding is the Load control runs a small Pi network on the amplifier output that adjusts the final amplifier output LOADing, and can be used, something like an antenna tuner, to match the transceiver to the antenna system so you can drive the most power into it. The Plate and Load controls interact and are adjusted one after another during tune-up (see below).
Meter Controls what the meter displays. (Took me a while to figure out that when the rig is in receive mode, the meter is always an S-Meter, no mater what this switch is set to. Also, the receive S-Meter is only accurate if the RF Gain is wide open and the AGC switch is on "fast" or "slow.")
"ALC" = (automatic level control) amount of drive to final amplifier. Useful in SSB to see your voice peaks (adjusted with the "mic" control. I just realized that AGC (for receive) and ALC (for transmit) are not the same thing! Doh! Scale is the black ALC at the bottom of meter -- the lowest of the scales.
"IP" = (current "I" plate) Final amplifier plate current, read on mA scale
"RF" = (Radio Frequency power) Relative power output (not a wattmeter, but useful)
"HV" = (High Voltage) Final amplifier plate voltage - normally reads about 800V (8 on the red HV scale)

I guess my current "mental model" of how the these control work goes something like this: CAR/MIC injects the amp, DRIVE peaks up the 12BY7A to juice the finals, and PLATE resonates the 6146 finals and LOAD tweaks the inductance and resistance the final tubes see as they pump RF out of the radio . All these controls interact in various ways, with PLATE and LOAD being the most important, and twitchy!

If you can think of a better/clearer expression for this circuit syllabus lemme know.

Tune-Up Procedure

The User's Manual (downloadable above) has the "Kenwood Approved" procedure for tuning up the rig starting on page 20. In particular it has a nice chart of initial settings for ALL the controls, which is useful if you have never done this before. The procedure presented here differs in some respects.

  1. First, fire up the rig and tune to the band you would like to transmit on. The rig needs a load that is fairly close to 50 ohms. Less than 2-1 SWR is good. If your antenna has been trimmed for the band you are going to transmit on, you're probably all set. If you are using an Antenna Tuner to load up a random wire or mis-matched dipole, the procedure is to connect a dummy load (rated 100 watts or better) to the 520 and tune the rig into THAT perfect 50 ohm load, THEN switch in your antenna tuner and adjust it for minimum SWR. You might want to use a dummy load to practice this tune-up procedure anyway, since part of it involves putting a signal on the air.
  2. Make sure the H.SW is on. Warm up the tubes.
  3. Make sure the FUNCTION switch is in the VFO position. Make sure RIT is OFF (out). Make sure RF ATT is OFF (out).
  4. Plate idle current: Kenwood wants to be sure the idling current of the plate is at 60ma before you begin. Generally, you only have to check this once in a very long while. Set the METER switch to "IP" (current, plate), tune to the band of interest, set the MODE switch to USB or LSB. Flip the rec/send switch to "send." You should read 60ma on the top scale of the meter. If you get a different value, you need to open the little door on the left of the rig and turn the bias pot until you get it. See the manual.
  5. Get the DRIVE control into the ballpark: If you have an antenna connected, you can turn the DRIVE knob until you hear the loudest static (with the MODE switch on USB or LSB). If you are working with a dummy load, or just want something easier to work with, flip the FUNCTION knob a click to the left to the Cal 25 Khz setting. Then tune to the nearest 25,000 HZ division (i.e. 7.125, 7.150) so you can hear the tone then turn the DRIVE knob until the tone is loudest. Be sure to set this switch back to VFO when you are done. (The marker is every 25khz, but, like CW, you have to offset to hear it -- or my radio is out of whack! -- for example, at 14.150 I use 14.152.5.)
  6. ALC adjustment: Turn the CAR and Load controls fully counter-clockwise. Put METER switch in "ALC" position. Put the Mode switch in the "tune" position. (If you are not using a dummy load, find a quiet place on the band.) Flip the send/rec switch to "send." Turn the CAR control slowly clockwise until you get a half-scale deflection or so. (The original instructions and manual are unclear, I turn for a half of the ALC scale, or S5. I think this is right.)
  7. Fine tune the DRIVE: With the rig still set to "send", turn the DRIVE control to peak the ALC meter reading. I wind up at S9 on the ALC scale. Put the send/rec switch back to "rec" and breathe. (Try keep the rig in "send" as little as possible -- less than 15 seconds at a stretch -- and let the tubes cool down between time.) Franky, I've been skipping this step lately (Oct02), since the right setting is good for both xmit and receive you can do either this step or the ballpark step above and be OK. I think this is harder, so I've been using the 25khz tone and peaking the receive side instead.
  8. Dip the PLATE: This is my favorite step, if only because of the name! Put the Meter switch in the "IP" (current,plate) position. Set the PLATE for the middle of the band you are tuning on. With the MODE switch still in "Tun", flip the send/rec switch to "send." Quickly adjust the PLATE control for minimum meter reading. (I think the dip is bigger on the higher frequency bands.)
  9. Peak the output: Everything is close now. Put the Mode switch to CW, the Meter switch to "RF" (or, if you have an antenna tuner, read the actual RF power there). Be sure you're on a dummy load or quiet place on the band. Put the send/rec switch in "send." Key down. Quickly turn the LOAD control for maximum RF output. Jump to the PLATE control and twiddle it for maximum RF output. Alternate back and forth between the two quickly and "walk" the meter up to the most RF you can get out of your rig. (Right now, I get around 100 watts on 40m, maybe 90 on 20m.) Key up between jumps. Don't do this for very long. When done, put the send/rec switch back to "rec." Breathe.
  10. Final adjustment: send/rec to send, key down. Twiddle the DRIVE control to see if you can get anymore RF out of the thing. Probably not if you've done the previous steps properly. Leave DRIVE at the strongest meter reading. Adjust the CAR control to where the RF output just starts to drop. Again, you should already be close. Key up. Flip the METER switch to IP. Key down. The plate current should be about 240ma. Mine hits this exactly if I tuned into my dummy load properly. If the current is more, you need to reduce the loading -- turn LOAD to the left and re-dip the Plate control.
  11. Congratulations, you are resonating! If you have an Antenna tuner, switch from your dummy load to it and make your final antenna tuner adjustments, if necessary. The rig has to be re-tuned if you change frequency by more than 1-2% or so, and want to transmit. This means 25-50 kHz on 80 meters, and progressively more on the higher bands.

Later (October 2002): I've been doing this a lot now, so I have a short version if you understand the basics above, and have an outboard RF wattmeter (like the one in the AT-2x0 antenna tuner series...)

  1. Pick a frequency. Select your dummy load, turn on the 25khz marker, peak the DRIVE control on the meter at the nearest 25khz division. (When the 520S is in receive the meter is always an S-Meter, no matter what the METER switch is set at.) You might have to crank the CAR a little to get a reading. Also, the AGC switch should be on FAST or SLOW.
  2. Turn the LOAD control down (CCW). Put the METER switch in "IP" position. Select "tune" on the MODE switch. Flip to "send." Dip the plate.
  3. Walk it up: Put the MODE switch on "CW" and key down. Raise the LOAD for maximum RF on your outbound wattmeter. Now adjust the PLATE to lower the "IP" current shown on the transceiver's meter. Repeat, back and forth, back and forth, until you can't get any more RF out or plate dip. I say to myself, "this meter goes up, this meter goes down, this meter goes up, this meter goes down" -- silly, but it works. Go back to "REC."
  4. Select your live antenna and adjust your antenna tuner for lowest SWR if necessary.

Tips

When receiving CW, turn the AF gain up almost all the way, turn the RF gain down, and turn the AGC off. Use the RF gain for the volume control. This method helps fight QRM and receiver overloading.