Using Spectrum Lab with
PERSEUS
PERSEUS is a direct sampling, software defined receiver covering 10 kHz to
30 MHz (or, without preselector, to 40 MHz). Technical details about PERSEUS
are on the Microtelecom website
.
Since March 2008, Spectrum Lab directly supports this radio, based on the
SDRDK (Software Defined Radio Development Kit), (c) Microtelecom s.r.l.,
Pavia di Udine, Italy . So thanks to IV3NWV, you don't need a bandwidth-limiting
"virtual audio cable" between the original Perseus software and Spectrum
Lab.
Installation
To use Spectrum Lab with PERSEUS, you will need a PERSEUS interface DLL
and a few other files installed on your system. But if you have a PERSEUS
connected to your PC, you will most likely already have the software which
you receive with the radio (by Microtelecom) installed. If not done yet,
it is highly recommended that you use the latest (WinUSB-based) drivers,
which are available on the Micotelecom website (see link at the top of this
document).
As an alternative to the built-in support for Perseus in Spectrum Lab,
you may be better off with a Winrad-compatible ExtIO-DLL
(especially with future windows versions, because SL's author is sick
of microsoft re-inventing the wheel at an ever-growing pace).
Due to the ever-changing default directory in which applications are installed,
it's a daunting task to find out where the Perseus interface DLL ("perseususb.dll")
and the FPGA files are located. For example, on a Windows 8.1 machine (64 bit), Spectrum Lab
could successfully load "perseususb.dll" but that interface DLL was unable to load
the FPGA files. If that also happens on your machine (which is quite likely..), fill out
the 'FPGA path' on the 'Config' tab of Spectrum Lab's Perseus control panel:
Updated info about how to use Spectrum Lab with Perseus (2014, 2016)
On a Windows 7 / 64 bit machine, Perseus could be convinced to work directly
with Spectrum Lab as follows (in short form):
- Download the 'Perseus USB Drivers' and the 'Perseus Software' (V4.1a at the time of this writing)
from microtelecom.it/perseus/software.html.
In 2016, the driver used to be a file named "PerseusWinUsbDriversXp-W7-W8-W10.zip" . But things keep changing...
- Install the drivers (good luck with that.. under Windows 7, this was a pain because
the driver 'plug-and-pray' system didn't recognize Perseus, and Windows 7 didn't ask
for a path to the inf-file from the unzipped driver archive. All the triple-stupid system control
(Geräte-Manager on a german PC, showed was:
Andere Geräte
Unbekanntes Gerät (click on 'Properties / Eigenschaften' on this item)
Die Treiber für dieses Gerät wurden nicht installiert. (Code 28)
Es sind keine kompatiblen Treiber für dieses Gerät vorhanden.
The advice to let the "operating system" look for an updated driver naturally failed, too.
The downloaded zip file contained a 'Zadig' executable, which showed the following when launched:
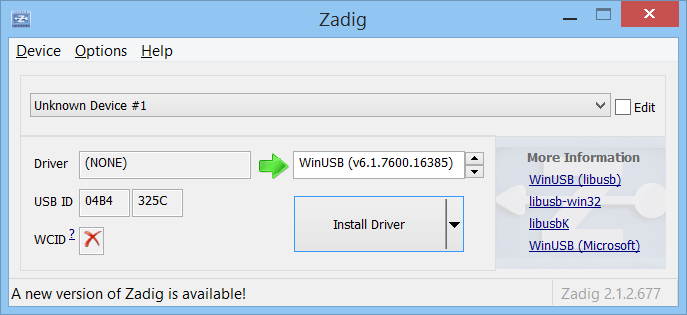
Don't just click 'install' at this stage ! Follow the instructions in the file WinUSB_W7_Install.pdf instead !
("Load Preset Device".."perseus.cfg".."Install Driver"... )
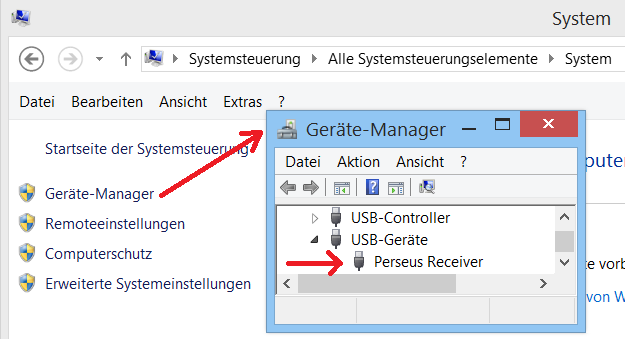
Unfortunately, on the SL author's Win 8.1 64bit machine, the system control still showed 'Unknown device' after this.
What the PDF didn't mention was: The PC needs to be re-booted after 'Zadig' performed its strange magic.
Only after rebooting, the Perseus appeared in the system control as a known device:
Note: Don't try the painful way of getting the non-signed Perseus USB installed under Windows 8
by letting your PC to accept non-signed drivers, as mentioned somewhere else (search the net
for "So You Thought You Could Run A Perseus With Windows 8".
But in 2016, neither 'perseususb.dll' nor the Winrad-compatible ExtIO_perseus.dll worked properly
on a Windows 8.1 / 64bit system. Neither Winrad 1.32 nor Winrad 1.61 nor HDSDR nor Spectrum Lab
would run with Perseus (they all didn't receive digitized samples, and they all crashed when
trying to quit). Only the recent original Perseus software was able to use the radio. What a shame.
The author gave up at this point, after wasting several days of 'hardcore debugging' trying to get Perseus running.
(Old info below, which worked with Windows 7 but not with Windows 8 ...)
- Also install the original Perseus software, and make sure it successfully detects
the radio.
- Exit the original Perseus software.
- Start Spectrum Lab, and select one of the preconfigured 'Quick settings' for Perseus:
In SL's main menu, select
Quick Settings - Image cancelling DC receivers -
"Perseus, 125 kHz sampling, downconverter, adjustable filter"
If not done yet, also let let SL know where the FPGA files, and the interface DLL for the Perseus driver
are located, as explained here.
Keep fingers crossed, hopefully Spectrum Lab will be able to locate the
interface DLL ("perseususb.dll"), load it, initialize it, and tell it to load
the FPGA pattern into the radio.
- Hint:
- You can see from where the DLL was loaded in Spectrum Lab's Error History:
In SL's main menu, select 'View/Windows' .. 'Error History'.
Example, copied from the Error History:
22:34:47 Loaded Perseus-DLL from "c:\cbproj\SpecLab\perseususb.dll".
  Perseus DLL version      : 3.5 .
  Microtelecom product code: 0x8014
  Perseus serial number    : 00117-511B-CA81-0113
  Hardware version/revision: 1.0
22:34:51 Successfully downloaded Perseus FPGA, bitstream nr. 0 .
You can later select a different FPGA pattern (with a different sampling rate) as explained
in one of the next chapters.
Outdated info from OLDER Spectrum Lab versions
- only use this method if everything else failed !
For various reasons, the files required to operate PERSEUS from SpecLab are
not part of the installation archive. Download them from Microtelecom, or
copy them from the CDROM which you received with the hardware. A list of
the files which had to be copied into the Spectrum Lab directory was in
this readme-file . As a bare minimum,
the files perseususb.dll and all *.sbs files had to be copied
into the same directory where Spectrum Lab (the executable)
was installed. Again, those files were not, and will never be, part of the Spectrum Lab installer.
(Since 2016-05, don't copy those files into the SL folder anymore.
Instead, let Spectrum Lab know where those files are as explained here)
After the Perseus USB driver was installed, and all necessary files were copied / extracted,
Spectrum Lab could talk "directly" to the radio.
Because the USB connection to the radio can only be occupied by ONE application at a
time, it was impossible to let Spectrum Lab and the original Perseus software
running side-by-side.
To select PERSEUS for input (instead of the soundcard), open the "audio settings"
tab in SL's configuration, and select "PERSEUS" in the list of "Audio Input
Devices".
Note: SL doesn't check if the radio is really connected to the USB port in
advance !
Alternatively, you can select one of the preconfigured PERSEUS settings in
SpecLab (this is easier than configuring everything yourself):
-
In the main menu, select Quick Settings..Image cancelling DC receivers
(I/Q)..
"PERSEUS, 125 kHz sampling, downconverter, adjustable audio filter"
-
Wait until the receiver is initialized. The spectrum analyser (and, depending
on which setting was selected, the audio output starts).
In this configuration, SL acts as a back-end for a software defined radio,
including waterfall display and audio output (through the soundcard). How
to set the receiver frequency is explained in the next chapters of this document.
How to adjust the audio filter is explained in
another document... but in short form,
there are a few diamond-shaped controls on the frequency scale, which you
can move around to change the audio bandwidth (for SSB and CW), the audio
center frequency ("pitch"), and the RF center frequency ("VFO") within the
current IF bandwidth.
SDR Control / Configuration Panel
Note: This chapter only applies to the native support for Perseus !
If you use the ExtIO-DLL for Perseus instead, you will see a completely different,
and much larger control panel which is built inside the ExtIO-DLL.
To open the following control panel for the PERSEUS, select View/Windows
/ SDR Control Panel in SL's main menu:
SDR VFO tab / main control panel
Note: The control panel may look a bit different, because there are different
radios, too ;-)
You can modify the radio's NCO (numeric controlled oscillator) in the "VFO"
field. Either type the number, or click on one of the digits to place the
cursor there. You can then increment / decrement the frequency with the cursor
up/down keys, or with the mouse wheel (unlike SpectraVue, just pointing the
mouse above the edit field isn't sufficient ! ).
The RF gain combo changes the preamp gain / attenuator. Some less frequently
used settings (which are specific to the radio) must be set on the "cfg"-tab
(config):
SDR Config tab
The radio's IF bandwidth (and, at the same time, the sampling rate) can be
set on the "CFG" (config) tab of this control panel :
Notes:
-
It may be necessary to stop and restart the external SDR before the new settings
become effective. If SpecLab fails to do this automatically, or if the radio
"stalls" when switching to the new settings, stop and restart it from SpecLab's
main menu ("Start/Stop"..."Stop Sound Thread"..."Start Sound Thread").
-
A sampling rate of 200 kHz (and more) creates a heavy load on the USB connection
between the radio and the PC, and requires a relatively fast CPU. If you
don't really need a large displayed bandwidth, select a lower sampling rate
- especially when using a laptop running on batteries !
Other options on the SDR configuration tab are:
-
SDR clock frequency ( and the [Calibrate]-button )
This edit field contains the precise clock frequency of the A/D-converter
inside the radio. For the PERSEUS, the nominal frequency is 80000000.0 Hz,
but it can be calibrated if necessary. You can let the program calculate
the precise value: Click the "Calibrate"-button, enter the frequency of a
well-known reference (for example, Droitwich on 198.0 kHz in Europe), followed
by the measured frequency. Use a large FFT, and a low sampling rate
to get the best accurary of the frequency measurement.
-
[ ] add VFO frequency in the spectrum display
If this option is selected, the VFO frequency will be added to the frequency
scales in the main spectrum display, and when modifiying the VFO frequency
(via mouse wheel for example), the displayed frequency range in the spectrum
display will be adjusted, too.
Otherwise, the main spectrum display will only show the "audio" frequencies,
and the display will not change when the VFO frequency changes.
-
[ ] keep this panel on top of the main window (and other windows, too...)
With this option, the small SDR VFO control panel will always be visible
on top of Spectrum Lab's main window, even if it doesn't have the focus.
-
"More..." (button)
Opens a popup menu with the following options:
-
Use passband ripple compensation (for the FFT)
(Not applicable for the PERSEUS yet).
-
Select FFT compensation file
(Not applicable for the PERSEUS yet).
-
"Apply" (button)
Click this button to apply the changes (not required for the VFO frequency,
which will be sent to the radio immediately).
Because the output sampling rates of PERSEUS are not integer multiples of
the soundcard's standard sampling rates (like 11025, 22050, or 44100 Hz),
you need Spectrum Lab's output
resampling function if you want to send the (demodulated) signal to the
audio output of the soundcard.
See also:
Selecting an Audio Input Device in Spectrum Lab (SDR, soundcard, or similar hardware)
Audio via COM port (serial port, from external A/D converter)
Using Spectrum Lab with SDR-IQ
Using Spectrum Lab with FiFi-SDR
Using Spectrum Lab with a Winrad-compatible ExtIO-DLL for input
Troubleshooting

