


The GM300 was Motorola's next
step in the MaxTrac / Radius mobile product lines. The
schematics are remarkably similar. You can even
interchange some boards between the GM300 and MaxTrac
radios. Like the MaxTrac, the GM300 line has been
discontinued by the manufacturer. Throughout this
article, reference to MaxTrac radios implies Radius
radios as well.
Naturally, you need different programming software (RSS), but if you've ever programmed a MaxTrac, you'll be right at home with the GM300. The radios operate the same, too. See below for more info on the RSS and programming.
GM300 mobile radios cover the VHF (136-174 MHz in two ranges) and UHF (403-520 MHz in four ranges) bands, with 8 or 16 channels, 12.5 or 20/25/30 kHz channel spacing, and 10, 25, and 35-45 watt power levels. They use the same accessories (loudspeakers, microphones, accessory plugs, power cords, mounting brackets, etc.) as the MaxTracs.
The M120 radio is just about the same as a GM300 but has "less features" - this would be the 2-channel version, equivalent to a MaxTrac 50. There is also an M10 single-channel radio, and an M130 2-channel radio.
Here's a front view photo of a 16-channel MaxTrac, a 16-channel GM300, and a 2-channel MaxTrac:

GM300 Model Numbers:
The first six characters are
pretty much standard Motorola convention. The IF
frequency is usually 45.1 MHz but if you have multiple
radios near each other, this can cause interference,
so you can optionally order the radio with an
alternate IF frequency.
| Mount | Power Watts | Band MHz | Series | I.F. MHz |
| M: dash | 0: 1-10 | 3: 136-174 | GM | C: 45.1 |
| 3: 10-25 | 4: 403-520 | R: 45.3 | ||
| 4: 25-45 |
The second six characters
provide a lot of useful information about the
capabilities of the radio and the boards contained
within it.
| Spacing kHz | # Ch. | Logic Board | Range MHz | Rev. |
| 0: 12.5 | 0: 8 | C: Expanded | 1: 136-162 | A_ |
| 2: 20/25/30 | 9: 16 | D: Masked | 1: 403-430 | |
| 2: 146-174 | ||||
| 3: 438-470 | ||||
| 4: 465-490 | ||||
| 5: 490-520 |
A typical model number would be
M44GMC09C3A_. This is a 40 watt, UHF radio, 45.1 MHz
IF, narrow spacing (12.5 kHz), 16 channels, expanded
logic board, 438-470 MHz band.
It is rare that the model number includes the specific frequency range the radio is capable of handling (10th character). You don't get that lucky with MaxTracs, Spectras, etc. I wish all the model numbering was so useful. It is NOT practical to change the frequency range for which the radio was manufactured. The RF board and PA assembly are frequency-dependent; the logic board and front panel are not. As the model number tells you which range the radio is, if you end up with the wrong one (assuming the radio hasn't been thrown together out of spare parts or had modules swapped) it's your own fault for not doing your homework.
The expanded logic board has its firmware contained in a socketed EPROM, which can be replaced. The masked logic board has its firmware permanently stored in the soldered-in microprocessor IC. I have heard that the masked logic board is only capable of 8 channels maximum.
It would appear that GM300s are not capable of any form of trunking operation. However they can do G-Star signaling for use with GE radio systems.
There are other models, such as M10, that are often called GM300. This article is specifically oriented towards the radios with "GM" in the model number.
Specifications:
Click on the image to enlarge it.

Note that a revision to the
service manual shows two VHF ranges: 136-162 MHz and
146-174 MHz. Also, the power levels are continuously
variable throughout the three ranges: 1-10, 10-25,
25-45 watts.
Board Numbers:
This list is sorted alphabetically by Function, then Description.
| Board # | Function | Description |
| HLN8075A | Display Board | |
| HLN8070A | Logic Board | Expanded, 4-layer |
| HLN8070D | Logic Board | Expanded, 4-layer |
| HLN8074A | Logic Board | Masked, 2-layer |
| HLN8074E | Logic Board | Masked, 2-layer |
| HLE8385A | UHF Power Amp | 403-433 MHz, 01-10 Watts |
| HLE8275A | UHF Power Amp | 403-433 MHz, 25-45 Watts |
| HLE8267A | UHF Power Amp | 438-470 MHz, 01-10 Watts |
| HLE8034A | UHF Power Amp | 438-470 MHz, 10-25 Watts |
| HLE8271A | UHF Power Amp | 438-470 MHz, 25-40 Watts |
| HLE8284A | UHF Power Amp | 465-495 MHz, 25-40 Watts |
| HLE8269A | UHF Power Amp | 490-520 MHz, 25-35 Watts |
| HLE8229A | UHF RF Board | 403-433 MHz, 25 kHz |
| HLE8230A | UHF RF Board | 403-433 MHz, 12.5 kHz |
| HLE8301A | UHF RF Board | 438-470 MHz, 12.5 kHz |
| HLE8300A | UHF RF Board | 438-470 MHz, 25 kHz |
| HLE8264A | UHF RF Board | 465-490 MHz, 12.5 kHz |
| HLE8263A | UHF RF Board | 465-490 MHz, 25 kHz |
| HLE8228A | UHF RF Board | 490-520 MHz, 12.5 kHz |
| HLE8227A | UHF RF Board | 490-520 MHz, 25 kHz |
| HLD8293A | VHF Power Amp | 136-162 MHz, 10-25 Watts |
| HLD8299A | VHF Power Amp | 146-174 MHz, 01-10 Watts |
| HLD8033A | VHF Power Amp | 146-174 MHz, 10-25 Watts |
| HLD8287A | VHF Power Amp | 146-174 MHz, 25-45 Watts |
| HLD8266A | VHF RF Board | 136-162 MHz, 12.5 kHz |
| HLD8265A | VHF RF Board | 136-162 MHz, 25 kHz |
| HLD8029A | VHF RF Board | 146-174 MHz, 12.5 kHz |
| HLD8031A | VHF RF Board | 146-174 MHz, 25 kHz |
| HLN8071A | Vol/Mic Board |
Logic Board Jumpers:
Click on any image to enlarge it.
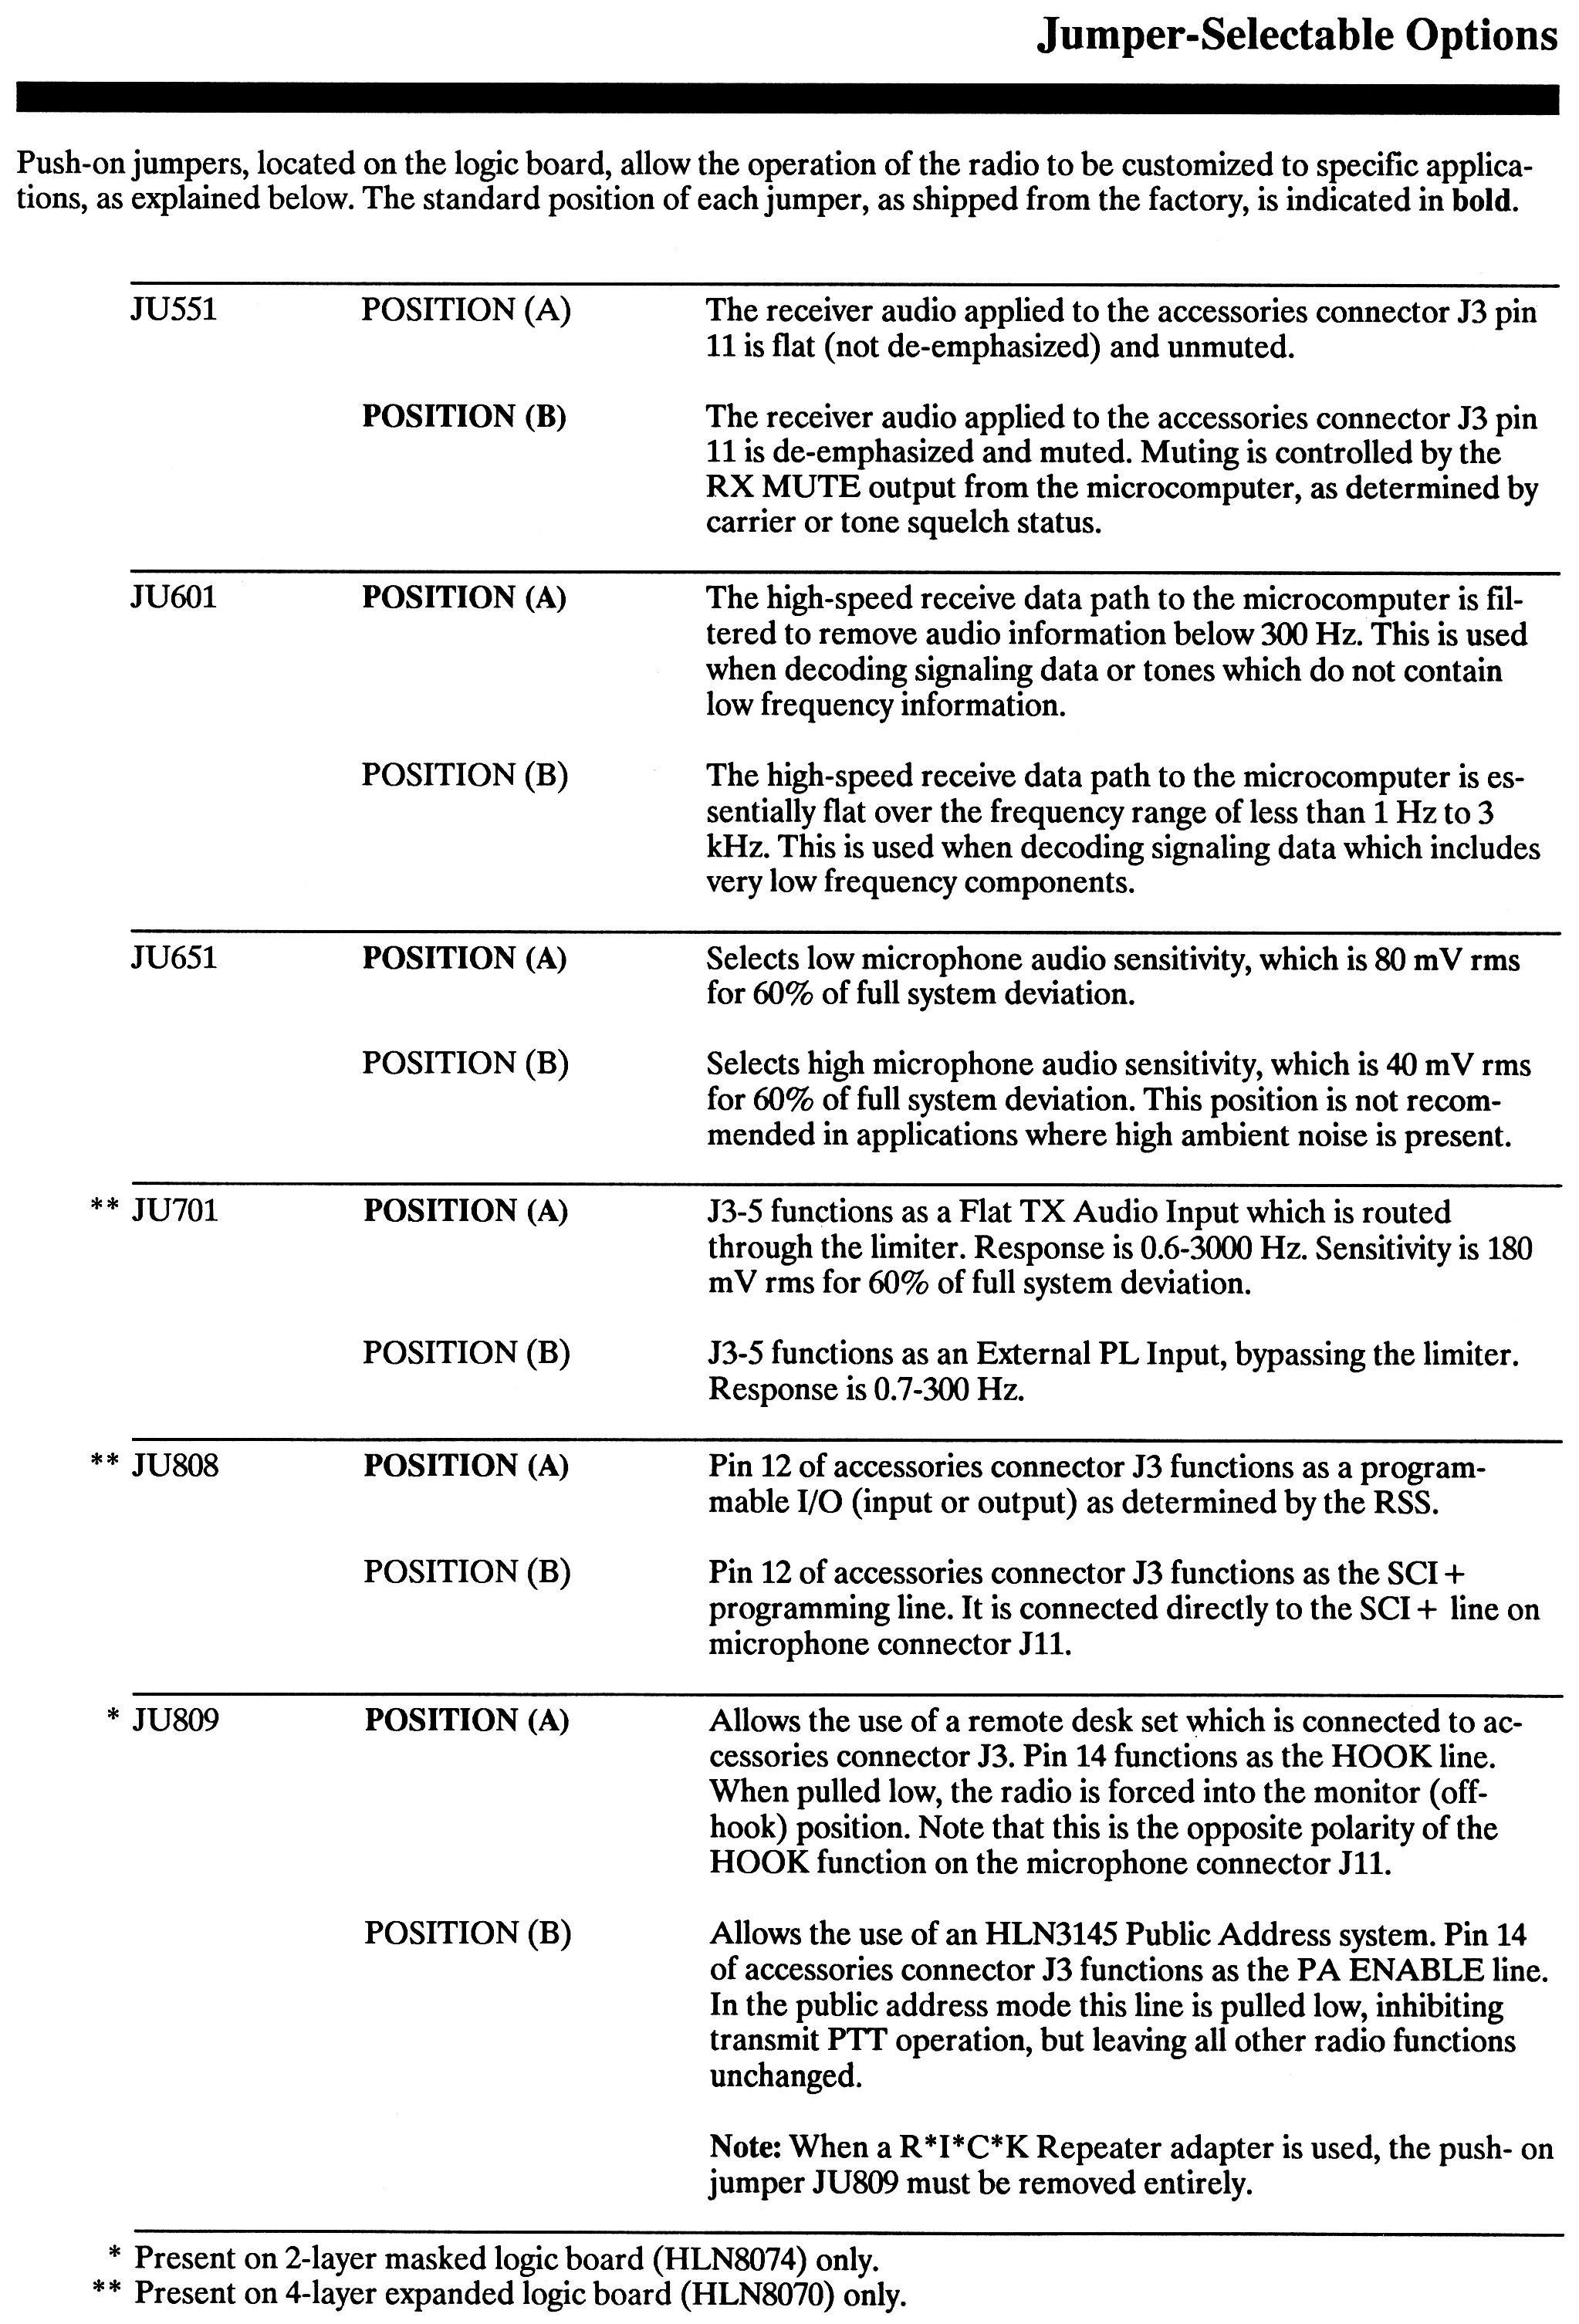
The documentation page above
lists the jumpers as JUnnn. For some reason these are
shown on the board layouts as either Pnnn or JUnnn.
They're the same thing. There may or may not be
silk-screened legend on the boards; it depends on the
revision level.
There are two quite different logic boards used with the GM300. One (the expanded logic board) has a shield over the microprocessor components, its program is stored in a socketed EPROM, and the board has four layers, while the other (the masked logic board) has all the components exposed, its program is stored within the microprocessor, and the board only has two layers. The image below shows the location of the jumpers on the two-layer (masked) board:
There are two quite different logic boards used with the GM300. One (the expanded logic board) has a shield over the microprocessor components, its program is stored in a socketed EPROM, and the board has four layers, while the other (the masked logic board) has all the components exposed, its program is stored within the microprocessor, and the board only has two layers. The image below shows the location of the jumpers on the two-layer (masked) board:

The image below shows the
location of the jumpers on the four-layer (expanded)
board.
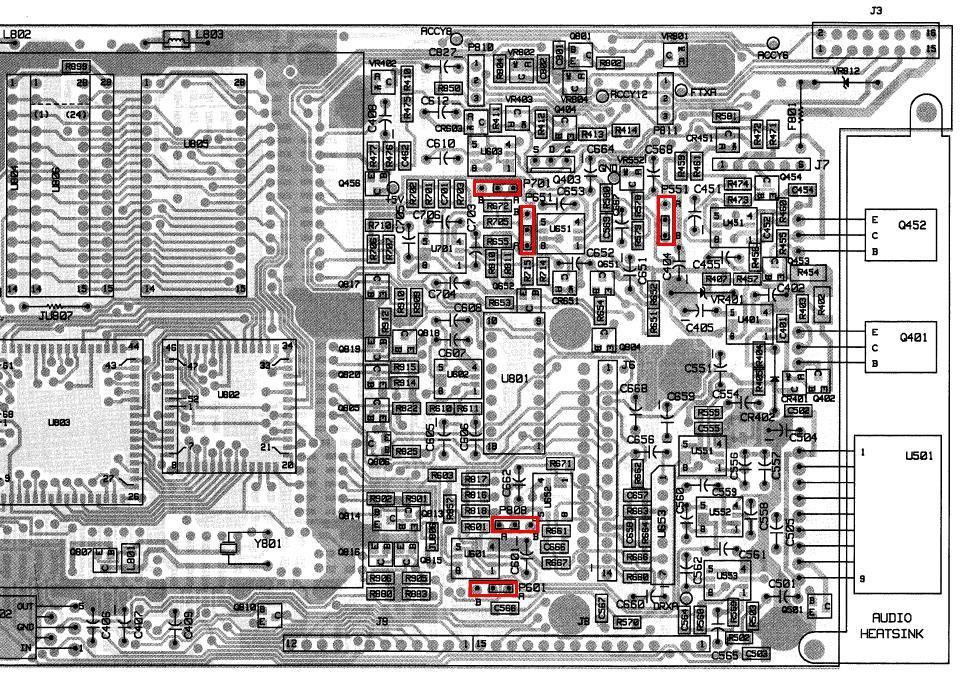
These jumpers are quite visible
on the photo of the expanded GM300 logic board below.
Note that some of them are also present on MaxTracs
and have the same functions.
Accessory Connector:
Click on the image to enlarge it.

Note that the 8-channel radio
signals are slightly different than the 16-channel
radio signals. That may be due to the masked vs.
expanded logic board. Fortunately, you can use
an accessory plug wired for a MaxTrac (7-9, 15-16) in
a GM300.
Click on the image to enlarge it.
Click on the image to enlarge it.

The accessory connector and
pins are also well documented in the MaxTrac section.
Note that many accessory pins on the expanded (four-layer) logic board are programmable, whereas you're stuck with the pin assignments on the masked (two-layer) logic board.
Note that many accessory pins on the expanded (four-layer) logic board are programmable, whereas you're stuck with the pin assignments on the masked (two-layer) logic board.
Channel Steering:
The 16-channel expanded logic
board radios support "channel steering" through the
accessory connector. You need to program the
general-purpose I/O pins (6, 8, 9, 12, and 14) for
"Channel Select". They turn into a binary coded input
that allows you to select any of the possible 16
channels by grounding the appropriate input lines
(assuming you've programmed the radio for active-low
inputs). To select channel 1, ground the "Channel
Select 1" line. Channels 1, 2, 4, 8, or 16 may be
selected by grounding select line 1, 2, 3, 4, or 5
respectively. All other channels are selected by
grounding multiple select lines. If you release all of
these lines, the radio reverts to the channel selected
by the front panel. If you select a channel that does
not exist (i.e. 10 channels programmed and you select
channel 16), the radio reverts to the channel selected
by the front panel. Channel steering DOES work as
expected on radios with more than 16 channels, i.e.
you can select anything up to channel 31, as that's
all that's possible with five select lines.
This document describes the I/O connector settings and shows one way of handling channel steering.
Pins 4,8,12,14 can be configured for COR. Pins 6,8,9,12,14 can be configured for Channel Select. So you can put COR on pin 4 and CS on the others. The fact that the masked (8-channel) radios and most MaxTrac users selected pin 8 for PL&COR Detect is something that will have to be changed if you want multiple features activated. It's up to the user to choose the desired functionality given the number (six) of programmable I/O lines.
The Motorola Radius programming software also supports Channel Steering if you have Version 21.01 firmware in the radio and a 16-pin logic board. Unfortunately, the MaxTrac software does NOT offer this feature, so if you have a MaxTrac and you want channel steering, you have to install the Version 21.01 firmware, then blank and initialize the radio with RADMBL software, turning it into a Radius model, just so you can program the accessory connector to handle channel steering. Also, the Radius software only provides for three Channel Select input lines, not five like the GM300. This means you can only select channels 1 through 7 plus whatever the front panel has selected, regardless of how many channels the radio might be programmed with.
Programming:
The HVN8177 programming software (RSS) programs the M10, M120, M130, and GM300 mobiles, as well as the GR300, GR400, and GR500 desktop repeaters. The latest release is HVN8177F version R05.00.00 dated December 1995. The RSS is shipped on 3.5-inch diskettes and is a DOS-only program.
The microphone connector is exactly the same as on a MaxTrac, and it's also well-documented in the MaxTrac section. The programming cable and RIB setup is the same as what you'd use for a MaxTrac or GTX.
You can hex-edit the MDF file in the RSS to allow an 8-channel radio to take 16 channels. Additional information is available at Colin Lowe's web site.
The GM300 with the expanded logic board supports the same common signaling modes as a MaxTrac (PL, DPL, MDC, etc.).
Differences from a MaxTrac:
The GM300 has models that fully
cover the 144-148 MHz and 440-450 MHz amateur bands.
Some MaxTracs will go that low if you adjust the VCO
and hex-edit the RSS.
The GM300 RF boards have a local/distant attenuator in the receiver front end. This reduces the gain of the receiver and improves intermod rejection by 10dB. You can put a GM300 RF board into a MaxTrac, but there will be no control of the local/DX circuit, and the radio will have poor sensitivity. The circuit can be activated by soldering a small jumper on the RF board. The GM300 RSS and logic boards know how to control this circuitry; the MaxTrac RSS and logic boards do not.
The GM300 RF boards have a local/distant attenuator in the receiver front end. This reduces the gain of the receiver and improves intermod rejection by 10dB. You can put a GM300 RF board into a MaxTrac, but there will be no control of the local/DX circuit, and the radio will have poor sensitivity. The circuit can be activated by soldering a small jumper on the RF board. The GM300 RSS and logic boards know how to control this circuitry; the MaxTrac RSS and logic boards do not.

The GM300 control head is quite
similar to the MaxTrac. There is an additional circuit
board, soldered to the logic board pins, that the
control head connectors plug into, that provides some
RF filtering and Zener diodes to protect from
excessive voltage. Also, the internal speaker now
connects through the control head cables, rather than
on its own 2-wire cable. This makes it easier to
remote-mount a GM300. There are kits available for
this purpose.

For comparison, here's the
inside view of a MaxTrac. Notice the lack of shielding
and no filter board between the logic board and
control head.

The GM300 logic board is
significantly different from the MaxTrac logic board.
It can control the RF board's local/DX circuit. The
audio power amplifier is one single IC rather than
discrete transistors. The heat-sink is considerably
different and mounts only to the bottom of the chassis
- no more T8 flat-head screws through the side of the
chassis. There are far fewer components on the board
too. All GM300 logic boards have a 16-pin accessory
connector. A full metal shield covers the entire logic
board, just like they have for the RF board; the
MaxTrac only shields the microprocessor area. This
further reduces spurious emissions.

The GM300 audio amplifier
drives both sides of the loudspeaker. Therefore you
must NOT ground either pin 1 or pin 16 of the
accessory connector. You must run two wires to an
external speaker. The same circuit design and
components are used on the Spectra radios and they
suffer from the same restriction. Grounding either
speaker lead may let out the chip's lifetime supply of
smoke.
The internal loudspeaker for the GM300 (and MaxTrac/Radius) radios is p/n 5080085D03, however this part number has been replaced by p/n 5004639J01. This is a 22 ohm, 5 watt speaker that retails for around $7US in early 2009.
The GM300 power amplifier has a thermistor mounted near the final transistor, so it actually senses the heat-sink temperature. The logic board uses this to control the output power in a more reasonable way; the power will be reduced if/when the power amplifier gets hot enough, not when the microprocessor "thinks" it's getting hot from extended use. This makes GM300 radios more suitable for repeater transmitter usage. (They still need adequate forced-air cooling.) This extra signal requires a 6-wire cable and connector between the PA and the logic board (the MaxTracs only have a 5-wire cable and connector). I have heard that you can use a GM300 PA in a MaxTrac by snipping the temperature sensor wire off the connector, but I personally would not butcher either the radio or the cable that way.
Blanking the Radio:
There doesn't seem to be a lab
version of RSS for the GM300. You can fool RSS into
thinking the radio is blank by manually erasing the
serial number (filling it with spaces) using the
bit-banging facility available in the MaxTrac lab RSS
program. After that, you should be able to initialize
the radio using the GM300 RSS. That procedure is
similar to, if not exactly the same as, the steps
you'd do for a MaxTrac: set the radio model number,
frequency range, signaling features, serial number,
key in the crystal data and 9.6V reading, and align
the power amplifier and deviation circuits.
Note: people have used the MaxTrac lab RSS to blank GM300 radios. They then install a MaxTrac EPROM, make some changes to the logic board, and turn the radio into a MaxTrac, including the model number. Then they initialize it with MaxTrac RSS.
To blank the radio, you need to deposit the following data at the locations shown. These values came directly from a factory-fresh blank board. This data will go directly into the radio's memory. You may want to write down the contents of these locations first, incase something goes terribly wrong. Use this at your own risk. All values are hexadecimal.
| Loc | Data | Usage |
| B600 | 20 | Serial # |
| B601 | 20 | Serial # |
| B602 | 20 | Serial # |
| B603 | 20 | Serial # |
| B604 | 20 | Serial # |
| B605 | 20 | Serial # |
| B606 | 20 | Serial # |
| B607 | 20 | Serial # |
| B608 | 20 | Serial # |
| B609 | 20 | Serial # |
| B60A | FF | Panel # |
| B60B | FF | Model Index # |
| B60C | 1B | Product # |
| B60D | FF | SW Ver. |
| B60E | FF | ??? |
| B60F | 4F | ??? |
| B610 | FF | ??? |
| B611 | 5B | Checksum |
After setting the memory to
these values, the radio will appear blanked to the
GM300 RSS, and you'll have to go through the blank
board replacement procedure and either align the
radio, or fill in the various fields with data that
was previously there. You can also write any
previously saved code plug to the radio, but make sure
you use one that matches the band and number of modes.
By the way, the RSS knows about two "panel numbers" for these radios: 5 for the multi-digit display, and 4 for the two-channel radios, and it covers the Radius GM300, M10, M120, and M130 models.
The value at location B60C is an entry number of the Product Series in the MDF file. There are only four possible values and you must select a value for this location. The value at location B60F seems to be the value at B60C plus 34. The checksum at location B611 has to be correct if you want to eliminate the long boooop at power-up. The table below shows the values that can go into these three locations. All values are hexadecimal.
| Product Series | B60C | B60F | B611 |
| Radius GM300 | 1B | 4F | 5B |
| Radius M120 | 20 | 54 | 51 |
| Radius M10 | 21 | 55 | 4F |
| Radius M130 | 29 | 5D | 3F |
You should always record the
original values or make a backup when hex-editing
any radio or file.
Common Problems:
For some reason, GM300s seem to
be prone to losing receive sensitivity. Whether this
is due to nearby excessive transmitter power or
operator error, the eventual cause seems to be either
shorted protection diodes across the receiver's input,
or a dead first RF amplifier transistor. All of these
components require removal of the RF board to access
them, but replacement is quite easy. They're
surface-mount, of course.
These radios often go way off frequency, to the point that the warp adjustment will not get it back where it belongs. The cause is most often dirty interconnection pins inside the radio. These are between the RF board and the logic board. On the MaxTrac, they are attached to the logic board; on the GM300 the strip of pins is mounted on the chassis and both boards plug into it. Remove both boards, clean these pins, and reinstall the boards. While the radio is apart, clean the front panel connectors too. These same connectors get dirty on MaxTracs as well, but for some reason they don't often cause serious problems like they do on the GM300.
To remove the logic board, you need to remove about a dozen screws, including all the ones on the components mounted to the heatsink. I found it easier to remove the RF board first, then flip the radio over and pull the logic board and the interconnect pin assembly together, then remove the interconnect from the logic board. On some radios, the interconnect pins are mounted to the radio chassis.
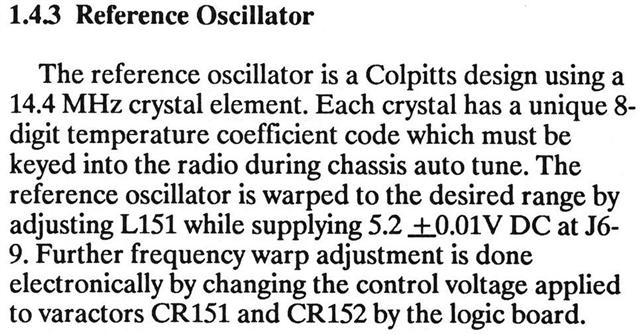
Reference Oscillator Coarse Adjustment Procedure:
Rather than type this
paragraph, here it is directly from the service
manual. This same procedure (with different part
references) could also be used with MaxTrac radios.
Manuals and RSS:
- GM300 8-channel Operator's Card, 6880902Z26
- GM300 16-channel Operator's Card, 6880902Z41
- GM300 Owner's Manual, 6880902Z09
- GM300 Service Manual, 6880902Z32
- GM300 RSS, HVN8177F
- GM300 RSS Manual, 6880902Z36