QRSS WITH THE NanoVNA
(2022)
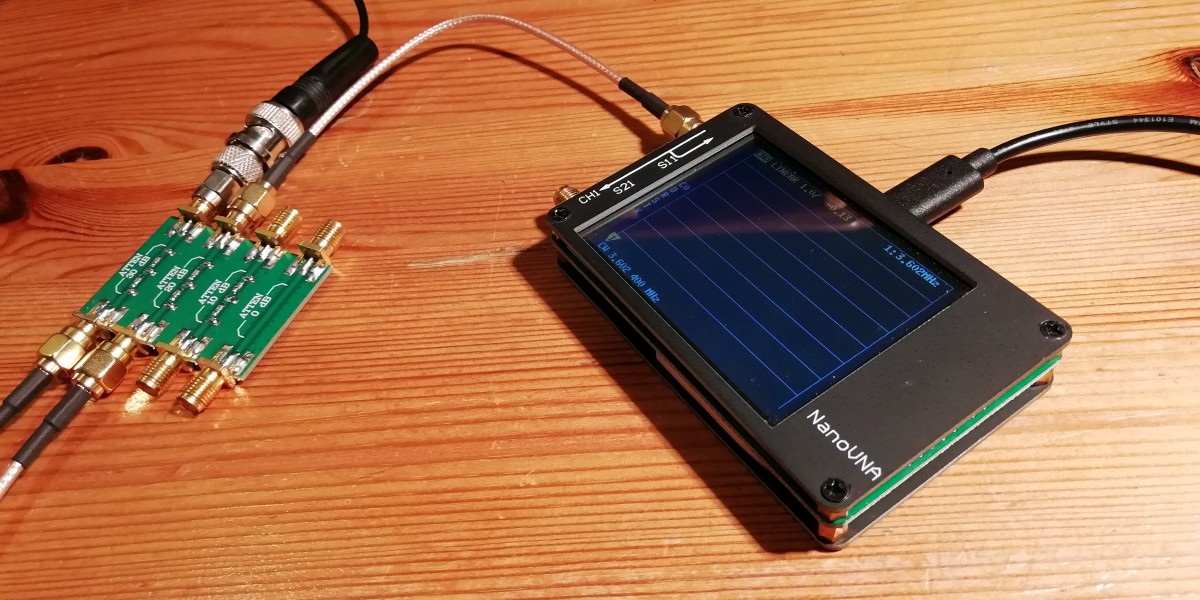
The famous nanoVNA and an attenuator to attenuate the QRSS and
CW signal to make it low enough for the QRSS receiver measurements.
QRSS WITH THE NanoVNA
I wanted to make software for the NanoVNA to make a QRSS test signal and to use it as a HF generator. Nowadays, webbrowsers have -web serial API- and it should be possible to control the NanoVNA with such a virtual serial USB port. A new challenge, we people need challenges, we like challenges! I wanted to try to make the following programs:
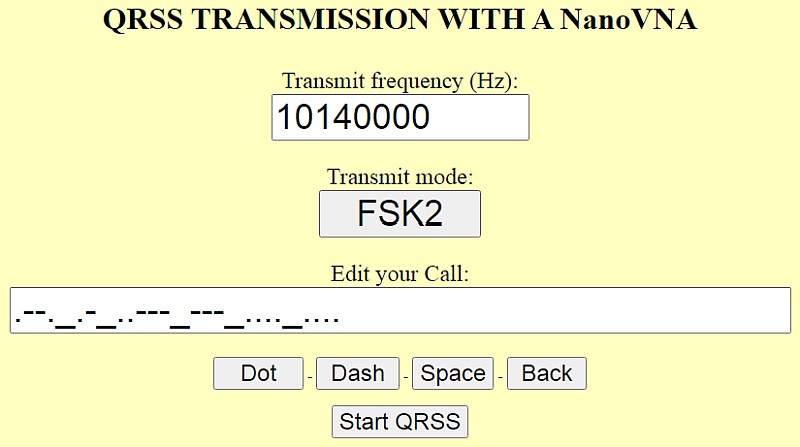
- nvnaqrss.htm: A HF signal generator that transmits a QRSS test signal. QRSS is a low power / slow speed Morse code signal
- nvnaterm.htm: A Terminal application. It can send commands to the NanoVNA and display the responses
- nvnahfgen.htm: A simple HF generator with sweep function to measure bandwidths and side band suppression of receivers
The 80 meter QRSS receiver with 9 kHz LF output will be used to test the software.
The 80 meter QRSS receiver is available as a test device to receive that QRSS signal. And to measure the audio bandwidth and side band suppression. Just with the use of scripts running in a webbrowser and the NanoVNA! But... my brain is cracking, it didn't understand the software with async and await statements and variables called promise...
And there was a problem with the NanoVNA and static electricity. That jumped through all kinds of menus and selected random choices because of static electricity. So I could not touch it and only use it via the USB cable.
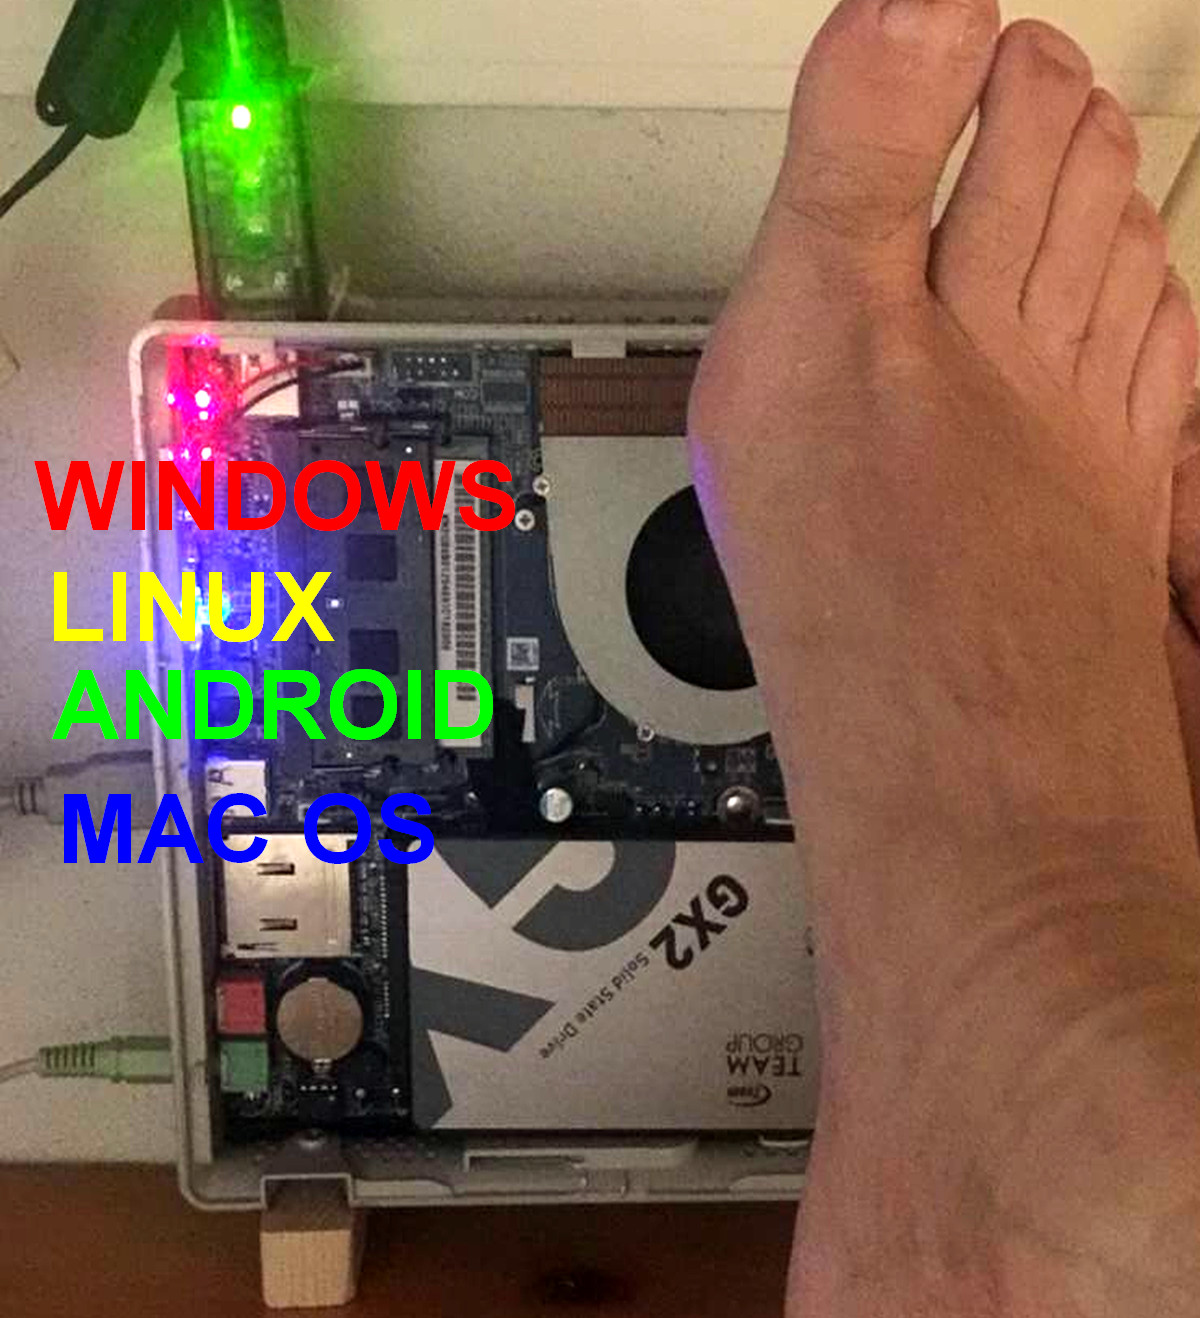
Barefoot simplicity! No installation of software!
Windows, Linux, Android mac OS, it works on any PC with a webbrowser!
Exciting challenges!
Really exciting challenges! Slowly it became clear to me that the -async- routines were not executed one after the other, but at the same time in parallel! And the mistake I made was that I was already writing to a serial port while the previous routine, opening that port, was not ready yet! That's why -await- should be added. And those -promises-, they were added automatically, I didn't have to do that at all! But there were examples and tutorials on the internet. However, most of them were copies of each other, it wasn't that easy. However, here the result, a link to download the 3 scripts:
CLICK TO DOWNLOAD THE SCRIPTS
nvnaqrss.htm
nvnaqrss.htm
The long struggle was not in vain!
Yes! Finally success!!! I could make a QRSS transmission with the NanoVNA. The signal is too weak for a transmitter, but strong and stable enough for a test signal for all my grabber receivers. One problem took a few days. I had to use the command -sweep cw- instead of -cwfreq- and after many -sweep cw- commands the NanoVNA crashes. That happens after a few transmissions. It is a problem in the internal software of the NanoVNA that cannot be solved. But it works perfectly for a test signal of one hour and perhaps that it is not a problem anymore for newer versions of the NanoVNA.
Simple!
- Connect the NanoVNA to the USB port of your PC.
- Set the transmit frequency. It is possible tht your NanoVNA is not exactly at that frequency. At 10 MHz, the frequency of my NanoVNA is 170 Hz too low.
- Choose the normal FSK2 or the special FSK3 mode.
- Edit your call with the Dot-Dash-Space-Back buttons.
- Press -Start QRSS-, select the serial port and the transmission starts on the next integer 10 minute value of the clock.
Extra audio test signal
At the same time, an audio tone of 1500 - 1505 is generated. You can use it as an audio QRSS test signal for the audio device that is normally connected to the receiver. If you do not want that, edit the script and set the tones to 0 Hz.
It is also possible to edit the script and set the frequency and call to your desired default values.
FSK2 and FSK3 mode
The normal mode is FSK2. But you can choose FSK3 too. This alternative QRSS mode has not two, but three shifts. A space is again a low tone and the dot a slightly less higher tone (+3 Hz). But the dash has now become a dot with a third highest tone (+6 Hz). The benefit will be obvious. The transmission is shorter. Was the length of a dash 3 dots, now it's only 1 dot! Another advantage is that the dot and dash have two different pitches and are therefore easier to distinguish from each other. I increased the length of a dot from 6000 ms to 8000 ms for even better readability and more or less the same trransmit time. But you can change the script with an ASCII text editor like -Geany- to what you want.

At the left the normal FSK2 mode, at the right the special FSK3 mode.
nvnaterm.htm
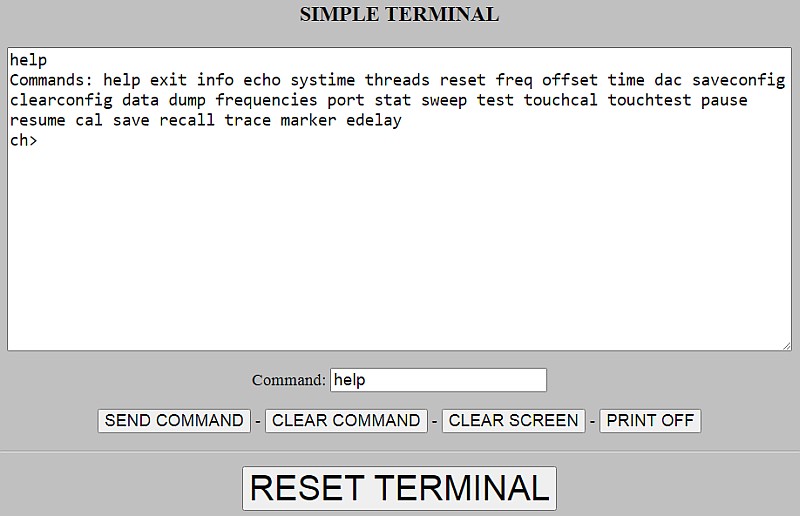
nvnaterm.htm
The next challenge, to receive serial data!
The next script, a terminal application. Now we also have to receive data from the NanoVNA! It was quite a fight again. And thanks to Sean it became a success! He suggested that I should use a -text area- to display the received data! That was a very valuable, even essential advice!
Simple again!
- Connect the NanoVNA to the USB port of your PC.
- Type the command and press the SEND COMMAND button. The response will be displayed. Just play with the CLEAR COMMAND and CLEAR SCREEN buttons, no explanation required.
You can also connect this application to other devices. If I connect it to my GPS module, the received GPS data is displayed. And then it might be handy to press the PRINT OFF button to stop printing so that you can read the data.
And some devices do not want the CR character as the end of command but another character. You can change that in the first lines of the script.
For the NanoVNA you can try the -help- command.
nvnahfgen.htm
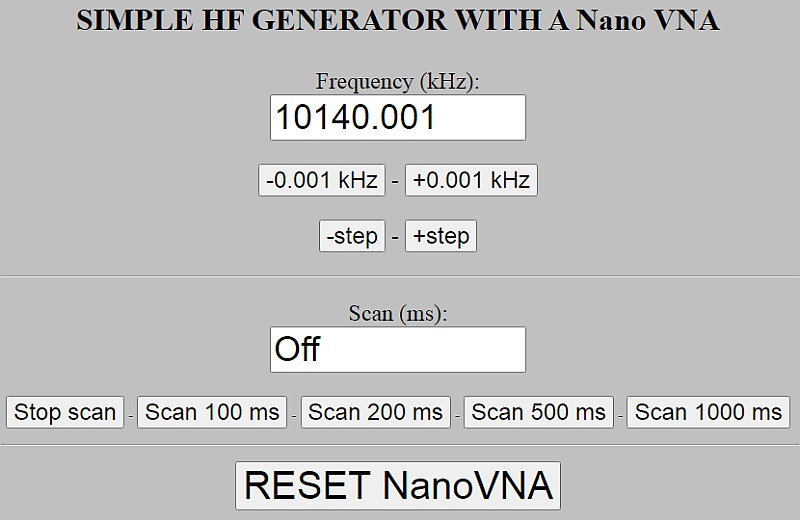
nvnahfgen.htm
The HF generator with sweep mode!
Controlled via the USB cable I did not have no problems with static electricity with the NanoVNA! So we can continue with the third script, a simple HF generator with a sweep mode. What can I say about such a simple program... It is possible to set a timer to a routine so that it is activated after xxx milliseconds. Less CPU usage than a waiting loop that checks the clock time and the buttons can be activated continuously.
Simple again!
- Just play with the buttons and you will find out in a minute how it works. Scanning is done upwards with one step size per scan time.
However, after APPROXIMATELY 500 steps, the NanoVNA crashes. So keep the number of steps low and reset the NanoVNA after each scan by pressing RESET NanoVNA.
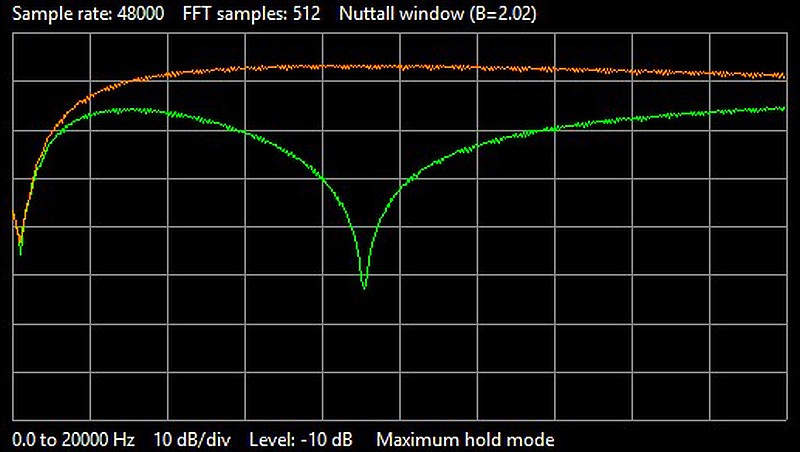
Audio bandwidth and side band suppression of the 80 meter QRSS receiver.
The bandwidth is too wide! I had expected that it should be 10 dB down at 20 kHz...
The audio bandwidth is measured with the Python spectrum analyzer in peak mode. The orange trace is the audio band response. The green trace is the unwanted side band response. The difference between the two traces is the side band suppression. The NanoVNA sweeps over a frequency range of the VFO frequency minus 25 kHz to VFO frequency +25 kHz in 100 Hz steps with a sweep time of 500 ms. The side band suppression is approximately 45 dB over the very narrow QRSS band.
Problem with the NanoVNA
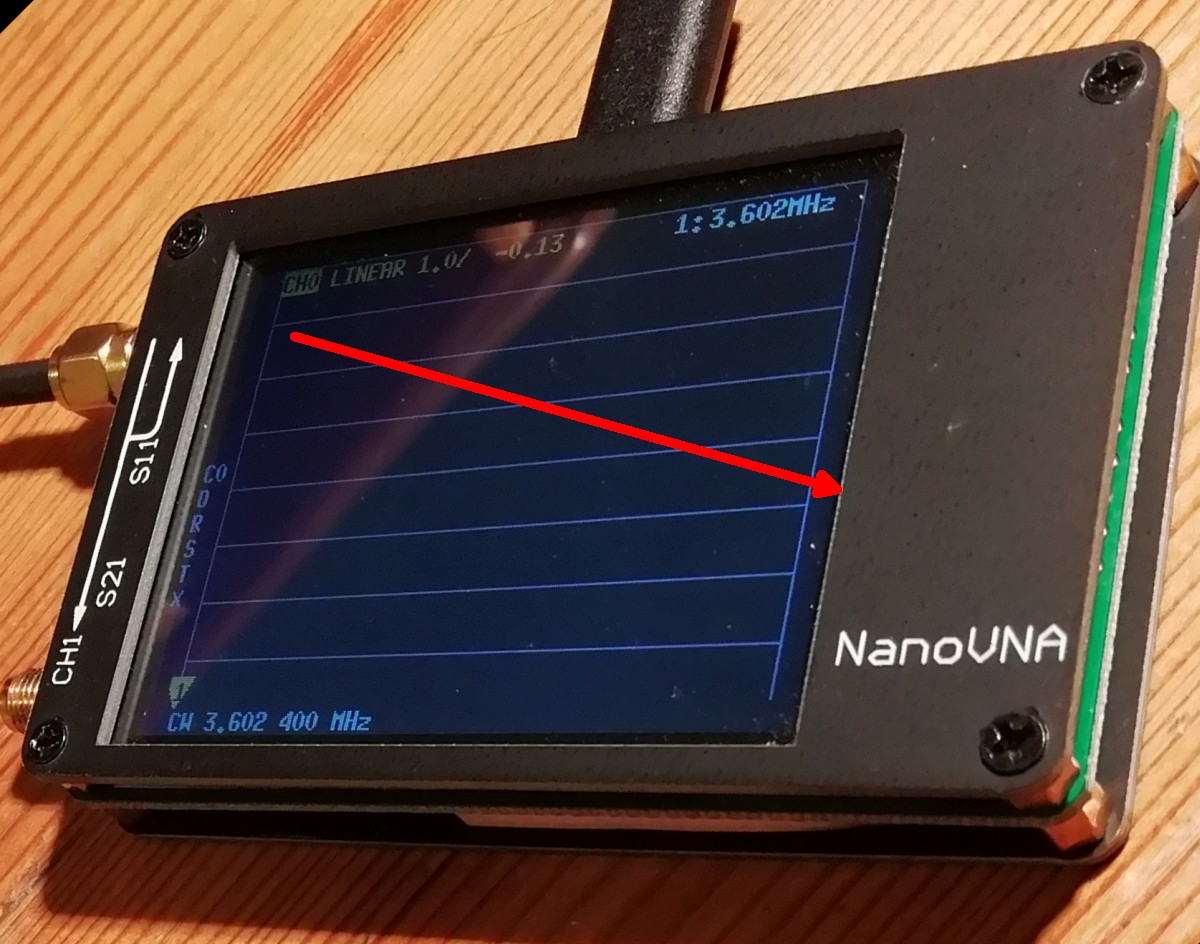
The problem with the NanoVNA was that the front plate just touched the touch screen where the arrow is.
I made the square hole for the display half a millimeter bigger and also fixed the display better. Problem solved!
The problem with the NanoVNA was not static electricity
But was the problem with the NanoVNA really a problem with static electricity? As soon as I touched it, it jumped through the menu or selected random choises that I did not make. So I removed the black front cover plate to check if there was a bad connection with the display unit. And without that cover plate, the problem was gone. With the cover plate, the problem was there.
The problem with the NanoVNA was that the front plate just touched the touch screen where the red arrow is on the picture here above. I made the square hole for the display on that side half a millimeter bigger and also fixed the display better. Problem solved! It was not a problem with static electricity!
Index PA2OHH