Reference page 2, Service Bulletin #808, issued 2/12/80 for a picture of the PCB/Vol control insulation.

19-07-1998 TR-2400 Battery Charger Failure
Author: Trio-Kenwood Communication, inc.
When replacing the volume control in a TR-2400, certain precautions should be observed to insure against inducing new problems to either the control or the radio.
When installing a replacement volume control R05-2409-05, soolder the leads to the potentiometer sparingly, to prevent flux or solder from running down the tabs and into the joint between the tab and the deposited resistance material. If this precaution is not observed, future failure of the new control is possible.
Secondly, when reassembling the radio, tape insulate the PCB ground pathe directly adjacent to the power switch tabs on the volume control. This will prevent accidental shorting of the battery to ground, and loss of the B+ RF choke, L101.
Note:
Reference page 2, Service Bulletin #808, issued 2/12/80 for a
picture of the PCB/Vol control insulation.
19-07-1998 TR-2400
Battery Charger Failure
Author:
Trio-Kenwood Communication, inc.
The stock charger (W09-0307-05) supplied with the TR-2400 may be rapaired
and/or tested as necessary.
Open circuit, the charger should deliver
18-20V. Current when charging sould be 45mA.
Contained in the charger, in
series with the output is a 120 ohm 1/2 watt current limiting resistor. Under
normal use (including momentary short circuit test) this part should not
fail.
If you receive a charger with no output, the unit may be opened by
fracturing the glued seam by a sharp moderate hammer blow. Place the charger on
its side ofon a hard, flat surface. A layer of cloth at top and bottom will
protect the case from marring. Strike the seam first on one side, and then the
other. The case should open in two pieces.
Replace the 120 ohm 1/2 W
resistor with a 1 W resistor. After replacing and before closing the unit,
perform voltage and current checks. A spot of glue or cement at each corner will
reseal the charger.
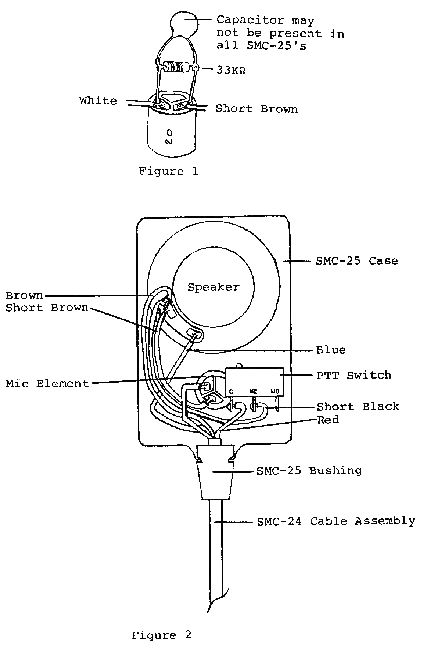
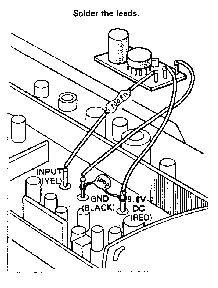
19-07-1998 Speaker Mic
for TR-2400
Author: Trio-Kenwood
Communication, inc.
The SMC-25 Speaker Microphone may be adapted for use with the TR-2400 by performing the following:
Parts Required:
Qty  Part No.       Description
1    E30-1628-08    SMC-24 Cable Assembly
1    J42-0429-08    SMC-25 Bushing
Procedure:
Note: This change may be performed at the owners option and may not be performed in warranty.
In some cases, users may report RF interference, or motor-boating, when using a tone encoder in their TR-2400. A secondary complaint of excessive tone level may also be encountered.
For complaints of a tone burst type noise, or simply a noise, at initial key down, suspect either a broken losse component, or incorrect valued component on the RX TX unit.
On the RX TX unit, Q16 emitter, check C82, a 33 uf tantalum cap for broken connection.
If you find a 22 uf cap at C82 replace it with a 33 uf cap.
19-07-1998 TR-2400
Display or Keyboard trouble
Author: Trio-Kenwood Communication,
inc.
Display
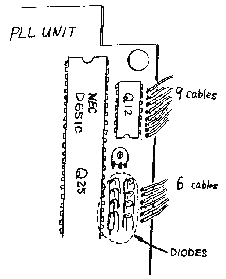
An intermittent or blank digit may be caused by either a broken lead, or intermittently shorting lead on the PLL unit.
On the PLL unit, look in the area of Q12, the touchtone generator. Between Q12 and the board edge locate the D1-D4 lines. Inspect this area for either an open (Broken) lead, or shorted (pinched) lead. Repair as necessary, and check lead dress before reassembly.
Keyboard
An intermittent or inoperative keyboard row or column may be caused by a torn or pinched lead, or a cracked diode.
Again, in the area of Q12, inspect the "T" and "Y" lines for shorts or open connections, and inspect diodes D19-D26 for physical breakage.
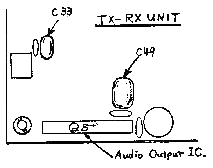
For any of the above complaints, suspect a broken loose component in the RX IF or audio output circuit on the RX TX unit. Simply pull up on the leads and resolder.
Adjacent to Q9, the audio output IC, find C49, a 1uf cap. If broken loose from the board, audio output may be down, while current consumption may be up from the normal 30mA to about 100mA due to the audio output amp oscillating.
Adjacent to L10, the discriminator, locate C33, a .033uf cap. If this component is broken loose, audio output may be up approximately 6 dB with excessive high frequency audio response.
Complaints of scratch audio, noise when flexing the antenna, or noisy audio when handling the unit during transmit may be remedied by tightening the Printed Circuit Board screws.
To disassemble the unit remove the back cover and battery compartment screws. INspec t the VCO shield solder points along the edge and bottom of the PLL board. Resolder if you find a broken solder bond.
Flex the metal frame several times to reseat the board, and retighten the
board mounting screws. Be certain the flat metal spring has good tension when
installed between the RX TX unit a fram (below the PTT switch).
18-03-2000 TR-2400
Optional charge input protection
Author: Trio-Kenwood Communication,
inc.
Some users may request addition of a series diode to the Charge Jack to
prevent inadvertent shorting of the battery pack if a voltmeter probe, headphone
jack, or other conductor accidentally shorts across the external Charge
Jack.
This can be used only for the standard wall changer. The optional fast
chargers require battery voltage be available at the charge jack as feedback to
the changer regulator.
Add a S1 diode in series with the battery changer line, at the Charger Jack. Observe battery polarity, as shown. Charging current will drop approximately 2 mA.

Note:
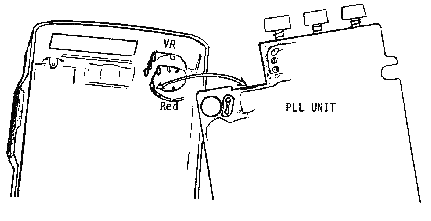
For intermittent or no offset, suspect as intermittent abort between the metal body of the REV NOR SW and an adjustment jumper on the PCB, or intermittent contact between the volume control metal body and the PLL PCB.


For apparent unlock, or either RX or TX failure, suspect not PLL unlock, but low RX or TX XTAL activity. Adding or replacing circuit components and returning the oscillator will cure the problem.
For NO RX
Suspect low XTAL activity for X3 on the RX unit. At Q1, add 7-12pF Base to Emitter. At Q5 replace L5, 22uH with a 15uH with choke, L40-1501-05. Adjust TC1 for 42.6 MHz in RX.
For NO TX
Suspect low XTAL activity for X2. At Q4, add 7-12pF Base to Emitter. Replace
L15, 22uH with a 15uH choke. L40-1501-05. Adjust TC2 for exact 146MHz transmit
frequency. At the base Q4, also check L2 for intermittent shorting against the
Display unit mounting screw.
19-03-2000 TR-2400
pulse noise
Author: Trio-Kenwood
Communication, inc.
For elimination of pulse type noise, either in receiver, include by the LCD oscillator, or in transmit, inducted by stray RF in the H.T., install additional chokes and a capacitor as detailed.
Disassembly:
TX RF noise:
TX or RX LCD pulse noise:
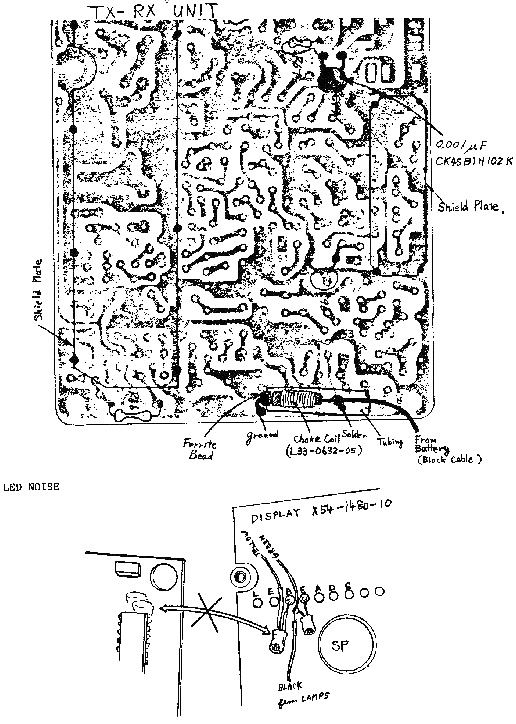
Some units may exhibit excessive background noise (up to several hundred Hertz deviation). This may be reduced or eliminated by installing an additional shield between the Display and PLL units.
This changes applies only to units between serial numbers 011xxxx and 101xxxx. Radios before this group (with a momentary REV switch) will not show improvement by addition of this shield. Refer to Service Bulletin #815 for this early group.
Units appearing with serial numbers after 101xxxx will have this shield factory installed.
Parts supplied:
N09-0627-05  Pan head screw    3 pcs.
F10-1627-05  Shield w/lead     1 pcs.
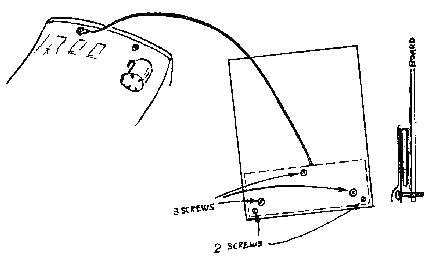
Installation time for this shield is approximately ½ hour.