Modifications for the Kenwood
TW-4100

19-07-1998 Modificatie
KENWOOD TW-4100E voor subtone
Door ON5OF, Dirk Van Offel
*Deze modificatie laat toe ALLE
mogelijkheden van de dualbander ONGEWIJZIGD te behouden, INCLUSIEF 1750 Hz
repeatertoon, vanaf frontpaneelknop "SQL" De TONE toets wordt dan Subtone
ON/OFF, en de toon wordt ingesteld via SEL- menu (zoals de shift, de step enz.).
Subtone is ALLEEN TX, geen RX. De nodige Unit is de TU-7, standaard in Belgie
door Kenwood leverbaar. De verbindingskabel is NIET die van de TU-7, maar degene
die ORIGINEEL bij de TW4100 E is (ai voor diegenen die deze "ergens" mislegd
hebben).
Procedure
- open toestel Boven/onderdeksel/ 4 vijzen van frontpaneel
- installeer TU-7 zoals p. 31 tw4100 instruction manual, met de lange
verbin- dingskabel, standaard geleverd bij toestel.
- knip Diode D3 op de control unit x53-3000-xx gelegen juist boven display,
de eerste diode van links.
- localiseer connector CN9, met 1 blauwe draad op rint x60-3000 composite
unit, herkenbaar aan het gat voor de magneet van de speaker. Hij (CN9) zit
rechts opzij, heeft 2 pinnen waarvan 1 bestukt (blauwe draad) ongeveer 3 cm
vanaf de voorzijde van de print, achter de input TOKO's van RX144 IN.
- volg de blauwe draad naar het frontpaneel en knip hem door, dichtbij CN8
van frontpaneelunit, isoleer met krimpkous de zijde die naar de brede
connector (12 polen) CN7 van de frontpaneelunit (controlunit x53-3000-xx).
- de andere kant van de blauwe draad solderen we aan de zwarte massa-draad,
komende van de "push"schakelaar in de squelchknop (voice switch) die wordt dan
1750 i.p.v. voice. Zo zetten we 5 volt op de 555 om 1750 hz te maken als we,
met de ptt ingedrukt op de squelch duwen.
- de zwarte massadraad komt van de squelchknop en gaat naar uiterste rechtse
zijde, positie 4 GND van CN8, ligt juist rechts naast een rode draad (in de
richting van de opdruk "CN8", dus met de onderzijde van het toestel naar boven
microplug links, en voorzijde frontpaneel naar onder)
- knip de zwarte draad van CN8 op 2 cm van de connector CN8 en isoleer die
zijde van de draad die naar de connector gaat.
- de andere zijde dus vastsolderen aan de blauwe draad naar CN9 op de andere
print x60-3000-xx, eerst isoleerkous erover!!
- en de modificatie is klaar!!. Toestel nog dichtschroeven en RESET de
micro- processor (hold "M" on power ON). Als U een DCL unit hebt, laat de
processor weten dat er een inzit (hold "DCL" on power ON).
VEEL SUCCES EN TE HOREN OP ON0ZK 145.637,5 subtone 173.8 Hz
                    en op ON0HOB 430.250   subtone 131.8 Hz
from the only serious EME station on 70cm in Belgium, yours truly
servant,
Dirk, ON5OF
19-07-1998 BandMod for
TW4100
The following modification will allow the TW-4100A to
transmit on the VHF band from 141-151 and on the UHF band from 420 to 450
MHz.
- Disconnect the antenna, mic, and power cord.
- Remove the top and bottom covers fromm the transceiver by following the
procedure on page 28 of the Instruction Manual.
- Locate the row of diodes on the control unit (top front). The diodes can
be seen by lookng throught the cutout the chassis just behind the front
pannel.
- Using a sharp pair of wire cutters, cut diodes D6 (UHF) and D8 (VHF). Note
that diodes D3, 4, 5, and 7 are already removed.
- Reinstall the top and bottom covers.
- Reset the microprocessor by turning on while pushing the M
button.
16-04-2000 TW-4100
repeater stop scan on the UHF band
Author: Trio-Kenwood Communication,
inc.
Service Bulletin no. 926 (17-12-1987)
During repeater cross band operation, the TW-4100 may not detect a UHF signal
while it is alternating between the two bands. This is due to the electric field
generated by the strong UHF receiving signal causing the busy circuit to
malfunction. The following modification will allow detection of the UHF signal.
Parts required:
(1) Resistor 4.7 Kohm 1/8 watt              RD14BB2B472J
(1) Capacitor, electrolytic 4.7 µF, 16V     CE04CW1C4R7M
(1) Diodes 1S1555                           V11-0076-05
- Remove the 4 screws securing the top cover.
- Remove the 10 screws securing the bottom cover.
- Carefully remove the top and bottom covers. Do not damage the speaker
cable attached to the bottom cover.
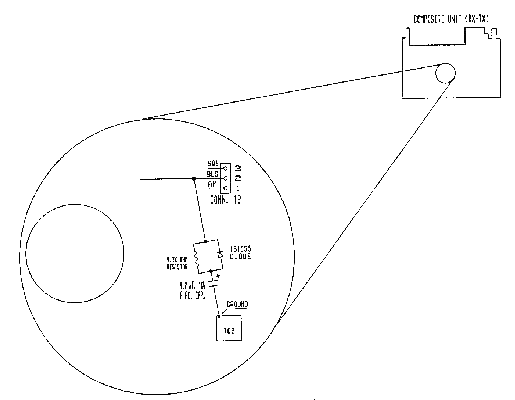
Refer to figure 1 for the next 3 steps.
- Locate connector number 12 on the Composite unit (RX-TX) on the bottom of
the transceiver.
- Carefully strip 1/8 inch insulation from wire attached to pin 2 connector
12 approximately ¼ inch from the connector (do not break the wire).
- Solder the 3 components (listed above) between the wire and ground. A good
ground location is the can around TC2 and L8.
- Assemble the transceiver by reversing steps 1 - 4.
Figure 1.
This modification may be covered under warranty.
Time required for this
modification is ½ hour or less.