Modifications for the Kenwood
TH-25

19-07-1998 TH-25AT MARS/CAP
modification
The following modifications will allow the TH-25AT
to transmit from 141.000 to 162.995 MHz. Specifications are guaranteed for the
Amateur band only. The transceiver may require realignment of the PLL
circuits.
- Disconnect battery pack and antenna.
- Remove the volume, squelch and tuning control knobs by pulling them
straight up from the top panel.
- Using a 7mm spanner wrench, remove the nut from the volume control and the
nut from the tuning control.
- Remove one screw from the back of the radio, by the PTT switch.
- Remove one screw near the speaker jack.
- Remove two screws from the battery terminal plate:
        --- remove ----
       /
    +---------------------+
    [ 0                 0 [
    [                     [
    [          +------+   [
    [          [      [   [
    [          +------+   [
    [                     [
    [ O                 O [
    +---------------------+
- Carefully pull the front panel up from the transceiver (do not break the
wires connected between the front panel and the body of the transceiver). Lay
the front panel to the side of the transceiver (keep track of the PTT and
F.LOCK covers if they come off).
- Gently lift the top panel from the transceiver by pulling it forward and
then up (the O-ring on the BNC connector will produce some tension).
- Rotate the top panel toward the front of the radio to expose the 3/4 x
3/4" board.
- Using a 45 watt (or less) soldering iron that has an isolated or grounded
tip, unsolder and remove chip resistors R19, R20 and R21 from the control unit
(X53-3080-02).
- Carefully reassemble the transceiver by reversing steps 1-9. Pull the BNC
connector O-ring up a little before installing the top panel.
- Reset the microprocessor by following the procedure in the instruction
manual (p. 16) called CLEARING ALL MEMORY.
Disclaimers:
The source
of this information is unknown and not personally verified. It is illegal to
transmit outside the ham bands with this equipment.
Frank W9MKV
[email protected]
19-07-1998 KENWOOD TH-25/45 out of banad
modifications
Here are some mods for the TH-25AT and the TH-45AT.
Please note that I do not encourage transmitting on a frequency for which you do
not have a license, nor do I encourage transmitting on a non-amateur frequency
without FCC type accepted equipment (in the United States).
First let me
recommend that you buy the service manuals for these radios. The service manual
is not expensive (about $15 I think) and it will greatly help you in performing
these modifications.
Look at the schematic for your radio. In the lower
left hand corner is an IC labled IC2. This is an ASIC microprocessor. At the
lower right hand corner of this uP are several diodes and pull-up/pull-down
resistors. They are D4, D3, R19, R18, R28, R20, R21, R22, R25, R26, and a couple
of resistors that are not even on the schematic that attach to B2 (pin 51 on
IC2) and B3 (pin 50 on IC2). The TH-45AT schematic shows R23 on the ASIC uP pin
B2.
The schematic for the TH-25AT shows:
                         R18-R21  R25  R26,27  R28  R36
TH-25A    M,M2      -12     O      X      X     X    X
TH-25A    M3,M4,X   -23     O      X      X     O    X
TH-25AT   K         -11     O      O      X     X    X
TH-25AT   M,M2      -12     O      X      X     X    X
TH-25E    T         -52     X      X      O     O    O
TH-25E    W         -62     X      O      O     O    O

And the schematic for the TH-45AT shows:

                         R19-R21  R22  R23  R25  R26,27  R28  R36
TH-45A    M1,M2,X   -21     O      O    O    X      X     O    X
TH-45A    M3,M4     -22     O      X    O    X      X     X    X
TH-45AT   K         -10     O      X    O    X      X     O    X
TH-45AT   M1,M2     -21     O      O    O    X      X     O    X
TH-45AT   M3,M4     -22     O      X    O    X      X     X    X
TH-45E    T         -51     X      O    X    X      O     X    O
TH-45E    W         -61     X      O    X    O      O     O    O


where O means USED, and X means NOT USED.
On the TH-25AT:
(All frequencies given in MHz.)
R22 in
R28
out
This is how the radio is delivered in the USA. TX 144-1, 141-163
(I
think).
R22 out
R28 in
The radio tunes from 142-151. This may be
the modification given to US MARS members. I don't remember where the unit will
transmit. It may or may not transmit outside the range from 144-148.
R22
in
R28 in
The radio tunes only from 144-148.
R22 out
R28
out
Frequencies may be selected from 100-200 MHz (on the display only - your
PLL will not lock up in this entire range). In addition, TX is possible where
your PLL locks up.
R25 out
Removing R25 disables automatic offset
selection.
R23 and R24 are used for selecting the step size for tuning. I
can't remember which positions are for which step sizes, and alas I didn't write
down what I found. If you want to play with this, go ahead.
On the
TH-45AT:
(All frequencies are given in MHz.)
R18 in
R28 in
This is
how the radio is delivered in the USA. The radio covers 438-450 MHz.
R18
in
R20 out
The radio is prohibited from tuning outside 440-450
MHz.
R18 out
R28 in
The radio will only tune from 215-230 MHz. Note
that the PLL would not lock up! (What did you expect?) Could it be possible that
Kenwood originally planned a 220 version of this radio, but then scrapped their
plans?
R18 out
R28 out
The radio will tune from 200-500 MHz (on the
display only - your PLL will not lock up over this entire range). Transmitting
is possible anywhere your PLL will lock up.
Some of the above codes are:
K     USA
T     England
X     Australia
M     Other Areas
These components are found on the flexible circuit board under the
display. To get to them, take the radio apart. Some unsoldering of obvious
grounding wires may be necessary. You will see where the flexible circuit board
plugs into a socket on the main circuit board.
Before unplugging it, make
sure you know what's in the memories, because they will be lost. Unplug the
flexible circuit board and unfold it so that the components are accesable. One
of the fold-out parts of the flexible board will look something like this:
+----------------+
! R   R R D3 R R !
! 2   2 2    7 2 !
! 5   3 2      1 !
!                !
! R  O      O R20!            The O's are solder pads.
! 2  O      O R19!
! 6  O      O R18!
!    O      O R28!
!                !
!              R !
!           D4 6 !
!        +-------+
!        !
!        !
The fold out board is actually square, but with only characters for
graphics, I couldn't draw it that way.
On both radios, R36 is for the
European tone burst to "whistle up" repeaters.
On both radios, D4 is for
selecting the type of display. With D4 in, the display is normal. With D4
removed, the display is a channel display.
D3 is for selecting VHF or UHF.
With D4 in, the radio thinks its a VHF radio. With D4 removed, the radio thinks
its a UHF radio. Don't change this on your radio.
I have found a quick
and easy way to retune your PLL (in the TH45-AT) with a minimum of test
equipment. All you need is a scope and a small tuning tool. First, take off the
battery pack holder plate. Then, remove the silvery sticker covering the tuning
pot access holes. If the radio is positioned on its back, with the top folded
over so that the touch tone pad is also facing down, the test point you want
(TP1) is on the bottom half of the radio, near the center (left to right), and
close to the battery; the tuning pot you want (TC1) is on the bottom, and
closest to the PTT switch. Under no circumstances change the tuning of TC51.
This is used to calibrate the output of the radio with the display the radio is
giving; you don't want to mess with it. Once again, the Service Manual makes it
very clear where these points are, if you are having trouble with my
descriptions. On with retuning the PLL.
With the radio on, and receiving,
monitor the voltage and the waveform on test point TC1.
Tune the radio
DOWNWARDS in frequency until the PLL unlocks. Note that the radio will beep when
this happens, and the waveform on TP1 will change. Tune the radio about 1 MHz
higher so that the PLL locks up again, and note the voltage on the testpoint,
TP1.
Now, tune the radio to the LOWEST frequency that you want to be able to
receive. Adjust TC1 until the voltage on the test point TP1 is the same as what
was noted earlier. Button the radio back up, and you're done. You will not be
able to tune the PLL to any range you want.
There are limits. On my radio, I
have been able to retune the radio so that I can recieve from 439.2-468.6 MHz
with a set of batteries fresh out of the charger. The tuning range will probably
diminish as the battery voltage decreases. I have not retuned the PLL on my 2m
HT, but I'd imagine the same technique will prove fruitful.
I may have
some more information on these radios someplace. If I can find it, I will add to
this posting, and post it again with the updated information. Enjoy. Kenneth J.
Hendrickson N8DGN
19-07-1998 TH-25/45AT Automatic Power OFF
Function
Author: Trio-Kenwood
Communication, inc.
Service Bulletin no. 939 (2-6-1988)
Some users of the TH-25AT/45AT have expressed a desire to defeat the
automatic power off function. The following modification will explain how to do
this. It should be noted that this modification does not effect the battery
saver function.
Required Part:
Diode Kenwood Part #1SS133
- Disconnect the battery pack and antenna.
- Remove the Volume, Squelch, and Tuning Control knobs by pulling them
straight up from the top panel.
- Using a 7mm spanner wrench, remove the nut from the volume control and the
nut from the tuning control.
- Remove one screw located by the PTT switch. (Figure 1).
- Remove one screw located by the speaker jack. (Figure 2).
- Remove two screws from the battery terminal plate. (Figure 3).
- Carefully pull the front panel up from the transceiver (do not break the
wires connected between the front panel and the body of the transceiver.) Lay
the front panel to the side of the transceiver (Keep track of the F.LOCK cover
if it comes off.)
- Remove the PTT cover.
- Remove one screw from the PTT switch unit. (Figure 4).
- Gently lift the top panel from the transceiver by pulling it forward and
then up (the O ring on the BNC connector will produce some tension.)
- Carefully unfold the flex Printed Circuit Board (PCB) to expose IC2.
(Figure 5).
- Using a 45 watt (or less) soldering iron that has an isolated or grounded
tip, add a diode between pins 23 and 58 of IC2. (Figure 6).
- Carefully assemble the transceiver by reversing step 1-11. Pull the BNC
connector "O" ring up a little before installing the top panel.
- Reset the microprocessor by following the procedure in the instruction
manual (page 16) called CLEARING ALL MEMORY.

This is an optional change that is not covered under warranty.
Time
required for this modification is 1 hour or less.
SYSOP NOTES:
Later versions of the TH-25/45AT came with a
programmable defeat for the Auto power off function. Do not install this
modification if your manual provides a procedure for turning the power off
function off! Step 11 tells you to carefully unfold the flexible pc board. It is
extremely important that you do not try and bend the board in a direction that
is opposite from its current bend. To do so will break the board or the foil
traces inside the board!
19-07-1998 EXT TX ON THE:
TH-26AT/TH-45AT/TH-75A HT's
On the three above units a jumper
wire controls the TX frequency coverage. By removing the jumper you will extend
TX from 142-152Mhz.
By removing a diode you can extend the TX coverage to the
limits of the VCO. Both the jumper wire and the diode are located on the
"CONTROL UNIT".
On the TH-26AT this is just a bare jumper wire, TH-45AT
???, TH75A it is a green wire labled W1. Removing or lifting D4 on the TH-75A
extends TX from 136-174Mhz and 335-512Mhz.
On the TH-26/TH-46 models this
would be 136-174Mhz and 335-512Mhz respectivly.
16-04-2000 TH-25/45 W/TSU-6 Tone alert
improvements
Author:
Trio-Kenwood Communication, inc.
Service Bulletin no. 932 (11-4-1988)
When using the TH-25/45 in combination with the TSU-6 you may experience
erratic operation of the tone alert function. This may be due to an incoming
signal that is over-modulated, distorted, or noisy. The following modification
will correct this tendency.
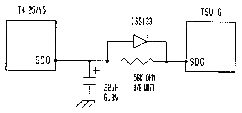
Required parts:
22 µF, 6.3V electrolytic capacitor        part # CE04CW0J220J
56 Kohm, 1/8 watt carbon resistor         part # RD14BB2B563J
Diode                                     part # 1SS133
- Remove the TSU-6 from the TH-25/45 (refer to theTH-25/45 instruction
manual for details).
- Cut the blue wire (pin # 4) approximately 5 mm from the connector for the
TSU-6.
- Solder the components to the blue wire and ground as shown in figure 1.
Note that the cathode side of the diode goes toward the TSU-6 connector. Use
the leg of the VCO shield to ground the negative side of the
capacitor.
- Insulate the components with electrical tape to prevent shorting.
- Install the TSU-6 in the tH-25/45. Route the components so that the
battery terminal plate does not bow when installed.
Figure 1.
This modification may be covered under warranty.
Time required for this
modification is ½ hour or less.