Modifications for the Kenwood
TS-820

19-07-1998 TS-820 Fix the problem with the
display
Here is somthing you can do if your digital display on
the kenwood ts-820 is giving you a problem..............
- Remove the counter assembly unit from the 820.
- Remove both circuit boards from the counter assembly ( upper and lower
boards ).
- Scrape away the varnish from the corners of the boards where the
interconnecting screwes and spacers hold the boards into the case.
- Reassemble the counter....
That should take care of the
problem..
19-07-1998 New Display Tube for
DG-1
The original display tube (LD-8109) used in the DG-1 digital
display for the TS-820 and TS-820S has been discontinued by the manufacturer.
However, there is a replacement tube available. This tube is the LD-8135. It is
not a direct replacement for the original tube. The leads come out of both ends
of the display tube instead of just one as in the LD-8109. Therefore, it will be
necessary to replace the complete display unit if the display tube fails. The
part number of the new display unit is X54-1310-00.
Please use this part
number when ordering a replacement display unit. The new display unit is being
installed in the current production of the TS-820S and DG-1.
The new
display unit (X54-1310-00) is a little more involved to install than the old
one. The installation is as follows:
- Remove the top cover of the TS-820 (or TS-820S) and set the unit on the
bench so the front panel is facing you.
- Remove the two screws from the original display unit (save them), unplug
the display unit forom the counter assembly and remove the display unit from
the transceiver.
- Run the connector of the new display unit through the left bracket (from
the center).
- Gently (but firmly) push the right side of the display unit throught the
right bracket. ( This is the most difficult part).
- Gently push the left side of the display through the left bracket.
- Install the screws from the old display in the mounting bracket of the new
display unit and plug the connector into the counter assembly.
- Turn on the TS-820 (or TS-820S) and make sure the display tube works
properly.
- Replace the top cover of the transceiver.
19-07-1998 TS-520, TS-820 CW filter select
control
Author: Trio-Kenwood
Communication, inc.
Service Bulletin no. 812 (14-2-1980)
In the TS-520SE, the Heater Switch has been replaced with a CW WIDE/NARROW
select switch. For those operators who desire this type feture for their
transceiver, the following information may be considered as a
guideline.
TS-520S series transceivers
- A minature SPDT switch may be installed at the operators preference, on
the rear side, or bottom panel. Use this to switch the CW or SSB filters by
wiring the BROWN lead, which normally is transferred to the CW terminal on the
IF unit, between the SSB filter, for WIDE , and CW for NARROW.
- A Traditional solution has been to use the FIX CH switch, position 3 and 4
for filter switching. This may be donw by completely rewireing the switch, or
by leaving the switch wiring and the filter wiring as for normal operation,
and bridging the following terminals:
     A.   FIX CH C terminal to IF SSB Terminal
     B.   FIX CH 4 terminal to IF CW terminal
          Placing the FIX CH switch to 4 will operate the SSB filter
                  in CW mode.
TS-820S Series Transceivers
- Similar to the TS-520 series, a miniature SPDT toggle switch may be
installed at the operators preference a the rear or on the obttom cover.
- The FIX CH switch, or Digital Hold switch may be rewired to control the CW
wide/narrow function
On the MODE switch, S6-1, the SSB filter
control is GREEN, and the CW filter control line is GREY. Break the GREY line
and connect it from the MODE switch to the SPDT common terminal. Connect the
GREY line to the IF unit ot one terminal, and bridge tht GREEN SSB line to the
other Switch terminal.
19-07-1998 Installing AUX Band in TS-820 (RX
only)
Author: Trio-Kenwood
Communication, inc.
Service bulletin no. 11 13-1-1977
The following information is for the installation and alignment of the AUX
band inthe TS-820. This extra band will be for receive only. Reference will be
made to schematics and board layouts as shown in the Service
Manual.
INSTALLATION
- Remove the top and bottom covers.
- Remove the Connectors from the PLL Assembly.
- Remove the PLL assembly and set it aside.
- Use the board layout of the Coil Pack to locate thepositions for the ANT
and MIX coils on the Coil Pack.
- Install the ANT and MIX coils on the Coil Pack.
- Remove both covers from the PLL Assembly.
- Remove the 5 Phillips head screws holding the PD Unit in the PLL assembly
and carefully remove the PD unit.
- Use the board layout of the PD unit to locate Q11.
- Install R01, R02, C01, C02 and X01 as needed for the band desired.
- Locate terminals AUX, B1, B2, B3, and B4 on the PD unit.
- Install a jumper from the AUX terminal to the B terminal for the band
desired. B1 is for 1.8 MHz to 9 MHz, B2 is for 10MHz to 18MHz, B3 is for 19MHz
to 24MHz and B4 is for 25MHz to 30MHz.
- Replace the PD unit in the PLL Assembly.
- Use a 3mm nutdriver to remove the 4 hex nuts mounting the VCO unit in the
PLL assembly, then remove the two phillips screws.
- Carefully remove the VCO unit from the PLL assembly.
- Use the board layout of the VCO unit to locate Q11.
- Install C01, C02, C03, C04, C05, and T11 as needed for the band desired.
Install T11 last.
- Replace the VCO unit in the PLL assembly.
- Install the connectors on the PLL assembly.
ALIGNMENT
- Turn on the TS-820.
- Tune VFO to 250.
- Set band switch to AUX.
- Set the TUN/NOR switch on the VCO unit to TUN.
- Connect a frequency counter to terminals TP5 and TP6 on the VCO unit. (TP6
is ground).
- Adjust T11 for a frequency of 9.08 MHz plus the lower limit of the band
desired.
- Connect a frequency counter to TP4 and ground on the PD unit, and verify
the frequency of the reference oscillator. It may vary +/- 500KHz.
- Return the TUN/NOR switch on the VCO Unit to the NOR position.
- Turn off the TS-820S.
- Replace the covers on the PLL assembly and reinstall it in the
transceiver.
- Replace the top and bottom covers on the TS-820S.
CAUTION
Do no use magnetized tools when working on the PLL
assembly. Beryllium tools would be better than ferrous ones. If the PLL assembly
should become magenetized, use a bulk tape eraser on open core AC transformer to
demagnetize it.
19-07-1998 TA7201P Substitution Parts
Kit
Author: Trio-Kenwood
Communication, inc.
Service Bulletin no. 954 (20-7-1989)
The Toshiba TA7201P audio amplifier (Q3) used in the TS-820(S) and R-820 is
no longer available. The part has been replaced with a kit (Part # W05-0257-00).
This service bulletin will provide the correct installation procedures for
replacing a defective TA7201P with the new kit.
- Disconnect the power cord and antenna from the transceiver.
- Remove the covers from the transceiver and disconnect the speaker
wire.
- Remove the AF AVR board from the bottom of the transceiver (4 screws and 3
connectors).
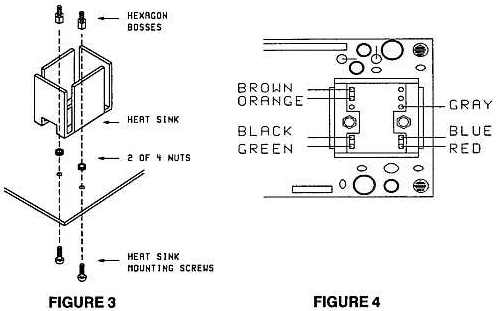
- Remove the two nuts that secure the heat sink to the audio amplifier (Q3)
and then remove the heat sink. Figure 1.
- Desolder and remove Q3, C21, C22, C26, C33, R40, R42, and R47 from the AF
AVR board. C33 and R47 are mounted on the foil side of the board, but may not
be installed on some models. Figure 1 and 2.
- Using the parts from the kit, install a 22 uF capacitor in the C21
position, a 0.068 uF capacitor (labeled 683K) in the C22 position, a 3.9 ohm
resistor in the R40 poisition, and a 470 ohm resistor int he R42 position.
Figure 1
- Solder a 0.1 uF capacitor (labeled 104K) in parallel with C30. Mount the
part on the foils side of the AF AVR board. Figure 1
- Remove the two nuts from the heat sink mounting srews. Figure 3.
- Replace the mounting screws with the ones in the kit. If the original
screws have been soldered to the board, remove the excess solder and while the
screws are still hot, turn the board upside down to allow the screws to fall
onto the workingsurface. Figure 3.
- Secure the new mounting screws with the two nuts that were removed in step
8. Figure 3
- Install the heat sink and secure it with the two hexagon bosses from the
kit. Figure 3
- Insert the wires from the new audio amplifier circuit board as shown in
the diagram. Make sure the pins are firmly seated and then solder them into
place. Figure 4
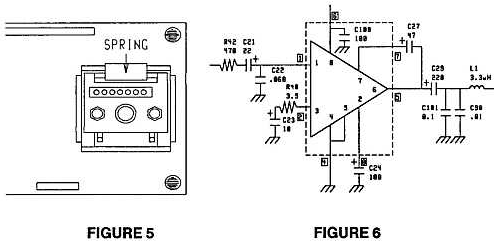
- Apply a thin layer of silicon grease to the back of the audio
chip.
- Insert the circuit board into the heat sink and secure it with the two
nuts that were removed in step 4. Avoid pinching the wires between the board
and the bosses as well as the board and the heat sink.
- Attach the heat sink spring from the kit over the chip. Figure 5
- Assemble the transceiver by reversing steps 1-3.
Note:
Due to the differences in characteristics between the TA7201P
and the new audio chip, the noise level will be increased. The increase in noise
will effect the position of the AF gain control. Should it be found that the
audio is too low, the value of resistor R4 on the AF AVR board can be reduced
from 220 ohms to 82 ohms. The resistor removed from the R40 position can be used
in this situation.

19-07-1998 TS-820 Speech Processor
Alignment
Author: Trio-Kenwood
Communication, inc.
Service bulletin no. 9 17-11-1976
The following alignment procedure may be used in lieu of the one in the
Service Manual.
Test Equipment required:
Audio Signal
Generator
Audio VTVM
Oscilloscope or RF VTVM
- Preliminary control settings:
Screen grid switch off.
Mode switch to
USB.
Comp Level to USB.
Processor SW to Pull "ON".
Meter switch ot
"Comp".
Send/Rec switch to "Send" as required when making
adjustments.
- Apply 1500 Hz audio signal to the mic jack at 10mv level.
Connect RF
VTVM or scope to TP-2.
Adjust T-11, 12, 13, for maximum level on the
S-meter.
Adjust T-14 for maximum level on scope or VTVM at TP-2.
- Turn compression level to min, (CCW).
Reduce audio sig at mic jack to
0.3 mv.
Adjust TC-4 (Freq response for speech processor) so that level at
TP-2 is not changed when changing audio gen from 400 Hz to 2000Hz.
- Turn compression level to max, (CW)
Set audio gen to 1500Hz at 0.3
mv.
Adjust TC-3 and VR-6 (carrier bal for speech proc) for maximum level at
TP-2.
- Set audio gen to 10 mv at 1500Hz
Send/Rec switch to send
Adjust VR-7
(comp level for speech processor) so that the level at TP-2 is not changed
when turning the processor on and off. VR-7 should be adjusted for the
particular microphone the customer will be using with his TS-820.
- Finally check for non distortion of signal, and that comp level of 20db
can be obtained at full comp on.
19-07-1998 General Notes on
TS-820S
Author: Trio-Kenwood
Communication, inc.
Service bulletin no. 21 (25-10-1977)
- No output TX: SG switch is "OFF".
- No TX, RX or VFO: There is no 9 Pin plug installed.
- Low RX Sensitivity, no TX: The transverter switch is"ON."
- S Meter full deflection when first turned on: Makesure RF gain is not
fully CCW.
- If digital display does not count: Make sure DH is not"ON."
- If there is no DG display: Make sure you are not inREMOTE VFO with no
remote VFO attached.
- When intermittant in any circuit:
- Check for loose black jumper from point to pointon circuit board.
- Check for broken foil path.
- Check for component that has been pulled out or loosely soldered.
- Check for solder splash across foil path.
- Check for loose pins.
- Check for component leads touching to metal IF cans.
- Check for wire not soldered at function switch orat any switch or
control.
- When checking FET's, check for excessive voltageat can top usually
source, or same G-1, G-2 voltage.
- Check for loose Molex mini connector or any foreign substance on pins.
- Complaint of frequency shift when TX-CW: This is normal. 800 Hz.
- Not proper PLL action: Make sure PLL slide switch isin NOR not TUNE.
- Receiver audio self oscillation at high level: Make sure audio board
mounting screws are tight.
RECEIVER
- Low audio output receiver sensitivity and no transmit: -6v supply is bad.
Q13 on FIX VOX unit.
- 25 kHz calibrator will not zero: Add 3 pf in parallel with TC-1 on the
marker unit.
- Receiver sensitivity down: Q2 on RF unit. +9v on PD unit is shorted. L-6
shorted to ground.
- Intermittant receive when moving set.: Check for touching terminals at
final relay socket.
- No receiver or digital: 14v wire pinched between DG-1 chassis and ground.
- Receiver sensitivity 40 db down: Check for shorted L8, 1.8 MHz antenna
coil on coil pack.
- Adjacent signal interferance: See TKC bulletin.
- No receive audio: Check for shorted TA-7201P module at X49-1080-00.
- Poor receive audio: The 100 V AC 120 V taps were miswired.
- Receiver doesnt work 20-40: Check for wafer touch to ground on band
switch.
- No DG1, no RX, no TX, no VCO: Bad D1 5 volt zener on relay unit.
- RIT action seems warbly: See TKC bulletin.
- Receiver has bad static and is noisy: Bad C14, C15, tantalum on PD unit.
- VFO frequency shift: Check for loose tension of VFO tension spring.
- USB/LSB will not work: Check for loose connection at C18 CAR-1 unit.
- Intermittant audio: Check for loose mounting screws on audio board.
TRANSMITTER
- Mushy audio on transmit: Mic amps Q20 and Q21 on IF unit are bad.
- No 14V supply: Bad bridge diodes D8-D10 on X43-1090- 02.
- Intermittant operation of any one band: Check for loosely soldered Xtals
in PD unit.
- Mic gain down: Cold solder joint at SSB xtal filter IF unit.
- Self oscillation when TX: Bad final tubes. Burned cathode resistors 10
ohms R2, R3 at final unit.
- No VOX operation. No sidetone: Burned resistor R12 220 ohms at key socket.
- No USB or LSB: Check CAR1 X1-X2 crystal for cold solder joint on CAR- 1
unit.
- No TX: Check for shorted Q1 and Q8 balanced mixer on RF Unit.
- No ALC meter movement: Readjustment of meter amp VR1, VR2 on IF unit.
- Intermittant ALC action after peaking drive: One final tube is bad.
- Fix lite on when in VFO position: Wire shorted terminals on function
switch.
- No loading of TX: Cold solder joint at relay socket RL1 antenna relay.
- Using Sure 444 speech processor is distorted: See TKC bulletin regarding
16db pad for mic input.
- No relay closure on TX: Q9 on fix Vox unit is bad.
- Very low RF output only when using RF speech processor: Bad Q30 on IF
unit.
- Low RF output on SSB without RF speech processor: Bad Q20 on X48- 1150-00.
- Large audio difference between USb and LSB: realign carrier unit per TKC
specifications.
- No loading on 40 meters: Foil path is open on RF coil pack.
- No tX when using send switch: Bad R28 1K and Q9 on FIX VOX unit.
- Blows fuse: Check for shorted C21, C22 100uf 500v.
- No drive, no TX or bias: Open screen resistor R6 470 ohm at rectfier unit.
- VFO intermittant: Check for cold solder at VFO power plug.
- Audio distortion on TX with processor: C96 may be loose on IF board.
- Faulty LED indications: Check for loose ground screws on LED board.
- Low output on CW: R14 470 Ohm touch to filter case on IF unit.
- VOX operation is intermittant: Solder touch VS terminal oand 14v at
X50-11350-00).
- Intermittant TX: Make sure ground strap for 12BY7 shield is under the
shield.
- Insufficient power out to drive linear amplifier: An increase of 5-7 watts
can be obtained by paralleling R6 on receiver unit with a 47 ohm 2 watt
resistor.
- VFO output level is down: Q2 inside VFO is bad.
- No TX or RX on any band. No VCO output: Q14 on X50-1330-00 is bad.
- No TX or RX: Loose contact VFO output terminal on Fix Vox unit.
13-02-2000 TS-820 RIT
modification
Author:
Trio-Kenwood Communication, inc.
Service bulletin no. 13 (27-1-1977)
We have had a few reports of the TS-820 RIT tuning being "rubbery". The
following information will solve this.
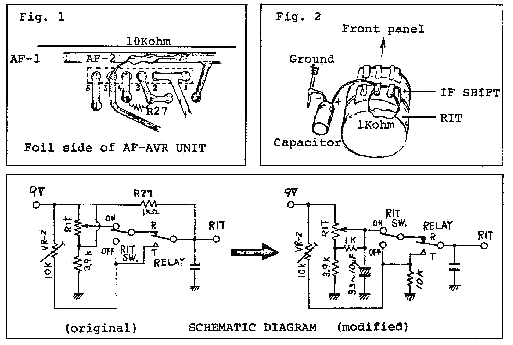
How to modify:
- Remove resistor R27 (1Kohm) on AF-AVR unit (X49-1080-00).
- Install a 10Kohm resistor on foil side of AF-AVR unit. See figure 1.
- Install a 1 Kohm resistor on RIT control. See figure 2.
- Install a capacitor (3.3uF - 10uF) between RIT control and ground. See
figure 2.
- Adjust VR-2 on AF-AVR unit (X49-1080-00) for the same frequency as the
center position of the RIT control.
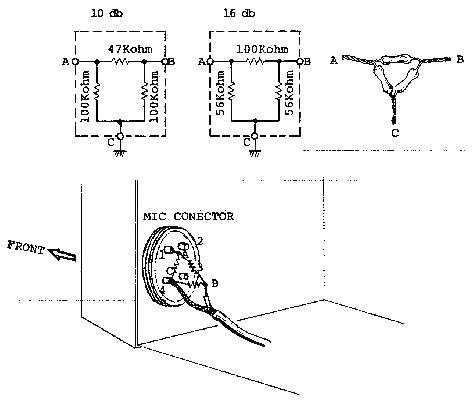
13-02-2000 Microphone input attenuator for
TS-820
Author: Trio-Kenwood
Communication, inc.
Service bulletin no. 14 (16-2-1977)
When using a high output microphone (i.e. Shure 444), it is very likely that
there will be distortion of the transmitted audio if the processor is used. The
reason the distortion occurs is because the processor is between the first
microphone amplifier and the microphone gain control. The installation of one of
the attenuators shown below will reduce the microphone input to a level that
will not cause RF speech processor distortion. The attenuator figures are
approximate.
20-02-2000 General Alignment Procedure for
the TS-820(s)
Author:
Trio-Kenwood Communication, inc.
Service bulletin no. 30 (14-3-1978)
The purpose of this bulletin is to give a simplified alignment procedure for
the TS-820 and TS-820S transceivers. We have tried to combine some of the step
and rearranged the sequence of step so the alignment may be done quicker. This
may be used in lieu of the alignment procedure in the Service Manual.
- Adjustment, A.V.R. unit (X49-1080-00)
- Adjust VR1 for 3.3V
- Adjust VR4 for 9V.
- Adjustment, V.C.O unit (X50-1330-00)
- PLace ST to TONE and connect a frequency counter tp TP5.
- Adjust T1-T11 for proper frequency. (See table)
Note from
www.mods.dk: I'm not sure about the data in the table are correct,
because the drawing i read from was very bad. Have you a better drawing, or
can you verify that the frequency are correct then please mail to me.

| Band |
Coil |
Frequency |
| WWV |
T1 |
24.08 MHz |
| 1.5 |
T2 |
10.88 MHz |
| 3.5 |
T3 |
12.88 MHz |
| 7 |
T4 |
16.08 MHz |
| 14 |
T5 |
23.08 MHz |
| 21 |
T6 |
30.08 MHz |
| 28 |
T7 |
37.08 MHz |
| 28.5 |
T8 |
37.58 MHz |
| 29 |
T9 |
28.08 MHz |
| 29.5 |
T10 |
28.58 MHz |
| AUX |
T11 |
Received signal
+ 0.03 MHz |
- Adjustment of coil pack (X44-1140-00)
- Turn screen grid (S.G.) switch (rear panel) OFF, heater switch ON.
- Center DRIVER control.
- Peak coil pack all bands for max. reading on panel meter in TX and RX
(except WWV in TX).
Another note from www.mods.dk: I'm not
sure about the data in the table are correct, because the drawing i read
from was very bad. Have you a better drawing, or can you verify that the
frequency are correct then please mail to
me.

Adjustment
sequency |
Band |
VFO meate |
| 1 |
1.8 |
100 |
| 2 |
3.5 |
250 |
| 3 |
7 |
150 |
| 4 |
14 |
175 |
| 5 |
WWV |
0 : 15.0 MHz |
| 6 |
21 |
225 |
| 7 |
28.5 |
500 |
- Carrier point (X50-1310-00)
- Peak TX power in CW mode. Then switch to LSB and modulate with Audio
Gen. (A.G.) @ 5 mv 1500Hz while reducing mic. gain to 500 Watts outputs.
- In the CW mode connect a frequency counter to TP5 on the IF unit
(X48-1150-00) and adjust TC1 on the CAR-2 Unit (X50-1320-00) for 8.830.7
MHz.
- Adjust VR1 o the CAR-1 Unit (X50-1310-00) for equal output freq. on USB
and LSB.
- In LSB mode, check the RX and TX frequency at TP5 on the IF Unit. It
should not change.
- With mode switch in LSB position Audio Gen. input @ 5mv, vary input
frequency from 400Hz to 2600Hz and check for BALANCED output while
monitoring on scope LSB to USB and vice versa.
- Speech processor (X48-1150-00)
- Tune TX for maximum output power at 14.175 MHz.
- Set mic. gain in center and S.G. off, comp meter ON.
- Place scope on TP2 and counter on TP3.
- Set A.G. for 10mv @ 1500Hz and modulate unit.
- Turn processor max. "ON" position, and adjust TC4 to 451.9 ± 200
Hz.
Adjust T11, T12, T13 for peak indication on COMP. meter.
- Peak T14 by scope on TP2.
- Turn processor full C.C.W.. and reduce A.G. gain to 1mv @ 400Hz.
- Adjust TC4 for max. level n scope but at proper frequency.
(451.9 ± 200Hz) (May adjust slightly off frequency if higher peak can be
obtained.)
- Sweep A.G. frequency from 400Hz to 2000Hz and check for balanced output
on LSB and USB.
- COMP. full clockwise and @ 1500Hz adjust TC3 and VR6 for min. reading on
COMP. meter.
- At 1500Hz @ 10mv adjust VR7 to balance processor in "ON" and "OFF"
positions (same level).
- Balance mod. adjustment (X48-1150-00)
- In CW position adjust TX for max. output. Key unit with mode switch in
SSB position (no Mod.).
- Adjust VR5 and TC2 for min. output level on scope.
- Check BALANCED output LSB and USB.
- Neutralization
- S.G. switch turned off after TX has been tuned in CW mode at 21.3MHz.
- Adjust neutralization cap in final cage for min. output as seen on
scope.
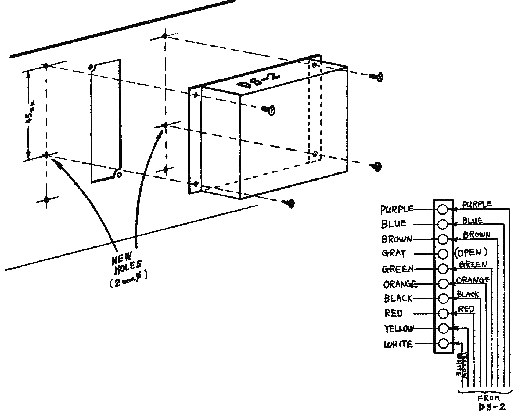
02-04-2000 DS-2 Replaces DS-1A DC-DC
Converter
Author: Trio-Kenwood
Communication, inc.
Service Bulletin no. 842 (26-1-1981)
The DS-1A DC-DC converter for the TS-820 series and TS-520/S has been
replaced by a new model, the DS-2. Wiring color code is the same. Physical size
is smaller. Two additional mounting holes must be drilled in the transceiver
rear panel.