Modifications for the Kenwood
TS-830

19-07-1998 Modification to TS-830S,
TS-530S
Subscriber's comments on qro modification to TS-830S,
TS-530S and TS-530SP
I would like to pass on the problem I hace
encountered in connection with the QRO modification to the Kenwood radios
TS830S, TS-530S and the TS-530SP.
The problem occurs after many hours of
long winded QSO's. It seems that with the increase in the screen voltage from
210 to 300 volts, R37 on the RF unit (#X44-1360-00) heats up tremendously and
will change it's value so greatly that even the receive either suffers or goes
out totally. R37 originally is Metalfilm resistor at 3.3K ohms and is 1/2
watt.
I have changed mine to a Metalfilm as original same value but have
used a one watt resistor. The brand I was abble to get was RCA and I suppose
there are better on the market. This is a 2% tolerance. Three units that I know
of have had this problem that I took care of in this area alone. Two units were
TS-830S and one a TS-530SP. Just thought I would pass that information along for
what it is worth. (Thanks, Frank J. Lukas, Jr., 5301 Main Ave., North
Ridgeville, OH 44039)
19-07-1998 TS-830S Frequency
Shift
Author: Trio-Kenwood
Communication, inc.
Service Bulletin no. 840 (14-4-1982)
Some users may report an intermittent shift in the display and operating
frequency. This may typically be a 1 to 4 kHz random shift. Cause will be a
loose grounding screw on the AF/AVR unit heat sink.
On the AF/AVR unit X49-1140-00, there are three self-tapping screws holding
the aluminum heat sink to the PCB. These also supply the ground connection to
that section of the board. Between the heat shink and PCB foil, add a
toothe-lockwasher N17-1030-41 at eht two self-tapping screws on the side of the
heatsink that has the two transistors attached. (The remaining screw already has
a lock washer.)
When replacing the board to the chassis, add a solder lug
E23-0420-05 to the heat sink mounting screw as shown, and tighten all screws for
this board. Solder an insulated lead between the TPG (Test Point Ground) wrap
post adjacent to C81, and the added solder lug.
Procedure:
- Remove the top cover (8 screws) and unplug the speaker.
- Remove the bottom cover (8 screws).
- Remove 5 screws holding the AF/AVR unit and swing the board over. Leads do
not have to be unplugged.
- Add two tooth-lock washer as shown.
- Replace the circuit board and heat sink to the chassis, adding the solder
lug as shown.
- Solder a jumper between the TPG wrap post and the added solder
lug.
- Replace the top and bottom covers.

Installation time for this procedure is 1/2 hour or less.
19-07-1998 Amtor modification
- Remove C500 (4.7uF) on the signal board (located top center near connector
30).
- Ground the junction of R-476/Q-100.
- This will provide a very noticable decrease in switching time.
19-07-1998 Warc modification
- In early TS-830's, the WARC transmit was not enabled.
- If this is the case, solder a jumper wire from Pin 12 of IC-23 to ground
on the DIGITAL UNIT PCB. Ground can be obtained at Pin 8 of IC-4.
19-07-1998 VFO-230 fine tune mod
correction
A note published in your t/k newsletter of january,
1983, issue no. 30, concerning a fine tuning mod for the vfo-230, impelledme to
purchase a new vfo-230 for the sole purpose of obtaining a slower dial tuning
rate for my ts-380s. then the combination of a defective new vfo-230 and some
bad information in your newsletter note triggered many, many hours of
frustration and irritation over a period of several months starting in june
1986. i believe you should know about it when information in your newsletter
causes frustration and irritation.
I decided to try the diode cutting bit
again. it did not work. the optical dial encoder went crazy. i was ready to
explode and did. Fortunately there was nobody around to hear me. back to the
drawing board. now i know practically nothing about optical encoders but i do
have an engineering background so i spent some time staring at the vfo-230
schematic in the ts-830s service manual. suddenly the light came on. ka0nnf gave
you the wrong information about which diodes to cut. (his call is not wa0nnf as
given in your newsletter note. i tracked him down by telephone. he told me he
had sold the vfo-230 and couldn't remember.)
The proper diodes to cut for
6-1/4 khz per dial rev. are d19. d20, d22, d23, d24, and d26. i presume cutting
diodes d19, d21, d22, d23, d25, and d26 would also work but i will leave that
for someone else to try. in other words, of the eight diodes, cut all but d21
and d25 or d20 and d24 fpr 6/14 khz per dial revolution.
that7s the end of
the story. my vfo-230 now works perfectly at 6-1/4 khz per dial revolution. this
jpermits me to use the excellent ts-830s receiver on 160m cw with very extreme
if (250 hz) and external audio (50 hz) seletivity. incidentally, i wonder how
many repair facilities (including yours) are equipped to motor drive the vfo-230
dial shaft at 300 rpm while observing the optical encoder waveform? this
alignment procedure is necessary, and is prescribed in the service manual,
before you should expect the encoder to work at slower than the "stock" rate. (i
think this was part of the problem).
19-07-1998 TS-830S Low Voltage Supply
Optional Improvements
7-29-81
Power supply drift and stability may be
improved by these optional component changes and additions.
On the AF AVR
unit X49-1140-00 (Vicinity of Q27-Q30) change:
R124 from 1K to 1.5K
(RD14CB2E152J)*
R127 from 470 to 390 (RD14CB2E391J)*
R130 from 47K to 33K
(RD14CB2E333J)#
D25 from WZ-061 to XZ-053 (V11-4101-60)*
*This will
improve temperature drift from a maximum of about 100mV to a maximum of 1mV, and
may be applied to any unit before serial # 201xxxx.
Add two 22 k ohm 1/4
resistors (RD14CB2E223J0, one each across Q30, and Q34, collector to
emitter.#
#This will improve overall stability and may be applied to any
unit before serial #105xxxx.
Note:
These changes are at the owners
option and may not be performed in-warranty.
24-01-1999 Kenwood TS-830 filter
modification
Here is an easy filter modification for the kenwood
ts-830s. first to use this mod, your rig need the yk-88c and to mak t even
better, the yg-455c installed. in short what we are going to do, is move around
a 9 volt switching voltage. this voltage comes from the af board, connector no.
7, pin no. 5. its marked rlr on the schematic. this voltage ends up at the pll
assembly, connector no. 8, pin novp2. please do try this modification by cutting
in this circuit at he source, because this same switching voltage feeds the if
shiqo circuit, and the vbt circuit, and the pll. so cutting the wire at the af
board will make the pll unlock when the mode switch is anywhere but in the cw
positions. now to te prtceires.
- Remove the top and bottom covers, and turn the radio upside down with
front facing you.
- Locate the mode switch, and on the middle wafer set of contacts, cut the
white wire with the blue stripe. it is located next to the terminal with no
conn ction, on the middle wafer set of contacts9)3-;3 about 1/4 inch ox wire
on t switch contact, so youcan make a connection there later.
- You will need a another switch, one with at least three terminals, with
the center teminal always in contact with one or the other of the outside
contacts. its best to use a toggle type so you can mount it in one of the
spare holes on the back of the radio.
- Splice into the wire removed from the moeoppcich, and connect this wire to
the center of your new switch.
- From one (you select) of the side terminals of the new switch, connect a
wire and run it back to the mode switch. connect this wire to t tminalon the
mode switchnrom which you removed the white wire with the blue stripe. you did
leave that 1/4 inch of wire didn't you? take care here, the grey wire next to
the one you are working on carries 110 volts, so don't make any solder
shorts!
- Now from the remaining terminal of your new switch, connect and run a wire
to the if board to pins cw1-cw4. connect this wire to the green wire, that is
connected to one of these pins. you will then have two wires connected to one
of these terminals.
- Make sure tu have no solder shorts or bridges, make sure you have taped or
insulated any bare wire connections. mount new switch in one of the spare
holes on the baccof the radio. install the top aod bottom covers.
The modification works great, one position on the new switch and
everything isnormal, in the other position the cw filter is placed in-line
regardless of the position of the mode switch. to use the cw filters on
rtty/amtor i found i had to turn the if shift control ccw to about the 9:30
position to center the tones in the passband. if you need an even narrower
passband, just tighten it up a little with the vbt.
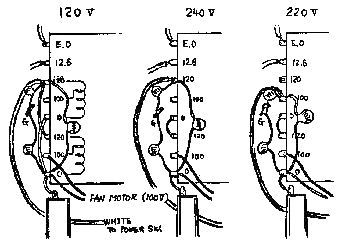
02-04-2000 TS-830S Operation on 240V
AC
Author: Trio-Kenwood
Communication, inc.
Service Bulletin no. 837 (15-12-1980)
To operate the TS-830S on 240V AC, the power transformer split primaries must
be rewired from parallel to series connection.
- Unplug the AC power cable.
- Remove the bottom cover.
- Remove the jumper wires between the two ø terminals and two 120 terminals
on the bottom of the power transformer.
- Connect the adjacent 120 and ø terminals at the middle of the transformer.
This will provide 240V AC operation.
For 220V AC operation, connect the
adjacent 100 to ø winding.
- Change the AC fuse from 6A to 4A. Tag the power cord at the back of the
radio to indicate that the transformer is strapped for 240V AC, and the power
fuse should be 4A, and not 6A.
- Replace the bottom cover and reconnect power to verify your work.
02-04-2000 TS-830S Low voltage Supply
Optional Improvements
Author:
Trio-Kenwood Communication, inc.
Service Bulletin no. 847 (14-4-1982)
Power supply drift and stability may be improved by these optional compoents
changes and additions.
On the AF AVR unit X49-1140-00 (Vicinity of Q27-Q30) changes:
R124 from 1 Kohm to 1.5 Kohm  (RD14CB2E152J) *
R127 from 470 ohm to 390 ohm  (RD14CB2E391J) *
R130 from 47 Kohm to 33 Kohm  (RD14CB2E333J) *
D25 from WZ-061 to XZ-053     (V11-4101-60)  *
* This will improve temperature drift from a maximum of about 100mV to a
maximum of 10 mV, and may be applied to any unit before serial # 201xxxx.
Add two 22 Kohm 1/4W resistors (RD14CB2E223J), one each across Q30 & Q34,
collector to emitter. *
* This will improve overall stability and may be applied to any unit before
serial # 105xxxx.
Note: These changes are at the owners option and may not be performed
in-warranty.
08-04-2000 TS-830S Noise Blanker Optional
Improvements
Author:
Trio-Kenwood Communication, inc.
Service Bulletin no. 851 (26-7-1982)
Receiver Cross-modulation while using the noise blanker may be improved by
these optional component changes and additions. Realignment is not required.
At the Noise Blanker level control VR8, change R19 from 22 ohm to 15 ohm
(RD14BB2E150J)* 
On the AF AVR unit X49-1140-00 (vicinity of Q20) change:
D22 from an MV-13
to an MV-203 (VII-3379-16)*
R96 from 2.2 Kohm to 820 ohm (RD14CB2E821J)*
(vicinity of Q24)
R112 from 47 Kohm to 56 Kohm (RD14CB2E563J)*
Across T2, (Fig. 1) add a 12 Kohm (RD14CB2E123J)*
At Q21 (Fig. 2,3) add 2 pcs. 680 ohm (RD14CB2E681J) *

Note:
- Applies to any unit before serial: 2010000*, 1120950*, 1132058*.
- These changes may be performed in-warranty.
08-04-2000 TS-830S Transmitter
"Talkback"
Author: Trio-Kenwood
Communication, inc.
Service Bulletin no. 857 (11-2-1982)
Transmitter "talkback", either with or without a linear amplifier, may be
eliminated by adding a filter at the receiver audio power amplifier.
On the AF unit X49-1140-00 at Q4, cut the 12V DC B+ line between R47 and C28,
and add a 1uH choke (L40-1092-02) in-line. Add a .01uF cap (C52-1710-36) from
the IC pin 1 to ground, as shown using a 3 mm lug (E23-0015-04) under the IC
mounting screw on the Heat Sink.

Installation time for this procedure is ½ hour or less.