About GenLog Contest Logger
Use this software to log more than 400 HF/QRP/PSK/VHF/UHF/Microwave contests and activities. Log while looking for counties to add to your total. GenLog can also be used as a general logbook to log any frequency from DC to light, including SWL.
GenLog is a general type contest logger for the casual contester. No attempt was made to interface to radios (CAT) or rotors, to use a PC network, or to support digital mode I/O. Having a problem? See the FAQs on my web site.
!! One on-line GenLog reviewer believes that my logger should catch mistakes entered by the contester (and maybe fix them, I don't know). For the most part, GenLog will let you enter most anything in the exchange fields. It does not check to see if you are following the contest rules, doesn`t check for valid exchanges, doesn`t check spelling and certainly does not work properly if you don`t use <Enter> or <Space> to input data. You are operating in a contest, so do not expect GenLog to fix something or even tell you if you mis-spelled something. Why would I write software that did that?
It is impossible to always have the current multiplier list available, so invalid multiplier entries are on you. After all you are following the contest rules, are you not? Read the Help About this Contest for logging tips and do your best to <Enter> what the station transmits, without typos.
Auto File open Log in multiple contests
Band Change Logging without the mouse
Cabrillo log file Log screen refresh
Club competition Log submissions
CW options Modes
CW F-key messages Moving the TX Windows
Datafiles Multipliers
Duping/Dupes Partial Call Search
DVK option QSO Accept
DXCC datafile and mults QSO Rate
Export ADIF files Save screen position <<= Use this index - or use <Ctrl + F> to search a topic
Favorite Mode Screen resize
File Backup Start a new contest
Grid Squares State QSO Parties
Import ADIF files or QSOs Use of the <Tab> key
Initial Setup screen UTC time
Keystroke shortcuts Windows Shortcuts
Log Editor Writing ADIF .mlt .sum .dup files
Load existing log, last log file Zone Tracking
Load WSJT QSOs in real-time
Important:
Only the <Enter> and <Space> keys can be used to accept data inputs and move to the next field. After all required fields are filled, use <Enter> or <Space> to accept the QSO into the log. Activating or mouse-clicking the {Save data to Log} button without first <entering> the data, may cause errors in the log. That button is provided just in case and is not required during normal logging.
You need some way to move around without using the mouse - use the <Tab> key. Using the <Tab> key does not input data. Contest specific sub-routine code required for duping, QSO points and multiplier checking is only called when data is entered using the <Enter> or <Space> keys. It just won`t work with the <Tab> key!
Important: Initial setup screen:
It is important that you fill in the setup screen, which eliminates the need for individual contest configuration files. Your call sign, section, county etc. are used to fill in the TX Exchanges in your log file. The DXCC prefix, Sec/Prov, ITU zone etc. are used to tell GenLog how to score different contests and how to setup the logging window. Sent and received information may be different in QTH specific contests, so these fields tell GenLog what end of the QSO you are operating from. GenLog supports all contests from either end of the QSO.
Power Level / Class:
Please check (and edit if necessary) your category and class before submitting your log.
In the setup screen, enter your power level / class abbreviation. If you click the Power/Class input box, hints are displayed related to power levels.
Power/Class:
Usually this will be: A=LOW, B=HIGH or Q=QRP.
This field is used for your category class. Follow the sponsor`s rules for log submissions.You can select Single-Op LOW or Single-op HIGH in the [Op Status], but you must enter the corresponding A or B in the Power/Class field. Otherwise you can select any other Category in the Op Status and use any code.
For examples: in ARRL November SS: Q/A/B/U/M/S - in ARRL 10-Meter: A, B or Q.
Some contests sponsors use the Power/Class identifier to score logs.
ARCI QRP Contests example:
CATEGORY: SINGLE-OP A - where A is the X15 multiplier for power levels 55mW - <250mW.
This code is appended to your Category and written to your Cabrillo log. Check/Edit this power level code in contests that use it.
You can go to the contest Help page before leaving the setup screen and see what abbreviation is required for the contest you will be operating in. Click the blue [Contest HELP] label and search the `Index` for the contest.
Portable operation:
You cannot enter a slash in your callsign in the setup form. Using VE/F5LEN for example: The callsign is used to name files written by the logger and VE/F5LEN.log is an illegal Windows filename. Use VE-F5LEN or VE_F5LEN in the setup screen. Keep in mind that you cannot use CW macros that send <yourCall> however - enter your portable call into a CW memory text instead. After writing the Cabrillo, verify the log. GenLog usually changes the OPERATOR: field. GenLog changes the dash (or underscore) to a slash in the rest of the log.
There are 2 fields for section and province. Depending on the contest, one or both may be used. Although the `Sec/Prov` field is the ARRL field, it is also used for provinces and etc for DX stations. The other field, `State/Prov` was initially intended for US states and Canadian provinces, but is also used by DX stations. Both fields provide information that is transmitted in contests and is data that also goes into your log. Verify these fields against the contest rules before logging.
Make sure the correct TX Exchange information is displayed in the `TX Exch` combo-box. ie: your section, province, area code, department number etc., as this information is stored in your log file. You can edit this field in the logging screen if necessary. Or exit the logger and change the appropriate field in the set-up screen.
Before using the software in a specific contest, always try a dummy contest to make sure all input data and logging information is formatted correctly. At this time you can also setup a CW keyer file for the contest. Turn your output power to minimum and select your dummy load to do keyer tests using the transceiver`s side-tone.
It is also important to read the current contest rules to be sure you are logging within the rules, since GenLog may not have the most current rule changes.
Use the Help About this Contest menu to see hints and simplified rules for the loaded contest.
Note:
Some input fields are pre-formatted for specific length inputs and some fields will be used to combine QSO information to make logging simpler and faster, as in the ARRL November SS, Helvetia Contest, NRAU Baltic Contest, EA-DX Contest, CQ-WE, OE 160m, Commonwealth CW etc.
Make sure the computer clock / date and UTC offset are correct. Although the UTC offset should be automatic, verify that it is correct - click on the [UTC offset] label in the setup screen to change it. The date format is normally mm/dd/yy. Change it if you have your computer system clock set to dd/mm/yy. In the PC`s system clock setup, you can setup an on-line clock synchronization sequence to make sure your clock is always set correctly.
The screen may flicker with some video monitors when the UTC time is displayed in hh:mm:ss format. Double-click the UTC time display to change the format to hh:mm.
To start a new contest or logbook:
Click the green [Contest] label or use the pull-down menu File, New Contest to select a new contest or general logging activity. Contests are in `groups` in the scrolling window: General, ARRL, CQ, DX, Digital, State, QRP and VHF - selectable via the `group` buttons. Or use the `search` function to enter a partial contest name. Then click the [Enter new file] label or use the pull-down menu File New filename to enter a filename. Long filenames are OK, but keep them simple so they fit in the display windows. Using a filename that tells you what the contest is, can be helpful. ie: w3km_2014wpxcw w3km_2014paqp etc.
Note:
GenLog will not let you name a contest log file to [urCall.log], since [urCall.log] is a filename reserved for the Cabrillo log file. So, don`t re-name a contest file to [urCall.log] or do {Save As} to [urCall.log] when editing a file in NotePad.
With more than 400 contests/activities being supported, many of the same labels and button click functions are used for all. Their names and functions are just changed for that contest. For this reason I cannot use the third party screen re-sizing control that my other software uses. If some buttons or functions seem incorrect after just starting a contest, re-loading that log file will reset these screen functions.
If logging post contest, after selecting the contest and naming the log file, the expected date format is displayed in the [QSO UTC Date] box. The date format, either mm/dd/yy or dd/mm/yy is initially selected in the setup screen. This setup follows what your PC`s system clock format is set to. Select the {After contest} radio button and enter the date of the first QSO. Then enter the UTC time of the first QSO. Continue entering all exchange data from left to right, hitting <Enter> or <Space> to input each field. When the UTC date changes, edit the new date and continue entering QSOs.
Loading the last log file automatically at startup:
Use the Log menu to select {Load last log file at startup}. When you continue to the logging screen, your last log file and contest Ini are loaded.
Load and continue from existing log file - log multiple contests:
Click an existing filename from the files box to re-load it. You can do this at any time. During a contest, you can load a general log and work a non-contest station, then reload your contest log to continue. This makes it possible to work several contests at one time. I don`t think this is possible with any other logger. A logfile must be initialized with at least one QSO <Entered> before it can be re-loaded.
Importing WSJT QSOs into General logs.
Read about the new auto loader to have a CW keyer file loaded when you change contests.
I have worked 2 state QSO parties on CW/SSB and a PSK contest at one sitting. I used MixW for the PSK operation and logging. You can go back and forth between GenLog and MixW without problems.
Moving all your old log files to another folder allows only the `working log` files to remain in the files box. Also, the old Visual Basic un-install file [ ST6UNST.LOG ] can be deleted. The new JGS Windows installer software uses Deploy.log and Deploy2.log for un-installs.
After a contest is started, that contest file can be re-loaded at anytime by clicking it in the files list-box. In addition, clicking the yellow [Contest name] label up top will bring up a more descriptive contest list (and file date modified) window. Clicking a line in this window will open that log file. Note: Blank *.log files (with 0-bytes - a log file was started, but no QSOs were entered) are deleted automatically, so you don`t have to.
Note: You may need to un-check the `Hide file extensions...` option in Explorer (MyComputer) or turn on the `view file extensions` option (and select {View} {Details}) to see the .log extensions. Otherwise when you want to open a file in Explorer, you will not be able to tell the difference between {urCall.log} or {urCall.sum} or {urCall.txt} etc. And, in Explorer, if you view files `by date`, the latest files will be displayed at the top of the list.
Accessories:
The {Access}ories forms - Linear and Tuner - are viewed via the Access menu or by <Entering> the LI, LN and ST keyboard shortcuts. The tables are used to eliminate `post-it` notes on your equipment.
Bonus points & scoring:
In some contests, you are required to select or input the bonus points or bonus multipliers. Click the [Multi/Bonus] button to setup the bonus points post contest. Then re-load the log file to update the score. A file is created for contests that use the bonus feature, to make scoring more automatic. The filenames are hard coded into GenLog and are names similar to the contest name with an `ini` extension.
examples:
fd_bonus.ini - ARRL Field Day ini file.
fl_bonus.ini - Florida QSO Party.
wv_bonus.ini - West Virginia QSO Party.
The data from the bonus file is store to the logging folder and will be used for every contest of that type. So, update it each time you operate that contest. If there are no bonus values for the contest, uncheck the options or select zero values. If an error occurs from loading one of these files, just delete it. GenLog will make another the next time you use the bonus feature.
Call Signs:
The FCC allowed hundreds of state-side US stations to apply for `DX type` callsigns - a bungle for sure! To help assign the callsign with the correct DXCC prefix identifier, a second datafile [ DXCC_Exceptions.dat ] is used to identify the DXCC country callsign exceptions.
Chronological re-ordering of logs:
GenLog`s date sort function is available for certain logging options - like General logging, County Hunting - the Log Sort Log by Date menu is not available for standard contests, which are already in date order.
Clean Sweep data file:
Some users wanted a file or print-out of the QSOs that were a clean sweep. To aide you with QSL-ing or submitting proof of QSOs for awards, you can write the file {clean_sweep.txt}. This file will list all the multiplier QSOs.
Club competition:
If you are not submitting your score for a club or the contest does not have club competition, make the {Club Affil.} field blank in the setup screen. Otherwise, you can always edit the E-file before E-mailing it to the sponsor.
Club member and QTH numbers:
Read about changing your club member numbers or QTH dependent values.
Contest rules:
Simplified rules and hints for each supported contest are available in the Contests HELP file [contests.hlp]. After loading a contest, select the Help, About this contest menu to view the basic rules for that contest. These rules can also be viewed while in the setup screen, by clicking the [Contests HELP] label.
You can also open the HELP files in Microsoft Explorer, or make shortcuts to these files. The HELP filenames are [ contests.hlp ] and [ gen_log.hlp ]. They reside in the {c:\genlog32} folder on your HD.
Obviously I cannot keep the logger and all the partial rules updated all the time, so make sure you follow the sponsor`s rules for operating and log submissions.
County Hunting:
It would be nice to add QSO Party type contest logfiles to a County Hunting log, to update your totals. Since other contests/activities do not have the county name spelled out, you need a way to get around this. While not automatic, the following is a way to add selected QSOs to a County Hunting log {Option19}.
Use the Counties, Add other logs menu. This brings up a window that will allow you to edit the county abbreviation to the full spelling (and enter the state if necessary), so the total U.S. counties can be counted accurately. Click a QSO Party logfile in the files list-box, or use the arrow key to scroll thru the logs in your logging folder. If that logfile has the word `QSO` in the contest name and it is a U.S. counties contest, you can add the QSOs to the County Hunting log. Follow the [Hint] label in the center of the window.
Save your work before returning back to the logging screen. After returning to the logging screen, re-load the `County Hunting` log to update the `Counties worked` totals.
Or, since these contests are low pace and low activity - run a `County Hunting` log at the same time you are logging a QSO party - and also enter the QSO into the `County Hunting` log, with full spelling. Remember, you can operate in multiple contests and just click the filename to change logs. Hint: Give the logfile a name that tells you what the contest is - {ind_qp.log} {co_hunt.log} {usco_ssb.log} - so you can bounce between them quickly - and move the old contest logs to another folder for less confusion.
See a nice counties list and colored maps of each state at the County Hunting web site: http://www.countyhunter.com/counties.htm. More info is available in the County Hunting topic of the `Contests` HELP file.
CQ zone tracking:
You can keep track of CQ zones worked. Selected log files can be added to build a CQ Zones totals file, [ cq_zones.ttl ]. Use the CQ Zones, Add this log menu to build the file and add logs. Once built, you can view or print the CQ zone totals or by band. The total unique CQ zones is displayed in the CQ Zones total menu label, CQZones[23] for example. You can delete, re-name or move this totals file - if you want to generate a totals file for other logs. CQ WW DX, GACW and JA DX Contests have CQ zones as multipliers. See ITU Zones tracking.
CW message keywords:
My CW messages are very simple. There are only a few keywords (Macros if you want to call them that). <CALL> and [SN] - the callsign of the station typed into the callsign field is sent where <CALL> is used and the QSO number is sent where [SN] is used. An example of a message using both in the Nov SS is: <CALL> NR[SN] W3KM 66 EPA K
A space character can be used for the first `letter` in any message to provide a delay when using PTT and amplifiers, etc.
CW and DVK TX windows:
You can move any of the 3 transmit windows to the desired location using the Windows drag mode. Grab the blue title bar with the mouse and drag the window. It will stay at the new location until you exit the program.
Hit [Ctrl] to move the keyboard CW TX window.
Hit one of the CW F-keys to move the CW memory TX window.
Hit <F12> and move the DVK TX window while in the RX segment of the repeating <F12> message.
Data files:
Many data and text files are provided with GenLog to enable functions like multiplier and scoring functions, to name a few. It may be helpful to print out counties or sections for example so you can have the list in front of you for reference. Or, open the file in NotePad and <Alt + Tab> between the datafile and the logger. Note: In the [dxcc_pre.dat] datafile, DXCC prefixes that can be confused with States or RAC provinces are tagged with ! after the prefix (examples: OK! LA! ON!).
Note:
Other datafiles are used to find information (name, member number) about the station being worked. For example, GenLog will show you the name and/or member number in many contests that have these fields as part of the exchange. If you want to copy the transmitted exchange and do not want to use the datafile, move the file to another folder. However, in contests where GenLog uses the datafile to figure out multipliers and points, the log data and score will be inaccurate.
I have included sufficient code to trap errors that can occur from missing datafiles. Instead of the logger terminating due to an error, the function selected that caused the error is bypassed.
To view certain data files stored in the logging folder, use the File, Display log/datafiles menu. You can also print the file from this viewing screen.
All State QSO Party contests use two files: [ all_coun.dat ] & [ counties.txt ].
The latest datafiles and HELP are supplied with upgrade versions of the logger. Plus, up-to-date files are also available at:
http://www.qsl.net/w3km/gen_data.zip. Select `Open this file`, then extract the file(s) you want to the c:\genlog32 folder.
Date format:
If your PC`s system date format is set to DDMMYY, you must select the same format in GenLog`s setup screen, otherwise the month and day in your Cabrillo file will be reversed and could be rejected by the sponsor`s E-mail server. Unfortunately, you cannot just change GenLog`s format and expect the Cabrillo file to re-written correctly, since your contest LOG file was written in the previous date format.
You can fix your current LOG file by using the `Find and Replace` function in NotePad or other editor. For example: find 30/07/04 and replace with 07/30/04. After you select the correct date formats in the PC and in GenLog and re-load the LOG, the Cabrillo file will be correct.
Digital contests:
I use MixW in digital contests - http://www.mixw.net - it has a built-in logger. Verify that what the logger sends (from Macros) is what goes into the log - in particular the QSO serial number !
DXCC tracking:
If you want to keep track of DXCC countries worked, in selected contests, log files can be added to build a DXCC totals file, [ dxcc_lst.ttl ]. Use the DXCC, Add this log menu to build the file and add logs. Once built, you can view or print all the countries by band. The total unique countries is displayed in the DXCC menu label, DXCC[232] for example. You can delete, re-name or move this totals file - if you want to generate a totals file for other logs.
Export ADIF files:
Use the Log, Write More Files, Export ADIF file menu item to write the log file to the ADIF format to be imported into another logger. The exact data written from each contest log file may be different, although most of the pertinent information is included in each ADIF file. See ADIF Import topic. See ADIF Export topic.
Fast partial callsign search:
When 2 or more characters are typed into the CallSign field, the log and a datafile are searched for the characters typed in. The results can be displayed in 1 or 2 windows.
Favorite mode:
Put CW or PH in this field so you can start a new log in that mode. This field is disregarded for single mode only contests and VHF contests where PH is obviously the predominant mode of operation.
Unless specifically called out in the rules, always use PH as the voice mode designator for contesting. The Cabrillo file template has a 2-letter field for the mode, and SSB is not one of the Cabrillo modes. In most contests, the points value is set to zero when SSB is selected, as a reminder. For the same reason, GenLog uses `RY` and `PK` as the 2-letter Cabrillo modes for RTTY and PSK. Most Contest sponsors use RY in Cabrillo for all digital modes. See the Modes topic for more.
File Back-up:
For automatic back-up (append), select the back-up drive in the setup screen, before starting to LOG - or use the View, BU file path: menu to view or select a BU file path. Each QSO will be saved to the selected disk drive, even to a USB flash drive.
Grid tracking:
You can keep track of 4-digit grid squares (locators) worked, in selected contests. Log files can be added to build a Grid totals file, [ grid_lst.ttl ]. Use Grid Total or Grids [n], Add this log menu to build the file and add logs. Once built, you can view or print the grid squares totals or by band. The total unique 4-digit grid squares is displayed in the Grids menu label, Grids [155] for example. You can delete, re-name or move this totals file - if you want to generate a totals file for other logs.
Interested in the 50MHz FFMA, or just want to keep track of US grids worked? Use the Grids, Count US Grids menu based on the [FFMA-488Grids.txt] file.
Import ADIF files:
Use the Log, Import ADIF file menu to merge the file into a General Log {option 09}, County Hunting log {option 19} or US Prefix Awards log {option 225} only. The exact data loaded and merged from the ADIF is only specific to these modes. See ADIF Export.
ITU zone tracking:
You can keep track of ITU zones worked. Selected log files can be added to build an ITU Zones totals file, [ zone_lst.ttl ]. Use the Zones, Add this log menu to build the file and add logs. Once built, you can view or print the zone totals or by band. The total unique ITU zones is displayed in the Zones menu label, Zones[34] for example. You can delete, re-name or move this totals file - if you want to generate a totals file for other logs. See CQ Zones tracking.
Log screen refresh:
To manually refresh the Log screen, enter `SL` (show log) in the callsign field or click the yellow [Last QSO] label. The score and log are normally refreshed after a QSO is entered and after returning from the log edit screen. About editing the log.
After loading bonus points, re-load the log to update the score. Click the [End] checkbox to view the `End` of the Log.
Log editor:
See Edit Log file.
GenLog`s log editor works for most contests, but there are some exceptions. A pop-up is displayed for the exception contests. Some log formats (columns) are non-normal and the complexity of editing these logs produces more problems that it is worth.
Changing a callsign to a dupe isn`t allowed (even though some contests allow dupes with different multipliers) - just too much extra code to write. Deleting QSOs when serial numbers are used is another issue. And - re-numbering the # new mults in some contests is disabled because of the scoring complexity. The sponsor will score your log anyway - the #new mults is only used within GenLog`s scoring routines.
Some contests allow dupes when the QTH exchange is different - QSO Parties where mobiles travel to different counties for example - or Rovers in different QTHs. When a dupe message pops up, hit <Enter> or <Space> to select the [OK] button, then enter a different exchange.
If you select the {View} menu and click {Show dupe info} it toggles to the other selection {Don't show Dupe info}. This can allow entering dupe QSOs. If the QSO points are quite right, the sponsor will score your log without penalty for the dupes.
Log submissions:
Make sure you follow the latest contest rules. Several ASCII log file formats are available. See how to submit an E-mail log.
Manually editing log files:
Q: When I manually edited my log file in NotePad and tried to re-load it, I got an error: [ Input past the end ] [ No such band ] or other. Why?
A: When editing your log file in NotePad or EditPad for example, be careful not to disturb the columnar format of the datafile. Logs are space-delimited files (spaces between columns, not tabs). Also, be sure that there are no empty/blank lines or spaces after the last QSO line. There is a carriage return after every QSO line, so the editor`s cursor should flash at column 1 on the line below the last QSO line, with nothing below or to the right. Check to see if there are blank lines saved by using the Page Down or arrow down keys.
Or - if the error displayed is [ No such band ], you can see if this caused by a blank line by selecting the `End` checkbox - which displays the end of the log in the log window. Enter `DL` in the callsign field to delete the last QSO (or blank line in this case).
Merging contest log files:
You can merge selected contest LOG files into a General log file to get the State/Grid totals worked per band.
Importing WSJT QSOs into General logs.
Modes:
Unless specifically called out in the rules, use PH as the voice mode designator for contesting. See the Mode topic.
Mouse:
The mouse is not needed for normal logging functions. <Esc> <Tab> <Enter> and <Space> are used. Windows double-click functions are used where applicable. More on mouse usage.
Multi-Operator:
Read about Multi-Op contesting.
Open / View / Writing files:
To auto load the last log and contest used (before exiting the logger), use the Log menu to select Load last log file at startup. Click the menu, then use the Log menu again to see that it is selected. The next time you continue to the logging screen, your last log file and contest Ini are loaded.
When you write the Cabrillo, ASCII, dupe, summary, ADIF or multiplier files, GenLog can auto-open that file for view/edit using NotePad or EditPad. Copy either NotePad or EditPad to your logging folder. This is useful since you must verify (and possibly edit) the electronic files that you submit to contest sponsors. Check your submission for correct category, power level etc.
You can also use the File, Display log/data files menu to open or print your log or the lookup files used by the logger.
Note:
When you tell the logger to write a file, it overwrites the previous file without prompts. Be aware that files like the Cabrillo file [urCall.log] can reside in different folders on your PC, depending on whether you have other logging software installed. Although GenLog won`t let you name a normal logfile as [urCall.log] at the beginning of a contest, make sure you don`t rename or do {Save As} using [urCall.log] as the filename when editing in NotePad. If you do, when you write a Cabrillo file, the contest log file will be overwritten.
To view these files in Microsoft`s Explorer, you need to uncheck the {Hide filename extensions} option so you can see the complete filename. Unless you do this, it is easy to get the files confused, since there can be 3 files starting with `urCall` in the same folder. Explorer shows only the filename (no extension) unless you change the options setup. For more info, see deleting files.
Operating time calculation:
GenLog will calculate the total hours of operation. Use the Log, Count hours menu to start the calculation. A gap in QSO entries less than 30 minutes is considered as On-Time. OFF/ON times are not required in a Cabrillo log submission. This information is taken from the log file.
Partial Calls:
See the partial search.
Power Level/Class:
The power category or class for different contests is entered into the `Power/Class` field in the setup screen. For example: In the ARRL November SS and ARRL 10M Contest: A=Low, B=High and Q=QRP. If the multiplier is applied automatically in the selected contest, entering A, B or Q in the setup will multiply your score by the value called out in the sponsor`s rules. Example: A=Low power x1.5, B=High power x1 and Q=QRP x2. Open the contest of interest while in the setup screen. Click the blue `Contest Help` button and use the index.
Print a Manual:
If you really want to print-out the GenLog general use manual (~60 pages), select Contents. Single-click each Book Menu and select Print.
Simplified rules for more than 400 contests/activities are available in the `Contests` HELP file [contests.hlp]. Print the contest of interest.
Printer Font:
For more flexibility when using Laser and Ink Jet printers, you can select either 10 or 12 point font for print-outs. Font type is always {Courier New} to print using a fixed font width in columns.
Program exit:
The screen position is saved when exiting and the .ini file is updated. Exit by either using the File, Exit menu, by clicking the KM icon, or using the Windows upper left corner double click. Using the upper right corner <X> click will save the current window position for GenLog. The same applies to save the setup screen position.
Pull-down menus:
Some menu items are only enabled or visible when their function is related to the loaded contest. If a menu item is not available when a contest is first started, make a few contacts, then re-load the log file to reset it.
Q-Rate:
The number of QSOs worked in the current hour is displayed in the Q-Rate label, just below the [QSO UTC Date] box.
QRZ.com callsign lookup:
To lookup a callsign in the QRZ database:
1. Click a QSO in the log and do right-mouse click.
2. Or - <Enter> `!callsign` into the callsign field.
3. Or - <Enter> `QRZcall` into the callsign field, where call is the lookup callsign.
4. Click a QSO in the log - then <Enter> `QRZ` in the callsign field.
As of early 2025 WSJT has QRZ.com, hamqth.com and qrzcq.com lookup by right-clicking the 3 buttons below the DX Call and DX Grids buttons.
Another QRZ.com lookup for US state edits:
To tally the number of states worked, use the Log Edit US states to imported WSJT log menus, which works on any General log.
When you click the menu, the software loops thru your log. QRZ.com opens using your default browser if:
1) the state field in the log is blank.
2) the station`s QTH is the USA.
If 1 and 2, then an input box appears in the upper-left corner of your monitor. Shrink or move the browser window to the right if it is not visible. Enter the 2-character State into the input box. At the end of the editing loop, or when you <Enter> nothing into the input box, the log file is saved and the log window is updated. Use the [SS] or [SM] keyboard shortcuts to see the US map.
QSLs confirmed:
With the on-line QSL servers available, this is probably no longer useful, but in a general log (option 09), you can still keep track of QSLs received.
QTH dependent values:
Read about changing your QTH dependent values.
Rotator control software:
The PstRotator application software uses the typed in callsign to calculate the azimuth and sends beam heading data to your rotator. This requires no setup in GenLog.
Roving ?
See how to submit a ROVER log in a VHF/UHF Sprint, for example.
Scoring contests:
GenLog will handle about 98% of the scoring requirements for more than 400 contests and activities supported. Special functions are used to score many contests that simply could not be accommodated by user configured files or external .ini data. So, you will find that most contests are scored automatically and correctly. Only a few contests require some user editing or external calculations. These are relatively light participation contests, so this is not a problem.
For examples, the CCCC PSK and Anatolian PSK31/RTTY contests have rather complicated multiplier requirements: Multipliers are DXCC countries, plus each call area of W(0-9), VE(0-9), JA(0-9), VK(0-9) and TA(0-9). The first W, VE, JA, VK and TA count as two multipliers, one for the DXCC country and one for the call area, on each band. GenLog automatically and accurately scores these contests.
Score text format:
If the PC`s system `number format` is set to use a period separator (###.###) instead of a comma (###,###), the score text may not be displayed correctly. Use the View menu to change the format - "Score format ######". Re-load your log to see the change.
Screen colors:
You can select a grayed out logging screen or the colored screen, and select the bright or lite color schemes. Users have requested this feature to reduce eye strain in long contests. The output windows can also be changed from white to grey if you desire. Use the View Screen Colors menu to select your color options. In General logs CN=06, double-clicking the log window toggles the back-color white to green.
Screen size:
Sorry, I cannot use the third party re-size control in GenLog like I do with my other loggers/software. GenLog sets up lots of different input fields and label sizes (and positions left/right & up/down) for each different contest, the re-sizing control does not work in this situation. Some secondary screens are resizable, like the grid maps, setup form etc.
Make the logging screen larger:
Options:
1) In newer PCs you can right-mouse click on the desktop, select `Screen Resolution`, `Make text and other items larger or smaller`. Select 1 size larger. However, this changes the size of desktop icons and program screens.
I use #1 and it works good, since all your other apps can be re-sized smaller as needed using the standard Windows lower-right-corner drag.
2) You can run the logger in a lower resolution, larger-screen mode by changing the properties of the executable. I would close all other software when I do this. In MyComputer, find GenLog326.exe in the c:\genlog32 folder. Right-mouse click on GenLog326.exe and select Properties and the Compatibility Tab. Select `Run in 640 X 480 screen resolution`. Apply. When you run the logger, it changes the screen resolution to 640 X 480. When you exit the logger, the video resolution returns to normal. But, depending on your video interface, the logger might be bigger than the screen.
3) Using the standard video resolution change option works well. Right-mouse click on the desktop and select Screen Resolution. Select 1280 x 720 for example.
States Worked Map:
In the general logging [option 09], State QSO parties and some contests where States/Sections are multipliers (ARRL SS, ARRL 160, ARRL 10m, ARRL FD, etc.), you can display the US map with states worked highlighted in black. This map screen is printable. Use the View, States Map menu or shortcuts [SM] or [SS] to show this map. In PAQP, the map displays PA if counties in EPA or WPA were worked.
When working in your `own state` QSO party and you select the States Worked map, you are asked if you worked your own state.
SWL:
SWLs can log in any contest. Just set the 599 check-box to Off, set TX Exchanges RST to 000 and member numbers to 0 etc. Serial numbers can remain as is. Type in the received RST if required. Write the Cabrillo file, change the category to SWL, submit your log and let the sponsor score your log.
Tab Key use:
Since you need a way to move around without using the mouse, the <Tab> key is only used to move between the different inputs quickly.
As mentioned before, only the <Enter> and <Space> keys can be used to accept data and move to the next field. ex: Typing a callsign - then tabbing over to enter the next input will cause unknown results - no dupe checking and probably bad data conversions in contests that have special functions.
Tool Tips:
Some labels and check boxes have `Tool Tips` that appear when the mouse cursor is positioned on the label or control. These are simple `help` messages about that item. On check boxes, the message changes to show the function of the control.
Writing files:
Rather than having just a paper print-out, you can write files to disk - then you can edit the files and use them for electronic submissions. Some File write selections are under the Log menu. VB ran out of main screen menu space, so I had to put some file write selections under a sub menu Write More Files under the main Log menu. More on writing datafiles.
When you write the Cabrillo, ASCII, dupes, summary, ADIF or multiplier files, GenLog can auto-open that file for view/edit using NotePad or EditPad. Copy either NotePad or EditPad to your logging folder. This is useful since you must verify (and possibly edit) the electronic files that you submit to contest sponsors. Check your submission for correct category, power level etc.
Note:
When you tell the logger to write a file, it overwrites the previous file without prompts. Be aware that files like the Cabrillo file [urCall.log] can reside in different folders on your PC, depending on whether you have other logging software installed. Although GenLog won`t let you name a normal log file as [urCall.log] at the beginning of a contest, make sure you don`t rename a normal log file or do {Save As} using [urCall.log] as the filename when editing in NotePad. If you do, when you write a Cabrillo file, the contest log file will be overwritten.
To view files in Microsoft`s Explorer, you need to uncheck the {Hide filename extensions} option so you can see the complete filename. Unless you do this, it is easy to get the files confused, since there can be 5-6 files starting with `urCall` in the same folder. Explorer shows only the filename (no extension) unless you change the options setup.
Some files are:
ADIF - logfile.adi
ASCII log - logfile.log
ASCII log - urCall.log
Back-up - logfile.bak
Back-up - logfile.bu1
Cabrillo most contests - urCall.log
Cabrillo others - urCall.cbr
Clean Sweep - clean_sweep.txt
CQ zones totals - cq_zones.ttl
CW keyer ini - filename.kyr
Dupes file - urCall.txt
DXCC totals - dxcc_lst.ttl
EDI - urCall.log
Grid totals - grid_lst.ttl
ITU zones totals - zone_lst.ttl
Multi/Bonus - contestname.ini
Multiplier - urCall.mlt
Summary - urCall.sum
WSJT Contests
Contests supported:
FT8 DX Contest
FT8 Roundup
In the WSJT Advanced tab, select the [Special Operating activity:] check-box and the appropriate exchange for that contest.
To log WSJT QSOs in other contests:
Copy the DX Call from WSJT and paste it into GenLog, hit Enter and enter the remaining exchange(s).
If the contest can be selected in WSJT`s Advanced Tab, WSJT will write a log. The log window is displayed - you can get the State/Section/Province if needed from that log window. From that log, WSJT will write a Cabrillo log, using File, Export Cabrillo log...
WSJT-X contests duping
To fill in QSO data from the wsjtx.log file:
First, the WSJT options must be setup in GenLog.

Select the checkbox to show the Log Import WSJT Log menu. Fill in the path to the WSJT log file and the WSJT log filename. The path and filename can be found by using the WSJT File Open log directory menu. Copy/paste the directory path and filename into the appropriate fields.
Use the Log Import WSJT Log menus to show the log form.
A pop-up error regarding RST, Class, etc. means a QSO loaded into the WSJT Contest QSOs log is invalid. If a pop-up occurs, use the decoded data or the WSJT Log to manually input the exchange data.
All QSOs for the current month and year are listed. After saving the QSO in WSJT, refresh GenLog`s WSJT log window. Click a QSO to pre-fill the GenLog logging screen. The callsign field is active, continue logging by hitting <Enter> or <Space>, then enter the other fields as needed. Log the QSO.
The State/Section/Province can be taken if needed from the WSJT log that pops-up when you select the "Special Operating activity:" check-box in the Advanced tab.
Member and Location numbers
Your member number is used to setup GenLog for the contest being run, and is written to the Cabrillo submissions log. These numbers are stored in data files like:
MyARCI_MemNum.dat
MyAZQP_MemNum.dat
MyFlyingPigs_MemNum.dat
MySKCC_MemNum.dat
If you do not have a member number, the file is either saved as `none` or left blank. This sets up GenLog for the correct TX exchange data. Your local log (and Cabrillo log) will also be formatted based on member or non-member status. If you don`t have a number, then you join a group, enter your # at contest startup, if prompted. If not prompted, you can always delete the MemNum datafile and enter your # at the prompt, so GenLog will be setup correctly.
Other member or QTH related numbers are stored in the main startup Ini file {GenLog_Control.Ini}. You can either make the entry blank or edit your number into the field. Close GenLog, do the edit and save the Ini file.
Example entries:
[My UKSMG number]
-
[My 10-10 number]
10-10:
[My 070 Club number]
[My AGB number]
AGB:
[My QCWA Chapter number]
[CIS QPSK63 DXDA number]
etc.
Hint:
In MyComputer/Explorer, you may need to change the option that shows file extensions - so you can see the file extensions .dat, .ini etc. You do this in XP MyComputer for example by doing Tools, Folder Options, View tab, and uncheck the Hide extensions for known file types. Click Apply and OK.
WSJT-X duping
Duping, new calls, new DXCC etc when using WSJT-X colors to hi-light stations:
The hi-lighted data comes from WSJT-X`s file {wsjtx_log.adi}.
When working contests with WSJT-X, only work dupe stations if they initiate the QSO.
To have WSJT-X hi-light "new" stations, you need to start the contest with a blank {wsjtx_log.adi} file. But, before you delete/erase it - save it to {wsjtx_log-BU.adi} for example. When you are finished with the contest, save {wsjtx_log-BU.adi} back to {wsjtx_log.adi}.
The full-ADIF file is used to show station color status, when working non-contest stations for example.
County Entry form
It would be nice to add County and QSO Party type contest logfiles to a County Hunting log, to update your totals. Since other contests/activities do not have the county name spelled out, you need a way to get around this. The following is an easy way to add selected QSOs to a County Hunting log {Option19}.
First load your County Hunting log. Use the Counties, Add QSO Party Logs pull-down menu. This brings up a window that will allow you copy QSOs from selected logs to your County Hunting log, so the total U.S. counties can be counted accurately. Click a County or QSO Party logfile in the files list-box, or use the arrow key to scroll thru the logs in your logging folder. If that logfile is a `U.S. counties contest`, you can add the QSOs to the County Hunting log.
Click a QSO in the lower log window. The state is found from datafile look-up. Or - type the 2-character state if necessary and hit <Enter>. Then verify the selected county name - or select the county from the list if necessary. Click {OK} to put that QSO in the upper log window. Follow the [Hint] labels in the center of the window.
Click {Save} to save the QSO. Continue adding QSOs as needed. If you make a mistake, click {Clear last QSO} or return to the logging screen without saving that QSO. If you do save the QSO by mistake, return to the logging screen and <Enter> {DL} to delete the last QSO.
After returning to the logging screen, re-load the County Hunting log file to see the updated totals. Use the Edit form to delete any QSOs that do not have the full spelling (or correct spelling), which will cause erroneous totals.
COM ports
USB interfaces, USB to Serial adapters:
The `Other` setup can be used for all interfaces.
1. Select the `Other` port option.
2. Enter the COM port for the interface.
3. Select `USB` from the list (sometimes this works with real COM ports).
4. Get the USB COM port number from the PC`s Device Manager.
CW/PTT uses the RTS/DTR ports for keying. You can reverse DTR and RTS in the setup screen when required. The need to reverse these pins is evident when you key CW.
Some USB to serial adapters may not work properly. Known to work properly are interfaces with the FTDI chips like the VScom USB to serial port adapters.
_ _ _ _ _ _ _ _ _ _
Old computers:
When using a real COM1 thru COM4 port, the upper COM port setup can still be used as it was from day 1, but first try the 'Other` setup as explained above. If needed, the required third party driver software {port95nt.exe} is available here.
PCI or external COM cards:
If you use a PCI slot COM card or an external COM board, select the `Other` option and enter the COM port number and Hex Address. The address must be in the &Hxxx hex format. These boards automatically configure themselves to the next available COM id# and address. With USB support, these boards are probably not needed now.
Checking or changing the interface COM port:
You can view or change the USB adapter`s COM port selection in the PC`s Device Manager.
Start | Settings | Control Panel | System | Hardware | Device Manager
Double-click Ports (Com & LPT). Select the USB Serial Port. Right mouse, Properties. Port settings | Advanced.
COM addresses are:
Address COM Port
&H3F8 COM 1
&H2F8 COM 2
&H3E8 COM 3
&H2E8 COM 4
Address Virtual Port
&H2F0 COM 5
&H3E0 COM 6
&H2E0 COM 7
&H260 COM 8
COM1 example: range 03F8-03FF. The address would be &H3F8 (leading zero value not used).
VHF UHF Contests
GenLog does not support the `Big 4 ARRL` VHF contests.
Use my VHFLOG contest logger.
Use KMRover contest logger for the 4 ARRL contests and several Sprints.
Genlog supports these VHF/UHF contests.
Multiple contests
Since log file access is within the logging program, you can work multiple contests at the same time. You load each contest by just clicking the filename. There is no need to re-start the logger. When I`m logging in a US contest and hear a DX station I want to work, I`ll click the HF log file and work the QSO. Then click the contest log file and go back to contesting.
A new function auto loads a CW keyer setup file associated with the contest loaded.
Of course, you need to start the logs that you want to use - select the contest, give it a filename and <Enter> at least one QSO before loading another file. Moving the older log files to another folder will make this easier. Plus, use filenames that tell you what the contest or activity is: 2k4gen.log co_hunt.log as examples.
Post contest:
A multi-contest effort requires some thought post contest. Although the actual LOG files are different, at the end of the contests, the post contest files that you write will overwrite each other - urCall.log, urCall.sum etc. So, e-mail the file(s) to the sponsor one contest at a time. As with all contests, if you want to save the submission files, rename them after submission.
Accessories forms
Two forms are available that eliminate the use of front panel marks and `post-it` notes when setting up your Linear Amplifier or Antenna Tuner.
Use the Access menu to show the forms. Or - without using the mouse: use the [LI] or [LN] and [ST] keyboard shortcuts to show the forms. You can move them off to the side so you can see the settings during the contest.
Data files search
Many data and text files are provided with GenLog to enable many functions like multiplier and scoring functions, to name a few. It may be helpful to print out counties or sections for example so you can have the list in front of you for reference. Or, open the file in NotePad and <Alt + Tab> between the datafile and the logger. Note: In the [dxcc_pre.dat] datafile, DXCC prefixes that can be confused with States or RAC provinces are tagged with ! after the prefix (examples: OK! LA!).
Note:
Other datafiles are used to find information (name, member number) about the station being worked. For example, GenLog will show you the name and/or member number in many contests that have these fields as part of the exchange. If you want to copy the transmitted exchange and do not want to use the datafile, move the file to another folder. GenLog will just bypass the search function when the file is not found - this does not cause an error.
Note:
You cannot move required files like [all_coun.dat] & [counties.txt] & [DXCC_Exceptions.dat] & [dxcc_pre.dat] - that are required for multiplier and scoring functions.
The latest datafiles are supplied with upgrade versions of the logger. Plus, up-to-date files are also available at:
http://www.qsl.net/w3km. Select `Open this file`, then extract the file(s) you want to the c:\genlog32 folder.
To view the available *.dat and *.txt files in the logging folder, use the File, View datafiles menu.
Multiple field inputs
Some input fields will be used to combine QSO information to make logging simpler and faster. This example shows entering the serial# and a 1or 2-letter Province - for the Helvetia DX Contest.
When 12CS is entered into the `combined input field`, the number is parsed from the alpha characters and separated into 2 fields. Slashes are not used. You can enter the serial as 1, 01 or 001. Try it to see how this works before the contest starts.

See examples of this in the ARRL November SS, Helvetia, NRAU Baltic, CQ-WE, Commonwealth CW and EA-DX Contests.
Note:
Read the Help About this contest help for simplified rules and logging information.
You will notice that <Entering> data into this field after it has been separated, will cause unknown results. Always enter the serial# followed by the exchange into the combined input field. If necessary, clear the field before entering new data.
QSLs
With on-line QSL servers, this is probably not needed, but you can still do this. In a General log (option 09), go to the edit log screen by clicking the [Edit/Change Log] label in the middle of the logging screen. Find the QSO by either scrolling or searching for a callsign. Click the QSO line as you would if doing other edits. <Enter> Y in the QSL RX field. Then you can use the pull-down menu to see/print the confirmed QSOs.
Some users wanted a file or print-out of the QSOs that were a clean sweep. To aide you in QSL-ing or submitting proof of QSOs for awards, you can write the file {clean_sweep.txt}. This file will list all the multiplier QSOs in the order that they were worked.
Multipliers
NEW: See Edit Log file about in-state stations scoring own STATE as a multiplier.
Only the <Enter> and <Space Bar> keys can be used to accept data inputs and move to the next field. Contest specific multiplier sub-routine code is only called when data is entered using the <Enter> or <Space> keys. It just won`t work with the <Tab> key!
Viewing multiplier totals:
In selected contests, click the {Counties} {Depts} {Districts} {Mults} or {Areas} label to display the total multipliers from the datafile. Then use the {Worked} and {To Work} functions to see these totals. This only works per log. If the logger shows 17 multipliers worked, when you click {Worked}, there should be 17 shown. If not, you probably spelled one wrong. By the same logic, the {To Work} number should be the total minus the {Worked} number.
Need a way to count your own country as a multiplier? This example is for the MDXA PSK Contest. Since US stations receive the State from other US stations, a way to count W as a DXCC multiplier is needed. Use GenLog`s QSO editor to change the second QSO with the same state as follows:
DAVE VA 1-40m 1
ALEX CT 2-40m 1 <-- first time CT worked on 40m.
RON F 3-40m 1
ALEX CT/W 4-40m 1 <-- second time CT worked on 40m.
When you change the multiplier, GenLog will re-number the `# new mults` column. Actually, changing the multiplier to anything different will count as a new multiplier.
Keep in mind, when you enter an exchange, you must enter what the other station transmits. GenLog cannot change the spelling of log data! The logger may suggest exchange text based on the contest and the callsign you enter - BUT as always, enter what you receive from the other station.
Note: Remove the multiplier edits in Cabrillo before submission.
More and more contest sponsors do cross-checking of logs, so it is a bad practice to simply accept the logger lookup text. This is why GenLog does not change what you enter - the logger has no way of knowing what the transmitted exchange is! After all, you QSL`d the message - it IS correct in your log - right ?
Electronic Data Interchange
Specific contests and the Region 1 VHF/UHF contest sponsors require the log be submitted in the EDI format.You need to check and edit your EDI log before sending it to the sponsor. Check it for accuracy and edit/add information - like station data and comments.
Notes:
Each time GenLog writes the EDI file, it overwrites the previous version of the same filename.
MAKE_EDI.exe is a stand-alone application that writes EDI log files.
EDI is band specific - a separate EDI file is submitted for each band.
A partial sample EDI file:
[REG1TEST;1]
TName=IARU Region 1, March contest VHF
TDate=19950304;19950305
PCall=OZ1FDJ
PWWLo=JO65FR
PExch=
PAdr1=Herlevgaardsvej 32 A, st. tv., DK-2730 Herlev
PAdr2=
PSect=Multi operator
PBand=144 MHz
PClub=OZ2AGR
RName=Bo Hansen
RCall=OZ1FDJ
RAdr1=Herlevgaardsvej 32 A, st. tv.
RAdr2=
RPoCo=DK-2730
RCity=Herlev
RCoun=DENMARK
RPhon=(+45) 42 91 53 98
RHBBS=OZ6BBS
MOpe1=OZ1FTU
MOpe2=
STXEq=FT-225RD+MRF247
SPowe=90
SRXEq=FT-225RD+MuTek+BF981 1,5 dB NF
SAnte=9 elements OZ5HF
SAntH=14;41
CQSOs=2;1
CQSOP=402
CWWLs=2;0;1
CWWLB=0
CExcs=0;0;1
CExcB=0
CDXCs=2;0;1
CDXCB=0
CToSc=402
CODXC=DL5BBF;JO42LT;396
[Remarks]
Put your comments here - or erase this note.
[QSORecords;3]
950304;1445;OZ9SIG;1;59;001;59;006;;JO65ER;6;;N;N;
950304;1446;DL5BBF;1;54;002;59;023;;JO42LT;396;;N;N;
950304;1523;DL5BBF;2;599;003;599;044;;JO42LT;0;;;;D
See ADIF Export. See ADIF Import.
Also available is the application MAKE_EDI that comes with the GenLog software. It fills in more fields and can be used to save/print your station information.
State QSO Parties
In State QSO Parties where all 50 states are multipliers for in-state stations, in addition to the counties for that state, use the [Edit\Change Log] form to add your state as a multiplier.
The logger decides which end of the QSO your station is, based on the state entered in the setup screen. Normally the county abbreviations are the first 3 or 4 letters of the county, except where duplicates occur. The county input field is length limited, depending on the contest. Looking at the county abbreviations for that contest will indicate the field length.
Mobiles and county line stations:
When moving to a different county (also for county line QSOs), don`t forget to change your 3 or 4-letter county designator in the TX Exchange field - type in the new 3 or 4-letter abbreviation. Otherwise it will be incorrect in your log. You don`t have to go to the initial setup screen to do this. Each county line QSO is logged as a new QSO. After a possible dupe pop-up, to work the QSO, hit [OK] and log the QSO in a different county. Or <Esc> to clear the inputs. I believe the N1MM+ logger supports multi-counties in 1 QSO.
It is important to realize that the logger does not verify the county abbreviations that you enter. I could never keep the counties datafiles up to date for this kind of function to be effective. Hopefully, the station sends the correct county abbreviation spelling. Having the printed list of abbreviations in front of you will reduce the multiplier errors. Use a highlighter to identify those county abbreviations that are not the first few letters. Run the supplied COUNTIES App while logging to help with county names. For the county abbreviations that are not the first few letters, I make a paper note of the call and the whole county name so I can verify them post contest.
Stations operating in a QSO Party that is not their state, can check the county multipliers by using the {Worked} and {To Work} functions. If the logger shows 17 county multipliers, when you click {Worked}, there should be 17 shown. If not, you probably spelled one wrong. By the same reasoning, the {To Work} number should be the total minus the {Worked} number.
Stations operating in a QSO Party that is their state, can select `Counties`, `States`, `St/Prov` and `Prov` from the combo-box on the right to show {Worked} and {To work} for each item. I probably used the ARRL RAC provinces for those look-ups. Hints: If you have a mouse with the selector roller, you can click the combo-box and change the selection with the roller knob. When using the above sorted outputs, use keystroke shortcuts {SC} and {SL} to `show counties` and `show log` respectively.
Stations operating in a contest (except Great Lakes QP for an example) where the QSO party is for their state, you can`t use the {Worked}, {To Work} functions as explained above, since other multipliers are used in addition to counties. The {Worked}, {To Work} functions are only useful to see when you worked all the counties. Note: This function only shows {Worked} and {To Work} per log, not per band (which is correct for Great Lakes QP and a few others).
Sort Log by Date
In the General logging [option 09], County Hunting [19] and SWL [85] modes, you can re-order the QSOs in the log by the date. You may want to do this after merging some files. Contest logs are already in date order, so only the logging modes listed above will activate the Log, Sort Log by Date menu.
Each time you do a date sort, a backup file [logfile.bu2] is saved before the sorting and file re-write takes place. Understand that each time you do a file date sort, the previous backup file is overwritten. So if an error scrambles the file, the next time you date sort it, the backup file becomes a scrambled copy as well.
Know how to use back-up files and how to re-name backup files before working with your logs. Go into Explorer and make your own back-up files and store them where they will be safe.
Rover category
If you want to operate in one of the ARRL `Big 4` or various Sprint contests as a ROVER, use my free KM ROVER software.
GenLog does not directly support the rover category for log submissions. But, when operating in one of the VHF/UHF Sprints, you can enter in the ROVER category very easily.
The following example is for the VHF/UHF Sprints sponsored by the East Tennessee DX Association.
Partial rules:
4.2. Multiplier: The total number of different grid squares worked. Each 2 degrees by 1 degree grid square counts as one multiplier.
4.3. Final score: Multiply QSO points by multipliers. Each Sprint is scored separately.
4.4 Rovers score same, but please segregate logs by grid. Scoring for Rovers is cumulative, total # of grids worked from each grid activated multiplied by total # of stations worked in each grid activated.
Per the rules, the contest sponsor wants the logs separated by grid activated. The multiplier total is the sum of the different grids locators worked in each grid activated. So, using a separate log file for each grid activated and merging them post contest works perfectly.
Basically you operate the contest using a new GenLog file for each grid activated and merge the files by selecting only the QSO lines and doing `Copy` + `Paste` in NotePad, ignoring the headers in all files but the first file (file1).
Important Notes:
Edit your individual logs before merging them. If you edit a grid locator in the merged file (for example), GenLog will renumber the new grids column and your multiplier total will be wrong (reducing the score displayed).
Using a log filename that indicates the grid and band for each location is most helpful. ex: fn20_144june fn21_144june etc.
How to:
Start GenLog and enter your first grid square locator into the setup form. Select the `Generic VHF Sprint` contest. Enter the band when prompted for a band designator. Alternately, your current grid locator can be <Entered> into the `TX Exchange` field while in the logging screen. Log stations as usual until you are ready to move.
After setting up in grid #2, repeat the above sequence for that grid square. And so on till the end of the contest.
Post contest, merge your log files into one file for log submission and to get a total score.
1. Open file1 in NotePad (for example). Do SAVE AS and save the file as a new name - 2k3_144s.log (for example).
2. Open file2. Highlight the QSO data only by dragging the mouse starting at line 3 and going down to the end of the last line. Do <Ctrl> + <C> to copy the QSO data. Now the log data (minus the log header) can be merged into the new file1.
3. Click the mouse at column1 on the next line after the last QSO in file1. Do <Ctrl> + <V> to paste the QSO data. Make sure there aren`t any blank lines below the last QSO line. The cursor should flash in the first column of the line directly below the last QSO, nothing below that. Save file1.
4. Do #2 and #3 with the other file(s) as necessary, saving file1 each time.
When done merging files, file1 will contain all the QSO data from all grids activated. Load file1 into GenLog. The correct score is displayed.
Write the ASCII log output file [ urCall.log ] to be submitted to the contest sponsor.
Write the ASCII summary output file [ urCall.sum ] to be submitted to the contest sponsor. Be sure to edit the summary file header, changing your category to ROVER and adding the locators activated, etc. Re-save the file.
Whew!
Actually it`s simple. Try it on 2 dummy Sprint files like I did.
2003 144 MHz Sprint
04/03/03 W3KM 106
144 PH 04/03/03 1604 W1AW FN20 FN31 1-144 1
144 PH 04/03/03 1605 W3RJW FN20 FN20 2-144 1
144 PH 04/03/03 1607 WA3DRC FN20 FN20 1
144 PH 04/03/03 1700 W1AW FN21 FN31 1-144 1
144 PH 04/03/03 1702 W3RJW FN21 FN20 2-144 1
144 PH 04/03/03 1703 WA3DRC FN21 FN20 1
144 PH 04/03/03 1711 AA2DR FN21 FN30 3-144 1
The above log shows 7 QSOs, 2 grids activated and 5 multipliers total. The first 2 header lines are used by GenLog to setup the logger in the 144 MHz Sprint mode. The `106` on line 2 is the contest number, which is all GenLog needs to know to log in that activity, so you don`t have to make a config file for each contest.
Partial Search
See previous callsigns.
This search function is selectable via the View menu as shown below. Select and check Use partial search. Select whether you want 2 separate window outputs (left window output is from the current log search and right from the search data file). Then, select which data file you want searched.
Hint:
You can just do partial check on your current log, so you can quickly see calls worked as you type. This shows stations that would be dupes if you <Entered> the call. Make a blank data file, or use the [KM-Dummy.dta] file that I supply with my updates.
Users living in northeastern US are welcome to use [KM-VHF-Partials.dta], a VHF/UHF partial search lookup file with 6-digit grids. [KM-VHF-Partials.dta] is created from the [VHF-History.txt] VHF/UHF contest lookup file, which is also geared toward NE US stations, that can be used instead of the older [vhf4K.adi] file.
Both files were originally created for Mt. Airy VHF RC - Pack Rats - club members using my VHFLOG or the N1MM+ logger. The use of the history file is configured using File Options Setup menu.
Note:
If you make/edit your own files, use a different filename, so they don`t get overwritten by GenLog updates.
When this function is turned on, the search will start when 2 or more characters are typed into the CallSign field. The current log is searched first, followed by the search datafile that you select. As more characters are entered, the list of possible callsigns is reduced. Any part of callsign can be entered.
Clicking a callsign in the right partials window will insert it into the callsign field. In selected contests w/grid squares, clicking the right hand window inserts the callsign and the grid locator into the appropriate fields. See below to add grid locators to your partial search datafiles.
Making search datafiles:
A logfile compiler application [ GenSort ] is supplied with GenLog, and is used to generate your own callsign look-up datafiles. The file is a simple ASCII text file with one callsign per line.
The list of GenLog *.log filenames are displayed in the files window. Select one or more files, then select {OK} to compile. Alpha sort the file if you wish. Do `Save As` and save the compiled file {gencalls.dat} to a {filename.dta} file. These files must have a .dta extension. When saving these files, use filenames that indicate which contest they might be used for. Ex: pacc_master.dta wwdx_mas.dta vhf_partial.dta
If you would like WWL (grid square) data included in your search data files, click the 4/6-digit function. When this option is checked, the grid locator in taken from selected log files that have grid locators as the exchange. After merging the log file(s), you can view the records with grid square data. When merging multiple files, click the most recent log file first - the grid square will be as up-to-date as possible.
Contest log files that the grid locator can be taken from are:
2GHz+ WW Microwave Contest
2-4-6 Meters
ARRL 10-GHz+ Cumulative Contest
ARRL Sprints
CQ World-Wide VHF Contest
DDFM 50-MHz Contest
Fall VHF Sprints
FM Simplex Challenge
Generic 6-Digit Contest
Generic Microwave Sprint
IARU R1 VHF/UHF Contest
Lario Six Meter Contest
Millennial Microwave Contest
RMG Cumulative Contest
Six Club 6-Meter Sprints
SMIRK 6-Meter QSO Party
Spring VHF Sprints
Stew Perry TopBand Challenge
TOEC World-Wide Grid Contest
Weak Signal Actvity Weekend
WSJT Winter Rally
WW Locator DX Contest
Previous callsigns:
Enter `PC` (previous callsigns) in the callsign field to display the last 5 calls typed in. Clicking a callsign line puts it in the callsign field.
Although not part of the `partial search`, the `previous calls` function displays the last 5 callsigns typed into the callsign field. It is another layer added to the `last` callsign function. Entering `L` always recalls the last callsign.
This is very useful when you clear the callsign field by mistake while sending CW - for example. Although the `last` callsign is now remembered with `PC` even if it is not <Entered> and duped.
Modes
Please use PH as the voice mode designator for contesting. The Cabrillo file template has a 2-letter field for the mode, so SSB is not a Cabrillo file mode. Since many contest sponsors are using the Cabrillo format (and more will in the future), users should get in the habit of using PH instead of SSB. In many contests, the points value may be set to zero when SSB is selected, as a reminder.
Select RTTY or PSK for digital modes. CW is CW.
Most Contest sponsors use `RY` for the Cabrillo digital mode designator. Using `RY` for all digital QSOs allows duping by the 3 modes (PH, CW and RY). GenLog converts RTY, PSK and DIG modes to RY in Cabrillo for most contests. GenLog`s mode field is set to 3-characters, so full text modes like JT65, RTTY and PSK31 cannot be used, so do not use them when manually editing log files.
For special case contests, not used in most contests:
Some contests use non-Cabrillo specified modes and they either don`t fit in GenLog`s 3-letter field or there isn`t a Cabrillo specified mode yet. In the MDXA PSK Death Match Contest you can use PSK31 and PSK63 modes. In GenLog these modes are tagged as P31 and P63, which correspond to 31 and 63 in the Cabrillo file 2-letter field. These modes are available either by using the {Mode} pull-down combo box or by <Entering> the shortcut into the `callsign field`. Ex: PK, PS, P31 and P63. Mode SAT (Satellite) is ST in the Cabrillo file.
WSJT modes:
The mode pull-down combo-list allows selecting WSJT digital modes, which will make ADIF modes more accurate. The ARRL now uses "DG" for all-non RTTY QSOs in Cabrillo- converted in the Cabrillo write function.
When writing an ADIF for upload to on-line QSL services that do mode matching, these modes are useful.
MSK = MSK144 = &
JT4 = JT4 = $
JT6 = JT65 = #
JT9 = JT9 = @
FT2 = FT2 = *
FT4 = FT4 = +
FT8 = FT8 = ~
Q65 = Q65 = :
Windows shortcuts
Do not drag applications .EXEs from Explorer to the desktop to make shortcuts. The program will use the desktop as the startup folder (which will not work). Do right-mouse click on the .exe filename and select `Create shortcut`. Drag that shortcut to the desktop. Check the shortcut`s `Start in:` folder by doing right-mouse on the shortcut and selecting `Properties`. The `Start in:` folder is always the folder where the application .EXE resides.
Desktop shortcuts:
Right mouse on a blank space on the desktop.
Select `New`. Select `Shortcut`.
Browse to the logging folder. Select GenLog.exe
Change the title of the shortcut. Finish.
If you make a logging folder for the desktop, you can drag all the logging shortcuts into that folder to unclutter your desktop.
Program Menu shortcuts:
Go thru the `Start` menu.
Start | Settings | Taskbar & Start Menu
Select the Start Menu Programs Tab.
Select Advanced.
Use the Explorer file system to locate where you want to put the shortcut. If you want it in the Programs Menu, then select the Programs folder, highlighting it.
Select File | New | Shortcut. Then browse and continue making the shortcut as above.
Merging Log files
You can combine selected contest LOG files to get the States/Grids worked per band. Use the Log Merge Files menu and merge log files into existing General logging files [option 09].
For example, to merge an ARRL 160m Contest log into a new General Log:
Start a General Log and enter a dummy QSO. After you have one QSO in the log, re-load the log file to activate the Pull-down menus. Select Merge Files from the Log menu. Select the ARRL 160 Contest from the left window. Then single-click the ARRL 160m contest file from the right window. The 160m log is merged into the General log file. Re-load the General log file to see the added QSOs. Delete the first QSO in the [Edit/Change Log] screen. If you already have a General log file, just follow the merging procedure above.
See ADIF import. For WSJT-X QSO imports, read the next section.
See ADIF export to QSL services.
WSJT-X logs:
You can load QSOs from the WSJT-X log file directly in real-time into General [09] logging logs only.
So start with a loaded General log or start a new General log.
WSJT selected contests are supported as well.
To log WSJT-X QSOs in other contests:
Copy the DX Call from WSJT and paste it into GenLog, hit Enter and enter the remaining exchange(s).
WSJT contest duping
Use the File Options setup menus to configure this function.
Double-click the [Ex: path ...] label to try the inserted path and log file name.
Select the checkbox to show the Log Import WSJT Log menu on the main logging screen and check the Auto open WSJT log form.
Now, check if the path and log file are OK, by clicking [Done].
If an error pops-up, clear the 2 fields and fill in the path to the WSJT log file and the WSJT log filename yourself.
The path and filename can be found by using the WSJT File Open log directory menu. Click in the Path box in file manager and the path will change to a standard Windows directory path. Copy/paste the directory path and filename into the appropriate fields.
Start a General log. Use the Log Import WSJT Log menus to show the log form. Dragging the lower-right corner of the windows changes the font-size as well as the size of the window. Upper-right X saves everything.
The Stats menu is mainly for my own use. Most of the routines are using the grid for sorting and counting. If your log is missing the grid, the routine will stop. The data used in the different stats outputs comes from the current GenLog file, not the WSJT log. This is why I have a GenLog log file for each band.
All QSOs in the log are displayed by default, so you can import past QSOs. Selecting the check-box displays a shorter list for the current date and minus 1 day (for contesting). Click a QSO, then click the [Log QSO] button to log the QSO - double-click works as well. Importing QSOs that are exactly the same will throw a pop-up to that effect.

Check the [Current dates] checkbox when you work lots of WSJT QSOs. This log window refresh can slow down - like it did on my PC when I had 15,000 QSOs. Now I am up to 48,000 QSOs and keep the [Current dates] selected.
Keyboard shortcuts:
<Esc> refreshes the log window and selects the last QSO.
<Alt+Q> logs the selected QSO, like in WSJT.
Instead of using the Log Edit US states to imported WSJT log menus to loop thru the log and open your browser as explained below you can use a web search to find the station`s state. Enter the state into GenLog`s State/DX exchange field before you import the QSO. When you call a station, !Call is entered into GenLog`s Callsign field. !Call is the keyboard shortcut for QRZ.com look-up. If you have a state entered in the State field and you are not importing a US State QSO, that field is erased before the QSO is stored.
If you use the Log Edit US states to imported WSJT log menus to edit US states into the log, USA will not be counted and will not show in the [dxcc_lst.ttl] file. Edit the first US state out of your log, then run the DXCC totals file.
The QSO load procedure puts the WSJT-X mode characters in General log files.
& = MSK144
$ = JT4
@ = JT9
# = JT65
* = FT2
+ = FT4
~ = FT8
` = FST4
: = Q65
The Stats menu provides a QSO summary for the 6 continents and the US, plus QSOs per month for the current year, etc. A text file opens after the GenLog log data is processed.
Right-mouse on the num QSOs box displays a 3 selection menu.
Needed Grids (and new callsigns):
WSJT-X has this feature, but I wanted an alert window that popped.
To help identify grids not worked, in the WSJT-X log window use the `Needed grids` menu to display the Needed grids window. Just after WSJT does a decode, it writes the decoded QSOs to the {ALL.txt} file. Shortly after that, GenLog reads the {ALL.txt} file and compares the "CQ" and "QRZ" decodes to the QSOs in the loaded GenLog log, then displays the `new grid` decodes. And, when a station answers your CQ in the standard `urCall hisCall grid` format, that also triggers the grid comparison. This function (in FT8) is triggered at 15 second intervals. The last few 1 minute sequences are used to keep the list current.
RR73 hint:
To send RR73 in Tx4, double-click the radio button to change to RR73. This saves a sequence. After sending RR73 or 73, you must keep [Enable Tx] selected to continue the auto sequence in case a station needs a repeat - or to start a CQ.
WSJT-X Setup Hints:
1. In contests, select the [Special operating activity:] checkbox and the appropriate radio button in the Advanced section for specific activites. Make configuration files for contests, with the [Special operating activity:] selected. Use standard configuration files for non-contesting. See #8.
2. To reduce NILs, it is a good practice to log QSOs when you receive or send RRR, RR73 or 73.
3. Don't call stations on their frequency. If others are doing this as well, interference can prevent decoding. Check the [Hold Tx Freq] box and TX on a clear spot.
4. Set the Receiver AGC Off or Fast and turn OFF Mic compression (no ALC indicated). A good AGC test is - when the band is crowded and there are several strong stations (stronger than 5dB) - you should decode signals weaker than -20dB.
5. WSJT-X can be considered as a 100% duty cycle mode, so it is best to reduce your TX power a few dB from maximum to prevent transmitter/amplifier failure due to over-heating. Set the transceiver carrier/power level control to maximum. Now use the WSJT Pwr level slider and your audio interface level set and the transceiver Mic gain control to achieve the appropriate power output.
6. Do not set the computer`s sound card output at maximum. Keep it set to 1/2 to 3/4 of maximum. Adjust WSJT Pwr and your audio interface level and Mic gain as needed.
7. Keep your PC clock set to the correct time - use the free Dimension 4 software to auto update.
8. When using VHF/UHF transverters, you can save a configuration for each band. Then `Switch To` that configuration and all settings will be loaded, including Mode, [Special operating activity:], CAT setup, audio levels, sound card audio settings, non-CAT PTT, frequency used, Transverter offsets, color highlighting for duping, etc. Saving a configuration for contests is also useful.
Search the log:
Search the log for a call by right-clicking in the log window, then input the call sign (or a few characters). If that call or partial is found, it is hi-lighted. The [ Refresh ] button changes to [ Next call ] and is active, so hitting <Enter> is the same as mouse-clicking it. The log is searched for the next instance of that call or partial. Hit `S` to do the same search again.
QRZ.com lookup and log edits for US states.
To tally the number of states worked, use the Log Edit US states to imported WSJT log menus.
When you click the menu, the software loops thru your log. QRZ.com opens using your default browser if:
1) the state field in the log is blank.
2) the station`s QTH is the USA.
If 1 and 2, then an input box appears in the upper-left corner of your monitor. Shrink or move the browser window to the right if it is not visible. Enter the 2-character State into the input box. At the end of the editing loop, or when you <Enter> nothing into the input box, the log file is saved and the log window is updated. Use the [SS] or [SM] keyboard shortcuts to see the US map.
Writing a partial ADIF - for daily uploads for example:
To write a partial ADIF, use the Log Import/Write More Files menus. Click the Write partial ADIF=No menu to toggle it to Write partial ADIF=Yes. When you write an ADIF you are prompted to enter the callsign of the QSO previous to the write procedure. You can click the last QSO uploaded instead of inputting a callsign - the date and time gives you a hint. Hit <Enter> to write the entire file as normal, <Cancel> cancels the procedure.
WSJT files back-up:
Back up your wsjtx.log and wsjtx_log.adi files, so you won't lose them if your PC/HD fails. A simple Batch file example is here. Read this text for information about batch files.
Support files
*.ADI - ADIF format log import/export file.
*.DAT - multiplier and data files.
*.DTA - partial call search master data files.
*.LOG - your contest log files.
*.KYR - CW configuration files.
*.MAP - grid map data files for grid printouts, optional.
*.TTL - totals files for DXCC, Grids, CQ zones and ITU zones.
*.TXT - multiplier and information files.
*.WAV - DVK message wave files, optional.
URCALL.log - Cabrillo (or EDI) file for log submission.
URCALL.sum - summary file.
URCALL.txt - dupes file.
URCALL.mlt - multiplier file.
CLEAN_SWEEP.txt - clean sweep file.
CONTEST_NAME.ini - Bonus/Multiplier initialization files.
Deploy.log & Deploy2.log - new installation logs used for uninstalling the application.
GenLog_Control.ini - Ini file of options and setup.
GNAME.dat - This personal data file is required for all printouts/functions.
dxcc_pre.dat - DXCC lookup file - my "CTY" file from the 80`s.
DXCC_Exceptions.dat - this file is searched before the dxcc_pre.dat file.
LOGSORT.dat - `good calls` with grid/bands data file from your LOG files, optional.
ST6UNST.log - Old, not used - Windows installation log, for uninstalling the application. These can be deleted.
SYLLABLS.ini - list of syllables and partial or full calls used with the DVK, optional.
vhf4k.adi - Callsign & 6-digit grid data file - specific format ADIF.
VHF-History.txt - Callsign & 6-digit grid data file - specific format text file.
Mouse usage
The mouse is not needed for normal logging functions. <Esc> <Tab> <Enter> and <Space> are used.
Windows double-click functions are used where applicable. In selected countests, double clicking a QSO line will produce different data display results. ie: In Great Lakes QP, double-clicking a QSO line where a GLQP station was worked will display the counties for that state. Double-clicking the [DXCC] label in selected contests allows you to search for anything in the [dxcc_pre.dat] data file.
Moving the mouse during CW TX can cause the CW speed to slow down as Windows completes the mouse move procedure.
Many functions are initiated by clicking the identifying label,  and
and  for examples.
IO support
Keying CW/PTT via the USB port works with a USB to COM adapter.
When using a standard COM port, selecting a COM port in the USB setup works fine.
If using real COM1 thru COM4 ports setup or an internal PCI COM card or an external COM card - CW and PTT support uses a third-party 32-bit driver. If needed, download and install the driver software [port95nt.exe] from:
http://download.win-test.com/port95nt.exe
UTC Time
Set the PC`s time and date before logging !
The PC`s system clock setup is used to set the UTC offset, so the PC`s system clock can remain in local time. Make sure the UTC offset is correct and click on the [UTC offset] label in the setup form to change it. If the UTC offset is different than what your PC system clock reports, you are prompted to address this issue. Clicking {Cancel} allows your offset to be used. Users in parts of Canada can set the offset in 0.5 hour increments if necessary.
The date format is normally mm/dd/yy. Change it in the setup screen if you have your computer system time set for the format dd/mm/yy.
It is very important to have your PC system clock set properly, especially when using WSJT. A good application to automatically set your PC clock is Dimension4. Set the time update option for frequent updates. The frequency of updates depends on how good you PC`s clock it. This is indicated by WSJT decoded DT >1-2 seconds.
Standard Time/Daylight Saving Time changes:
When your local time changes twice a year and you are logging, the UTC offset will not change. The selected and/or loaded UTC offset at program start will be wrong when your local time changes. For now, you must exit the logger and re-start the program to update the UTC offset. If you made QSOs right after the hour change before re-starting the logger, you might need to adjust the time in your log for those QSOs.
Screen flicker:
The screen may flicker at each second update on some new video monitors. Double-click the UTC time display to change the format to hh:mm.
Set the wrong UTC offset?
Use the application Gen_Time.exe to add or subtract X hours from all the times in your log. Sorry, no minutes adjustment! And the dates are not changed. You must verify these and edit as necessary in NotePad.
Make sure you don`t reset the UTC offset mid-contest without first adjusting the QSO hour times in the log file, using Gen_Time. Make the adjustment to the log first. Re-run GenLog, set the correct UTC offset and re-load your log. Continue logging.
ADIF file export
GenLog exports the ADIF file, for import into other loggers or for uploads to QSL servers. Use the Log Write/Export ADIF menus. The data exported depends on which contest it is, but the pertinent data is exported in all cases. The exported file can be imported into a program that can make use of it - QSLing software, etc. GenLog will only import these files into a General log [option 09], County Hunting log [option 19] or US Prefix Awards log [option 225].
Files are written by default to the GenLog folder. To write all ADIF files to a different folder (for eQSL uploads for example), first create your ADIF folder - a sub-folder of the GenLog folder will be easiest to find. After that, use the File Open Options setup menus. Click the `Path to ADIF writes` box, a path dialog form opens. Select from the folder tree using double-click to move to the folder of interest. Use [Done] when finished.
In General logging, to write a partial ADIF - for daily uploads for example - use the Log Import/Write More Files menus. Click the Write partial ADIF=No menu to toggle it to Write partial ADIF=Yes. When you write an ADIF you are prompted to enter the callsign of the QSO previous to the write procedure. Hitting <Enter> at this prompt will write the entire file as normal.
Instead of entering the last callsign of the previous ADIF write, you can click that QSO in the log, then select write ADIF. The last QSO written is saved in the {GenLog_Control.ini} file.
File example:
ADIF Export from Gen Log v8.27
Log for station: W3KM
Operator: W3KM
Contest: 2001 432 Sprint
ASCII Log Source: 432_spr.log
Export date: 07-30-2001
Records exported: 21
<eoh>
<call:5>K1TEO <qso_date:8:d>20010425 <time_on:4>2300 <freq:3>432 <mode:3>SSB <gridsquare:4>FN31 <eor>
<call:5>K2MLB <qso_date:8:d>20010425 <time_on:4>2301 <freq:3>432 <mode:3>SSB <gridsquare:4>FN20 <eor>
<call:6>K1DS/R <qso_date:8:d>20010425 <time_on:4>2304 <freq:3>432 <mode:3>SSB <gridsquare:4>FN20 <eor>
<call:5>K2SMN <qso_date:8:d>20010425 <time_on:4>2307 <freq:3>432 <mode:3>SSB <gridsquare:4>FN20 <eor>
See ADIF Import. See EDI format.
ADIF file import
Not recommended for WSJT QSO import. Read WSJT-X logs.
Use the Log, Import ADIF file menu to load an ADIF file into an existing GenLog log file. This merge function only works with the General Log {option 09}, County Hunting {option 19} and US Prefix Awards {option 225} logs. It is turned off in others.
Load one of the log files mentioned above or make a new one by selecting the appropriate contest name option from the contests menu, then name a new filename. After that, you can import the ADIF file. Click the new filename in the file list-box to see the imported log. To edit some QSOs, use NotePad.
You can also import an eQSL.cc ADIF file that you downloaded from your eQSL inbox. GenLog determines that the ADIF file is an eQSL file, but you are also asked if the file is an eQSL file. Since the eQSL file is comprised of the `other stations` log data, answering `Yes` swaps 2 fields - the Sent_RST goes into your GenLog file in the Rcvd_RST field and the QSL_Sent `Y` goes into the QSL_Rcvd field. Unfortunately, most eQSL inbox ADIF files do not contain all the QSO data.
See ADIF Export.
Also see Merge Log files.
Deleting Files
As with any applications software, it is best to delete files from within a file manager, MS Explorer for example. You would not be able to restore files if you deleted files from within GenLog.
Empty *.log files (with 0-bytes) are automatically deleted from the logging folder. Back-up files with .bu1 and .bak extensions can be deleted when you are done with that contest. Since the files urCall.log, urCall.mlt and urCall.sum are overwritten each time you write them, you don`t have to delete them if you don`t want to.
Other empty 0-byte files:
When the logger tries to open a required data file that is not in the logging folder, a 0-byte file is initialized. Text (*.txt) and data (*.dat) files with 0-bytes should be replaced with good files, otherwise some functions of the logger may not work properly. Files used in most contests are the DXCC prefix file [ DXCC_pre.dat ] and the DXCC exceptions file [ DXCC_Exceptions.dat]. These files must reside in the logging folder.
Viewing the complete filenames (with extensions) in Explorer:
Start | Programs | Windows Explorer. View | Folder Options | View Tab. Uncheck the `Hide file extensions` box. Click Apply and OK. This will allow you to view filenames and their extensions. Now find the GenLog folder and delete the file(s). These files (and others deleted within Explorer) can be restored by going to the Recycle Bin, clicking the file and doing either the Undo or the Restore function.
DXCC data file
DXCC tracking.
Callsign exceptions.
See the Callsign lookup Apps in the Applications software section.
The data file [ dxcc_pre.dat ] must reside in the logging folder! This datafile is a simple ASCII text file, but the format and the order are very specific. When the  label is visible, clicking it will show the DXCC data file [dxcc_pre.dat].
At callsign input, the DXCC prefix and country name are displayed for most contests. Always enter what the station transmits. For ex: working EW6AB displays DXCC prefix EU, but EW6AB sends EW6 for his DXCC QTH exchange. Log it as sent. However, GenLog counts the unique QTHs in this field, so EW6 is counted. If you work another Belarus station later and he sends EU, EU will could be counted as well. Your claimed score does not affect your log submission, the sponsor re-scores all logs - sometimes based on logs submitted. You can always re-count your multipliers and change your claimed score in the Cabrillo header.
Simple text search:
Double clicking the label will display an input box. Enter a prefix or partial of anything in the file, to view that line. As an example, entering `Hon` displays: HQ.HR[Honduras]<NA>11 HR
This is only a simple string matching lookup like `Search` in NotePad and serves no other purpose. The string that matches what you enter is returned. Entering P3 will return the first instance of P3 --> KP3. T9 returns CT9, etc.
After a matching string is found, right-mouse click inside the window to find the next instance. The window returns to the log view when no other matches are found.
To lookup an actual callsign, enter 3 or more characters into the callsign field and see what country is displayed. Note: You must be in a contest setup that uses DXCC prefixes for this to work. Or - you can run PREFIXES.exe while logging and <Alt> + <Tab> between them.
In selected contests, when this label is not tagged as DXCC  or
or  but still visible, double clicking the label will display an input box that still allows you search the [dxcc_pre.dat] file for prefixes.
DXCC prefixes that can be confused with States or RAC provinces like PA, ON, HI, LA etc are followed by ! in this file. These prefixes will appear in the log the same way. When GenLog manipulates the log data, these countries will not be sorted or counted as states/provinces.
[ dxcc_pre.dat ] file format:
The file is arranged in a specific format - in an order required by the GenLog`s search routines - as well as other applications software.
DXCC Exceptions:
Used in conjunction with the DXCC prefix file is a second datafile that contains the exceptions callsigns. [DXCC_Exceptions.dat] is searched before the main DXCC prefix file.
The [dxcc_pre.dat] file is formatted with prefixes up to 4 characters - which is the maximum character length of DXCC country identifiers. The exceptions file allows full callsigns to be added, and is a way for GenLog to tag callsigns of stations living in countries other than their `Home` DXCC country. The FCC allows U.S. stations to apply for DX callsigns - NP2CB, KG6K and KH6QAI just to name a few. The contest sponsor will hopefully have an updated DXCC lookup file when judging logs - and they will change your score anyway.
As in the main DXCC prefix file, the exceptions file is format specific - GenLog use 2 fields. 1). The left-most data is the callsign, followed by at least 1 <Space> - not <Tabs>. 2). The data field at the end of each row is the DXCC country identifier - fielded for 4 characters as shown below. Example: the 4 character U.S. identifier would be 3 <Spaces> followed by W. VP2E is already 4 characters.
4U1WB [USA]<NA>08 W
KH6QAI [USA]<NA>06 W
VP8/MM0TJR/P [Antarctica]<SA>74 CE9
I periodically update this file, but you can add callsigns as necessary using copy/paste/edit from a similar callsign line. Or - take the country, continent, zone and prefix information from the [dxcc_pre.dat] file.
Also - as in the main DXCC prefix file - DXCC prefixes that can be confused with States or RAC provinces like PA, ON, HI, LA etc are followed by ! in this file.
OH0JJS/1 [Finland]<EU>18 OH!
To maintain this format, copy the appropriate line from the [ dxcc_pre.dat ] file and edit it when adding exceptions to the file.
Add as many exceptions to the file as you wish. If you work a station that is in a different DXCC country than listed in the [dxcc_pre.dat] file, then add that call to the Exceptions file.
Check the format by entering the exception callsign into a contest that uses DXCC prefixes. The <Space> after the callsign forces the search to be exactly what is entered in the callsign field. The search function adds a space to the callsign before searching for a match. Without the <Space> delimiter, the search function would find KH6QA in the exceptions callsign KH6QAI - for example.
CW Options
See the COM port setup.
CW interfaces topic
F-Key setup topic
Burst speed
An easy way to put an F-Key cheat sheet in front of you is to shrink the CW setup window and move it to the side.
Use the Auto Keyer file setup to load the CW keyer file that is related to the contest name. This also makes it a lot easier to log in several different CW mode contests on the same weekend.
See the IO support topic.
Click the [CW] option box near the center of the logging screen to enable CW. Messages are sent with the F-keys, defined in the CW setup. <Space> <Enter> or <Esc> are used to stop sending. This also allows you to shorten a message or even extend its overall length by stopping and restarting that message.
When using the <F5> message, a selectable delay is used between each repeating transmission.
<F7> can be configured to run in the beacon mode, with a selectable keydown time between IDs. Or, modify your old MFJ keyer to program a key-down sequence so you can use it as the beacon IDer.
Use <Ctrl> or <F8> to go to keyboard CW.
CW/PTT is keyed thru the RTS and DTR ports of the COM Port. You can select a software switch to reverse these connections in the COM port setup screen.
TX tune:
In the CW setup form, click the TX Tune button to put the TX in the keydown mode. Click again or hit <Esc> to return to the receive mode.
Note: You must run the CW calibration and save the set-up into a configuration file on initial setup. When saving another config file, the current calibration is also saved. After changing computer or motherboards, the calibration must be re-run and saved for all configuration files.
Special characters:
In the CW memory messages and keyboard CW, you can send combined characters like AR, BT, SK. Any 2 characters to be sent as one character are keyed in as \AR, \SK etc.
CW Speed Control
The CW TX speed can be set as follows:
1. Change in CW Set-up, saved to a config file.
2. While in the Transmit mode, use the up/down arrows.
3. Hit <Ctrl> or <F8>, use the up/down arrows.
Burst Speed CW
The CW keyer can be set-up for burst CW. Certain portions of the CW message are sent at burst speed. This speed is set in the CW setup. Any characters contained within parenthesis are sent at the burst speed.
(5NN), (BK) or (TEST) for examples.
MFJ beacon IDer
by W3KM, 1995
This modification was done to an MFJ Grand Master keyer, but could be used for other MFJ keyers also. A tune switch was added ahead of the memory circuits so a key-down could be programmed.
The simple mod uses a 330-ohm resistor and a miniature (normally open) push button switch. These components are connected in series between Pin 5 of U4 and ground.
Pin 5:U4 ---- 330-ohm ------ PB switch --- ground.
I soldered the resistor lead directly to the IC pin. The momentary PB switch was mounted on the rear panel.
CW F-Key setup
Keywords (macro):
<CALL> = the working station`s callsign in the callsign field. The call can just be typed in and not duped and it will still be sent by <CALL>. The text you enter is not case sensitive - it is upper-cased.
[SN] = the QSO serial number - no formatting.
[SN-] = QSO serial, space, precedence (ex: 266 A in Nov SS).
[L0SN] = leading zeros format serial numbers (ex: 1 sent as 001).
[LTSN] = leading zeros format serial numbers (ex: 1 sent as TT1).
<TX> = last correspondent number no formatting (LZ Open Contest).
<L0TX> = leading zeros format of last correspondent (ex: 1 sent as 001).
<LTTX> = leading zeros format of last correspondent (ex: 1 sent as TT1).
(text) = burst CW, speed is set separate from normal CW speed.
The <F1> thru <F3> keys can be configured to:
1. Send a normal <F#> message.
Examples: DE W3KM 5NN PA BK
CQ PAQP DE W3KM W3KM K
2. Call the station entered in the call sign field, followed by a keyboard message. Enter just the keyword <CALL> into the <F#> message to send that station`s call followed by a keyboard CW sequence. After hitting <F#>, the message will be sent as soon as you begin typing your message. You can type ahead and hit <Enter> when finished. Note: If you select this option and do not type in a callsign, the keyboard mode is still active.
Example: <CALL>
3. Call a station followed by a pre-defined message.
Enter <CALL> into the <F#> message, followed by the message to be sent.
Examples: <CALL> 599 DE W3KM K
<CALL> QSL TU QRZ
RR <CALL> QSL TU QRZ
4. Send a complete contest message with an incremental serial number, with or without the working station`s callsign. Obviously the serial number must be part of the contest setup.
Enter a message sequence using the [SN] keyword, followed by the rest of the message into the <F#> message.
Examples: <CALL> NR[SN] W3KM 66 EPA K
<CALL> [L0SN] W3KM 66 EPA BK
NR [SN] W3KM 66 EPA K
NR [SN-] W3KM 66 EPA K (space after sn)
QSL [LTSN] W3KM 66 EPA K
QSL [SN] W3KM 66 EPA K
Send serial number twice examples:
<CALL> NR[SN] [SN] BUX
<CALL> NR [SN] [SN] BUX
Send working callsign twice example:
<CALL> <CALL> NR[SN] [SN] BUX
Selected contest example - like LZ Open Contest:
<CALL> NR [L0SN] <L0TX> BK
5. In fast pace contests, stations will send CW with some text at burst speed. Send a CQ or other message with text sent at increased speed by putting the text in parenthesis.
Examples: CQ (WFD) W3KM W3KM K
CQ (TEST) W3KM W3KM K
<CALL> TU (5NN) PA BK
To remove the slight pause cause by the ( ) macro, skip the space before and after the ( ).
<CALL> TU(5NN)PA BK
Hints:
1) Copy/paste an above example into your F-key message, then edit it.
2) F-key messages 4 thru 7 are standard text, no formatting or macros.
CQ messages
TU QRZ
W3KM
3) Using a space for the first character can be used as a delay if needed when using PTT, amplifiers and relay keying etc.
4) If no call is entered in the logging input field, obviously none will be sent, even if the <CALL> keyword is used.
5) After sending CW, if you erased the typed in callsign by mistake, enter `L` in the callsign field to recall it.
6) The last 5 previous callsigns are stored in memory after `duping` a call or after sending CW with a call typed in the call field. Enter `PC` in the call field to display the `previous calls`.
7) If you are paper logging and using the CW keyer to send the serial number and exchange, change the serial number in the upper right box after logging each QSO.
8) In Nov SS and some European contests as examples, serial numbers with letter suffixes will have the letters appended to the formatted serial number.
DVK <F9> setup
The <F9> key can be configured to:
1. Send the normal saved wave message for <F9>.
2. Call the station entered in the call sign input field. The call sign is sent (using alpha.wav files) followed by the standard <F9> message. Select the [Send Call+] switch in the DVK setup. Using 36 sound card wave files {a.wav, b.wav, 5.wav, etc.}, GenLog calls the wave file corresponding to the letter/number in the call. Use the sound card software to record and save the 36 files.
Easiest is to record the 26 letters and 10 numbers with short pauses between each. Then using the histogram section of the sound card software, separate each letter/number and `Do Save As`. Edit all files to be as short as possible. Again using the histogram part of the software, expand the leading and trailing portions of the file, so you can delete the `dead air` parts of the wave files. This is especially true of the alpha/numeric wave files.
Also use the software to edit the volume of each file. I used the VU meter on a phone patch interface to set the same levels.
To make call signs sent by the DVK sound smoother, you can use prefix files. The {prefix.wav} files are sent followed by the rest of the call using the {alpha.wav} files. Record prefix files for the area you live in, {k3.wav, wa3.wav}. You can make up to 200 files.
You can make other wave files containing the whole call sign if you wish. The call signs could be members of your local club for example. GenLog will send the call, followed by the rest of the <F9> message.
Note:
You must write a file that tells the logger what prefix or callsign files you have. In NotePad or other editor, make a text file named [syllabls.ini] and enter the prefixes/callsigns, one to a line.
example file:
K3
W3
WA3
WB3
W3KM
WA3EHD
AA3GN
DVK <F12> setup
The <F12> key can be configured to:
1. Send the normal saved wave message for <F12>.
2. The <F12> message is repeatable after a specified delay time. While in TX or delay modes, the repeating function is cancelled by hitting the <Space bar>. The message continues to the end. In the 16-bit logger, use a PTT disable switch (S1 in schematics) to stop the transmission if required.
In GenLog in the `RIGblaster` mode, even if you do not have a RIGblaster unit, a DVK playing message and <F12> repeating message can be cancelled at any time using the <Esc> <Space> or <Enter> keys. The PTT disable switch is not needed. Read more about DVK over-ride.
Keyboard CW
Use <F8> or <Ctrl> keys to transmit CW from the keyboard. When finished typing/sending, hit <Enter> to go back to the RX mode. Use <F8> <Ctrl> or <Esc> to cancel.
You can type ahead and hit <Enter> as part of the transmitted message. The CW speed can be changed while sending your message - using the `Up` & ` Down` arrow keys.
The PTT feature is also used in the keyboard CW Mode.
Key strokes / Keyboard Shortcuts
Use the <Tab> key to move fields: Call - RST etc. Don`t expect the <Tab> key to accept the input data, just because some software packages do. You need some way to move around without using the mouse. Using the <Tab> key to input data will cause unpredictable results, since contest specific sub-routine code required for duping, QSO points and multiplier checking is only called when data is entered - using the <Enter> or <Space> keys. Also, use <Tab> to move between [No] and [Yes] in dialog boxes.
When a Button is highlighted,  <Space> or <Enter> will activate that button. This allows you to log and control all functions without using the mouse.
Hit <Enter> or <Space Bar> to accept input data. At the last input field, hitting <Enter> or <Space> will save the QSO to file if you have QSO Acc(Auto) selected. Using the `Auto` selection reduces the number of keystrokes required by one. If you have QSO Acc(Man) selected, the [Save data to Log] button will be activated by hitting <Enter> or <Space> again.
Use F-Keys to send CW or DVK messages.
The <Esc> key clears all QSO inputs.
<Ctrl> or <F8> activates the keyboard CW mode.
Many keystrokes can be used instead of the mouse click.
In the Call Sign input field: Note: The brackets are not entered.
Enter the frequency or wavelength to change bands. See band change.
Enter [!call] to do a QRZ.com lookup.
Enter [AM] change to the AM mode.
Enter [BB] for grid map by band.
Enter [BL] for grid map by log.
Enter [CW] to change to the CW mode.
Enter [CG] General logs: count US grids, no output window.
Enter [DIG] change to the DIG mode.
Enter [DL] to delete the last QSO.
Enter [G] display the grid map in modes with grid squares, WWL.
[BC] to select Alaska/British Columbia map.
[CA] Central America map.
[EU] Europe map.
[RU] Russia map.
[S1] South America map.
[S2] South America #2 map.
[US] United States map.
[U2] Eastern US map.
[VE] Eastern Canada map.
Enter [HS] change to the Hellschrieber mode.
Enter [L] for the last call sign entered, when you delete a QSO or cancel a QSO (wrong band). To re-enter the same QSO, enter [L] for the callsign.
Enter [LI] or [LN] to show the {Linear} settings.
Enter [P31] change to the P31 (PSK31) mode.
Enter [P63] change to the P63 (PSK63) mode.
Enter [PC] display list of 5 previous calls typed in.
Enter [PH] change to the Phone mode.
Enter [PK] [PS] or [PSK] to change to the PSK mode.
Enter [QRZ] opens QRZ.com in your default browser.
Enter [QRZcallsign] searches QRZ.com for that callsign.
Enter [RT] [RY] [RTY] or [RTTY] to change to the RTTY mode.
Enter [SA] show {Amplifier/Linear} settings.
Enter [SAT] change to the Satellite mode.
Enter [SB] change to the SSB** mode.
Enter [S] for same callsign as previous QSO, useful when moving stations up the bands.
Enter [SC] show `Counties` or whatever is displayed with that button (States, St/Prov).
Enter [SL] show the log, after counties were displayed for example.
Enter [SM] or [SS] to show the states worked map.
Enter [ST] show the {Tuner} settings.
Enter [SW] show the `Worked` window.
Enter [TW] show the `To Work` window.
Enter [VAR] change to the VARA mode.
------------------------------
Clear/Cancel keys:
<Esc> key clears all QSO inputs.
<Esc> <Space> and <Enter> cancel CW.
<Ctrl> <F8> or <Esc> cancels keyboard CW.
<Enter> returns keyboard CW back to RX after playing the KB buffer.
<Esc> <Space> and <Enter> cancel DVK play.
**Note:
Use PH for the contest voice mode. See the Mode topic.
Print the Cheat Sheet commands list.
Cheat Sheet
Enter commands in the CallSign field. Note: The brackets are not entered.
[!call] to do a QRZ.com lookup
[AM] AM mode
[BB] grid map by band
[BL] grid map by log
[CW] CW mode
[CG] General logs: count US grids, no output window
[DL] delete last QSO
[G] show grid map
[BC] to select Alaska/British Columbia map
[CA] to select Central America map
[EU] to select Europe map
[RU] to select Russia map
[S1] to select South America map
[S2] to select South America #2 map
[US] to select United States map
[U2] to select Eastern US map
[VE] to select Eastern Canada map
[HS] Hellschrieber mode
[L] last call sign <Entered>
[LI] show Linear settings
[LN] show Linear settings
[M] show states map
[P31] P31 mode (PSK 31)
[P63] P63 mode (PSK 63)
[PC] show 5 previous calls typed in
[PH] PH mode
[PK] PSK mode
[PS] PSK mode
[PSK] PSK mode
[QRZ] opens QRZ.com
[QRZcallsign] searches QRZ.com
[RT] RTY mode
[RY] RTY mode
[RTY] RTY mode
[RTTY] RTY mode
[S] same callsign as prev QSO
[SA] show Amplifier/Linear settings
[SB] SSB mode (use PH for contests)
[SAT] Satellite mode
[SC] show Counties - or other
[SL] show Log
[SM] show the states worked map
[SS] show the states worked map
[ST] show Tuner settings
[SW] show `Worked` window
[TW] show `To Work` window
[VAR] HF VARA mode
Typical band change shortcuts:
80m 3 or 80
40m 7 or 40
10m 28 or 10
432 43 or 432
2304 2.3 or 23 or 2304
Clear/Cancel keys:
<Esc> key clears all QSO inputs.
<Esc> <Space> and <Enter> cancel CW.
<Ctrl> <F8> or <Esc> cancels keyboard CW.
<Enter> returns keyboard CW back to RX after playing KB buffer.
<Esc> <Space> and <Enter> cancel DVK play and <F12> repeat.
ASCII LOG file
Under the Log Write Cabrillo Log or Write ASCII Log menu, you can write a Cabrillo file named [urCall.log] (or a plain ASCII file) that can be edited and E-mailed to the contest sponsor. Read you log file and make sure the header - Contest name, Category etc. is correct. You can edit the plain ASCII file to add the OFF/ON times if required. This is not necessary with a Cabrillo file.
The Cabrillo file format is required by most contest sponsors. GenLog will also export the log to an ADIF file.
The contest sponsor wants an ASCII log file:
1. If the sponsor doesn`t ask for a log file with the new mults ID, points per QSO, etc, then submitting a Cabrillo file is a good choice, since the Cabrillo file is an ASCII log file with a summary included.
2. If the sponsor wants the log file with the new mults ID, QSO points, etc, write the plain ASCII file as explained above, if the menu option is available.
3. Or, if the menu option isn`t available and you want to send a log file with all the information that appears in your log, then use the log file that you named at the beginning of the contest. Make a copy of it and rename it to [urCall.log].
Note: The file [urCall.log] guarantees that your file will have a unique filename on the sponsors hard-drive, that will not be overwritten by another log entry.
To view/edit these files after writing them: Copy either NotePad or EditPad.exe to your GenLog folder.
File back-up
For automatic back-up (append), select the back-up drive in the setup screen. Each QSO will be saved to the selected disk drive. Although the quick select combo box only shows the drive letters, you can enter the drive\path of choice into this box. F:\temp - or J:\hambu for examples.
If you want the backup USB device to have a persistant drive letter:
1. Use the Windows key + X keyboard shortcut to open the Power User menu.
2. Select Disk Management.
3. Right-click the USB drive on the list and select Change Drive Letter and Paths.
4. Click the Change button.
5. Use the drop-down menu and select the drive letter you want to use. Choosing a letter from M to Z will insure it will not conflict with other devices.
If you try to save BU to the logging folder or enter a drive\path that doesn`t exist, an error message is displayed. If you decide that you want to save to BU after you started logging, use the Log, Backup file path: menu. When you continue logging, the back-up file will be updated.
To use the auto back-up log file: It has the same name as the logfile being used and is located in the {Backup file path:}. First view it to make sure it is what you want, then copy it to the logging folder and re-load it.
Manual back-up file:
Manual LOG file back-up can be saved using the Log, Manually Save BU file menu. The file can be renamed and re-loaded into GenLog. ex: change .bak to .log. This is a different function than the Auto BU described above.
There is no reason why you should ever lose contest LOG data. You can have several files available that contain your QSOs. If a glitch erases or corrupts your normal LOG file, you should have no problem re-naming one of the files below and reloading it into GenLog. Make sure you know how to use the back-up file(s) and procedures BEFORE a contest!!
These files are saved in your GenLog folder:
[logfile.LOG] is the normal logging file.
[logfile.BAK] is the manually saved BU file, rename to [file.log] to re-load.
[logfile.BU1] is the logging file automatically saved before editing in GenLog, rename to re-load.
[urCall.LOG] is a manually saved file, either in standard ASCII or in the Cabrillo format.
[file.ADI] is a manually saved ADIF format file.
If you associate the .BU1 .BAK .ADI and .LOG extensions with NotePad, you can easily view or edit them. Back-up files with .bak and .bu1 extensions can be deleted from the logging folder after you are finished with that contest.
It is a good idea to manually backup GenLog`s Ini file, just in case. That file is named GenLog_Control.ini and is stored in the c:\genlog32 folder.
Band change
Band change is easy, although it is also easy to forget to change bands in the logger. Get in the habit of changing bands in the logger before changing bands on the radio.
To change bands:
Enter the band you are changing to, in the `Call Sign` field. Enter the freq band or the wavelength, except for 30m (10=10m). For 222MHz and above, use values in MHz or GHz. Or select the band in the band combo-box.

Besides selecting the band from the {Band} box, you can enter shortcuts as follows:
shortcut
160m 160
80m 3 or 80
60m 5 or 60
40m 7 or 40
30m 30
20m 14 or 20
17m 18 or 17
15m 21 or 15
12m 24 or 12
10m 28 or 10
50MHz 50 or 6
70 70
144 144 or 2
222 22 or 222
432 43 or 432
903 90 or 903
1296 1.3 or 13 or 1296
2304 2.3 or 23 or 2304
3456 3.4 or 34 or 3456
5760 5.7 or 57 or 5760
10368 10.3 or 103 or 10368
24192 240 or 24000 or 24192 (24 is 12m)
47000 47 or 47000
MMW MMW
Laser LAS or LASER
To view the valid bands, use the View, Valid Bands menu.
When logging in the SWL mode, enter the frequency text in the {Band} box.
Grid squares
For contests using grid squares as the exchange, or in the General logging mode, simple graphical representations of the US, Eastern US, Europe, Alaska (and Western Canada), Eastern Canada, Central America (and Caribbean), and the northern and central parts of SA are selectable to show grids worked. This is useful if you like collecting grid squares. The use of WSJT makes working lots of grids easy. The map of choice is selected via the pull-down Grids menu or by using the map selector shortcuts. In the Grids menu you can also select to show the grids worked on one band or the whole log.
The grid maps can be re-sized. Grab the lower-right corner of the map and drag to size. Use the menu to change to a larger font if desired. Resize the map, position it and select the font to your preference. The map size, font and position are saved when you close the map. Note that large maps with bigger fonts will not be captured when you print them. You may need to shrink them to fit on the printer sheet.
If you like viewing grid maps while working stations, you can have the grid map auto open after you <Enter> the shortcut. Use the Log Open Options setup menus to turn on the function. Select the `Yes` check-box. When you <Enter> a shortcut, that grid map opens. <Entering> `G` still works to open the maps.
Data files required for this function are:
Alaska_BC.map
Canada.map
CentAmer.map
Eastgrid.map
Europe.map
NthAmer.map
Russia.map
SthAmer.map
SthAmer2.map
If these files are not in the logging folder, the fill grid map function is ignored.
To print the map image, turn on the Printer checkbox and use right-mouse click on the map.
Grid locator lookup:
Some contests that use 6-digits also use the [vhf4k.adi] ADIF lookup file. This file was initially developed by K9PW and edited by W3KM using NE U.S. VHF logs. Make your own or edit the file for your part of the world using my Cab2ADIF updater software found at http://www.qsl.net/w3km/w3km_sw.htm. The file format is specific.
Or use my VHF-History.txt 6-digit lookup file. This file was created by, and is edited by W3KM for Pack Rat club members using my VHFLOG or the N1MM+ logger. Just as the above ADIF is format specific, this text file is also format specific. The use of either of these lookup files is configured using the File Open Options setup menus.
Note: If you make/edit your own files, use a different filename, so they don`t get overwritten by GenLog updates.
Grid tracking:
You can keep track of 4-digit grid squares (locators) worked, in selected contests. Log files can be added to build a Grid totals file, [ grid_lst.ttl ]. Use the Grid Total, Add this log menu to build the file and add logs. Once built, you can view or print the grid squares by band. The total unique 4-digit grid squares is displayed in the Grid Total menu label, Grid Total[155] for example. You can delete, re-name or move this totals file - if you want to generate a totals file for other logs.
In General logs [CN09], enter a 4-digit grid in the Grid field to see if it is a new one in the current log.

Interested in the 50MHz FFMA, or just want to keep track of US grids worked? Use the Grids, Count US Grids menu (or keyboard shortcut CG) based on the [FFMA-488Grids.txt] file.

Code used to calculate distances between six digit grid locators was taken from code written by J. Rautio, AJ3K in 1983. This software was available on the ARRL web site.
CW calibration
Since the processing speed of each computer is different, on initial set-up, the speed calibration must be run before using CW. After running the cal, while listening to your transceiver`s sidetone/monitor, adjust the weight setting for best sounding CW at the speed you are using. While the weight range is 0.85-1.25, best keying usually occurs around 1.05-1.15, depending on the transceiver and the PC`s processor speed. Click the [Def] button to get back to the default value.
Save a configuration file for each contest. When you save a file, the current calibration values will also be saved.
Go to the CW Option topic.
A Speed Constant combo box was added to allow the users to change the starting Calibration Constant. The need to use this depends on the PC`s processor speed. Try the default value first.
Delete Last QSO
Enter [DL] to delete the last QSO in the LOG. A file named <filename.BU1> will be written before changes are made. In case you want to use this file, rename it using the extension .LOG.
Before saving a QSO to the disk file, make sure it is correct. It is much easier to delete a QSO right away, rather than trying to edit the file. If you made a mistake and entered the QSO, make a note of the exchange(s) and just delete the QSO and re-enter it again. Enter [L] for last, to retrieve the last callsign entered.
Edit LOG file
The edit form is like the logging form - only <Enter> and <Space> are used to input data.
New Sept 2018:
State QSO Parties use counties for the in-state exchange. Half of them also score the in-state State as a multiplier.
In-state stations can now edit their state multiplier into the log using the [Edit/Change Log] form. GenLog counts 2 multipliers for the first in-state QSO (county and state).
KYQP example:
If you are a KY station, the {HELP Add KY as mult} menu and the [Add KY as mult] button are displayed.
Click the {HELP Add KY as mult} menu for information.
Click a QSO line to count as 2 multipliers. Click the [Add KY as mult] button to insert the State.
This example score 3 multipliers.
QSO 1: ADA 1 1 KY
QSO 2: PA 2 1
Clicking [Add KY as mult] again on the same line removes the State.
Important:
While logging, remember the shortcut command [DL] to `delete last` QSO, if you just entered it incorrectly (wrong band for example). After using the [DL] command, change bands and use the [L] command to recall the last callsign entered, then continue to log the corrected QSO. This is faster than going into the edit screen, which has its own limits anyway - it is impossible to have it dupe, check mults and re-tag the mults for every contest.
For the most part, you can edit the LOG file while in GenLog. Some contests have the edit feature locked out. A few contests I was unable to make the editor work properly without screwing up the log. But you can edit the ASCII log file that you named at the beginning of the contest using NotePad or EditPad. Remember that the log file is space delimited. Use <Spaces> not <Tabs> between columns. As always, save a backup copy of your log before editing, just in case.
Note: When saving any file using any editor, make sure you select the proper file type (.log .txt etc) and insure that the file extension is what you wanted, not what Microsoft thinks it should be.
To enter the Edit screen, click the label below the clock.
Scroll the log for a QSO or click [Search] to look for a callsign in the log, and [Next Call] to find the next occurance of that callsign in the log.
Adding QSOs should not be done during the contest. Adding QSOs is a limited function, since it is not possible to have this function work correctly for all contests. After you add the QSO, make sure the data is correct - the number of new mults etc may not be correct. Certainly you wouldn't add QSOs (or delete) in contests that use serial numbers.
To add a QSO you forgot, click the QSO line that will follow the added QSO. Then click [Add QSO]. Enter the QSO information from left to right using the <Enter> or <Space> keys, as in normal logging. After entering all the data, click [Accept Add]. Click [Refresh] to view the updated Log Window. Click [Save Changes].
Note:
If you made edit changes to a QSO, the QSO was only changed in memory. If you don`t want these changes made, don`t use the {Save} command, use the upper-right-X or Exit without Saving menu or the [Exit, no changes] button, then re-load your log file to negate the changes in memory.
To delete a QSO. Click that QSO line. Then click [Delete QSO]. Click [Refresh]. Click [Save Changes].
To edit the log in NotePad, EditPad or a word processor, save a back-up file first. When editing the log, keep the same column format (with spaces between, not Tabs). If you move the data in columns, GenLog will not read in the log correctly. If you think you screwed it up, then exit the editor without saving the file.
If you edited a file in NotePad and get an error at file-reload, check for blank lines below the last QSO line. If you drag the cursor over the last QSO line and continue down the page, you will see if there are any blank lines below the last QSO. If so, delete them and re-save the file.
Note: You do not need to re-start the logger to re-load an edited file.
Multipliers:
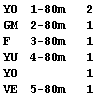
If necessary, you can re-number the new mults column of your log file in the edit screen. Some contests have this function disabled due to the complexity of the multiplier requirements of the contest rules. Click any QSO on the band in question, select the multiplier and hit <Enter>. The new mults column is renumbered.
A back-up file was written before editing (filename.BU1). You can rename it to filename.LOG to reload if necessary. Keep in mind that Windows will not allow you to rename a file to a name that already exists. And, you need to set Explorer`s {View} options to be able to view the entire filename including the extension.
QSO Point edits:
Normally the QSO points editor works fine. Contests that have points >9 require a 2 digit field. If you edit the points and only the first digit shows in the log, obviously the points field was saved as a single character. In this case, edit the 2 digit points value in NotePad.
Click the {Goto last edited} to return to the line just edited in the editor`s log window.
Entering Call Signs
Some special events call signs may produce inaccurate QSO points or multipliers that must be checked post contest. A call like [9AY2K] for example will produce an error message [BEEP Call OK? No numeral? points?] or similar. This is a reminder to check the call sign entered and verify the points per QSO. In some contests, this is your queue to enter a DXCC prefix or calldistrict, etc. If the call sign is correct, the points can be edited in the points field before <Entering> the QSO if time allows. Otherwise, edit the points post contest.
When entering Rover call signs, enter {Call/R. Or - enter {Call/mult}, if duping is an issue. After the contest, edit these callsigns to be call/R before submitting the log file.
Use the View menu to select what kind of `dupe` box you want displayed. A full information box or just the word `Dupe`.
GenLog does not tag dupes as 0 pointers. Many contests allow dupes - when the multiplier or state is different for example. The sponsor will score your log anyway.
Operating Times
GenLog will calculate the total hours of operation. Use the Log, Count Hours menu selection to start the calculation. A gap in QSO entries less than 30 minutes is considered as on-time.
Note: OFF/ON times are not required in a Cabrillo log submission. This information is taken from the log file.
DVK messages
The use of the DVK option is enabled by clicking the DVK checkbox near the center of the logging screen. Create DVK messages with your sound card software. Save these .wav files to your c:\genlog32 folder.
In the DVK Setup: click on an [F-key message filename] label on the right, then click the file from the filename dialog box on the left. Click a message label, then click [Test] to try that message. Or double-click a filename to test play that wave file. Clicking the [Alpha/Num] label plays all the alphabetical and number wave files that you made - in the {Send Call + } mode.
Message repeat:
The <F12> message can be selected to repeat after a specified delay.
DVK over-ride:
There are 2 DVK modes available. I did not remove the original `Normal` DVK play mode since users may want to continue using this mode. In the 'RIGblaster` mode, the playing wave file can be stopped at any time - in several ways.
1. Hitting the <Esc> <Space> or <Enter> key.
2. Hitting another F-key immediately plays the new wave file.
Even though you may not have the RIGblaster sound card interface, the <Esc> <Space> and <Enter> keys will still cancel a playing wave file - with the DVK control option set to the `RIGblaster` mode.
Note:
A dummy wave file [ stop.wav ] is used to stop a currently playing wave file when DVK cancel is requested. The file must be in the GenLog folder.
Note:
If you are using DVK PTT (and you will when using the RIGblaster), then you need to have a COM port selected and connected. When selecting the DVK, the CW setup initializes the COM port momentarily. If CW PTT is not already ON, the DVK initializer turns it ON.
Note:
Select {Send Call+} to send the callsign of the working station in your own voice. You will need to need to make the 36 associated letter and number wave files.
You can record some prefixes (or even club member callsigns) if you want the callsigns to sound smoother - wa3.wav, n6.wav etc. Just put a list of them in the syllabls.ini file in the GenLog folder - one to a line as below - limit 200.
W1
N6
WA3
W3KKN
In the `Normal` mode, missing wave files show up as a blank space being played. In the `RIGblaster` mode, missing files cause an error. In order for the logger to hold the DVK PTT line high during the playing duration, the length of the wave file being sent is calculated from information read from the wave file`s header. A non-exising wave file causes a divide by zero error - which can be trapped to display the message dialog box.
QSO Accept switch
Select QSO Acc [man] to manually click or activate (<Enter> or <Space>) the [Save data to Log] button.
Or select QSO Acc [auto] to automatically save after <Enter> or <Space> on the last logging input. This is useful if you get in the habit of `Entering` the last QSO input ONLY after you get the QSL from the other station. Using the `Auto` selection reduces QSO acceptance by one keystroke.
Applications software
Several support applications are supplied with GenLog, or can be download from my web site.
Counties.exe - US counties lookup by state.
FindDXCC.exe - like the Prefixes App but is small to put out of the way to lookup country information.
GenSort.exe - Compiles GenLog log files into search data files used in the partial search function.
Gen_Time.exe - changes the UTC hour in your log, if you forgot to set the UTC offset for example.
Prefixes.exe - Full display of callsign lookup displays country, zones, continent etc.
SQUARES.exe - grid square heading and distance calculator www.qsl.net/w3km/squares.htm
Use Windows Shortcuts to run your software.
Push-to-Talk
To use the CW PTT control, click [PTT] in the CW setup. The PTT line is connected thru the DTR connection of the COM port. You can select a software switch in the COM port setup screen to reverse the connections for CW and PTT.
To use the DVK PTT control, click [PTT] in the DVK setup. The PTT line is of course the same as for CW. Click the [CW] option box and setup the Com Port to be used for the DVK PTT.
The PTT option should definitely be used for transverter-amplifier operation. Problems due to sequencing and transients are eliminated by using the hard keying feature rather than semi break-in or VOX.
Writing Datafiles
VB ran out of pull-down menus in the main screen. Under the Log menu is a sub-menu system Write More Files. In the sub-menu you can write several datafiles, some that are also selectable in the Log menu. These files can be E-mailed to the contest sponsor if required.
At any time, you can see the results of each band during a contest. Select the Write summary [urCall.sum] menu item. GenLog writes the ASCII file, then opens it. Print the summary in NotePad if you want a hard copy.
For contest sponsors requiring a summary, the [urCall.sum] file can be edited to contain your entry class or power levels for example before E-mailing it along with your ASCII log file [urCall.log]. A summary is not required if you use a Cabrillo file, unless specified by the contest sponsor.
To view/edit these files after writing them: Copy either NotePad or EditPad.exe to your GenLog folder.
CW Interface
See the COM port section.
Basic Interface
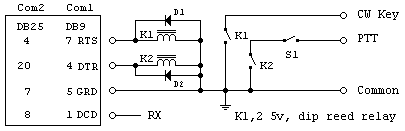

Optional switching circuits:
COM port:
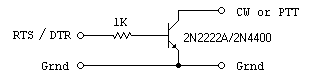
DVK Interfaces
Using a Heathkit HD-15 Interface
Basically the sound card audio is fed into the line input of the patch unit. The mic audio is taken from one of the outputs. Since the HD-15 has both 600-ohm and Hi-Z outputs, it will work with new radios and older types alike. So far, I have tried this interface on the Kenwood TS-180S, Icom IC-451A, IC-751 and Yaesu FT-221 radios. In order to use the interface with the station mic and logging software, you will want to add some impedance matching to the sound card output and switching of the audio and PTT line. If you don`t mind modifying the HD-15, you can put everything inside the box.

Audio from the sound card (8-ohm) is fed through an impedance matching transformer into the line input (600-ohm). This interface allows the audio level to be monitored on the VU meter and the TX mic gain can be adjusted using the front panel control. The sound card volume can be adjusted to match the station mic level when the `Trans gain` control is mid range. The sensitivity of the VU meter can be increased if necessary by reducing R1 (3600-ohm), which is connected between S1-A to S2-4. The VU meter allows you to set all your wave files to the same level. After recording your files, play each one into the DVK interface and reset the volume of each accordingly.
A small control relay switches the audio between the station mic and the DVK. The newer radios power the mic (8V) from the front panel connector. Unfortunately this power source is current limited to a few mA, so you can`t `steal` the voltage to drive a relay for example. Don`t forget the 2ufd dc blocking capacitor. Use the 600-ohm audio for new radios and the Hi-Z audio for older radios using a high impedance microphone. Shielded audio cables are used for all mic connections. I used one of the RCA phono jacks for the mic output to the radio.
Another small control relay switches the PTT line. The control line from the pc interface (ground on TX) can be connected at the SPKR terminal for example. The wire going to this terminal can be removed. A bypass switch should be wired into this line to act as a PTT bypass, if the wrong F-key is pressed for example (S1 in schematics). Connection to the radio`s PTT line can be made via the other RCA phono jack. You can use a single DPDT relay to switch both the audio and the PTT line. 5V reed relays are available in 14-pin Dip packages that can be activated directly by the RS-232 PTT +5V on TX, which will eliminate the need for the relay power source.
I connected to the 8-ohm speaker output of my sound card since the level of the line output was not high enough to drive the DVK interface. There is more than enough audio available. If you want to add an 8-ohm audio attenuator to make the volume adjustment less sensitive, attach a T-pad at the line terminals going into the 8-ohm/1K-ohm transformer.
10dB T-pad: 2 x 4.3-ohm series resistors and a 5.6-ohm shunt resistor to ground.
20dB T-pad: 2 x 6.8-ohm series resistors and the shunt resistor is 1.5-ohms.
This interface is perfect for PSK-31 operation also.

Using a Kenwood PC-1A Interface
The sound card audio is fed into the line input of the patch unit. The mic audio is taken from the normal audio output. The PC-1A was made for TS-520/820/930 series radios with high impedance mic inputs.
You will want to add some impedance matching at the interface audio input and some switching to use the interface with your Kenwood station mic and the logging software. If you don`t mind modifying the patch unit, you can put everything inside the box.
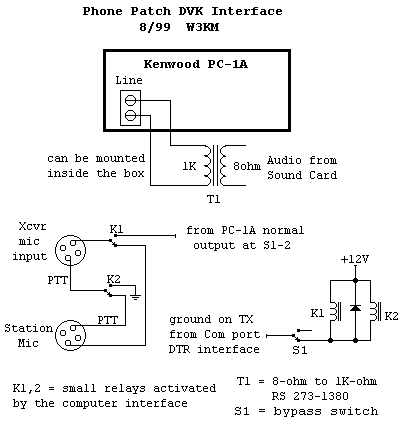
Audio from the sound card (8-ohm) is fed through an impedance matching transformer into the line input (600-ohm). The transformer can be connected to the line terminals inside the box. The sound card volume is adjusted to the same level as the station mic when the `TX Gain` control is mid range.
The PC-1A has a front panel mic connector for the station mike and a cabled output line, so the mic cable wiring may only require a connector change. A small control relay is wired in place of S1-2 and switches the audio between the station mic and the DVK audio. Shielded audio cables are already used for the mic connections, so keep your relay wiring as short as possible.
Another small relay is wired into the PTT line at Pin-2 of each mic connector to switch the PTT line. The pc board construction makes adding the relay modifications slightly harder than the open wiring of a Heathkit HD-15. Since the mic connections and DVK audio are available on the top of the pc board, removing the board is not necessary. A single miniature DPDT relay could be used to switch both functions.
The PTT control line from the pc interface (ground on TX) can be connected to the RX IN terminals for example. The wires that are connected to those terminals can be removed. A bypass switch needs to be wired in series with the pc interface line to drop the PTT control, if you hit the wrong F-key for example (S1 in schematics).
Control Options
[RST] checkbox
The [RST] switch is used to automatically insert the default 59(9) report into the sent portion of your log. You may change the RST if someone gives you a report that isn`t 59(9) (God forbid). If you want to enter real RST reports, uncheck the switch.
[Pre] checkbox
In contests where Sec/DXCC are used for multipliers, the data file [dxcc_pre.dat] is searched for the prefix of the call entered. Click the [Pre] switch to clear the multiplier input box after entering a call. Leaving it unchecked allows you to enter a mult before entering a call, while listening to the station working another QSO, for example.
In selected contests, checking the [Pre] switch erases the input field. Leaving it unchecked allows you to input the field before inputting the call sign. Note: This function is disabled in some contests.
[End/Begin] checkbox
Select END to see the QSOs to the end of the log.
Select BEGIN to see the QSOs starting at the beginning of the log.
[Real Time] [After contest] option boxes
Real time is automatically selected at the start of a contest and after loading a file. If you want to enter QSOs from a paper log, select the [After contest] option. When you click [After], the date of the last QSO is displayed in the UTC date box.
[Multi/Bonus] setup
ARRL Field Day has a dozen extra points, PA QSO Party and others use a power multiplier and bonus points that are used for score calculation and output setup. Click the  button and setup the multiplier or bonus points, then re-load the contest file to update the score.
Some contests require you to enter other criteria into the bonus setup. This procedure is used for contests where GenLog is not able to calculate the score directly. See Bonus points & scoring.
Cabrillo file
If you get an error when writing the Cabrillo (the file is partially written), check the Address format in the setup screen. Read the [City, ST Zip] tooltip and click the [Help] button on that field. The field needs the comma delimiter.
The sponsors of most contests require computer generated LOGs to be submitted electronically instead of on paper, and the Cabrillo log file is what they require. The Cabrillo format will allow log checkers to cross-check logs and accurately calculate the score using one software application for all logs submitted. Previous to the Cabrillo format, the ARRL and other sponsors had to deal with dozens of different log file formats. The Cabrillo file format contains both a summary and the log file. GenLog has a post contest entry function - if you want to submit a paper log electronically.
GenLog writes the Cabrillo LOG file for selected contests and uses [urCall.log] as the filename. Re-load your contest log file if the menu selection to write either a Cabrillo or ASCII file does not appear in the Log menu. This file can be E-mailed to the sponsor. Please do not use a filename other than [urCall.log]. All log files sent to contest sponsors must have unique filenames. Each time you write a log file, it overwrites any previous file with the same name. The file must be checked and edited if necessary before you E-mail it. Check the rules for submissions for the contest in question.
Important Note:
GenLog will not let you name a log file as [urCall.log] since it will be overwritten by the Cabrillo log file (without an over-write prompt). So, for the same reason - don`t rename a log file or copy a log file to [urCall.log] - as it will be overwritten and your log will be gone forever. I have been using the .log file extension in my software since 1983 and I don`t want to change it and all of my support applications. Now Windows installer deploy files are *.log as well.
Portable operation:
You cannot enter a slash in your callsign in the setup form. Using VE/F5LEN for example: The callsign is used to name files written by the logger and VE/F5LEN.log is an illegal Windows filename. Use VE-F5LEN or VE_F5LEN in the setup screen. Keep in mind that you cannot use CW macros that send <yourCall> however - enter your portable call into a CW memory text instead. After writing the Cabrillo, verify the log. GenLog usually changes the OPERATOR: field. GenLog changes the dash (or underscore) to a slash in the rest of the log.
Unlike other electronic LOG files, the Cabrillo file does not contain QSO points, nor indication of when mults were worked. In CQ-DX for example, the LOG file does not contain the country multipliers or QSO points. Using the Cabrillo file, the log checkers figure out the points/QSO, add up the country multipliers and cross check logs for accuracy, with software written for just that purpose. Operating ON/OFF times are also taken from the Cabrillo file and are not included as such.
Regardless of which date format you selected, GenLog will output the date in the Cabrillo format yy-mm-dd as shown below. Make sure the PC system date format agrees with the date format selected in GenLog. Logs created in one format and loaded in another will cause errors when writing files.
Example file:
START-OF-LOG: 3.0
ARRL-SECTION: EPA
CREATED-BY: GenLog v8.21
CONTEST: ARRL-SS-CW
CALLSIGN: PJ4/ W3KM
CATEGORY-ASSISTED: NON-ASSISTED
CATEGORY-OPERATOR: SINGLE-OP
CATEGORY-STATION: FIXED
CATEGORY-TRANSMITTER: ONE
CATEGORY-POWER: LOW
CATEGORY-BAND: ALL
CLAIMED-SCORE: 25636
CLUB:
OPERATORS: W3KM
NAME: David J. Mascaro
ADDRESS: 1603 Mink Rd.
ADDRESS-CITY: Ottsville
ADDRESS-STATE-PROVINCE: PA
ADDRESS-POSTAL-CODE: 18942-9541
ADDRESS-COUNTRY: USA
SOAPBOX:
QSO: 3500 CW 1998-11-07 2306 PJ4/W3KM 0001 A 66 EPA WA3KWU 0117 A 71 EPA
QSO: 3500 CW 1998-11-07 2310 PJ4/W3KM 0002 A 66 EPA WB3FOJ 0012 A 77 EPA
QSO: 3500 CW 1998-11-07 2332 PJ4/W3KM 0003 A 66 EPA K3SV 0188 B 71 EPA
END-OF-LOG:
Add lines beginning with SOAPBOX: as needed for more comments.
Note: Three address values come from the City, ST Zip field in the setup screen, formatted as indicated. The country comes from the DXCC Prefix entry.
Club competition:
If you are not submitting your score for a club or the contest does not have club competition, leave the {Club Affil.} field blank in the setup screen. Otherwise, edit the file before E-mailing it.
Copy NotePad.exe or EditPad.exe to your GenLog folder to have the file opened automatically after writing it.
Slashed-zeros, non-standard and extra characters:
Read your Cabrillo log before submission. Look for and edit out the slashed-zeros Ø, the non-standard characters Ê Ã É Ê and extra block characters ||| as callsigns and exchange data will not match when the sponsor Cross Checks your log. For example the multiplier GMØ5 does not match GM05. The above examples do occur when using PSK and other digital decoding software. Also do not use the <Tab> when editing you log - the file is <Space> delimited.
Cabrillo mode field:
The Cabrillo template has a 2-letter field for the mode. CW, PH, RY, PK etc. Therefore use PH for the mode in SSB contests, not SSB.
My free Cabrillo Evaluator scores more than 815 contests in Cabrillo format.
Submitting a log file
To send the file to the ARRL:
A new method recently required is the on-line upload at http://contest-log-submission.arrl.org. Read more in the Nov 2016 QST page 82. Fix any submission errors or requirements and re-submit.
To sending a log file to other sponsors, attach your log file to an e-mail addressed to the sponsor. The subject line is whatever the contest rules dictate.
Write the file using the Log, Write Cabrillo Log menu or the Log, Write ASCII Log menu item. Re-load your contest log file if one of these selections does not appear in the Log menu. The file name is [urCall.log]. The reason is: files with the same name will overwrite each other on the sponsor`s hard-drive. Your call sign makes the filename unique. Check the file to make sure it contains everything that the rules require. If you are submitting your score for club competition, make sure it says so in the Club: section of the Cabrillo file. If this contest doesn`t have club competition, make the Club: line blank.
Note:
You cannot enter a slash in your callsign in the setup form. Using VE/F5LEN for example: The callsign is used to name files written by the logger and VE/F5LEN.log is an illegal Windows filename. Use VE-F5LEN or VE_F5LEN in the setup screen. Keep in mind that you cannot use CW macros that send <yourCall> however - enter your portable call into a CW memory text instead. After writing the Cabrillo, verify the log. GenLog usually changes the OPERATOR: field. GenLog changes the dash (or underscore) to a slash in the rest of the log.
Note: Each time you select {Log} {Write ... Log ...}, GenLog purposely overwrites any existing file with the name [urCall.log] in the GenLog folder. Important! If you use other loggers, it is possible that the file [urCall.log] will appear in other folders on your PC. Make sure you select the file from the right folder when submitting it to the contest sponsor.
If you copy NotePad or EditPad into your logging folder, GenLog will open the log file after you write it.You can also view/edit the file using Microsoft`s Explorer. The file was saved in your GenLog folder. Edit the file and re-save it, if you made changes.
Make sure you read the Cabrillo before submssion. Also read these Cabrillo Hints at:
http://qsl.net/w3km/cabrillo_hints.htm.
Multi-Op stations
If you are a multi-op station, enter that option in the personal data screen. Then list the operators. GenLog does not have networking capability, but you can merge several log
files (from other PCs) post contest and submit a Multi-Op Cabrillo log to the contest
sponsor.
Start with one log file. Copy it and re-name it to a new file, which will be file1 and
will contain all the QSOs for the contest. Using NotePad, copy the QSOs from file2,
file3, etc. and paste them at the end of file1. File1 needs the original 2 line contest
header. The header is not copied from the other files.
When adding the QSOs to the end of file1, maintain the columar format, with one
QSO per line. At the end of file1, there should be no blank lines. When the cursor is
postioned at column 1 on the line after the last QSO, there should be nothing to the
right or below the cursor. Delete any spaces or blank lines after the cursor.
File1 can be loaded into GenLog and a Cabrillo file written for log submission. Edit the
Cabrillo file as needed to follow the Multi-Op category criteria for that contest.
DXCC tracking
You can keep track of DXCC countries worked, in selected contests. Log files can be added to build a DXCC totals file, [ dxcc_lst.ttl ]. Use the DXCC, Add this log menu to build the file and add logs. Once built, you can view or print all the countries by band. The total unique countries is displayed in the DXCC menu label, DXCC[232] for example.
You may rename or delete this file at anytime and re-build a new file using different logfiles (for different modes for example).
The total countries worked in a contest can be viewed or printed for selected contests. Use the Mults menu to display or print. In selected contests, States are viewed, sorted and printed using this menu.
County Hunting
GenLog will log counties, along with the state, etc. GenLog will keep track of the number of counties per band and the total different counties worked.
Upon loading a County Hunting log file {option 19}, a window will show the total counties worked per band. The total number of unique counties worked is displayed in the green label to the left of this window.
See ADIF import to add an ADIF file.
While logging, to see the counties in a state, enter the state first. Or click a QSO in the log window, then click the county button. The same county name can extend over many states. The state input field allows GenLog to sort the totals/uniques by also looking at the state. Check your spelling !
File merge:
It would be nice to merge some other logfiles into a County Hunting log to keep track of totals, but other contests/activities do not have the county name spelled out. See the County Entry form.
Remember, you can operate in multiple contests and just click the filename to change logs. Hint: Give the logfile a name that tells you what the contest is - {ind_qp.log} {co_hunt.log} {usco_ssb.log} - so you can bounce between them quickly.
You can run COUNTIES while logging and <Alt> + <Tab> between them.
Duping
Some contests allow dupes when the QTH exchange is different - QSO Parties where mobiles travel to different counties for example. When a dupe message pops up, hit <Enter> or <Space> to select the [OK] button, then enter a different exchange - or <Esc> to cancel.
Some contests allow dupes when the QTH exchange is different - QSO Parties where mobiles travel to different counties for example - or Rovers in different QTHs. When a dupe message pops up, hit <Enter> or <Space> to select the [OK] button, then enter a different exchange.
If you select the {View} menu and click {Show dupe info} it toggles to the other selection {Don't show Dupe info}. If the Q-points aren't quite right, the sponsor will score your log anyway - without penalty for the dupes.
WSJT contest duping
Auto Keyer file setup
Old: GenLog did not auto load different CW keyer setup files at contest startup, or when operating multiple contests.
New: Now it can. The auto load of keyer files associated with the loaded contest is particularly useful when operating in multiple contests at the same sitting.
Clicking a log filename in the logs window loads that log and sets up the logger for that contest, therefore working several different contests is possible. State QSO parties and others often occur on the same weekend. To work each contest or a non-contesting DX station, you can just click between the log files. Moving most of the old logs to a storage folder will make finding the contests of interest in the logs window easier. Naming them with some descriptive text is helpful as well - {2016 PAQP}, {2016 RoadKill} for examples.
Click the  button in the CW setup form to access the setup.
Use this setup to auto load a keyer file at the start of a new contest, or when you re-load an existing log.
1. You need to start a new contest and make at least 1 QSO. If you already have a setup for that contest you can re-load the contest log at any time and have the keyer file loaded as well.
2. If you do not have that contest setup, then after making 1 QSO, click the Refresh contest & keyer lists menu item to update the contest name combo-boxes and select the associated keyer file.
3. After that, you can start another contest if you wish and do #1 and #2.
4. Turn On the Auto Keyer function and select [Done].
All log files in GenLog`s log window and CW keyer files in GenLog`s folder are added to the 10 combo-boxes. New contest logs just added and new keyer files just created require the Refresh contest & keyer lists menu click to update the combo-boxes. Select the contest and the associated CW keyer filename from each list. Leave the unused boxes blank. Back-space existing boxes to clear them. When a contest log is opened and a keyer file is not specified in the setup table, the currently loaded keyer file is retained.
Initially I found it helpful to put my old logs in GenLog`s folder, to give me a large list to select from. Once you fill the Auto Keyer file setup with your favorite contests, you can test the setup. To test, open the CW setup and move it off to the side. Then click your favorite contest logs and verify the correct file loads and your stored messages follow the current contest rules. After testing the Auto load function, you can move the old logs back to the storage folder.
Click the Refresh contest & keyer lists menu item to update the contest name and keyer file combo-boxes. Do this after starting a new contest that is not in the current setup. Also do this after making and saving a new keyer file, that you want to add.
An easy way to put an F-Key cheat sheet in front of you is to shrink the CW setup window and move it to the side. The keyer filename is displayed as well.