HOME Ham Projects Outward Links Links to this site
I have been working on a very small, inexpensive, ARDF transmitter for practice use with the Edison Amateur Radio Network (EARN).
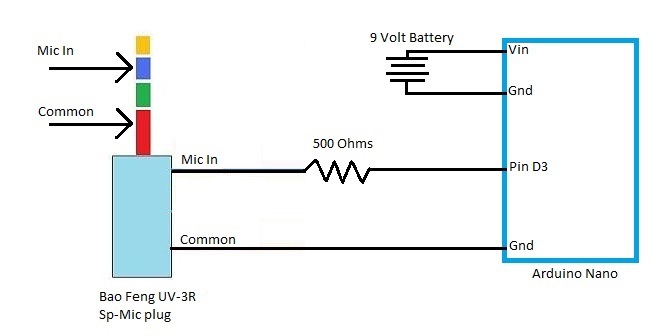
I have a Bao Feng UV-3R and a couple of UV-82 HTs, which have built in VOX (voice operated transmit) functions. This means if an audio signal is injected to the microphone input the HT will transmit. Using this function is much easier than building a push-to-talk circuit controlled by the Arduino, although that would certainly be an option if you wanted too.
By putting the ARDF tone generator in a simple enclosure that can be taped or velcroed to the HT it make a very small package. Using the standard rubber-ducky and low power, this can be received and tracked from several miles away in open territory.
I saw a comment on Facebook about a project by Allan Gallop, M3RKV, for a simple transmitter controlled by an Arduino Nano. He wrote a simple sketch, interpreting morse code: 0 - pause, 1 - dit and 2 - dah to control the timing of the pulses. His keyed a simple UHF module, and I wondered if it could also be used with a VOX HT. I also copied his tracker for use in rocketry, and it works well.
The circuit is very simple, with power being provided from a 9v transistor battery and the data being provided by a PWM digital pin on the Nano. I used an Arduino knock-off from Elegoo, available from Amazon for about $15 for a three pack. They come with the headers not installed, which is good for this kind of project that only uses three connections. In this simplified schematic the unused Nano pins are not shown.
Here is the sketch, based very closely on M3RKV's, since I hate to reinvent the wheel.
//Based on Fox Hunt sketch by M3RKV
//msg="moe"x15, w6dps
int msg[]=
\{2,2,0,2,2,2,0,1,0,0,2,2,0,2,2,2,0,1,0,0,2,2,0,2,2,2,0,1,0,0,2,2,0,2,2,2,0,1,0,0,2,2,0,2,2,2,0,1,0,0,2,2,0,2,2,2,0,1,0,0,2,2,0,2,2,2,0,1,0,0,2,2,0,2,2,2,0,1,0,0,2,2,0,2,2,2,0,1,0,0,2,2,0,2,2,2,0,1,0,0,2,2,0,2,2,2,0,1,0,0,2,2,0,2,2,2,0,1,0,0,2,2,0,2,2,2,0,1,0,0,2,2,0,2,2,2,0,1,0,0,2,2,0,2,2,2,0,1,0,0,2,2,0,2,2,2,0,1,0,0,2,2,0,2,2,2,0,1,0,0,2,2,0,2,2,2,0,1,0,0,2,2,0,2,2,2,0,1,0,0,2,2,0,2,2,2,0,1,0,0,1,2,2,0,2,1,1,1,1,0,2,1,1,0,1,2,2,1,0,1,1,1\};
int i;
int t;
void setup() \{
// set up pin 3 as output
pinMode(3, OUTPUT);
\}
void loop() \{
// main code here, to run repeatedly:
for(i=0;i<(sizeof(msg)/sizeof(int));i++)\{
delay(200);
if(msg[i]==0)\{t=450;\} //pause between letters
if(msg[i]==1)\{tone(3,800,100);t=100;\} //dit+delay between elements
if(msg[i]==2)\{tone(3,800,300);t=300;\} //dah(=ditx3)+delay between elements
delay(t);
\}
//15 second pause between messages
delay(15000);
\}
The tone() function is used to produce the audio signal required, where the first parameter is the Pin used, the second is the frequency, and the third the duration in mS.

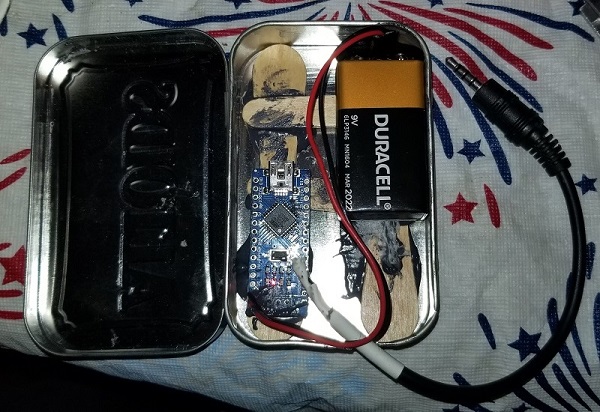
I used a popsicle stick to mount the Arduino into a Altoids tin. The Arduino is set in at an angle that allows the USB cable to be attached for updates.
I also built up a couple of popsicle stick tie-downs to allow the 9-volt transistor battery to be held in the tin with wire ties. The popsicle stick parts are then attached to the Altoid tin with JB Weld. (No, not the neatest job...)
Here is the finished ARDF Fox transmitter, installed in a box using velcro. I will also be making a version for the UV-82 family and playing with the sketch to coordinate two or more foxes.
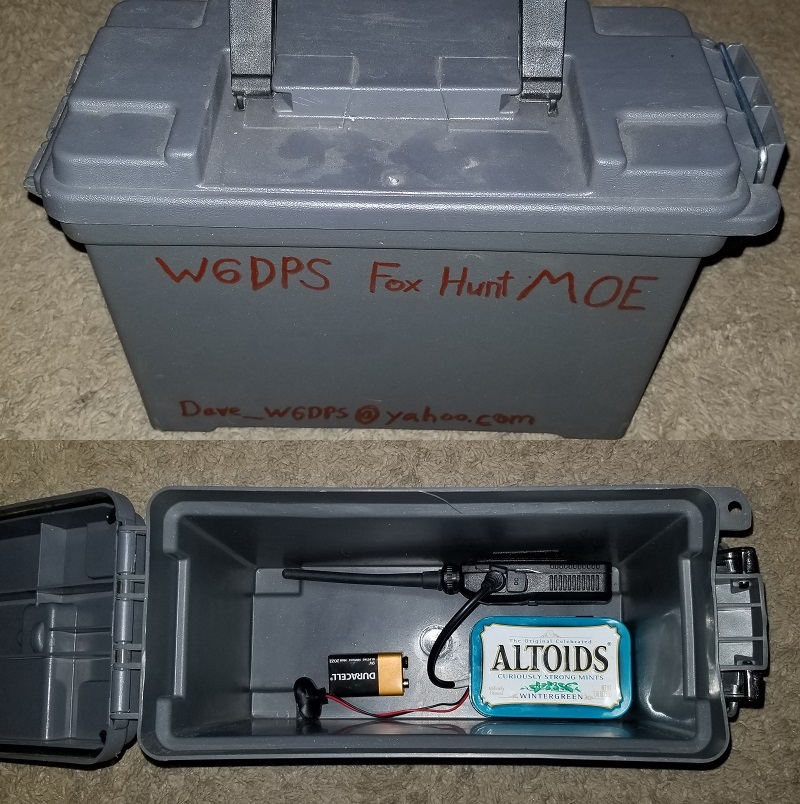
If you want a smaller fox, and weather resistance is not an issue, the Altoids tin will velcro to the HT. The battery easily fits in the Altoids tin, but I did not include a power switch, so I remove it when not in use. It also adds scale to the photo in case you are not familiar with the UV-3R or Altoids.

I will add more information after field testing.
Where you can get the Elegoo Nano Knock-off
Updated 02/08/26