W9FE'S
BASIC DMR INFO PAGE
|
Catch me on the Illinois-Link DMR Talkgroup 31171

NEW TO DMR?
LEARN THE BASICS FIRST!
REQUIRED FIRST STEP: GET A DMR ID
Click here or on the Picture to apply for a DMR ID at RadioID.net.

YOU MUST HAVE A DMR ID BEFORE TRANSMITTING ON DMR NETWORKS!
 VIEW THE INTRODUCTION TO DMR POWERPOINT PRESENTATION (by WCARA)
AND
Introduction to DMR (Digital Mobile Radio) Presentation - (by KB9VBR)
 | Introduction to DMR (by WD8KNI) | | DMR Etiquette & Common Courtesy |
Listen to Live DMR Worldwide (TG91) QSO's on the Brandmeister Hoseline
(NOTE: Be sure to press the top right corner Player Icon button on Brandmeister Hoseline Live to start the Audio stream)
SECTION 1
CODEPLUG PROGRAMMING
5 SIMPLE STEPS
Step 1: Set up your Basic & General Settings (Callsign, DMR ID)
Step 2: Add Your Talkgroups (Digital Contacts)
Step 3: Add Your Receive Group
Step 4: Add Your Channels
Step 5: Add Your Zones with Channels
EXCELLENT CODEPLUG PROGRAMMING VIDEO TUTORIALS
| How to Write a DMR Codeplug (video) | | How to Write a Hotspot Codeplug (video) |
| K8JTK Tutorial - DMR in Amateur Radio; Programming A Codeplug |
SAMPLE CODEPLUG EXAMPLES
Try out a Brandmeister Starter Codeplug for use with your Hotspot or SharkRF Openspot
 Hotspot Frequency: 434.0000 MHz
(Be sure to click the Download Button on the link Popup)
| Basic Hotspot Codeplug-TYT MD-380/390(GPS) | | Basic Hotspot Codeplug-TYT MD-UV-390(UHF/VHF) |
DMR to Fusion Crossmode Instructions with the SharkRF Openspot
FLOWCHART STEPS TO PROGRAMMING YOUR RADIO
FOR YOUR OPENSPOT OR HOTSPOT
(Click photos to enlarge Sample Templates)
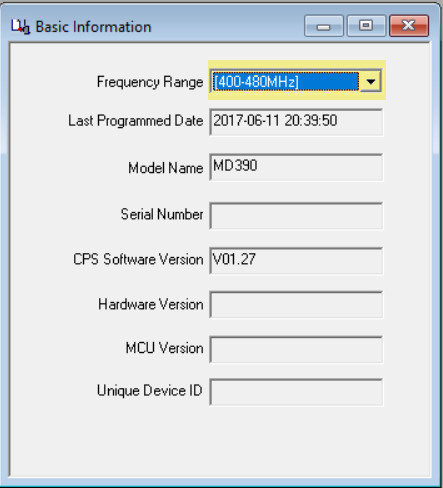
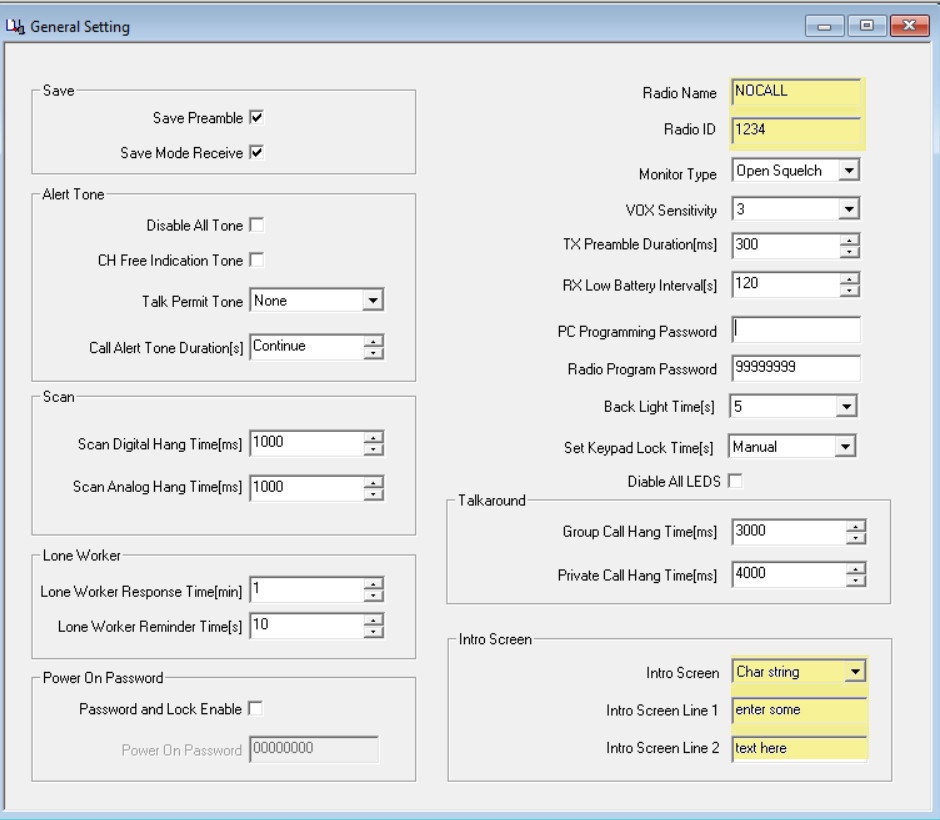
STEP 1) BASIC RADIO FREQUENCY, CALLSIGN & RADIO ID, AND GENERAL SETTINGS
BASIC AND GENERAL SETTINGS
Set Radio Frequency Range
Radio Name: Your Callsign
Radio ID: Your DMR ID
Intro Screen: Character Screen
Intro Screen Line 1: Your Callsign
Intro Screen Line 2: Your Name or Phone No.

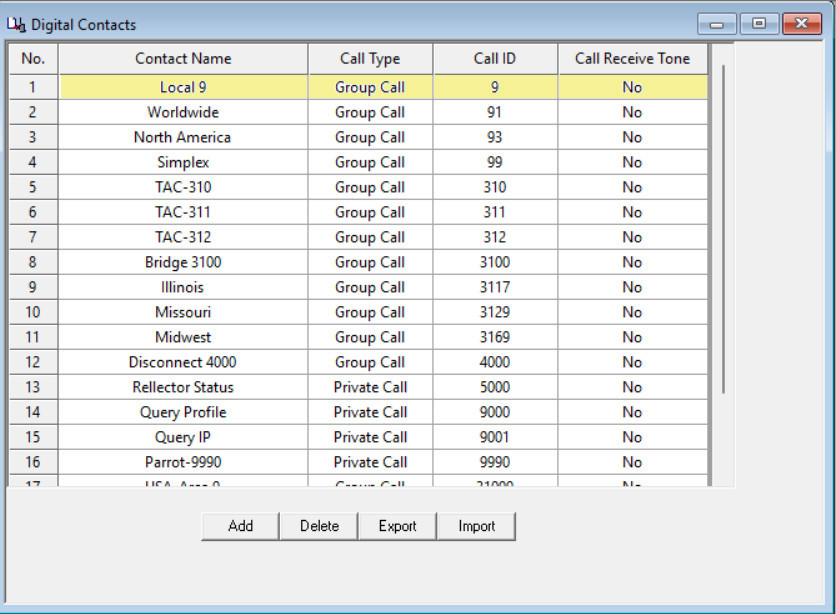
STEP 2) ADD YOUR DIGITAL CONTACTS
(include Call ID Talkgroup 9 for Openspot)
DIGITAL CONTACTS SETTINGS
Contact Name: Local 9 (or Openspot)
(Note: Add addtional Contacts as desired)
Call Type: Group Call
Call ID: 9
Receive Tone: No
NOTE: You can Print or download the Complete Brandmeister Talkgroup List here
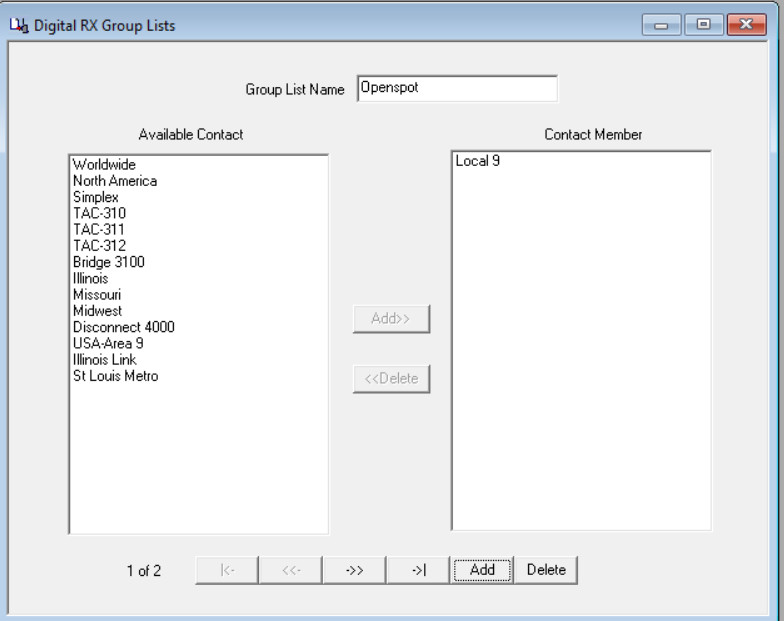
STEP 3) ADD YOUR DIGITAL RX GROUP LIST
(Local 9 for Openspot)
DIGITAL RX GROUP LIST SETTINGS
Group List Name: Openspot
Add Available Contact: Local 9 (for Openspot) to Contact Member
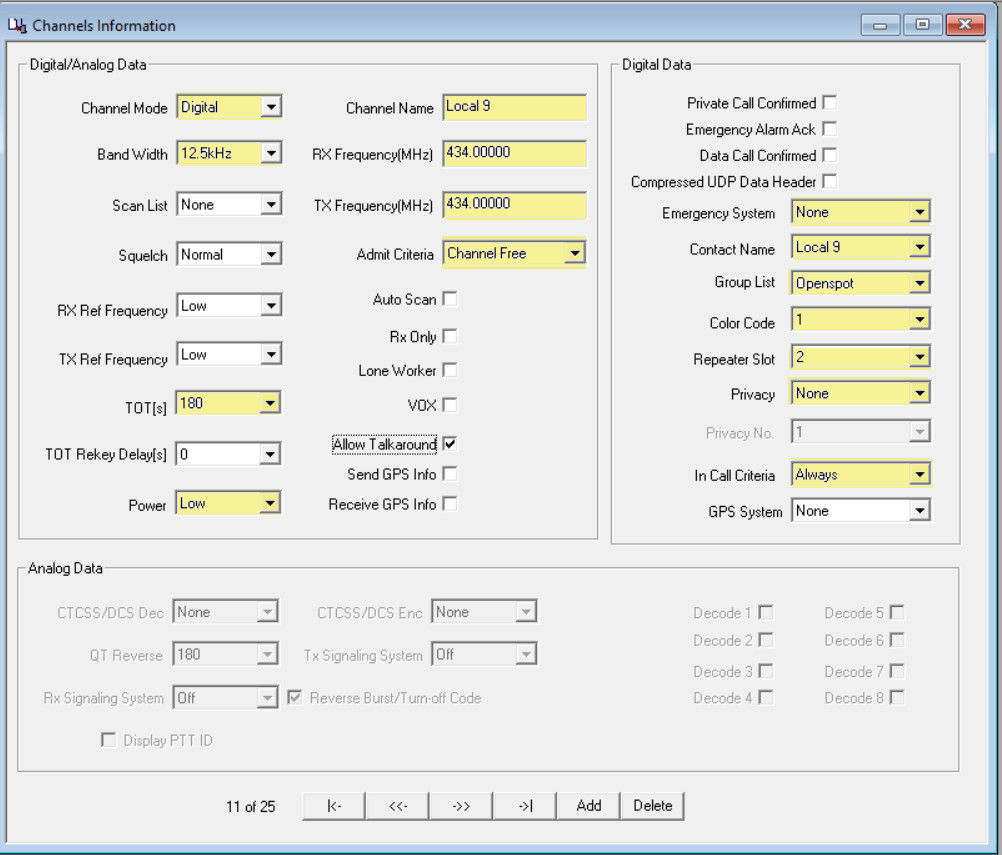
STEP 4) ADD YOUR CHANNELS
(RX/TX freq., Talkgroup, Color Code, Timeslot,...etc.)
NOTE: Openspot uses Color Code = 1, Repeater Slot = 2
CHANNEL SETTINGS
Band Width: 12.5kHz
TOT[s]: 180s (3 min) max.
Power: Low (for Hotspots), High (for Repeaters)
Channel Name: Local 9 (or OpenSpot)
RX Frequency: 434.000
TX Frequency: 434.000
Admit Criteria: Always or Channel Free
Allow Talkaround: Yes
Emergency System: None
Contact Name: Local 9 (or Openspot)
Group List: OpenSpot
Color Code: 1
Repeater Slot: 2
Privacy: None
In Call Criteria: Always
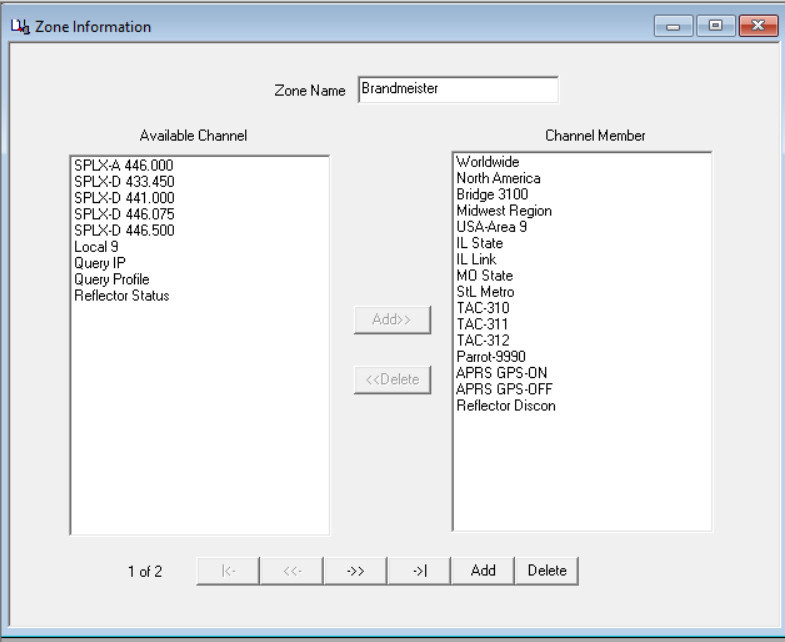
STEP 5) ADD YOUR ZONES
This shows your channel on the radio channel selector display
ZONE INFORMATION SETTINGS
Zone Name: Brandmeister
Add From Available Channels to Channel Members: (Examples)
Worldwide
North America
Bridge 3100
Midwest Region
USA-Area 9
Illinois State
Illinois Link
Missouri State
St Louis Metro
TAC-310
TAC-311
TAC-312
Parrot 9990
Reflector Disconnect
DMR ZONE LISTS
Need help organizing your DMR Zones and Channel List? Here's my DMR Zone setup.
Feel free to organize your Zones and Channel List similar to mine or create your own personalized setup
File can be downloaded in either PDF or Excel formats
| W9FE DMR Zone Listing.pdf | | W9FE DMR Zone Listing.xlxs | | W9FE DMR Zone Listing.xlx |
SECTION 2
DIGITAL SIMPLEX
FLOWCHART STEPS FOR PROGRAMMING
DMR SIMPLEX FREQUENCIES
ON THE TYT MD-380/390 (GPS)
DMR SIMPLEX VOICE FREQUENCIES
| 441.000 | | 446.500 | | 446.075 Most Common North America |
| 145.790 | | 145.510 | | 433.450 Most Common Non-North America |
 IMPORTANT: *DO NOT USE 146.520 or 446.000 Mhz as they are National Analog Simplex calling channels. Also avoid repeater input or output channels, locally used Non-DMR simplex channels, satellite sub-bands, and any other frequencies that could disrupt amateur communications
(Click photos to enlarge Sample Templates)
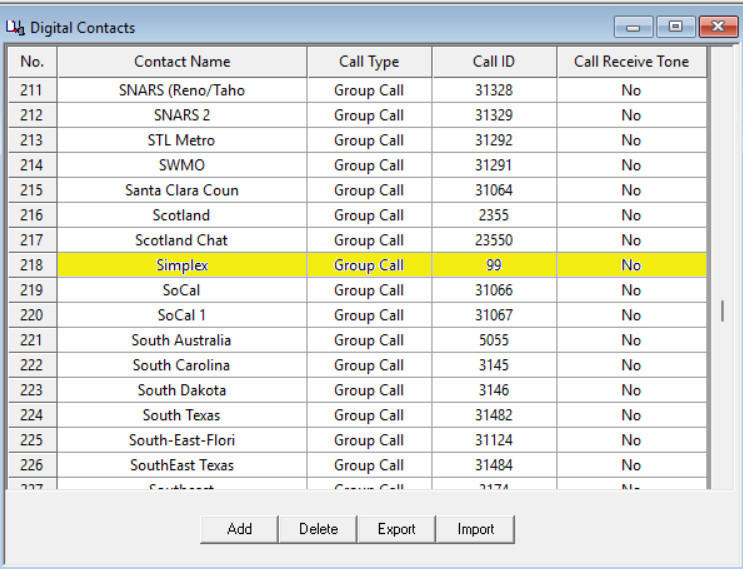
STEP 1) ADD DIGITAL CONTACT (TG99)
DIGITAL CONTACTS SETTINGS
Contact Name: Simplex
Call Type: Group Call
Call ID: 99
Receive Tone: No
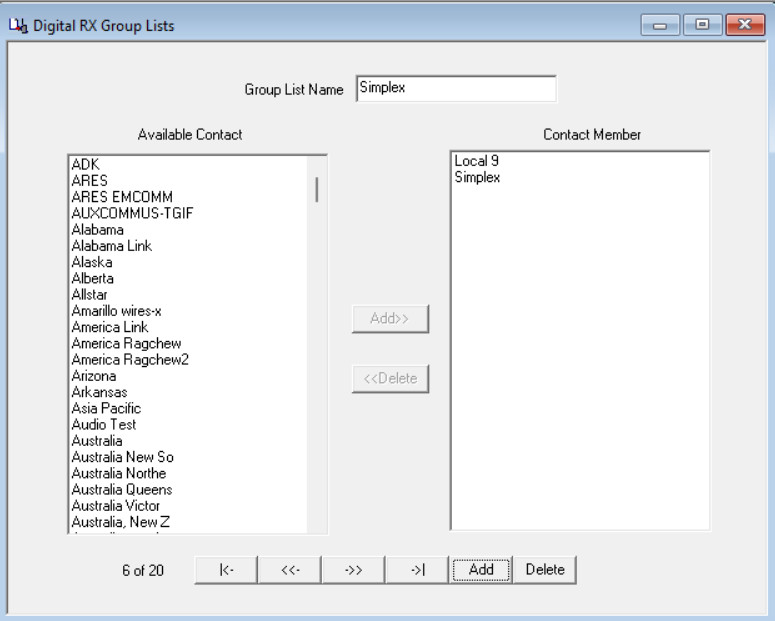
STEP 2) ADD SIMPLEX DIGITAL RX GROUP
DIGITAL RX GROUPS LIST SETTINGS
Group List Name: Simplex
Add Available Contact: Simplex to Contact Member
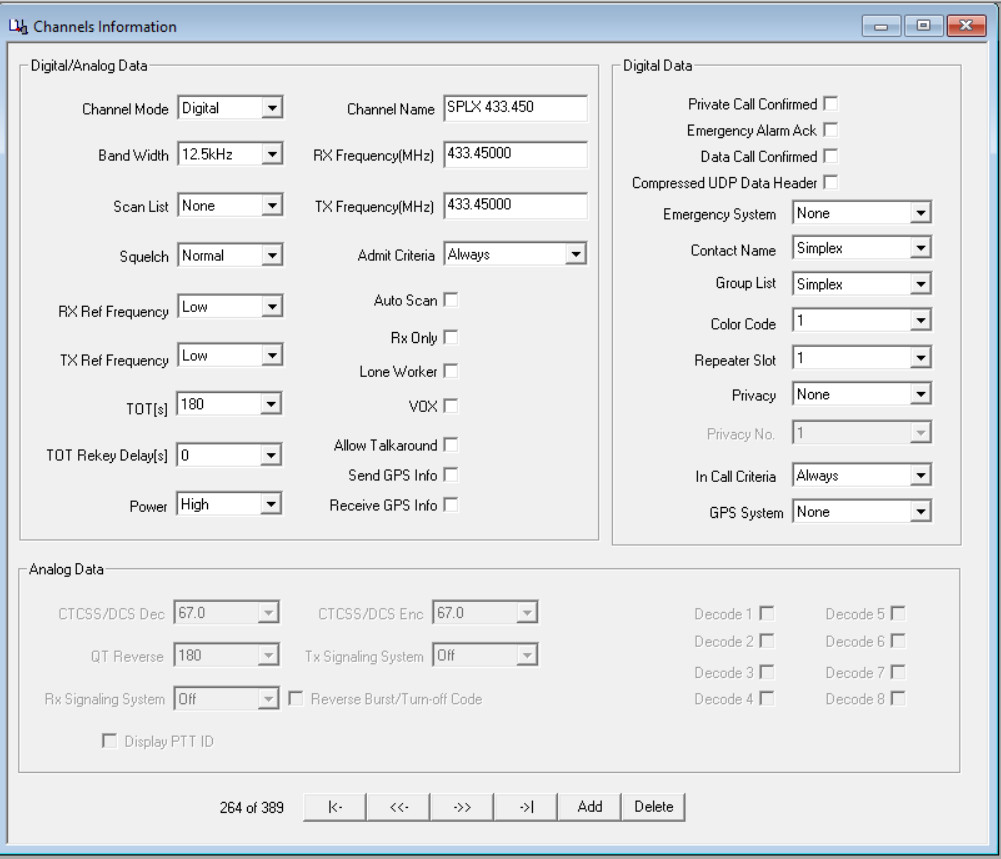
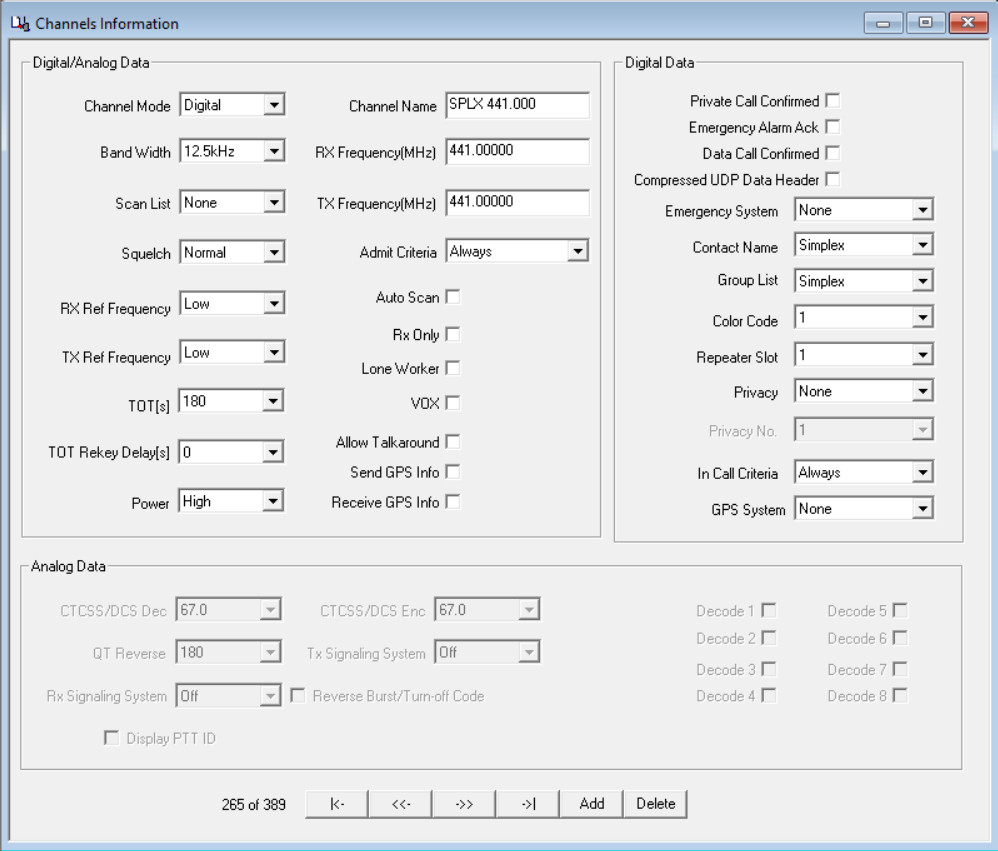
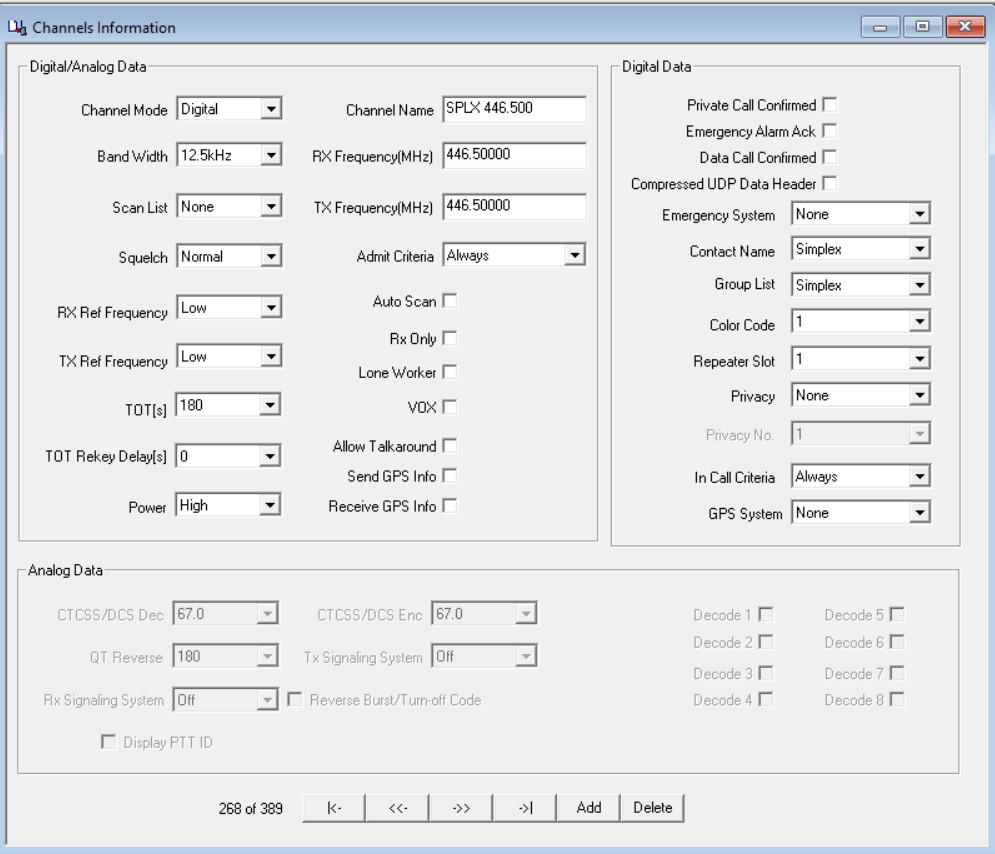
STEP 3) ADD THE SIMPLEX CHANNELS
Change Channel Name, RX & TX Frequency for Each Simplex Channel
NOTE: Simplex uses Color Code = 1, Repeater Slot = 1
CHANNEL SETTINGS
Band Width: 12.5kHz
TOT[s]: 180s (3 min) max.
Power: High
Channel Name: SPLX 433.450
RX Frequency: 433.450
TX Frequency: 433.450
Admit Criteria: Always (or Channel Free)
Allow Talkaround: No
Emergency System: None
Contact Name: Simplex
Group List: Simplex
Color Code: 1
Repeater Slot: 1
Privacy: None
In Call Criteria: Always
433.450 MHz 441.00 MHz 446.075 MHz 446.500 MHz

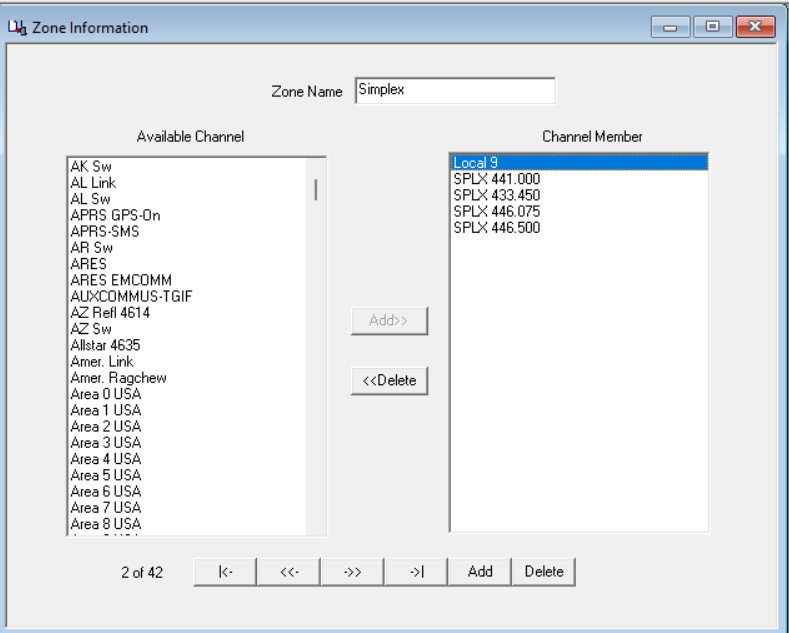
STEP 4) ADD CHANNELS INTO A SIMPLEX ZONE
This shows your channel on the radio channel selector display
ZONE INFORMATION SETTINGS
Zone Name: Simplex
Add From Available Channels to Channel Mmebers:
Local 9 (or Openspot)
SPLX 433.450
SPLX 441.000
SPLX 446.075
SPLX 446.500
SECTION 3
PARROT CHANNEL
and COMMON COURTESY
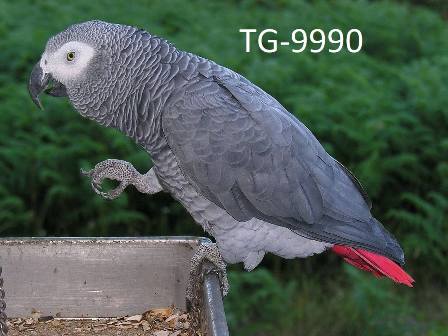
REMEMBER:...PARROT IS YOUR DMR FRIEND
Example Parrot Channel (Brandmeister) for Audio/Radio checks
Instead of constantly asking for radio checks on populated DMR talkgroups like you were still on CB...Take advantage of the Parrot talkgroup (Group call on Repeater TG9998 or Private call on Brandmeister TG9990) to check your audio. It will echo back your audio test when you transmit to it.
Announce your Talkgroup when announcing your availability or calling another station. Some users may be scanning or have a radio without a display. (e.g. "This is W9FE listening on North America" or when identifying during your QSO, say "W1ABC, This is W9FE on TAC 310".)
Avoid calling CQ. DMR is not HF. Operating DMR on the network is not DXing. If you desire a contact, Just say something like, "This is W9FE listening on North America"
Move to a more localized talkgroup when connecting with someone on a Wide Area Talkgroup (e.g. Worldwide, Nationwide, Regionwide, or Statewide) or keep your QSO's short. You will be tying up hundreds of repeaters on Wide Area Talkgroups. Consider moving to a TAC channel for longer QSO's
Listen...Listen...Listen. Spend most of your time Listening..not talking. Allow 180 Seconds before transmitting when first joining a talkgroup. This will avoid calling over a QSO transmission in progress that your radio has not yet unsquelched. Many people have their Time Out Timer (TOT) set to 180s and your radio will not unsquelch a transmission already in progress on the talkgroup until they actually unkey.
Allow several seconds of Pause between transmissions. This will allow users with hotspots to disconnect from the talkgroup or allow others to join. Quick keying during your QSO is inconsiderate.
and once again...Use Parrot to test your audio instead of on populated talkgroups
You will occasionally see some user ID's appear momentarily. "Kerchunking" on DMR repeaters is necessary for them to hear the PTT talkgroups or those with hotspots to change talkgoups. Don't assume that they are looking for you to contact them. Many times they are commanding things up so they can listen.
SUGGESTED HOTSPOT FREQUENCIES
Illinois Repeater Association Band Plan-2006
Have a DMR Hotspot? Set your DMR Hotspot to one of the Auxiliary Repeater Links below
Avoid Repeater inputs & Satellite Uplink frequencies
Hotspots, repeaters, terrestrial simplex, and "anything not satellite" should never transmit in the segments 145.8-146.0 MHz or 435-438 MHz by international band plan.
ARRL NEWS - DMR Hotspots & Interference with Satellite Uplinks
IMPORTANT: *DO NOT USE 446.000 Mhz as it is a National Analog Simplex calling channel. Also avoid repeater input or output channels, locally used Non-DMR simplex channels, satellite sub-bands, and any other frequencies that could disrupt amateur communications
IN THE U.S.:
Part of the 70cm band (433.00 - 435.00 MHz) is reserved for "Auxiliary Repeater Links" (your OpenSPOT fits this definition well enough.) IT IS UP TO YOU TO MAKE SURE A FREQUENCY IS NOT ALREADY IN USE BEFORE YOU BEGIN USING IT WITH YOUR OPENSPOT !!! If you cause interference with someone else's equipment, there is no excuse for not trying a different frequency! You might want to check with your area's Frequency Coordinator.
A second block within the 70cm band (445.00 - 447.00 MHz) is reserved for "Auxiliary and Control Links, Repeaters, and Simplex (Local Option)". Again, your OpenSPOT is a good fit, here. AGAIN - IT IS UP TO YOU TO MAKE SURE A FREQUENCY IS NOT ALREADY IN USE BEFORE YOU BEGIN USING IT WITH YOUR OPENSPOT !!! It bears repeating - you might want to check with your area's Frequency Coordinator.
It is recommended that you check with your local Frequency Coordinator before selecting a frequency, and at the very least, set a UHF ANALOG radio to a frequency of interest, in VFO simplex mode. Then turn up the volume, and just listen for a couple hours as you go about your day. If you don't hear anything (voice, digital screeching, or other obvious traffic), you might be able to use that frequency. If you hear anything, set VFO to a different frequency and listen again for a couple hours. (With so many frequencies to choose from, if you pick something in the middle of the pack, you'll likely get lucky on the first try.)
The Illinois Repeater Association (ILRA.net) lists the following Band Plan for Auxiliary Link Frequencies:
433.025-434.975 (25 MHz Spacing) - FM Auxiliary Links
445-447 (25 MHz Spacing) - Auxiliary and Control Links, Repeaters, and Simplex (Local Option)
ST Louis Area DMR Repeater Codeplugs
Need a DMR Codeplug for our St. Louis Area DMR repeaters?
NOTE: These codeplugs listed are NoCall / NoID codeplugs...you will need to enter in your callsign and DMR ID into them using your Codeplug Programming Software (CPS) prior to importing into your radio. NOTE: YOU MUST HAVE A DMR ID BEFORE TRANSMITTING ON DMR NETWORKS!
| Basic Hotspot Codeplug-TYT MD-380/390(GPS) | | |
| Basic Hotspot Codeplug-TYT MD-UV-390 (UHF/VHF) | | K7QLL Repeater (Greenville, IL)-TYT MD-380/390(GPS) |
St Louis Area DMR Repeater Listing (by Frequency)
IMPORTANT NOTE: It is imperitive to utilize a more localized talkgroup when connecting with someone on the St. Louis Area DMR Repeaters or keep your QSO's short. You will be tying up hundreds of repeaters on Wide Area Talkgroups that are Nationwide, Regional, and Statewide Talkgroups. Use these as calling talkgroups and consider moving to a TAC channel for longer QSO's. This is common DMR courtesy for everyone to adhere to.
442.450 - KD0BQS - Arnold, Mo
443.2500 - N0KQG - St. Charles, Mo
443.43125 - K7QLL Dragon Fly Acres Amateur Radio Club website - Greenville, IL
443.550 - K0MDG Missouri Digital Group website - St. Louis, MO
444.6500 - WB0HSI - St. Charles, Mo
Go to W9FE's Homepage