 |
Replacing the Internal
Battery
in the HTX-202 HT
Craig LaBarge, WB3GCK |
After nearly 11 years of faithful service, my
trusty HTX-202 lost it's memory. Every time I powered it up, I got the
dreaded "ERR1" error. This error condition is indicative of something
wrong with the internal memory. Sometimes, something just gets
temporarily out of whack in there and you can clear it by
simultaneously pressing the "Function" and "D" buttons while powering up.
In my case, the ERR1 condition showed up every time I powered up. This
is usually a sure sign that the internal memory backup battery has bit
the dust.
The original battery is a 3 volt lithium cell that is permanently
soldered into place. To make
future replacement a whole lot easier, I removed the original battery
and installed a battery holder for a garden variety CR2032 lithium
battery. While I did the repair, I took some pictures, in the hope that
they'll make life a little easier for someone with the same problem.
Disclaimer: While the procedure described here worked perfectly
for me, I make no guarantees in your case. When you perform surgery on
your radio, you do so at your own risk. I am not in the repair
business, so I am not able to perform this mod for you.
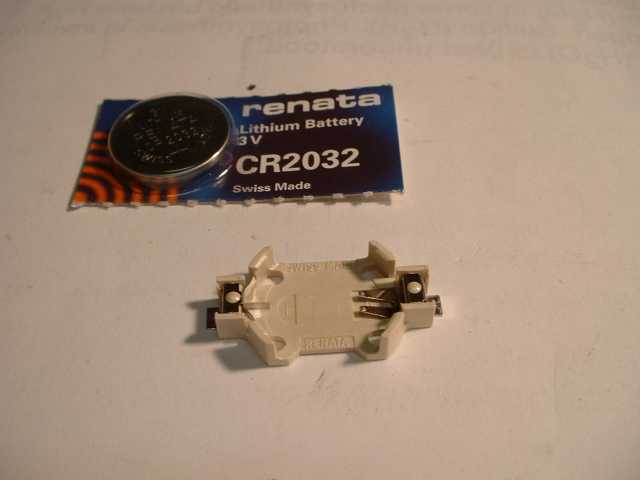
Now, with that out of the way... You'll need a battery holder. I
chose a surface mount battery holder similar to Renata HU2032-LF
(Mouser
Electronics part number 614-SMTU2032-LF). Other types might work; just
make sure it is a surface mount part. Of course, you'll also need a CR2032 3V lithium battery. These are
very common and are very inexpensive. (Mouser sells them, too.)
Here's the procedure:
 |
- Remove the battery pack and belt clip from the radio.
- Remove the 4 screws that hold the battery mounting bracket
in place.
|
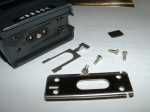 |
- Remove the battery mounting bracket.
- Remove the spring clip and the battery latch slide piece.
Take careful note of how they were installed before you remove them.
|
 |
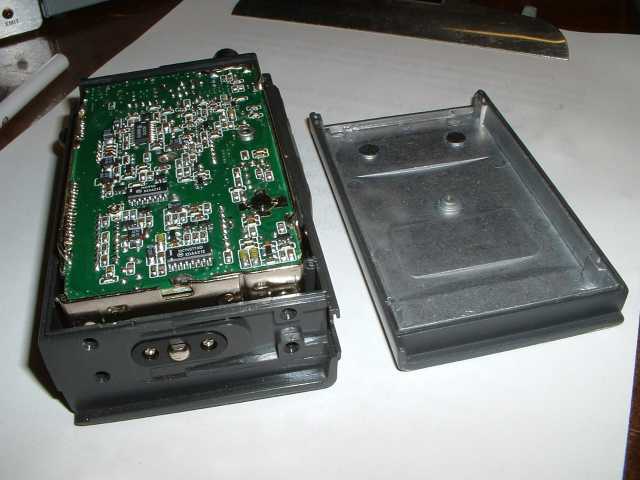
- Remove the 5 screws that hold the back of the radio on. Be
very careful not to strip the slots in these little Phillips screws. I
don't know if replacements are still available from Radio Shack or not.
|
 |
- Carefully remove the back of the radio.
|
 |
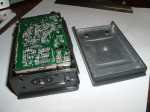
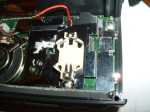
- Carefully remove the circuit board assembly from the radio.
It will still be connected to the front of the radio, so take care not
to damage the interconnecting assembly.
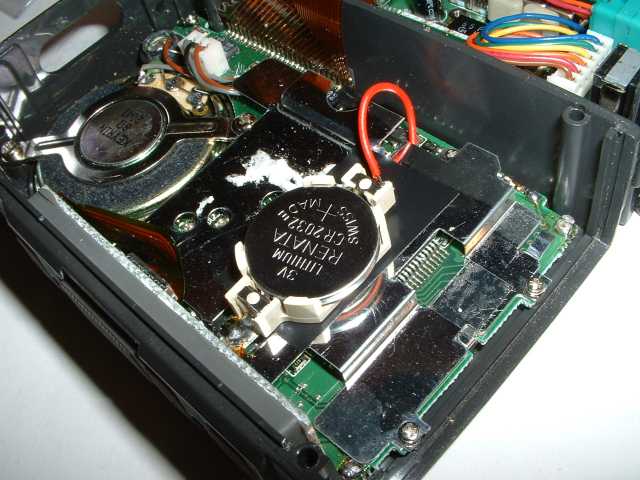
- The memory backup battery is the yellow object on the top
right of the photograph.
- Cut the red wire as close to the battery's positive
terminal as you can.
- Remove the old battery by unsoldering the metal tab
(negative terminal) from the metal shield that the battery sits on. Use
a low-wattage soldering iron and just enough heat to get it loose.
Don't overheat things.
|
 |
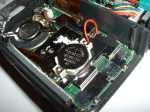
- Place a piece of electrical tape on the metal shield where
the new battery holder will go.
- Set the battery holder in place and solder the negative tab
to the area where the old battery was soldered. (Note: You could use
some thin, doubled-sided foam tape to help secure the battery holder.
If you do, you will proabably need to bend the negative terminal down a
bit to be able to solder it to the metal plate.)
- Before proceeding further, take an ohmmeter and make sure
that you have a good connection on the negative terminal. Also, make
sure that nothing on the positive side is touching ground.
|
 |
- Strip the red wire back about 1/8-inch. Solder the red wire
to the positive terminal of the battery holder.
- Install a fresh CR2032 battery.
- Take a voltmeter and make sure you're getting about 3 volts
from the battery.
- At this point, I covered the top of the battery with some
more electrical tape to make sure nothing gets shorted out when the
radio is reassembled.
- Carefully re-install the circuit board assembly into the
front of the radio.
- Reinstall the back cover.
- Replace the battery pack spring clip, slide button and the
bottom plate.
- Reset the processor by simultaneously pressing the "Function" and "D" buttons while powering up.
|
That's all there is to it. Hopefully, I won't have to open up the
radio again for another 10 years or so! When I do, it will be a snap to
replace the internal battery.
� 2004-2014 Craig A. LaBarge


