Disappointed with the accuracy of your frequency counter? Afraid that the cost of an accurate counter might be prohibitive? Not with this design!The chip count of good frequency counters can now be reduced from the 1980's level of 20 ICs to as few as four or five, and the power consumption and cost reduced as well. The modern counter can be a portable device in a small hand-held box. This new design was developed to suit the requirements of some of the local radio club members, and has three major advantages:
General view of prototype counter (Click on image for bigger view)
- Thanks to Terry ZL1TCF for building the prototype -
In this prototype, an extra POWER switch is fitted to the right, since this unit is powered by an internal battery. The switch on the far left selects HF/VHF, and the other the FILTER. The MODE switch is on the back. This prototype, constructed by Terry ZL1TCF, is very small, only 150mm long.There are three HF operating modes and one VHF mode:
Mode Gate Max Freq Resolution 1 100ms 25MHz 10Hz 2 1s 16MHz 1Hz 3 10s 1.6MHz 0.1Hz 4 (�10) 1s 250MHz 100Hz 4 (�64) 640ms 1600MHz 100Hz
At the centre of this counter is a fast, inexpensive ATMEL AVR microcontroller. Two simple CMOS chips provide the gating and precounter to provide the micro with the necessary high resolution, and the ability to count directly to 25MHz.Two input circuits, a Preamp for audio and HF operation, and a Prescaler for VHF and UHF operation, complete the input circuitry. One or the other of these devices is connected to the counter logic. When one input circuit is connected, power is removed from the other to reduce current consumption. At the same time, the micro is told which circuit is in use, in order that the correct maths can be used.
Other controls go direct to the micro. The power supply is just 5V, making operation from a battery very straight-forward. The micro connects directly to the LCD display, and controls every part of its operation. The display indicates the mode, status items, and the frequency with eight digits plus commas, decimal point and the units in the correct places on all ranges.
Counter block diagram (Click on image for bigger view)
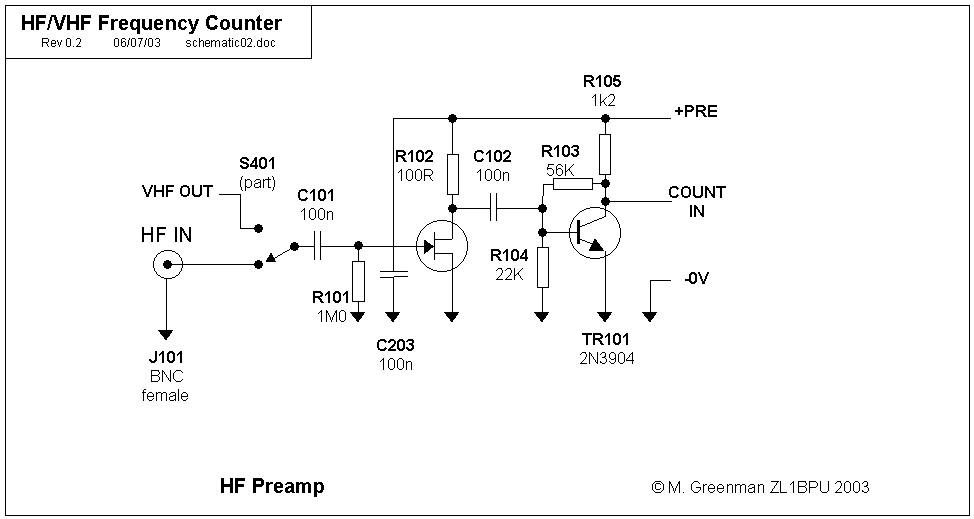
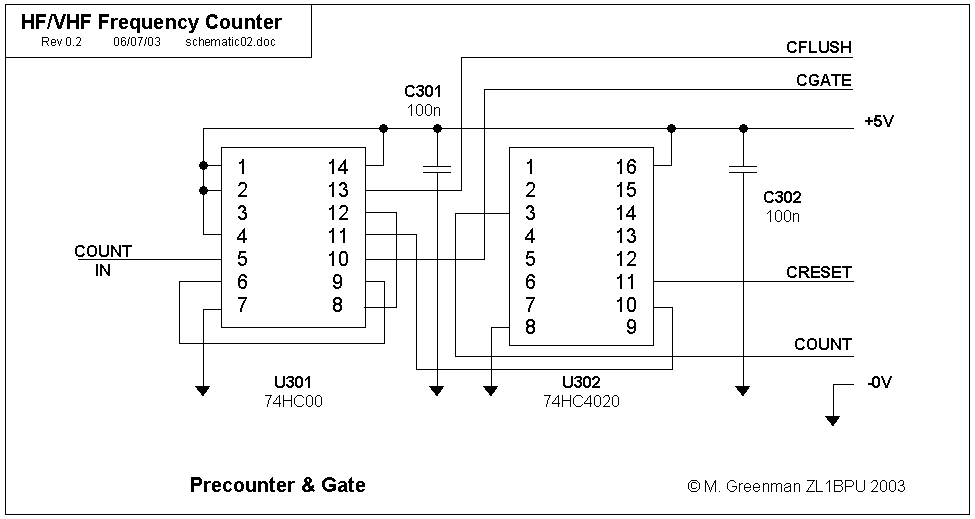
In the HF Preamp, the input signal is first amplified and turned into a logic level square wave, then gated and counted. The same happens with the VHF input, except that it is additionally divided by 64 (or 10, user's choice) by a high speed device capable of operating to 1200MHz. The actual frequency counter is a combination of an internal 16 bit micro counter, and a 14 bit CMOS divider IC called a "precounter". The gating circuitry is complicated by gating both the signal and the precounter, as will be explained.
The precounter is not another prescaler - the count in the precounter is not lost, but brought into the micro at the end of each count period so that it can be appended to the internal count. Extra logic switching allows the input frequency to be disconnected, so the micro can send pulses, and count how many extra pulses are required to flush the precounter. In this way the resolution is maintained. (In contrast, a prescaler, which also accumulates the least significant bits of the count, has this data discarded, and so data resolution is lost).
In VHF mode, an additional maths process has the effect of multiplying the displayed reading by the prescaler division ratio, ensuring that the counter is always direct reading, including decimal point, commas and units. Depending on the mode, the frequency can be indicated in Hz, kHz or MHz.
Closeup of the counter operating in VHF mode (Click on image for bigger view)
The counter includes the PC telemetry which proved so popular in an earlier counter design. It sends the binary count and the mode after every counting period, so an application program can automatically scale the data correctly, then log or display it.The RS232 interface to the PC is unidirectional, and uses power from the PC RS232 interface to power the transmitter. This saves counter battery power, as the RS232 interface draws no appreciable current from the battery, and none at all when not in use. The counter telemetry is quite fast enough to capture the start-up chirp of a transmitter (almost 10 samples/sec).
Special software was designed for two commonly available displays - 16x1 and 16x2. The smaller display indicates the frequency on one line, followed by brief indicators for Mode and Filter status (The photographs show the 16x1 version). The larger display indicates frequency and a gate indicator on the top line, and the Mode and Filter status in text on the second. Special LCD driver routines were developed to allow the LCD to be driven from the high speed processor.
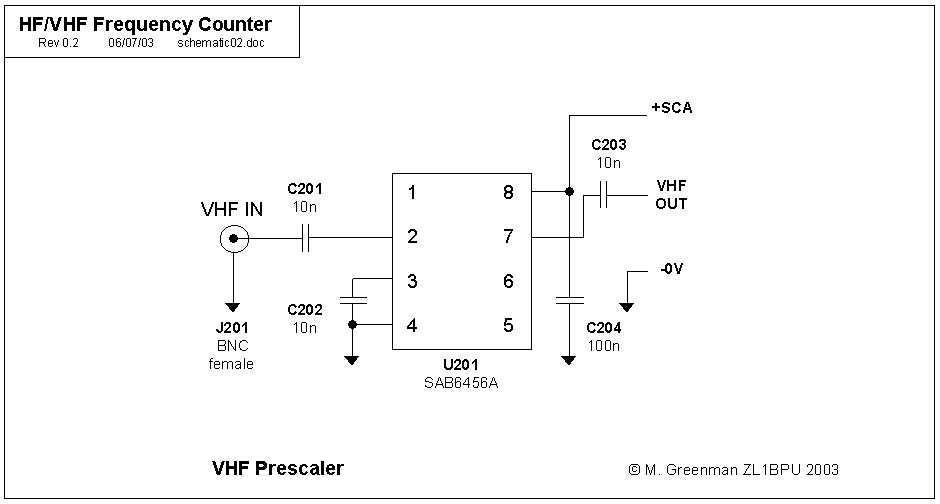
Prescaler
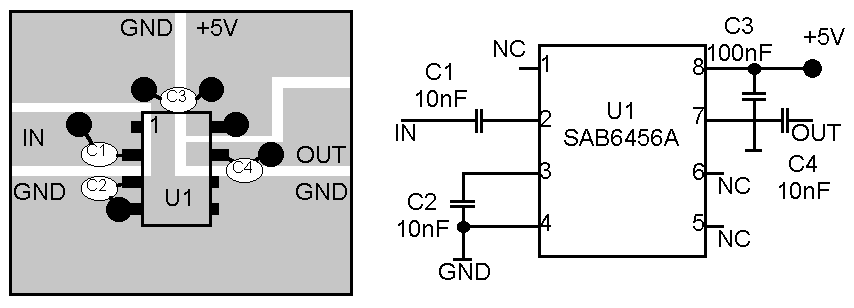
There are several popular prescaler chips. I used an obsolete TV chip, the Philips SAB6456A, in �64 mode. It is quite sensitive and stable, and gives a very reliable reading with the slightest sniff of signal. Other options include the Motorola MC12079P and Fujitsu MB506. To give the prescaler best performance, assemble it on a scrap of hand-engraved circuit board, mounted directly on the back of the BNC VHF input connector.Prescaler Schematic
Suggested Prescaler AssemblyPreamplifier
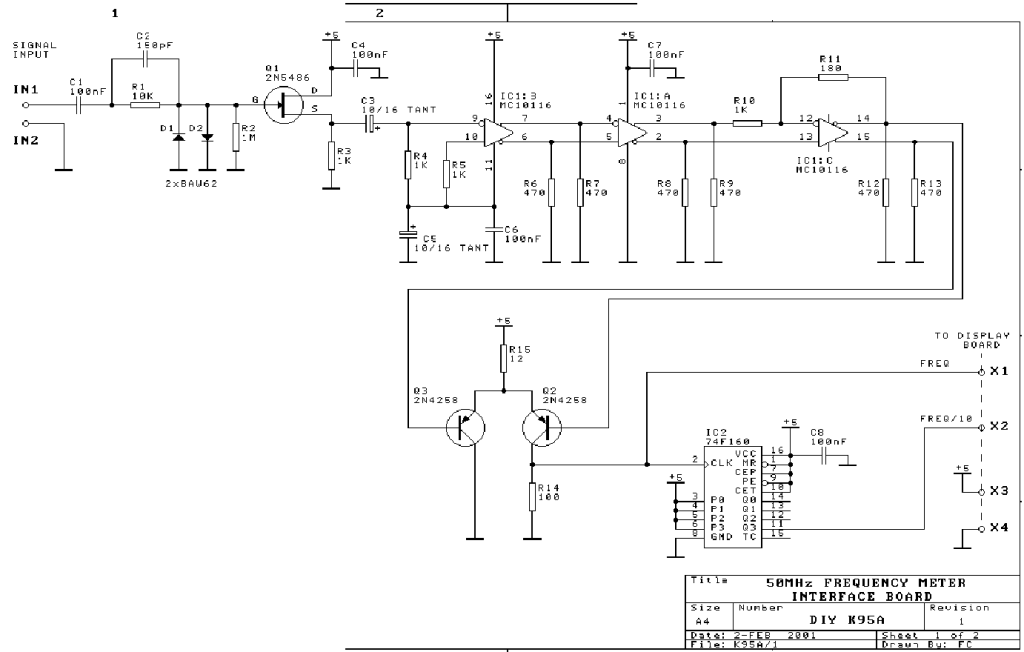
Three different designs are offered, giving differing levels of performance and power consumption. No one design can offer the whole HF frequency range, 1M Ohm input impedance, AND low current consumption.The MC10116 ECL design pioneered by Motorola has the best frequency sensitivity and frequency range, but is power hungry, and requires very careful construction, using VHF techniques. It can operate to over 80MHz. With this design, an extra divide by 10 prescale range is possible, giving better coverage of the "in between" 25 - 75MHz range that can often be difficult to provide in a counter. A good example is this counter preamp by provided Kits 'R' Us (links below).
Kits 'R' Us Counter (see page 7)
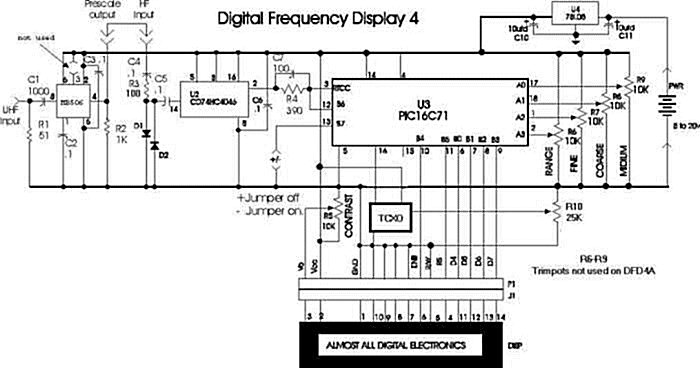
Local copy of K95 preamp schematicFor many applications a low power design using a Philips 74HC4046 is very attractive. It operates to over 20MHz, is reasonably sensitive, has high impedance input, and involves just one chip. This technique was pioneered by Neil Heckt in his DFD4.
DFD4 Frequency Display.
Local copy of DFD4 schematicThe simple FET preamp shown in my schematic has 1M Ohm input, but it is both insensitive and lacking in frequency response, but does draw little current. The FET can be a 2N5485 or BF244. This design is perhaps best used in an embedded situation such as a receiver or signal generator frequency display.
ZL1BPU Simple Preamp schematic
Precounter and Gate
The gate circuit controls the external signals from the preamp or prescaler into the counter, and in addition allows flushing pulses from the micro to read the precounter. This is a simple 74HC00 device.The precounter is a 74HC4040, a 14 bit binary counter. The combination of these two chips should easily count to 40MHz.
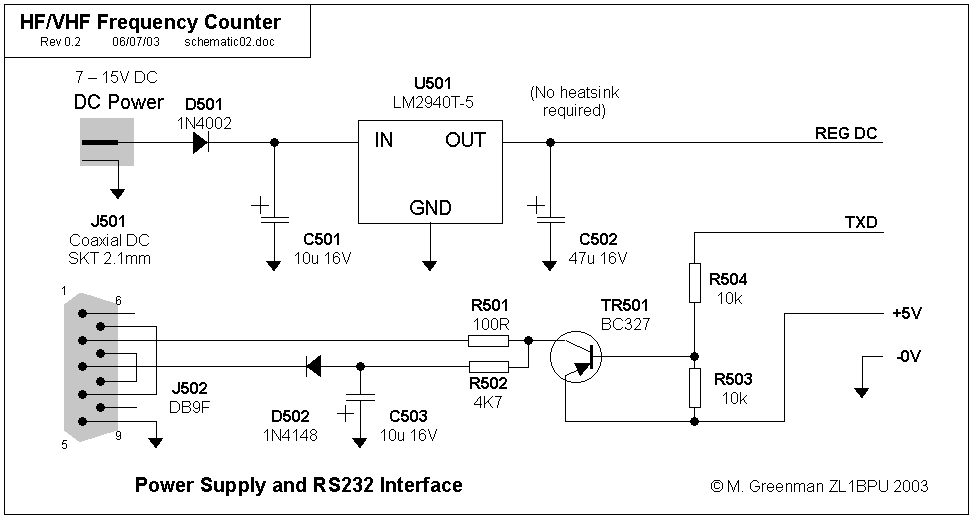
Power Supply and Serial Interface
The power supply is extremely simple. A small 5V regulator (preferably the low dropout LM2940T-5) provides all power for the circuit. DC input can be from a battery, either 7.2V (NiCd, NiMH), 6V (six alkaline cells), or 12V from a sealed lead acid battery or AC adaptor. The circuit is protected from reverse voltage. The current drawn by the circuitry is very low, and no regulator heatsink is required.The RS232 interface consists of just one bipolar transistor. Base current is provided by the micro, but all other current is provided by the host PC. In effect, the negative supply for the RS232 transmitter is provided by the RS232 receiver (which is otherwise unused).
Power Supply and Serial Interface schematic
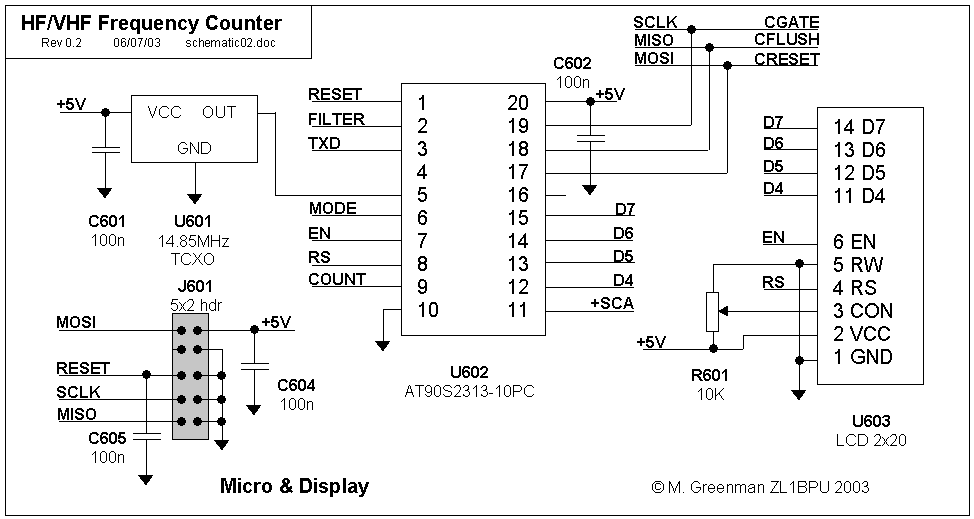
Micro Controller and Display
Even this part of the counter is simple. The 20-pin micro is driven by the TCXO reference clock, and most of its pins provide inputs and outputs to other sections. The LCD display is driven in 4-bit mode, and uses only six micro pins. The design does not require data to be read back from the display. A board mounted trim pot is used to preset the display contrast.The FILTER, MODE and HF/VHF switches are also read by the micro.
A ten-pin header is used to program the micro in circuit. This is especially handy during setup, as the EEPROM values may need to be reprogrammed several times to ensure that calibration is correct.
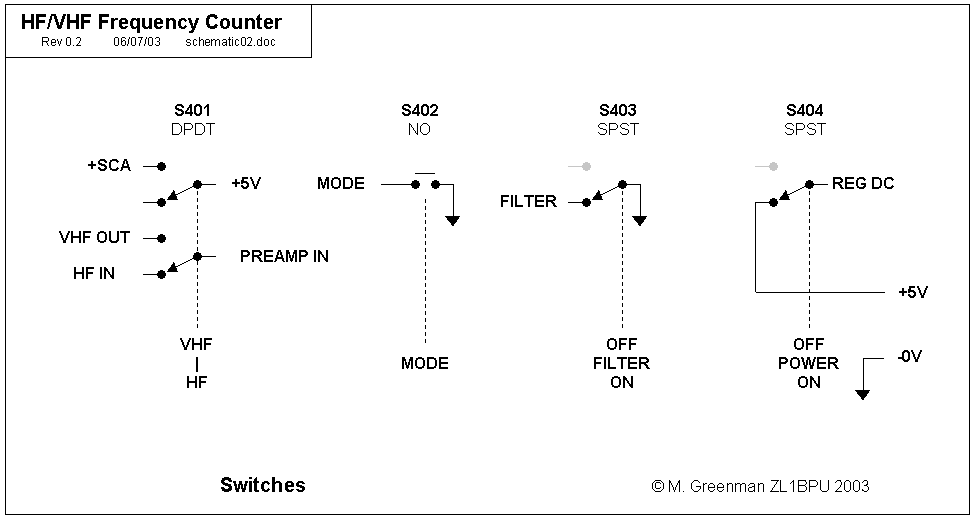
Referring to the Schematic containing the switches, the power switch is only necessary when the counter is built to operate from an internal battery supply. Otherwise, the +5V and REG DC points are simply connected together. The MODE switch is a momentary contact type; the HF/VHF switch is DPDT, and the others simple SPST switches.
Each time the MODE button is pressed, the mode is advanced in a circular fashion, 1, 2, 3, 1 etc. Most importantly, the MODE switch operates using an interrupt routine, so that the mode can be changed instantly, without having to wait for the end of the current counting cycle. This switch is debounced in the software to prevent erratic operation. Mode 4, the VHF mode, is not selected in this way, since extra switching is required. Operation of the MODE switch is ignored during VHF operation.The HF/VHF switch and FILTER switch are also read by the micro, but do not involve interrupts. So, if for example you switch to VHF mode, the present HF count cycle will complete before the next (VHF) one commences. These switches do not need debouncing as they are static and are read only between counts.
The FILTER provides two functions. First, it operates as a low pass filter, and allows signals that are noisy or have poor stability to be read more easily. One of the problems with digital counters is that each reading has an uncertainty of �1 count, because each gate period could contain one more or one less signal edge, depending on the relative timing of the signal and the counter. The second function is to use the improved resolution to remove the uncertainty, so the last digit on the display will not flicker. The readings change slowly with the filter on - in order to read the last digit you need to allow time for the reading to stabilize - at least 20 gate periods.
The counting function operates as the sole activity in the main program, in order to preserve high precision of timing. At the start of the counting period, the counter is cleared, the external precounter is cleared, and the gate delay readied. Once the gate is opened, the delay starts, and counting continues until the gate time is up and the gate is closed.
Then, the internal count is stored and the counter cleared, ready for the collection of the precounter data. The flush gate is enabled, and further pulses are sent from the micro until the internal counter is incremented. This occurs when the precounter has overflowed, and since the flush pulses are counted, the number remaining in the precounter at the end of the count is known. The values of main and precount are then added together.
This raw data is used for telemetry, and the counter value and mode data are sent out the serial port at this point. The raw data is then filtered (if the FILTER is on) and finally sent to a 24-bit BCD conversion routine. The output is then in packed BCD form, ten decimal digits packed into just five bytes of data.
Finally, the BCD data is displayed on the LCD screen. Since each mode is displayed differently (different decimal points and commas, different units) a separate routine is used for each mode. Once this has taken place, the next count cycle starts.
In VHF mode, the extra multiplication required is accomodated by simply placing the decimal point in the correct place.
Apart from the prescaler and preamp, which are best built on copper laminate, the counter can be built quite conveniently on a small project board or section of "Veroboard". All details are included in the manual.Setup and calibration consists of programming the micro, calculating the necessary delays and serial communications baud rate, then programming the values into the micro EEPROM. Finally, calibration is achieved by tweaking the delay values in EEPROM until the counter reads correctly on a standard frequency. If a 14.85MHz TCXO has been used, this will not be necessary as the correct values are supplied with the firmware.
The firmware for this counter comes in two versions, for single line and two line displays. For the one investment, you get both versions, as well as a PC display program, all schematics and the PDF Manual. See the bottom of the Projects page for details.
The two obviously recycleable items used in this project are not difficult to obtain. 14.85MHz TCXOs are common in old cellular phones. Look for older phones, as newer ones have components so small that they are hard to identify and even harder to reuse! Cast-off business phones and other used business and telecom equipment yield suitable displays. Battery packs from old cellular phones can also be used. The micros can often be purchased locally or from a mail-order buying house, although these latter sources have a minimum order value that would make a joint project with friends more attractive.The technical information, and seven pages of schematics for this new counter are available right here on this page. The firmware and user manual are delivered by email.
My thanks to Terry ZL1TCF for constructing the prototype, which enabled me to concentrate on the firmware.
Copyright � Murray Greenman 1997-2005. All rights reserved. Contact the author before using any of this material.