The transmitter codec and control program
Before you start transmitting, enter your callsign in the text box where indicated. This will ensure that your transmissions carry ID. However, since few other Amateurs will be able to decode the transmissions, it would be wise to also ID your transmissions using voice. Please mention the mode used.
Menu
At the top of the codec program window is a menu system. 'File' leads you to close the program; 'Soundcard' allows you to set playback levels on the Windows Playback applet. (Select 'Wave' as the source, and adjust the 'Playback' and 'Wave' volumes
for suitabe transmitter drive; mute other outputs). 'Movie frame rate' allows you to select what proportion of movie frames
are transmitted. 'Chroma subsampling' allws you to play with the amount of colour compression. For now leave it on the default setting.
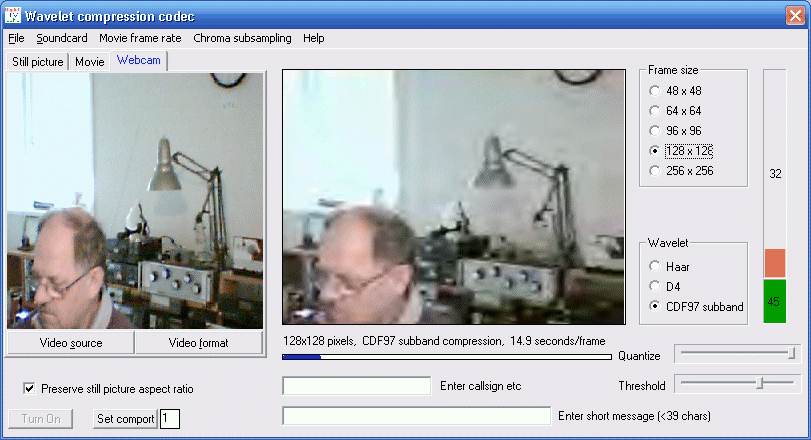
Tabs
The main part of the program has a source image pane at the left, and a transmitted image pane in the centre. The source
image pane is pre-compressed horizontally, and has three 'tabs' above it, which allow you to select one of three image sources. You can select any one
of these and transmit the appropriate image. You can also 'preload' some of these for instant switching and seamless
transmission. Whichever tab is currently showing is the one which will be transmitted in the next frame.
With the 'Still picture' tab selected, you can drag-and-drop any image file (just about any format, and any size) onto the tab for transmission. The file name is shown under the image.
Hints:
You can also transmit just about anything on the computer screen using the 'Still picture' tab, by simply placing the window containing the picture OVER the source image pane. It's a bit tricky to get the size and position correct, but it's a useful trick.It's a good idea to make a special folder to contain your favourite pictures, and set the folder view to 'thumbnail'. This makes it very easy to drag-and-drop a series of pictures onto the 'Still Picture' tab while transmitting. If you drop more than one during the transmission of a previous image, only the last will be recognised.
The 'Movie' tab also accepts drag-and-drop, but only accepts standard movie formats (such as .AVI). MPEG1 movies can also be sent, but the video accelerator must be set to minimum, in order to capture the pixels off the TX screen. There is no point in trying to transmit a large 25 frames/sec movie, as it would take hours to send even a few seconds of video. This tab works well with specially prepared small files or movies captured by the receiver. A pause button and progress slider are shown under the picture. If you pause the movie, you can use the slider to select a particular frame to transmit over and over again.
The 'Webcam' tab selects images from your live video source, typically a webcam. Note the extra setting buttons which appear under this tab. A new image is captured about every second, but fewer are transmitted. If you move the camera around, do so very slowly!
Transmitted Image
The centre picture pane shows the picture currently being transmitted. It is shown exactly as it will be received by the
receiving station, in other words, it has correct aspect ratio, is noise-free, and has the fuzziness and artifacts associated
with compression showing. Below the transmitted image pane is a progress bar. The new image (the one currently showing) is not
transmitted until after the bar restarts, and is not completed until the progress bar is all the way to the right. Thus you can change the settings while a previous frame is transmitted.
Image Controls
To the right of the transmitted image pane you find the transmission controls, which set the resolution of the image
(the received image size is always the same), set the compression type (if you are unsure, use the default CDF97), and the
amount of error correction transmitted. When conditions are poor, drag the red top part of the bar upwards to transmit more error correction. This will of course slow down the transmitted frame rate.
At the bottom right there are a further two mysterious image controls.Moving 'Quantize' to the left reduced thr number of bits per pixel, and is best left fully to the right. 'Threshold' eliminates the least significant bits, and again is best left fully to the right. Both of these controls have a dramatic effect on the transmission time, so if you are transmitting a very simple graphic image, play with these controls for best effect.
Transmitter image settings have a big impact on the success of reception of your pictures.
Hints:
The choice of image size can be crucial to success. If the band is quite noisy (say on average, a lightning burst or strong splatter event every 10 seconds) there will be no point in attempting to send images which take longer than 20 seconds to transmit, as the noise will exceed the ability of the error correction. Use a smaller (lower resolution) picture.If the noise is bad, increase the amount of error correction data transmitted. This will slow the frame rate, but improve the image success rate. Increasing the number of frames sent from each picture also helps.
If conditions are really bad, and you cannot achieve successful reception, try a different mode (such as OFDM NBTV or Hybrid NBTV).
Transmitter Controls
At the bottom left corner of the program are two buttons, 'Set comport' and 'Turn On'. 'Set comport' is used to select which
computer serial port is used for transmitter PTT control. Type the number of the com port you use in the box, and press
the 'Set comport' button. You will note that the 'Turn On' button is then no longer greyed out. If you plan to use VOX,
enter a number of any unused com port. When you press the 'Turn On' button, the transmitter audio sounds start and the
transmitter PTT is activated via the com port RTS and DTR lines.
Once the transmitter starts (there may be some delay in the audio), use the Windows Playback applet volume controls to set the transmitter level. 20W indicated output should be appropriate for a typical 100W rig. At higher power it is difficult to achieve linearity without the signal becoming rather wide, and in addition the transmitter will heat significantly. Remember that NBTV transmissions can take several minutes.
Data Transmission
At the bottom centre of the program window are two text boxes. You may place a callsign in the upper one, and it will be
transmitted with every frame with no overhead. You can also send a short text message with each frame (lower box), but this
involves sending an extra packet just for the message, which slightly reduces the frame transmission speed.
Receiving While Transmitting
If you have a very fast computer, you may be able to receive your own pictures, while transmitting, running both programs at once. It has been found that the sampling rate frequently becomes incorrect when you attempt this, and the receiver will not
resolve the pictures correctly. This seems to be sound card hardware dependent, and also dependent on the processor speed
and operating system. There is no real need to do this anyway, as the transmitted image pane shows exactly what the other station will see.