The Type 746 Telephone &
Making An Intercom

By Andrew Westcott
-- Links to other pages I've written --
Home Page
Radio Stuff
Concert Master
Coxparo
Gin Traps
Grimspound
Rust Electrolysis
National Explosives
Solar Hot Water
Wistmans Wood
Doddi Mines
Rants
Dog Walker
Zombies!
JS Email
Telephone Intercom
Whetstone Mining
Pulsar Zero 2250
Index Of Sub-Sections On This Page:
Introduction To This Project
Getting Inside The Telephone
Technical Stuff For Reference
Making The Intercom
Simulating Longer Lines
Related Links
Firstly, no cats were upset during the preparation of the top image; I had to entrust AI to create that as the Good Lady refused to pose for a photo, and the cats wouldn't do as they were told.
Introduction to this Project
The British Post Office offered many different designs of telephones over the decades, slowly improving and adapting the design to suit the demands of the time. There has been an increasing interest in the older style telephones in recent years, with many people buying them purely as a display item.
This type of telephone uses pulse dialling, something gradually being phased out in favour of tone dialling, and indeed with the advent of VOIP (Voice Over Internet Protocol), this type of phone will become unusable on public networks in the relatively near future, unless some kind of interface is used.
One way to make use of these iconic and collectable devices in the modern world is to create a two-telephone intercom system, and this page's function is primarily to document how I got such a system working, including the ability to ring the distant phone. Setting up a pair of phones in this manner is in essence pretty simple, but there are things that need to be attended to.
The telephone of particular interest to me for this project is the GPO's type 746 rotary automatic telephone, as I consider this represents the peak of development before things started to become too 'electronic', and it has the benefit of a real bell.

Example of details printed on the underside of the telephone
The details of the telephone should be found printed on the underside as in the example above. The first number indicates the model number and the 'F' suffix indicates, I believe, that the dial has just numbers, rather than numbers and letters; the SPK bit indicates the manufacturer, in this case Speke Telephones, and the last bit gives the year and production run.
Using electronics it is entirely feasible to create a local exchange for linking many of these phones together and there are several resources on the web detailing how to do it, and ready-made units are available to purchase, should you wish to do this instead of making an intercom.
Back to top
Getting Inside the 746 Telephone
Any such phone will arrive in an unknown configuration depending how and where it was last used, and it will need to be opened up to enable it to be modified for intercom use. This is done by undoing the single screw at the rear of the unit; it should have a spring and a captive nut fitted in which case it would be unnecessary to completely remove the screw, but if an inexperienced person has been inside before, these parts may have been lost in which case the screw comes right out.
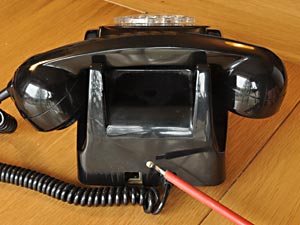
Loosen this screw |

Lifting off the cover |
With the screw now loose, the rear of the case can be lifted, taking care to ensure it carefully passes over the dial mechanism; the cradle tabs will probably need to be pressed down too, to allow the case to be lifted enough to clear the dial and the cradle tabs. The whole case can then be moved forwards to allow the front tab to disengage, allowing its removal. This operation can be a bit fiddly so be careful not to break anything. Once clear, the top can be lifted away to reveal the innards as pictured below.

A 746F telephone with the cover removed
The unit seems to be well-designed and was certainly intended to last. You can just see the two light-brown bell coils in the centre of the chassis which have '500Ω' printed on them: this is the type of bell we need to have fitted. One useful design feature is the small latch that can be used to lock the cradle switch down, as with the cover off, the weight of the handset can no longer reliably do this. This is useful if work or tests need to be done on the unit with it still connected to a power source.
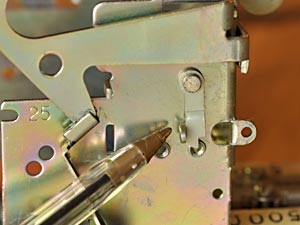
The latch loose |
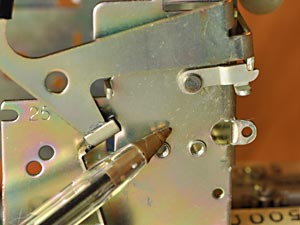
The latch engaged |
The latch is generally located on the left side of the cradle support, as viewed from the front; to use it, press the cradle levers down, then lift the latch forwards and up so that its tab engages with the cradle bar. Releasing pressure on the cradle will retain the latch, until the cradle is pressed down which will allow the latch to swing out of the way, allowing the cradle to rise.
Back to top
Technical Stuff for Reference
Although information on these telephones is widely available on the Internet, I've included some technical information here for convenience and reference.
Telephone Circuit Diagram
Below is my drawing of the circuitry inside a typical 746 telephone, based on official documentation, a copy of which can be found here: circuit description. The switch positions are shown in the rest condition, and the thick black conductors are the straps fitted between the screw terminals within the phone, placed as required for my intercom application. The various flying leads connected to terminals within the telephone are shown in their usual colours.

Note that terminals T17 & T18 are linked in this instance.
Although supply polarity is marked, phones will work either way round.
Handset Connections
The diagram below shows the connections for the handset; for clarity no other connections and no straps have been shown. The device labelled 'MR2' is a 'rectifer type 205' and consists of two selenium rectifiers connected in parallel but in opposite polarities, combined in a single package and connected across the earpiece. This acts as a sound level limiter by restricting the voltage across the earpiece to a maximum of about 0·5 - 0·7 volts, as anything above this causes the device to conduct, effectively clamping excess voltages to this level. This is to protect the user's hearing and possible damage to the earpiece, should a voltage transient occur.

Showing the connections for handset and sound-limiter MR2
Dial & Bell Connections
The diagram below shows the connections to the dial assembly and the bell. As before, all other connections and the straps have been omitted for clarity. I've seen telephones with black wires coming from the bell, but in any case the bell can be connected either way round.

Showing the connections for the dial assembly and the bell
Original Line & Strap Configuration
For reference, the diagram below shows the way most telephones were configured when originally issued. Shown here are the incoming line connections and colours, and the locations of the straps. The layout of this type of telephone allows great flexibility in how it can be configured, so some may differ from this. Telephones which have been 'converted' will have an additional resistor fitted somewhere, and the straps and leads will have been rearranged.
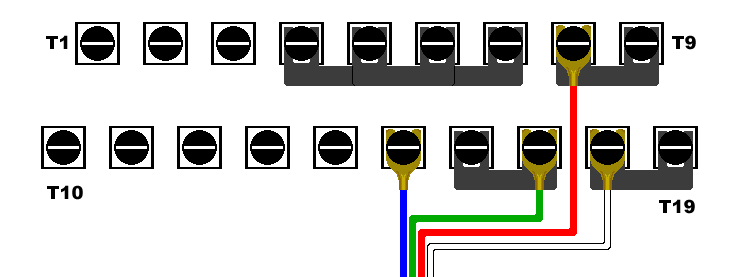
Showing the line connections & strap locations as originally supplied
Converted Telephone Layout
If you wish to use one of these telephones on the public BT telephone network, the diagram below shows how the straps should be arranged, the attachment points for the four incoming wires and the 3,300 ohm resistor which limits the ring current for the bell to the specified amount.
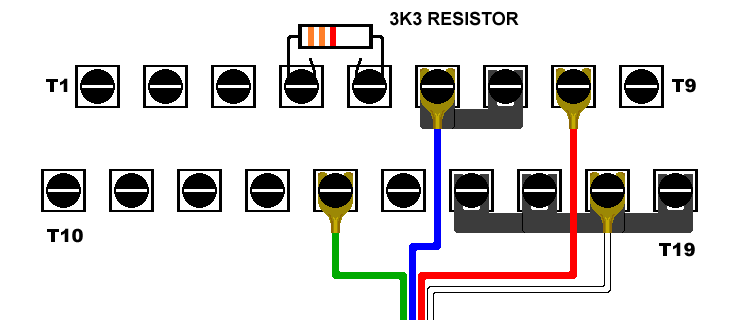
The straps, incoming connections & resistor locations to convert a telephone.
You will of course have to order the lead fitted with the correct BT plug from somewhere for this, but be aware that many exchanges no longer accept or recognise pulse dialling, and in the very near future you won't be able to use a phone like this at all on a public exchange without some kind of digital interface.
About The Microphone
The 746 type telephones originally came with type 16 carbon granule microphones, which over the years can become noisy and unreliable. Many of these phones have had a replacement microphone fitted, usually as a result of a complaint about a noisy line; these new microphones, type 21A, are generally of the electret type (although one supplier made dynamic units) which offered better sound quality and far superior reliability. Due to the nature of this type of microphone, some electronics were required which took the form of an integrated circuit fitted within the microphone casing.

Transmitter, type 16 |

Transmitter, type 21A |
The chip used in the type 21A electret unit is generally the Ferranti ZN470AE or ZN472E developed for telecommunications work and the resulting microphone was designed to be a direct drop-in replacement for the old carbon units. It is therefore reasonable to assume that the chip incorporated more features than just an amplifier: for example it included a bridge rectifier to ensure that polarity didn't matter. Widely differing line currents had to be accommodated, so I believe the chip must have also incorporated some kind of regulator and shunt circuitry to bypass line currents above the 1mA or so the unit required to operate properly, and to protect the unit from voltage surges.
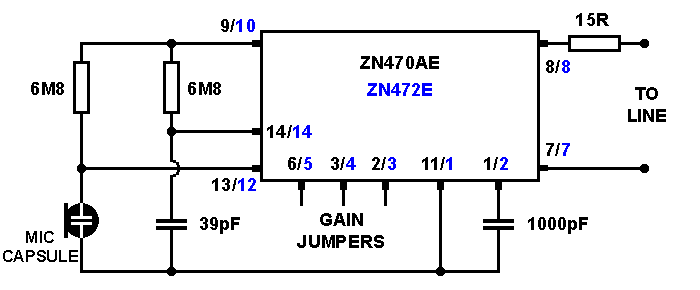
Circuitry within the type 21A microphone / transmitter unit
For interest's sake, I made some measurements at various levels of line current between 5mA and 50mA, noting the voltage dropped across the microphone. From this I could calculate the power dissipation within the microphone unit, most of which would be generated within the chip; this data is displayed in the following table.
| Current | Voltage Dropped | Dissipation |
| 5mA | 4·93V | 25mW |
| 10mA | 5·17V | 52mW |
| 15mA | 5·39V | 81mW |
| 20mA | 5·77V | 112mW |
| 25mA | 6·47V | 144mW |
| 30mA | 5·97V | 180mW |
| 35mA | 6·15V | 215mW |
| 40mA | 6·32V | 254mW |
| 45mA | 6·53V | 294mW |
| 50mA | 6·69V | 335mW |
It is worth noting that the microphone worked equally well at currents as low as 2mA and at 50mA, demonstrating the effectiveness of the circuitry; obviously at higher line currents the chip has to dissipate more heat, and going by the ZN470 data sheet, its maximum rating seems to be around 100mA or so continuous, but this would cause the chip to run quite hot and may compromise long-term reliability.
What's That Green Thingy?
The green cylindrical component on the circuit board is a stack of 8 selenium diodes in series, with the 9 connections to them being visible on the sides. The associated pair of thermistors look like small light bulbs fitted into a black protective plastic mounting, and would be located next to it.

The selenium diode stack MR1
The selenium diodes are in the form of eight small discs which are placed between nickel-plated contacts, the whole lot being clamped together by a surprisingly strong spring which bears against one end of the plastic cover.

The selenium diode stack with the lid off, and individual discs
I made the mistake of frowning at one of these assemblies once, which upset it enough to make the green plastic case break under that spring pressure exposing its innards, and allowing the spring to ping forth into another dimension. So... that plastic has become brittle over the years, touch it if you dare! This did, however, give me a chance to photograph the construction of the diode stack in detail.

The function of this diode stack is to act, in conjunction with the two thermistors, as a regulator for the audio, because if you were close to an exchange, the line current would be high causing the carbon microphones to have too high an output.
Quoted from a technical paper: (source: Sensitivity regulator)
"During field trials of the 700 type telephone it was found that on short lines the telephone was too loud. An automatic regulator, Regulator No.1 is included to limit the sensitivity on short lines whilst allowing full efficiency on long lines."
"The method of automatic regulation used is that of including a line-current sensitive regulator within the telephone. The regulator circuit can be seen consisting basically of a variable-loss network having a low d.c. resistance in series with the transmitter, with connections to the receiver circuit. It provides shunt paths across the transmitter and receiver, such that, on short lines with full feeding current (say 95mA), the shunt impedance is low, thus more current will be shunted away from the transmitter and receiver, reducing their sensitivity. On long lines with currents 30-40mA, the shunt impedance rises to several kilo ohms, thus the shunt currents are very small, and the sensitivity of the transmitter and receiver is normal."
One of the beauties of selenium rectifiers is the way they slowly begin conducting as the forward voltage is increased, unlike silicon which suddenly begins to conduct and would create noticeable distortion, so although considered old technology, they were ideal for this application.
In later times, exchanges limited the line current so that telephones close to an exchange didn't receive an unnecessarily high current; that and the fitting of electret microphones made the regulator within the telephone redundant, but it was retained for backwards compatibility. At low line currents (say 30mA or less) there is insufficient voltage generated across the thermistors to bias the selenium diodes, so they don't conduct and therefore the regulator has no effect and doesn't need to be disabled in any way.
Back to top
Making The Intercom
The object here is to make two telephones work as an intercom, with the facility to make the bell ring on the distant phone. As it happens, a pair of phones may well work this way with no modifications, but we need to check the configuration and there are things we can do to improve the way they work.
Surprisingly enough, two telephones are required, and I found the most suitable to be the type 746 (or the 741 wall-mounting version), which also seems to be the most common which is helpful. Both phones should have the electret type 21A microphones fitted; if the old carbon microphones are present they will operate in an unpredictable manner, if they operate at all so are best replaced. The replacement electret units can be found for sale or in another donor phone and are fitted as a direct replacement.
For the ring function to work as predicted, both phones should be models with the older bell assembly fitted, which consists of two coils of 500 ohms resistance wired in series, with '500Ω' being printed on both coils to aid identification. I haven't performed tests with the higher impedance bells, so can't comment on whether they would work on the lower voltages suggested here.
There is quite a bit of information in this section explaining why certain modifications are to be made and how they were arrived at, so the main four steps have been numbered and high-lighted for quick reference.

Showing where straps and wires should be fitted for intercom use
1. The telephones need to be modified slightly by altering the straps between the screw terminals, and any conversion resistor needs to be removed. The photo above shows where the straps need to be placed; if there aren't enough straps for the job, use a short length of wire to bridge the terminals. Ensure the handset, dial and bell connections are on the correct terminals according to the diagrams in the 'technical' section.
Tests have shown that the microphones will operate well at less than 2mA, but this beautifully low current is insufficient to operate the bells when required, so we need to go for a higher current, and 20mA is plenty for reliable ringing with all the bell assemblies I have here. With both phones in use and assuming good current-sharing between them, each phone will then draw around 10mA which is nicely low, keeping stress on the chip within those old microphones to a minimum.
2. A DC power supply needs to be constructed, capable of supplying between 40V & 50V open-circuit but it must be current-limited by a series resistance to around 20mA under short-circuit conditions. This supply should be well-smoothed and replaces the line current normally expected from the exchange and powers the circuitry of the telephones.
The table below shows suitable resistances at various voltages to give around 20mA of operating current. The telephone's circuitry normally drops between 5 & 6 volts when in use, so this has been allowed for in the calculations.
| Supply Voltage | Series Resistance | Operating Current | Shorted Current |
| 35 volts | 1500Ω | 19mA | 23·3mA |
| 40 volts | 1800Ω | 19mA | 22·2mA |
| 45 volts | 2200Ω | 18mA | 20·4mA |
| 50 volts | 2200Ω | 20mA | 22·7mA |
The speech signal produced by the microphone needs be isolated from the low impedance of the power supply, but the current limiting resistor alone seems to provide good isolation. Placing a choke in series with the current limiting resistor does improve audio transfer slightly and may help reduce hum on the line, but it probably isn't worth the bother unless you happen to have one kicking about.
If you wish to experiment though, the choke can be almost any wound component as long as it has sufficient inductance to block the AC signals: I've calculated that a 1H choke or bigger will provide excellent audio frequency blocking.
The choke could be the coil of a mains voltage AC relay or even the primary winding of a transformer, but be sure to include its DC resistance as part of the total series resistance if it is significant; I used a 1H choke I had kicking about for my tests, which had a DC resistance of just 12 ohms which is low enough to ignore.
3. This system only requires two wires to be connected, the positive wire going to terminal T8 or T9, which are both linked anyway, and the negative wire goes to either T16, T17, T18 or T19, which again are all linked. Any unused wires can be fixed to any of the unused terminals (T11 to T15) to keep them from flapping around and causing trouble.
The telephones are simply connected to each other using the two wires, and power fed to whichever telephone is convenient using those same connections; power will obviously pass to the other telephone as well, through the linking wires.

Diagram showing how power supply and phones are connected together
At this stage, with the two telephones linked together and the power supply connected, a conversation can now be made when both handsets are lifted. To ring the distant phone, lift the handset and turn the dial to, say, '0', and let it go. As it returns, the bell in the distant phone might ring a bit if you are lucky, assuming its handset is on the cradle and the contacts in the dial unit are in good condition.
The reason for the dodgy bell ringing is that originally the bell circuit would be fed with a voltage of possibly 75 volts or more at a frequency of around 20Hz, and under these conditions the bell's 1·8µF capacitor works just fine. However, at our lower working voltages and the lower 10Hz frequency of the dial pulses, the capacitor is a bit restrictive making the bell sound a bit pathetic, if it rings at all. This can be remedied by increasing the bell capacitance to give the ringing a bit more ping.
4. A 10µF electrolytic capacitor of a suitable voltage rating should be fitted between terminals T7 & T8, which places it in parallel with the existing bell capacitor. It is important to ensure the capacitor is connected the right way round, with the negative to T7, assuming the positive supply goes to T8/T9.
IMPORTANT!
This additional capacitor must be removed before connecting the telephone to a public network.

The additional capacitor in place
The ringing works as follows, and makes use of a normally undesirable effect experienced when two phones are wired in parallel as in an extension: bell tinkle. The first thing to understand is that the bell coils are wired across the supply, but there is a capacitor in series which blocks the DC current and so appears as an open circuit, drawing no current. The inductance of the bell coils ensures that none of the speech signals can pass either, so under normal conditions the bell assembly just sits there doing absolutely nothing.
When the dial is operated on a phone with the handset lifted, two sets of contacts within the dial mechanism first short out the earpiece and microphone, and then as the dial is allowed to return, a third set of contacts rapidly disconnect and reconnect the line repeatedly, the number of disconnects being directly related to how far the dial was originally turned.
Here's what happens electrically:
Initially as the dial begins to be turned, its contacts will be closed, dropping the line voltage to almost zero and so the capacitor in the distant phone will be discharged.
When the dial begins to return, the contacts first disconnect the line, allowing the line voltage to rise to its maximum, causing the bell capacitor in the distant phone to charge to full line voltage through the bell coils, making the bell ping one way as it does so.
As the dial continues to return, the contacts will again close, dropping the line voltage to zero and making the capacitor in the distant phone discharge through its bell coil in the opposite direction, making the bell ping the other way.
Therefore, the repeated opening and closing of the contacts as the dial returns causes the bell to ring for as long as it takes the dial to return, so if a '0' has been dialled, the bell will ring for that duration which should be enough to get the wife's attention.
As a point of interest, with both handsets in the cradle, no current is drawn and line voltage will be at its maximum. If a handset is lifted, it will cause the line voltage to drop to 5 or 6 volts, making both bells give a single ping. Replacing the handset will result in another single ping as the voltage once again rises. This almost replicates what the dial contacts do, so repeated dabbing of the cradle switch will ring the bells, but that's an annoying thing to do, right?
All that's left to do now is to tidy up the wiring, and train the wife to perform the appropriate action upon hearing the bell ring. Perhaps you could introduce your grandkids to the wonders of a rotary telephone!
Back to top
Messing About Simulating Longer Lines
The two phones in an intercom will be almost certainly be connected by a pathetically short length of line, but the units were intended to work well with far longer line lengths, several miles in some cases. These telephones incorporate an impedance matching transformer to increase the impedance of the voice signal for transmission down the line; I like the idea of making the telephones work for their living, so I decided to have a mess around trying to simulate a long telephone line.
The first job was to try to find some information on typical telephone line characteristics. After much frustrating searching, rejecting of cookies, declining of multiple offers of useless merchandise and idiotic chat boxes, I managed to locate or calculate the following data for a 0·5mm diameter copper pair telephone line, as used up to a few miles from the exchange:
| Loop resistance per Km | Capacitance per Km |
| 168Ω | 0·05µF |
I've seen mention of inductance too, but as the wires run parallel to and close to each other, inductance should pretty much cancel out, so I'll ignore it for now until I can find reliable data.
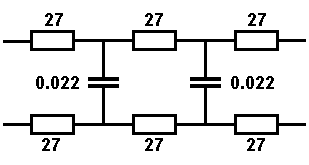
Simulating a 1Km line |
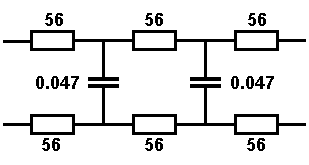
Simulating a 2Km line |
The diagrams above show the values required to simulate both 1Km and 2Km lengths of line, and using preferred values for the components, both examples come out close to that specified. If wished, these simple circuits could be constructed on a small piece of circuit board and fixed within the telephones; apart from simulating a long line, the circuits would also help to ensure good current sharing between the phones.
In a true length of line, the resistance and capacitance is distributed evenly along the length of that line, so a low component count may not be an ideal representation. A closer simulation would be to have multiple resistances in each leg of the simulated lines, with many low value capacitors across the lines at regular points totaling that required. Obviously there's a limit to how many resistors and capacitors is practical, but the diagram below may prove to be a closer simulation than the previous one without getting silly, if you wish to experiment.

More complicated 2Km line simulator circuit
0·01µF is a common value of capacitance so I've used 10 of these to total the 0·1µF expected. The resistances are 27Ω resistors for the bulk of the resistances, with four possibly unnecessary 3·3Ω resistors at each end of both lines to bring the total resistance close to that expected: this combination comes out at about 337Ω, close enough.
We could go further and have dozens of resistors and dozens of tiny capacitors in our line simulation circuit, but by then it may be simpler to just buy a couple of miles of telephone cable and use that.
Back to top
Related Links
British Telephones
An astounding amount of information on a vast array of British Telephones
You Tube
A video about converting a phone to work on a modern system
Sam Hallas' Website
Taking apart a 746 telephone
GPO Telephones
Wikipedia offers some info on these phones
Telephone Cable Modelling
Someone else having a go at simulating long telephone lines
Telecommunications Heritage Website
OK, not sure what they do and they charge for membership, but I've listed it anyway
Online Calculators
LC resonance calculator
Enter two values, calculate the third.
Inductive reactance calculator
Enter two values, calculate the third.
Wire resistance calculator
Allows selection of a variety of materials.
I can be contacted at this address:
Copyright © Andrew Westcott 2003 - 2026
I'm happy for anyone to use this material for private, non-commercial or educational purposes, but credit to the author must be given. For any other use please contact me.
No cookies. No Tracking. No AI text. No ads.