
Electrolytic Conservation Of Iron & Steel Artefacts
Rusting is an electrochemical process and can, to a degree, be reversed with the careful application of an electric current. This is known as electrolytic reduction, and can be used to help restore rusty items as long as a substantial iron core remains and the treatment is appropriate for the artefact.
In heavily corroded finds there will be, in the simplest terms, two types of rust present: the outer 'red rust' layer and a deeper 'black rust' formation. The outer 'red rust' component takes up more volume than the metal it originated from and tends to loosely adhere to the main body. This flaky layer represents a total loss of metal from the artefact and can't be recovered although electrolytic treatment does tend to loosen this layer further, making it easier to remove.
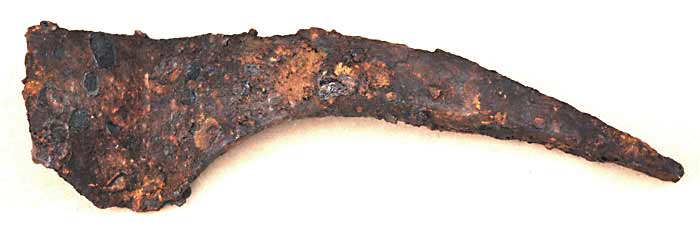
A badly rusted and broken miner's pick from the Victorian era
Beneath this outer layer of red rust there will be a layer of 'black rust' of variable thickness which formed in the oxygen-deprived region beneath the outer corrosion. Unlike the surface rust, this underlying corrosion product takes up the same volume as the original iron and is tightly bound to it; it's possible for this underlying 'black rust' to be converted to a stable material with careful treatment in an electrochemical cell, allowing preservation of much of the artefact's original dimensions and surface details. The chemistry behind iron oxidation is complex, but this site may help explain it: Chemistry Of Rust.
The idea of using electricity to treat rusted iron isn't new, and electrolysis has been used for the conservation of ferrous artefacts by collectors and archæologists for many decades. The results can be impressive, but the exact requirements are sometimes poorly understood and the suggested equipment often crude, exacerbated by the many web pages out there offering poor or misleading advice on this delicate process.
Why use electrolysis when there are simpler methods?
Iron & steel items can be sandblasted or treated with acids to remove the rust and this works well, but the valuable underlying 'black rust' which may still retain surface details is also removed, resulting in that part of the artefact being lost for good. Electrolytic reduction offers the possibility of recovering the iron which has turned to black rust, which is why the process is so important for the conservation of valuable and rare artefacts.
Rust electrolysis is not some magical, quick or easy way of cleaning rusty items and is generally only to be considered for post-mediaeval artefacts with a substantial iron core remaining; more severely corroded finds may need a different preservation approach. The amount and type of corrosion, coupled with varying degrees of adhering encrustation can all contribute to a variable outcome and needs to be considered.
Safety Considerations

The electrolyte used is mildly alkaline (washing soda) and although not considered dangerous, prolonged contact with the skin is best avoided as it is an irritant. Obviously, if it gets into your eyes, wash it out with plenty of water and get medical advice, and umm... don't drink it.
The equipment needed for electrolytic rust removal involves the use of electricity, although the voltages usually encountered in electrolysis are not considered dangerous. However, if the hands have been immersed in electrolyte for some time and the skin has become highly conductive, even a relatively low voltage may allow significant current to flow through the body, so it's wise to switch off the supply before putting your hands in the solution, should you need to. There is obviously also a concern with mains equipment being sited close to conductive liquid, so use a bit of common sense regarding the relative positioning of the components.
The production of explosive gasses is something to be aware of: even when using sensibly low currents, some hydrogen and oxygen will be evolved at the electrodes, producing a potentially explosive mixture. The procedure is best conducted in a well ventilated area and sparks or flames in the vicinity should be avoided. Sparking of the electrode connectors can, interestingly enough, be eliminated by switching off the power supply first.
Pre-treatment Artefact Care
If an artefact has been buried, it's important that it isn't allowed to dry out once removed from the ground, so it should be immediately sealed in an airtight bag upon removal to keep it damp until it can be dealt with, which should be at the earliest opportunity.
If, however, the item has been in a relatively dry shed or garage and is itself dry, the surface rust will be fairly stable meaning that there is no urgency to get the item treated; just keep it dry until you are ready to proceed with whatever treatment you decide is appropriate.
ELECTROLYTIC TREATMENT
This is best suited to light to moderately corroded artefacts, where surface details such as stamped names and manufacturer details may be present on a surface; electrolytic reduction increases the chances of revealing such details. Electrolysis is a fairly complicated procedure and may be considered overkill if just cleaning rust from everyday items, such as a car's brake drum or a modern-day tool.
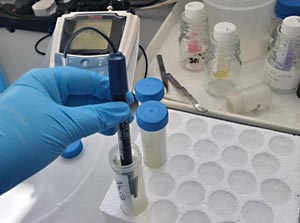
Testing the pH of different strength solutions
NON-ELECTROLYTIC CLEANING
Mechanical or chemical cleaning is more suitable for general items where the aim is simply to remove some surface rust, such as on a car component for example.
Note:
If a rusty item is to be stored for a while prior to mechanical or chemical cleaning and it is preferable that it doesn't rust any further, it can be stabilised in an alkaline solution:
"iron is best protected in an aqueous solution with 9-13.5 pH range."
Source: The Electrochemical Society.
For reference, here are some real-world tested pH values for various strengths of Na₂CO₃ · 10H₂O
(Sodium carbonate decahydrate):
1% w/v = 11.29
2% w/v = 11.40
4% w/v = 11.45
As can be seen, the strength makes only a small difference to the pH value once above a certain level, obviating the need for strong solutions.
IMPORTANT!
Do not store artefacts in an alkaline solution if electrolytic treatment is planned; this seems to cause chemical changes to the 'black rust' which then no longer seems to be reduced by electrolysis, rendering it largely ineffective. I'm unsure why this is, and I'm conducting further tests to verify the observation and to find out why.
Setting Up An Electrolysis Cell
The following sections deal with setting up an electrolysis cell in detail, and should act as a good guide to effectively treating a moderately rusted artefact.
Choosing A Container

A suitable plastic container
A suitable container for the electrolyte is needed which is large enough to totally immerse the artefact; the obvious choice would be one made of plastic, as this is entirely inert and non-conductive. For later on, you'll need to know how much liquid is required to fill the container to the required level; this can be done by filling it with water using a graduated jug and noting the total volume needed, or simply calculating the volume using basic arithmetic.
The Power Supply
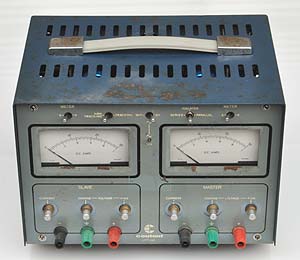
An old power supply, but perfect for the job
You are going to need a source of power for this process, so get your hands on a suitable regulated power supply with variable current limiting; as this component is central to the operation, get something suitable, they aren't that expensive if you are serious. The voltage should be above around 10 volts but not so high as to be a hazard, so one offering up to 30 volts at 1 amp or thereabouts would be a good choice; such units are widely available on the second-hand market.
The equipment should allow the current to be smoothly limited down to a few milliamps, this being the most important requirement. A maximum rating of 1 amp is more than enough for this process unless you are expecting to treat something particularly large, such as a cannon.
If you know a bit about electronics, you could make a suitable power supply; I've included notes and a schematic, should you wish to experiment. The following link will take you to that section of this page:
Home-made adjustable current source
If you intend to use a power supply that doesn't have variable current limiting, you should use a resistance in series with the supply to limit the current: a resistance of 220Ω would limit the current to around 45mA with a 12 volt supply, for example (allowing for the 2 volts or so across the electrolysis cell), which would be enough for smaller items.
Alternatively, you could place a 2·2 watt automotive bulb in series, which would allow around 150mA to flow, better for slightly larger items, with the benefit of indicating that current is flowing; two lamps in parallel would allow around twice this current to flow. Having fixed resistances does limit the adjustability of the equipment somewhat, but is a good work-around if all you have available is a battery charger or CB power supply, for example.
If your artefact has any value, either historical or personal, don't connect a battery charger directly to the electrodes; I see this suggested on many web sites but it is poor practice, potentially dangerous and suggests a lack of understanding of the electrolytic process. An unmodified battery charger is too aggressive for conservation work, don't use one.
To explain, there are two major issues with using a battery charger: firstly the low resistance of the electrolyte could allow large currents to flow causing a real risk of damage to the charger, or even fire. Secondly, the resulting current flow is far too high for effective iron recovery as the high rate of gas formation will damage the surface of the artefact by loosening corrosion products which may have otherwise have been recoverable. In addition to this, the large quantities of explosive gasses produced are a real danger, the anodes will corrode badly and the electrolyte will become a rusty frothy mess; you would have been better off just getting the item sandblasted.
Constructing The Anodes
Suitable material for the anodes needs to be obtained, and if you can get it, expanded steel mesh is probably the cheapest and easiest to work with. Failing that, 0.6mm or 1mm plain steel sheet as used for car repairs is an excellent choice as it can easily be cut and shaped and is inexpensive, but ensure it isn't galvanised.
Metal sheet like this is often coated in a protective film of oil and this layer needs to be removed with a solvent before use, and obviously it must not be painted: anything which may inhibit the flow of electricity between the metal plates and the electrolyte has to be removed. Even the thinnest layer of oil or grease (which you may not even be aware of) will insulate that part of the plate, so I recommend giving the surfaces a good sanding to ensure bare metal.
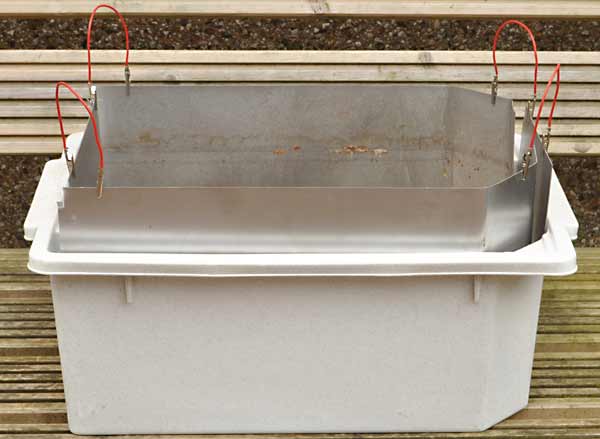
Anode plates arranged in the container
The anode plates should be cut and shaped to fit around the interior of the container, including one across the bottom, ensuring part of each plate protrudes above the water level to enable a connection to be made; if you are a perfectionist, you could also form a top anode out of expanded mesh and suspend that in the electrolyte above the artefact, which may prove beneficial. All of the anode sections must of course be electrically connected to the positive of the supply using clips and wire.
There are web pages out there suggesting using a bit of steel rod for the anode, but if you are serious about conserving your artefact, do it properly and prepare some decent anodes to completely surround it, as far as is practical. The process will run far more predictably and reliably as the combined anode to electrolyte resistance will be very low, and current can flow more directly between artefact and anode with little or no shadowing effects.
On the subject of shadowing, if you intend to treat something with a cylindrical component such as the head of a pick, an additional anode in the form of a steel rod can be suspended within the cavity to ensure adequate treatment of the inner surfaces. Fiddly to set up, but worth the trouble.
Suspending And Connecting The Artefact
Consider how to securely suspend the artefact, and how to make an electrical connection to it: it should go without saying that this is best done dry, before adding the electrolyte.
A dry run: suspending the artefact
The best material for suspending the artefact is thin string, as it is porous and won't affect the process where it is in contact with the artefact; the string can be tied to thin strips of wood resting across the anodes or the container. Experiment to get the suspension height within the container correct: it shouldn't be too close to the bottom plate and obviously should be below the intended surface of the electrolyte.
The artefact needs to be prepared for treatment by using a file or similar to carefully remove just enough rust on one edge in order to expose a small area of metal, the bare minimum required for an electrical connection to be made using a crocodile clip. This is a destructive action but critical to the process with no alternative, so the site of the proposed metal exposure must be chosen carefully.
A solid low-resistance connection to the artefact is vital to the process, so this connection should be verified as sound; the only way to confirm continuity with total certainty is to expose the smallest area of bare metal on a different part of the artefact and check that a reasonable current of perhaps a couple of amps can be passed between the two points without resistance, through the metal of the artefact.
Note that if the artefact consists of more than one component, for example a gin trap, all of the separate components need to be electrically connected to the cathode. This is important; don't assume the components will be electrically linked just because they are touching each other.
Suspend the artefact in the chosen position, make the electrical connection to it and verify that connection as described. Once the connection has been confirmed, be careful not to move the artefact or the connection to it from this point on as this could disturb that all-important electrical continuity; using very thin flexible wires helps to ensure no movement.
Side Note:
I use a small bit of Blu Tack packed in around the crocodile clip where the wire is soldered on to seal the joint, preventing electrolyte from wicking its way up inside the wire and causing corrosion.
Introducing The Electrolyte
Hopefully, you measured the volume of the container earlier so know how many litres of electrolyte are required.

An alkaline electrolyte can now be prepared, and I consider the best all-round option to be a solution of sodium carbonate (Na₂CO₃) as it is reasonably safe and also readily available at many supermarkets as washing soda or soda crystals. Some professional conservation laboratories suggest using a 2 - 5% solution of caustic soda (NaOH), and while this may be beneficial in helping conserve artefacts recovered from a marine environment, it is a dangerous chemical, needs careful handling and as such may not be appropriate for the home experimenter.
I use a 4% w/v solution (or thereabouts) of sodium carbonate which seems to work well, producing the required alkaline environment and being highly conductive while not using excessive amounts of chemical. In order to demystify quoted solution strengths, it simply indicates the weight of chemical contained in 100mL of solution, so for example a 4% solution would involve dissolving 4 grams of chemical in water and making up the final volume to 100mL. This is obviously the same as 1 litre containing 40 grams of chemical, 25 litres containing 1000g and so on.
It's sensible to first dissolve the required amount of chemical in a few litres of water in a bucket or similar rather than trying to dissolve it in the electrolysis container, as the stirring required may result in the connection to the artefact being disturbed. Once prepared, the solution can be slowly poured into the electrolysis cell, being very careful not to disturb that vital electrical connection to the artefact; continue until all of the dissolved chemical is in the container, finally topping up with water to the required volume.
I've noticed that despite using rain water, a small amount of white insoluble material settles out, which is presumably due to impurities present in the sodium carbonate. In hard water areas, a precipitation of white calcium carbonate may be very noticeable and although unsightly, it is of no consequence and doesn't affect the outcome of the treatment at all.
You could mix up the solution in, say, a bucket, and let it stand for a couple of days; the milky precipitate should by then have settled to the bottom, allowing you to carefully decant the clear electrolyte.
Applying The Current
This is the most critical phase and, it seems, the least understood.
Ensure all of the anode sections are connected to the positive output of your power supply; the connection to the artefact must go to the negative connection.

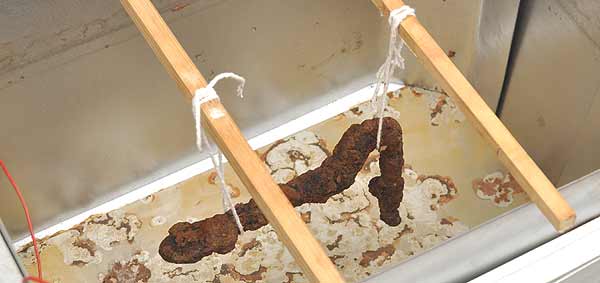
An artefact undergoing electrolytic treatment at a current of 65mA. Note the clear electrolyte
The current would ideally be from a regulated constant-current source and set to a value appropriate for the size of the artefact; ones with a larger surface area can accept a higher current and still be safely treated. As a rough guide, a professional conservation paper suggested using around 1mA of current for each square centimetre of surface area, which I would tend to agree with.
The heavily encrusted artefact pictured above has an area of around 140cm², and developed 2·2 volts across the electrodes when passing 65mA, amounting to about half a milliamp per cm², but was effectively treated.
For reference, around 150mA - 300mA should be used for something the size of a gin trap, and a correspondingly lower current for smaller items; for example I used just 5mA for a 6cm long wrought iron nail. Once set up, the cell can run unattended for a few days to ensure the conversion is complete, the current being low enough to ensure no damaging gassing occurs, and as a bonus the electrolyte should remain clear.
Working with an estimated constant current will work fine if it's set to around the right level, but determining that level is usually a bit of a guess, although it's not critical. By monitoring the voltage across the electrodes, the current can be set far more precisely at a level suitable for the artefact's area.
Although possibly overkill for some scenarios, this is how I determine the appropriate current, but it does require that in the early stages, you are around to monitor the voltage and adjust the current as needed.
1.) Initially, set current to give a 1 volt drop across the cell for around 30 minutes or so, carefully adjusting the current to maintain this voltage.
This is the stabilisation phase, as the electrolyte soaks into the rust layer and the reaction slowly gets underway. The required current can be surprisingly low, just a matter of a few tens of milliamps or less.
2.) Over the next couple of hours, slowly ramp up the voltage until you reach 2·2 volts.
This is the main conversion phase and whatever current is passing when you reach 2·2 volts can be considered appropriate for the item being treated. Run at this level for 2 - 3 days.
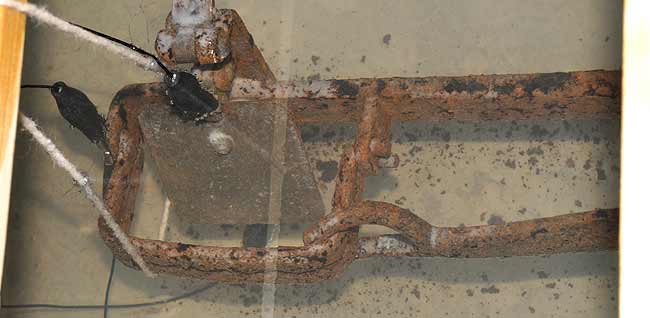
A gin trap a couple of days into treatment; current was about 140mA. Note the darkened areas and the flaking of the outer layers.
Be patient, and allow the process to run its course. If you aren't ready to deal with the artefact immediately, it can be left in the electrolyte with around 2 volts across the electrodes to protect it from corrosion until you are ready to remove it; it can be left indefinitely like this without damage as long as current continues to flow.
Side Note:
Certain pieces may consist of a combination of metals; zinc plating and brass components are unaffected as long as they are given cathodic protection by being also connected to the negative terminal along with the rest of the artefact, but unfortunately any corrosion present on these non-ferrous components is also unaffected, and would therefore require a more conventional cleaning process. If the piece has aluminium components, it is unsuitable for electrolysis treatment as the aluminium may be damaged by the alkaline electrolyte.
Final Cleaning
Once an appropriate length of time has elapsed, it will be time to switch off the power and remove the artefact from the electrolyte.
The artefact should be washed to remove all traces of the electrolyte, and at the same time can be given a good scrub using a brass wire brush to remove loose deposits from the surface. Once most of the easily removable deposits have been removed let the artefact sit in cold water for an hour or so, changing the water occasionally to be sure the electrolyte has been completely washed off and has had a chance to leach out of the pores in the metal.
Give the artefact a good final wash and then quickly dry it off. This is important, as the porous recovered iron has a tendency to rapidly rust, in a matter of minutes sometimes. For valuable items, it may be worthwhile rinsing or even immersing the artefact in a water-miscible solvent such as alcohol or acetone for a while, to help draw the water from the pores in the metal to ensure none is left, then heating the artefact up using a hair dryer to quickly dry off the solvent before it absorbs moisture from the air. The amount of attention you give at this stage depends on how much value you place on the artefact; some items simply don't warrant this much attention to detail.
Put the artefact somewhere warm for a few days to ensure it's completely dry, then you can get to work on the messy bit: with a small wire brush, remove the remaining soot-like deposits, and depending on the exact composition of the original iron, you should be presented with the original surface of the artefact, now preserved in a graphite-coloured material, mainly Fe₃O₄ along with metallic iron. If there are stubborn crusts of rust still adhering, you can gently dislodge them using a sharp tool. Finally, use a volatile liquid such as paint thinner or petrol to wash the dust off the artefact, and allow it to dry; don't use water at this stage, or you risk the item rapidly rusting again!
Once washed and the solvent fully evaporated, the artefact should be given a coat of preservative; clean engine oil is excellent for this but is a little messy. If the artefact is likely to be handled or put on display, you could consider using Renaissance Wax. Ongoing corrosion is a real problem with a treated artefact, so any anti-rust treatment needs to be checked regularly and the treatment re-applied as necessary to maintain protection.
Special Considerations
Voltage And Current
This issue has been dealt with earlier, but it's important enough to mention again: the supply voltage is not critical, as long as it's higher than around 5 volts and not so high as to be a health hazard. However, if too high a current is allowed to flow, any recovered iron will be very porous and possibly become detached from the surface and the rapid hydrogen bubble production can blast off rusted metal which could possibly have been recovered using much lower currents. If you are finding the anodes rust badly and the electrolyte bubbles a lot and becomes discoloured, the current is far too high and as I've said before, you may just as well have sandblasted the item and saved yourself a lot of bother.
Electrolysis Can Damage Paint
Be aware that electrolysis can soften and lift paint; this may be due to the original surface not being properly prepared before painting, or possibly because corrosion had crept under the paint layer. Certain paints may also be softened by the electrolyte itself. So be warned that if you have an object of value with a painted surface, and if that paint is important to its value, consider an alternative to this process.
Hydrogen Embrittlement
Steel can absorb hydrogen during electrolysis, which is known to cause hardened steels to become brittle. This effect will eventually reverse if no damage has occurred, and the reversal can be speeded up by heating the item in an oven. Using the low currents suggested here, and with the resultant minimal hydrogen production, embrittlement shouldn't be a problem. However, to be sure, the best advice is, don't operate any springs on recently cleaned items to eliminate the chance of breakages. More about it here: Hydrogen embrittlement
Painting The Treated Item
I have received a fair bit of communication regarding whether the surface of the treated metal is suitable for painting without further treatment. I use electrolysis to reveal surface features so I don't cover that with paint. However, I would suggest a coating of 'red lead' primer followed by a conventional metal paint should do the job and that there would be little chance of rust forming under the paint as long as the artefact was well rinsed and thoroughly dried beforehand.
Making A Simple Adjustable Current Source
If you have the know-how, or know someone who does, this section details a very simple design for an adjustable current source based around the once-popular L200 regulator IC. Sadly, it appears that this device is no longer made, although I was able to obtain some from good old Ebay in 2025; despite expecting the worst, they seem to be fully functional so may be available as new old stock for a while yet. You could experiment with the 3-pin LM317 by configuring it in a similar manner, but I haven't tried this so can't comment.
The circuit below has about as few components as it's possible to get away with; using the values shown, it's capable of just over 200mA output with a 24 volt supply and can be adjusted down to around 5mA, which should be an adequate range for treating small items. The values can be tweaked a bit to suit your specific requirements.
I used an existing 24v SMPS I had laying around to provide the DC input, but if you intend to use a lower voltage DC supply, you may need to reduce the value of the large 100Ω sense resistor as otherwise the maximum available current may be too low; that resistor is the main limiting factor at maximum current. Similarly, you could reduce the value of that sense resistor to perhaps 47Ω if a higher maximum current is desired, but at the expense of a higher minimum current, although this can be got around by placing a forward-biased diode in series with the sense resistor. Current regulation is excellent in relation to input voltage variations, certainly good enough for this application.
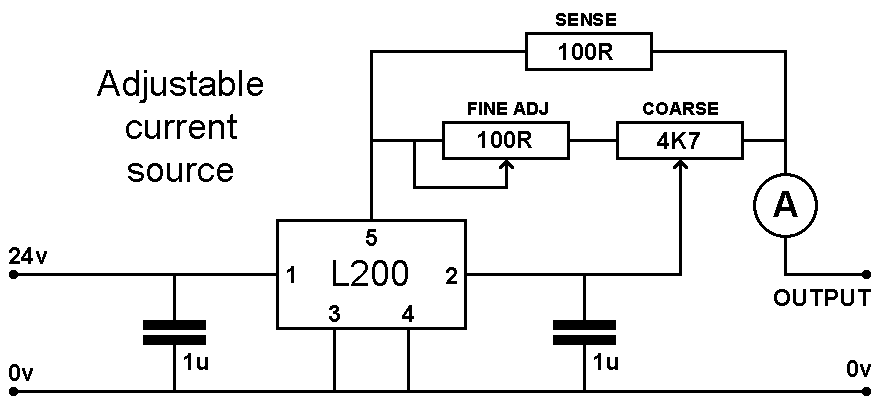
Schematic of a simple adjustable current source
The circuit operation is similar to when a fixed current limit is required, only in this case, the voltage across the sense resistor which is usually fed to pin 2 of the L200 is developed across a potentiometer which allows just a portion of that voltage to be tapped off and fed back, allowing the current to increase above what it would have otherwise been. At the high-current end of the adjustment range, it is difficult to make accurate adjustments, which is why there is another low-value variable resistor in series; this allows finer adjustment when near maximum current, if you feel that might be useful.
The main sensing resistor will be dropping most of the supply voltage across it at full current, so needs to be suitably rated. In my unit with a 24 volt supply, when passing just over 200 mA the resistor is dissipating just over 5 watts, so using a 10 watt device ensures some headroom.
The L200 will develop some heat itself, so needs to be mounted on a moderate heatsink; layout isn't in any way critical, but ensure the decoupling capacitors are fitted close to the IC's pins to ensure stability.
Examples Of Treated Artefacts
The pairs of photos here show some examples of artefacts I have treated using electrolysis, to illustrate what to expect and what can go wrong. As should be obvious, once iron has rusted away, it's gone for good and nothing will recover it, but this process does convert some rust to a stable material and makes it easier to remove oxidation which couldn't be safely removed otherwise.

Broken Victorian pick before treatment |
Broken Victorian pick after treatment |
This shows part of a miner's pick, which had been buried in the spoil heap of an old whetstone mine. It was immediately sealed in a plastic bag on excavation, and treated using electrolytic reduction, with excellent results.

Horseshoe before cleaning. |
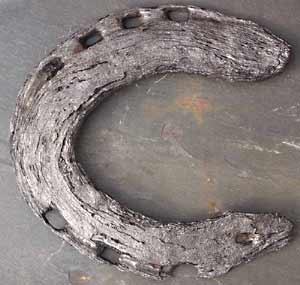
Horseshoe after cleaning. |
This horse shoe was in a particularly badly rusted condition, having spent much of its time buried in the ground. Unfortunately it had been allowed to dry out, causing the rust layers to separate from the core. It was treated for around a week in the cell, but if it hadn't been allowed to dry out before treatment, some of the corroded iron may have been recoverable; as it is, I was left with pretty much just the iron core in this case.
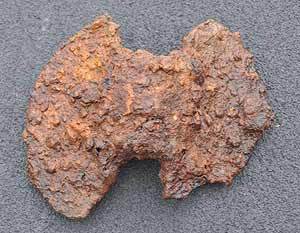
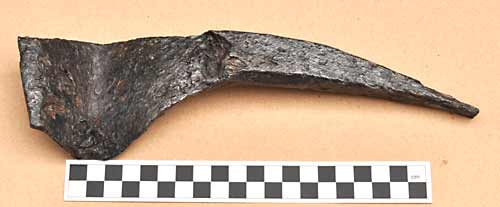
Old tool before treatment. |
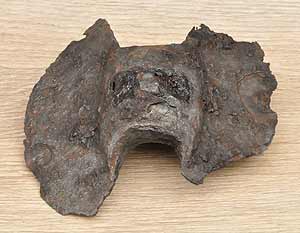
Old tool after treatment. |
The photos above show a badly corroded and damaged tool which was buried in the ground for around 200 years, and how it looks after careful treatment for a week or so in an electrolysis cell and some careful cleaning; I consider this to be a good result and as long as conserved artefacts like this are kept moistened with an anti-rust fluid, they should last indefinitely. Museums take note!