
An Experiment with an alcohol "Backpacker" Stove - page 1
This is an experiment where I tried to make a very light, easy to construct, efficient, low cost "backpacker" stove. After trying some designs that I found on the web, I came across a low-pressure, "self-pressurized" one that runs on alcohol and uses a penny for a pressure regulator. I tried to build it according to the instructions, but it blew the top (Burner) off and splattered alcohol when I lit it. The picture on the web page shows holes punched in the side of the top section. I think the side holes may have allowed some air to get into the interior. Alcohol vapor and air in an enclosed area seems like a bad idea to me. I modified the design to, hopefully, make it a little safer and work better. This design seals the chamber except for the small burner holes. The basic parts required are two pop cans, a small piece of cotton cloth, and a quarter. Some kind of wind screen and a pot support would need to be made also. Construction tools required for burner - marker, scissors, a drill with 1/16"(Or #57) and 3/16" (Or a "Unibit") drill bits, super glue (Optional), and needle-nose pliers.
Caution - This is an experimental design, not a production stove. Alcohol is very flammable and needs to be used with great care. It also burns with a flame that is hard to see. Care needs to be used when filling the unit. Overfilling can cause liquid alcohol to come out the burner holes when it is lighted. Only use methanol in this stove. Never use gasoline. Don't try to blow out the flame. Let it burn out or cover it with a container, until it's cooled down, to smother the flame. Only re-fuel the stove when it is cool. Pop can edges can be very sharp.
I tried using denatured alcohol for fuel, but it's a mix of ethanol and methanol. It burned poorly, with a yellow top to the flame. When I switched to methanol it burned well, with a stable, blue flame. I used "HEET", a gasoline fuel drier. It runs between $1.00 and $1.50 for a 12 oz. re-sealable bottle and is widely available. One 12 oz. bottle is good for four meals (3oz. fuel/meal). The yellow bottle (Methanol), not the red one (Isopropyl). Methanol may be available in another product form. I tried isopropyl alcohol also, but it burned with a yellow flame and the flame was not as stable.
Construction
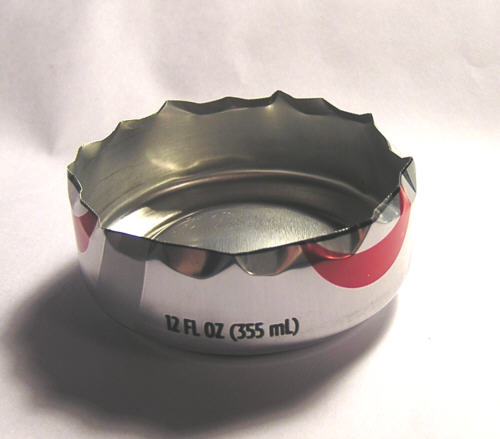
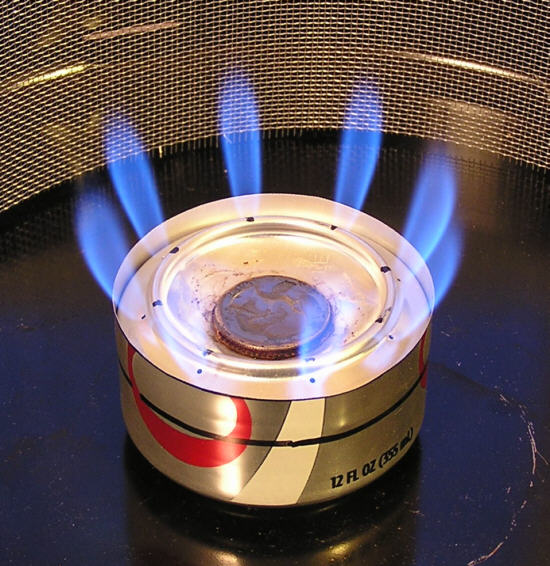
Cut the top part off two soda pop cans, leaving one with a height of 1 3/8"
(Base) and one 1 1/8" high (Top/Burner). Drill 6 evenly spaced 1/16" holes on
the outside edge of the burner section and one 3/16" hole in the center. See the pictures below. Bend in the edge slightly around the open side of the burner
section to help get it to slide into the base section. Press the burner
carefully into the base and, once it's started, turn the assembly upside down on
a solid surface and press the base down evenly until the edge of the base is
even with the very top of the burner section. With care, the bottom section will
stretch instead of splitting or damaging the side of the burner. I ran a bead of
"super glue" around the joint just to be sure there would be no leaks. Traced
around a quarter on a piece of cotton cloth (I used an old T-shirt) and cut out the circle.
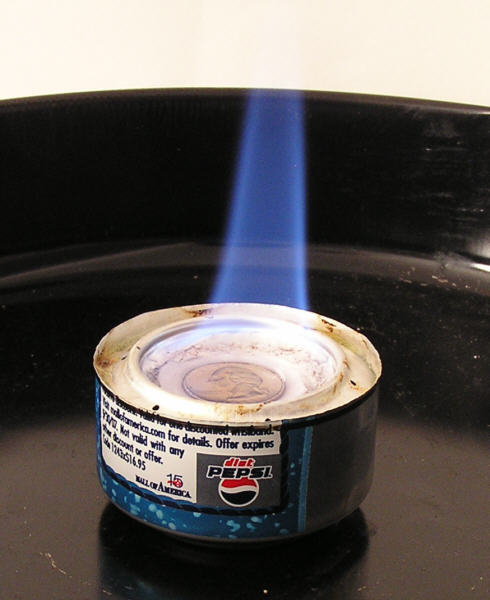
Test - Oct. 17, 2007
90 ml. of methanol (HEET) - filled chamber, added cloth and quarter, added fuel
to just cover quarter. Don't want to overfill chamber.
8:53 am Lit stove with match
8:55 am Burners light
8:56 am Burner flames about 1 1/2" high, center flame 2-3" high
9:02 am Burner flames about 1" high, center flame went out
9:45 am Burner flames dropped to 3/4" high
9:48 am Alcohol stopped boiling
9:52 am Flame out
These are some pictures of the test on Oct.17, 2007.
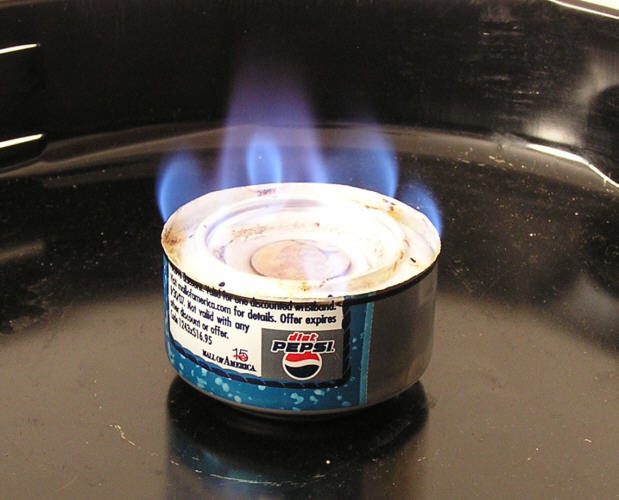

Second test - with a modified unit
Made another stove with smaller holes. Used eight evenly-spaced holes of 0.043
diameter (#57 drill). Other dimensions stayed the same. Didn't use super glue at
joint.
90 ml. of methanol (HEET) - filled chamber, added cloth and quarter, added fuel to just cover quarter.
5:50 pm Lit stove with match
5:53 pm Burners light
5:58 pm Burner flames about 1 1/2" high, center flame drops to low
6:00 pm Burner flames about 1 1/2" high, center flame low
6:20 pm Burner flames about 1 1/2" high, center flame low
6:22 pm Alcohol stops boiling
6:25 pm Flame out
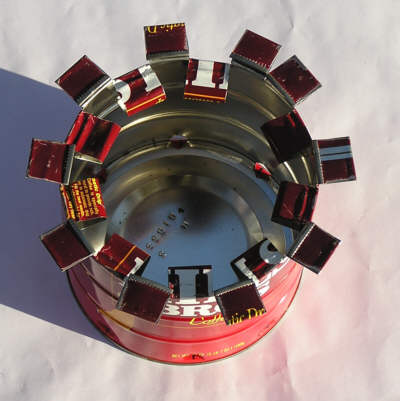
I tried a combination wind screen and pot support made from a coffee can to put
the stove in. It worked well at stopping the wind and kept the burner flames
more stable. Unfortunately, when I put a cook pot on top, it held too much heat
inside the can and overheated the stove, causing high burner flames and excess
venting from the pressure relief hole. Another design that stops the wind but also keeps the stove cooler will
need to be designed.
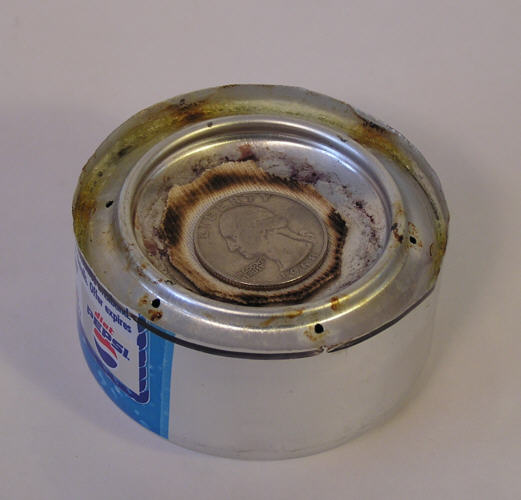
Conclusions:
The stove with smaller holes burned hotter and at a higher pressure, but the
stove with 1/16" holes lasted longer. The pressure relief (The
quarter) on the one with small holes let out a small amount of gas through the
whole process. The pressure in the stove with larger holes stayed low enough not
to release gas through most of the cycle. The piece of cloth under the coin
makes the pressure relief work smoother than the coin alone. It also acts like a
wick on startup, to make the burners start more reliably. That was another
problem I had with the coin alone. There is a large center flame for the first 5
minutes or so after the burners light. I believe that the liquid alcohol inside
is expanding as it's warmed and will come out of the relief valve until enough
alcohol exits where the liquid no longer touches the metal top section. Since it
isn't enough to force liquid out the burner holes and more heat is usually
needed anyway when starting to cook, this doesn't seem to be a big problem.
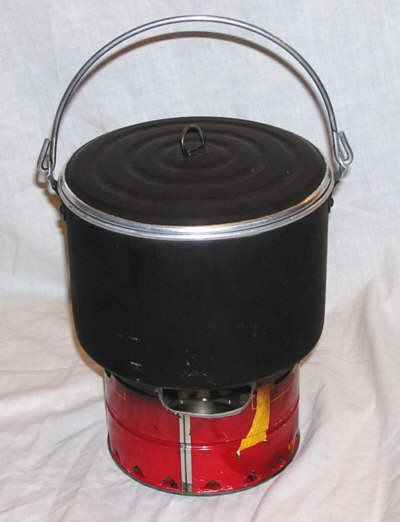
Nov. 25, 2007 - Modified Coffee Pot support- Cut can down to 4 1/2" high.
Made four cutouts in top of can 1 1/2" high by 2 1/2" wide. Doubled number of
holes made with a can opener at base of coffee can (16 total).

Stove with eight evenly-spaced holes of 0.043 diameter (#57 drill) for burner.
Used 90 ml. of methanol (HEET) - filled chamber, added cloth circle
covered by quarter over center hole, added fuel
to just cover quarter. One quart 60 degree F water in 8" diameter covered
pot. Room temp. 38 F.
10:53 am Lit stove
10:58 am Burners light, put pot of water on top of can
11:03 am Burners about 1 1/2" high, center flame drops to low
11:11 am Water boiling
11:19 am Alcohol boiling stops
11:21 am Flame out
Results - About 13 min. to boil 1 qt. water, 21 min. of useable flame.
Repeated test with the cloth circle covered by a penny, covered by a
quarter, to increase pressure required to vent stove.
12:46 pm Lit stove
12:48 pm Burners light
12:49 pm Put pot on can
12:52 pm Burners about 1 - 1 1/4" high, center flame drops to low
12:56 pm Burners about 1 1/2" high
1:04 pm Water boiling
1:17 pm Alcohol boiling stops
1:20 pm Flame out
Results - About 15 min. to boil 1 qt. water, 29 min. of useable flame.
Ran same test with more weight over cloth to give better seal at
vent hole.
Burner flames ran 3/4" to 1" for most of test. Only occasional, small puffs of
flame from vent.
Results - The pot of water got hot but never boiled. About 45 min. of useable
flame.
Conclusions - I expected that restricting the vent would increase the pressure in the stove. Instead, the heat from the center flame (Fuel released from the vent hole) seems to be most responsible for vaporizing the liquid alcohol inside, not the burners. The coffee can gets too hot to touch during use. When put inside an enclosure, the heat retained around the stove also increases the boiling rate of the alcohol and therefore the burner flame height. It's a balance between flame height and burn time, and channeling available heat to the cook pot without overheating the stove. A skirt with 3/8" to 1/2" clearance to the side of the pot, added to the support, might lower the time to boiling. A pot of the right diameter would be needed to take advantage of the skirt.
This tiny, simple, low-pressure stove design worked well for me. It didn't require a pressure pump, complicated burner, a special tank, or buying expensive fuel. It put out a lot of heat, burned smokeless with a stable blue flame, and cost me nothing to build. It does need a wind screen around it in even a light breeze. It is capable of burning almost an hour on one 90 ml. filling (About 3 oz.) with 1/16" burner holes. It's small enough to pack away and use for a backup stove if needed. Fuel can be purchased at almost any gas station. Several size burners could be carried for cooking different foods.
L.B.