An Experiment with a Rocket Stove - page 1
The Basics
Recently I found out about a type of high efficiency cooking device
called a "rocket stove". After a "Google" search, I began to
understand the theory of operation and how these stoves were being made. After
studying stove designs, I decided to start by taking the idea down to it's
absolute basics - to find the minimum system that would work, to use as a
starting point. Most rocket stoves
are fueled by wood. The idea is to save hard-to-obtain (Or expensive) wood fuel,
which is a serious problem in "third world" countries. These "rocket
stoves" have
the capability of being four to five times as efficient as the often-used "three
stone" fire (A cook pot supported by three stones or bricks with wood fed in
between). These fires generate a lot of smoke in use. Smoke is
incompletely-burned fuel. In third world countries, cooking fires are often made
indoors, subjecting family members to dangerous byproducts of partly-burned
wood. Open wood fires also waste large amounts of heat. Any heat that doesn't
transfer to the cook pot is wasted heat.
A typical rocket stove basically consists of four parts. A short inlet chamber, with a horizontal plate to separate the wood fuel (On top) from the air intake (On the bottom). Effectively injecting air into the wood fuel is important for best efficiency. This allows air to pass upwards through the fuel, causing a more complete burning of the wood. The air is also pre-heated to some extent as it passes under the plate into the fire chamber. Pre-heated air takes less heat from the fire. Part two is the fire chamber. The fire chamber is basically just a ninety degree elbow where most of the heat energy is produced. Part three is the chimney. The difference in density between the hot gas moving up the chimney and the room air causes air to be drawn up through the fuel to cause a hot-burning, low-smoke or smokeless fire. This difference needs to be maximized. Heat loss can be minimized by insulating the chimney and firebox. Wood stove cooking is different from heating. "Thermal mass" should be minimized in the stove. The properly designed stove will need to be fed above some certain minimum rate of fuel burn to remain smokeless (To keep up a strong enough chimney draw). This is related to the cross-sectional area. The larger the area, the more heat that can be generated by the oven, but the more fuel that's needed to maintain a minimum required chimney draw. Feeding wood into the fire area too quickly will also cool down the process and cause smoke. Also, high burn rates for a shorter time tend to be less efficient than lower rates over a longer period. A stove that can heat a pot of liquid to boiling in five minutes takes more total energy than one that heats it in fifteen minutes. Matching the heating capacity of the stove to the heating requirements is important for best efficiency.
One of the most important things to remember when making a rocket stove is
that the draft caused by hot gas traveling up the chimney is what makes the oven
so efficient and minimizes smoke. That is what drives the burning process. The
chimney, elbow, and intake areas need to be matched for best operation. Too big
a cross-sectional chimney area will have a poor draft. Too small will restrict
flow. A poor draft equals smoke coming out the chimney. This is bad ! A
properly-fed rocket stove should burn without smoke after the initial start-up.
The chimney on a rocket oven is much shorter than a conventional wood stove or
fireplace. It may only be twelve to twenty-four inches high above the fire
chamber. In general, from what I've found in testing, the taller the chimney,
the less trouble in getting the oven to start up, stabilize, and operate
efficiently.
From my tests so far, it seems that the chimney cross-sectional area needs to
be about the same, or slightly less than the intake and fire chamber areas, be
vertical, as tall as practical for the design, preferably insulated, and
obstructions minimized, to keep the exhaust gasses as hot as possible for
maximum flow and most complete combustion. The air supply to the stove may need
to be restricted to give the best compromise between the hottest flame and the
best efficiency.
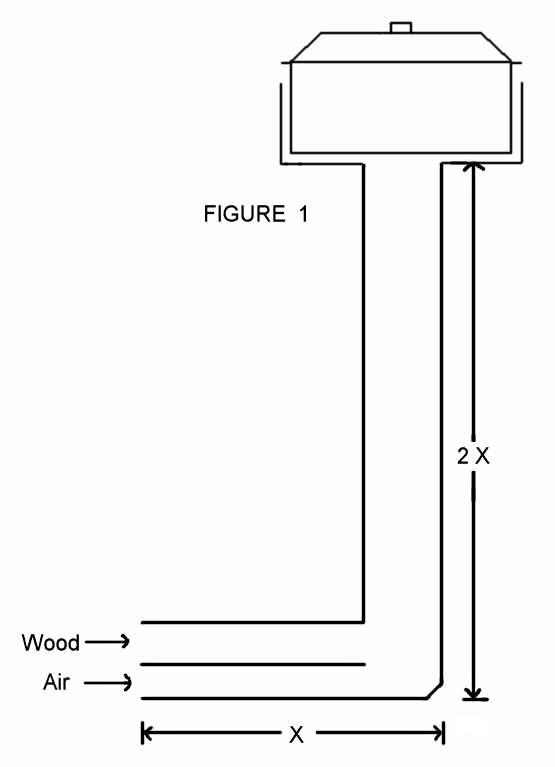
The fourth, and last part of the stove is what transfers the heat produced by burning wood to the food being cooked. If heat is not transferred effectively, it doesn't matter how efficient the rest of the stove is. Heat from the exhaust gas coming up the chimney needs to be transferred to the cooking vessel. For best efficiency, the hot gas needs to pass along the bottom and up the sides, making as much contact as possible. This requires making a "skirt" around the side of the pot (See Figure 1). The distance between the pot and skirt at the exit point for the exhaust gas is another important consideration. Too wide a gap will let the hot gas exit with little heat transfer to the pot. Too little a gap will restrict the flow and make the stove smoke. Making the total area of the pot-to-skirt gap around the pot about the same as the cross-section area of the chimney is a minimum. When the gas leaves the chimney, it expands and cools. As the gas cools, it slows down, so the exit area will probably need to be increased over that value for best operation.
This is how I calculated the width to use for the minimum side gap.
If the area of a circle is roughly 3.14 times the square of the radius, and you
know the outer radius of the pot and the cross-sectional area of the chimney,
you should be able to figure the radius of the skirt and the gap size.
4" diameter (2" radius) chimney
3.14 x 2 x 2 = 12.56 sq. in.
12" diameter (6" radius) cooking pot O.D.
3.14 x 6 x 6 = 113.04 sq. in.
12.56 + 113.04 = 125.6 sq. in.
3.14 x R x R = 125.6
R x R = 40
R = 6.32 in.
6.32 - 6 = 0.32 in.
Minimum gap between pot and skirt should be about 1/3 inch for 12" (O.D.) pot and 4" (I.D.) chimney.
The bottom of the pot also needs to be supported far enough from the top end of the chimney not to restrict the flow of the exhaust gas.
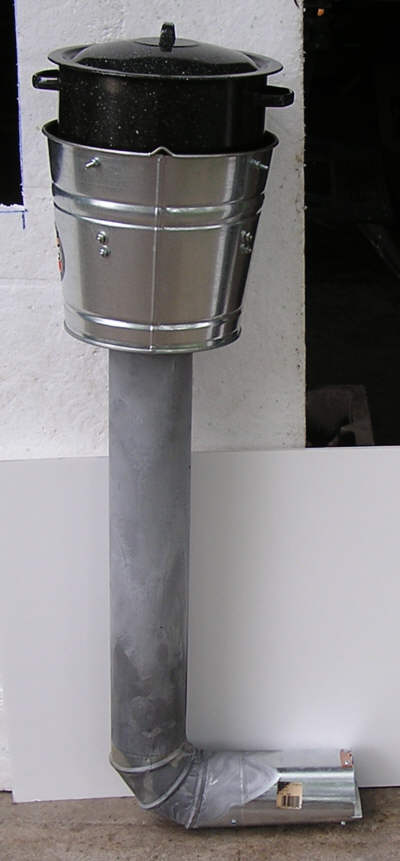
Basic Test Stove
I made a basic cooker for testing from an 8" long, 4" diameter steel vent
pipe for the horizontal, a 90 degree street elbow, and a 16" long, 4" diameter
steel vent pipe for the chimney. An 8" long flat plate is mounted about 1/3 of
the way up from the bottom of the inlet pipe. A metal bucket (Not one with
soldered joints) with a 4" diameter hole cut in the bottom made a useable skirt.
I paired up the bucket with an appropriately sized covered cook pot. "L"-shaped
brackets were mounted inside the bucket at a proper height to support the cook
pot and give the optimum side gap. Note the bolts (Heads pointed inwards) that I
used in four spots near the rim to keep the pot centered. The bolts use a nut on
each side of the bucket with a lock washer, to allow adjustment.
WARNING - Galvanized steel vent pipe should not be used for a stove. It
is not meant for such high temperatures. The zinc plating can be very dangerous
if it is breathed in. I bought a two foot length of 8" black flue
pipe and sheet metal screws from a hardware store to cut down to make a 4"
chimney. I also purchased some 4" diameter, aluminized steel truck exhaust pipe
to try for further tests. It ran about 70 cents per inch from a truck parts
supplier (About $17.00 for a 24" pipe).
 This was supported with some bricks for the test. The pot needs to have liquid
in it. The pot will be damaged if run dry. This simple-looking unit heated the
water surprisingly well and was very efficient. Four 24" long pieces of wood
lathe burned for 45 minutes. As long as the wood is pushed in as needed there
was no visible smoke coming out of the top. The wood is just pushed in as far as
it will go (Against the back of the elbow). Note the low thermal mass of the
system. The chimney was not insulated for this test. Smoke was visible when
burning only one piece of wood lathe. With two or more pieces of wood, there was
enough heat to make the chimney draw properly.
This was supported with some bricks for the test. The pot needs to have liquid
in it. The pot will be damaged if run dry. This simple-looking unit heated the
water surprisingly well and was very efficient. Four 24" long pieces of wood
lathe burned for 45 minutes. As long as the wood is pushed in as needed there
was no visible smoke coming out of the top. The wood is just pushed in as far as
it will go (Against the back of the elbow). Note the low thermal mass of the
system. The chimney was not insulated for this test. Smoke was visible when
burning only one piece of wood lathe. With two or more pieces of wood, there was
enough heat to make the chimney draw properly.
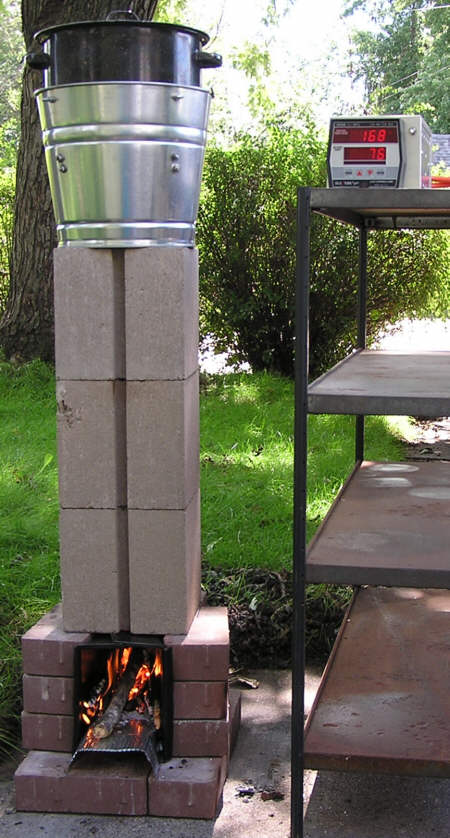
A simple functional rocket stove
I put together a small, complete, rocket cooker that could be made at low cost.
After making the chimney and firebox insert, it only took about five minutes. I
used some cheap 4" x 8" paver bricks, three 8" concrete half-blocks, a 24" long
8" diameter black vent pipe, and the bucket. The 8" black vent pipe was
cut down with tin snips to make a 4" diameter pipe to use as a chimney liner. The
remaining material was used to make the firebox liner. The paver bricks probably
wouldn't last long if used as firebrick. The metal liner makes the type of brick
used less critical. The brick & block also make a support for the bucket (Used
as a skirt) and cook pot. The paver bricks are angled inwards in the back of the
fire box - enough to make a shelf for the 4" exhaust chimney liner to sit on.
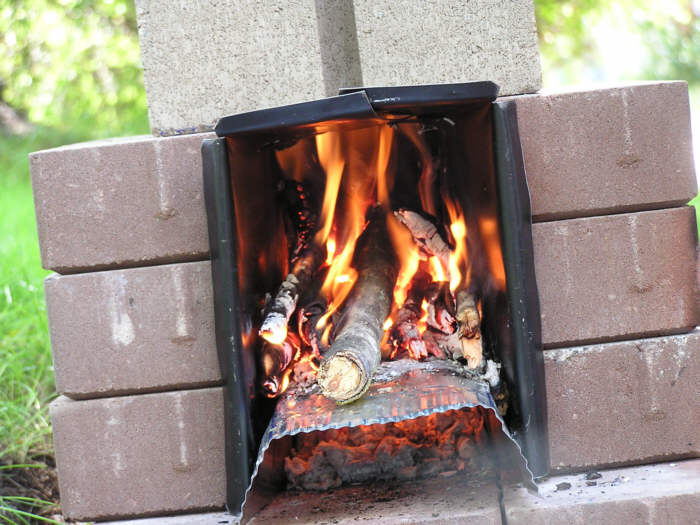
The fire chamber is about 7 1/4" high (3 bricks), 4 3/4" wide at the front end
of the bricks, and 3 1/2" at the back. The metal separator plate is about 2"
high. This leaves about a 5" high opening for adding wood. The length of the
chamber is 8". The chimney (3 concrete half-blocks) is 23" high. The 24" x
4" diameter metal chimney liner extends about one inch into the skirt. This
design may not be quite as efficient as the "vent pipe" test unit above. It has
more heating capacity, and more thermal mass, but it operates without smoke in
normal operation. It still is much more efficient than an open wood fire. In a
pinch, the stove will still work without the metal 4" liner, but the chimney
interior is too large for the inlet size and it will tend to smoke. The fire
chamber and chimney liner could also be made out of high temperature fire brick
instead of metal but this would increase the thermal mass.
Water Heating Test
4 liters of water in covered pot, Air temp. 75 F, 10 minute stove warm-up.
1:10 pm 69 F water temp. - Start of test
1:15 pm 112 F
1:20 pm 162 F
1:23 pm 180 F
1:25 pm 192 F
1:27 pm 200 F (Water starting to boil)
1:30 pm 212 F (Water boiling) - End Test
Summary
Water reached 180 F in 13 minutes, and a full boil in 20 min.
Adding the pot of cold water caused the stove to smoke. The hot gas hitting the
cold surface may have reduced the chimney draw. The smoke stopped when the water
got warm.
From my testing I came up with a general guide for minimizing smoke here.