An Experiment
in Solar Cooking - page 7
Improved simple parabolic cooker
This cooker uses the same 18"x18"x28" size (Size
doesn't include end flaps) 3M cardboard storage box
(Menards- about $4) and 18" wide heavy duty aluminum foil as before. This time I
used all of the box. If a number of ovens were to be built, it would be cheaper
to buy cardboard in bulk, rather than individual pre-made boxes. I used up one
7.6 oz. bottle of Elmer's glue.
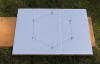
I cut down each corner fold of the box, and then cut each 47" X 18"
piece in half. This gave me eight identical pieces, Each one was 23 1/4" long by
18" wide.
Mixed 2 parts white Elmer's glue-all to 1 part water.
I glued two pieces together to make the base.
I brushed on glue and coated all seven pieces with foil. Starting on one
end and gently pressing down while rolling the foil to the other end minimizes
wrinkles. I wiped down the foil with a damp cloth to insure the foil pressed
down. I poked holes in any large air bubbles with a needle and pressed them out.
When the reflectors dried they took on a slight upward curve, which isn't bad.
Important - the panels should be allowed to dry slowly. I let them sit
overnight. Placing them in the sun to dry will cause the foil to expand
and pull away from the cardboard.
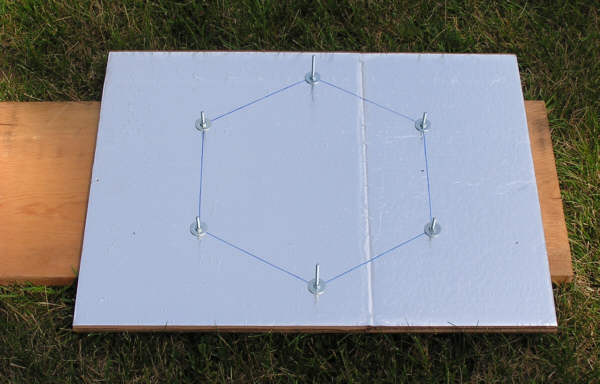
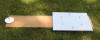
Used six 2 1/2" long, #8 bolts, fender washers, and nuts up through the
base (On top of a 1x12 board) to support the cooker. The long bolts sticking up
are used to insure that the six reflector panels form a hexagon. The board is
used to rotate and elevate the cooker. An 8" high wood dowel mounted vertically
at the end of the board makes a simple but effective aiming device.
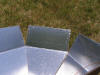
I marked the bottom of the reflectors 3 1/2" each side of center. Then I
measured up 14 1/4" (At a right angle) from the bottom and marked each outside
edge. I drew a line from each of the bottom marks to the side marks (Giving 7"
wide bottom and 18" wide at the fold line for the flaps). Notice that I only cut
off one side (The same side on each panel) This allows the other side to be used
as a support. I punched holes at one inch intervals along the cut edge and on
each side of the line I marked on the other side. When assembled, the reflectors
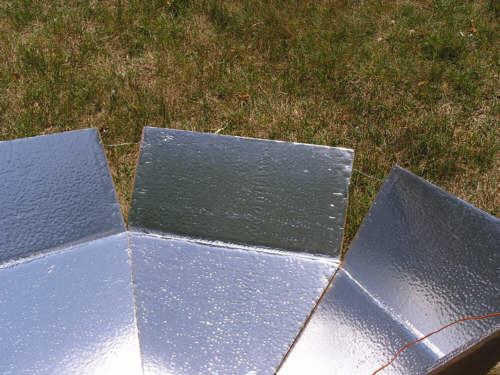
ended up about 43 degrees from vertical at the base. The 9" high top sections of
the reflectors (The end flaps of the box) are bent at the fold line and wired
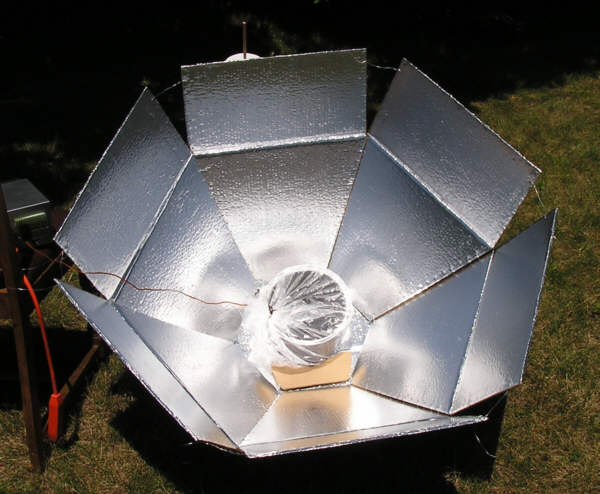
(Utility wire) together to give the best focus on the cook pot.
I aimed the cooker at the sun (No shadow cast by the aiming stick) and used
an small box covered with white paper in the middle of the cooker as a visual
aid to set the best angle for the top reflector sections. String was used to
connect the lower part of the sides. The oven ended up about 36" across at the
top of the reflectors. The reflector section of the stove lifts off the base and will fold up when not
in use.
WARNING - while the reflector panels are flat, not curved like a true
parabola, this cooker can possibly reflect some sunlight upwards. I used
dark glasses while determining the reflector angles and operating the oven. Also, the
cook pot got very hot without water in it - almost to 250 F - enough to cause an
instant burn if touched.

This oven was designed to be used with a dark vessel with a tight-fitting
lid, sitting on an insulating pad (Like a folded towel). An inverted clear bowl
over the vessel or a clear "oven" bag might help improve the
performance (Or a smaller covered pan, sitting on an insulator, inside a larger
covered pan on an insulator). Something to provide an insulating air layer to
hold in heat.
Water heating test
Twin Cities, June 30, 2008
Few clouds, slight haze, light breeze, outside temp. 85 F
Test to heat 1 quart of water in a covered aluminum pot, outside painted flat
black, left lid slightly loose with thermocouple probe in water. A piece of
cardboard underneath the pot for insulation. The pot was held in the center of the cooker
with a cardboard support. Spaced top edges of flaps 3 1/2" apart with wire. Used
a step stool under the board for adjusting the angle to the sun. Angles were adjusted
every quarter hour.
2:15 pm 70 F (Starting water temp.)
2:20 pm 76 F
2:25 pm 88 F
2:30 pm 104 F
2:35 pm 117 F, adjusted angles
2:40 pm 131 F
2:45 pm 141 F
2:50 pm 151 F
2:55 pm 160 F, adjusted angles
2:56 pm Sun went under light clouds
3:00 pm 167 F, Sun under light clouds
3:05 pm 172 F, Sun under light clouds
3:10 pm 175 F, Sun under light clouds, adjusted angles
3:15 pm 176 F, Ended test. Not enough sun for a good test
Water heating test
Twin Cities, July 5, 2008
Clear sky, slight haze, strong breeze, outside temp. 78 F
Test to heat 1 quart of water in a covered aluminum pot, outside painted flat
black, left lid slightly loose with thermocouple probe in water. A piece of
cardboard underneath the pot for insulation. The pot was held in the center of the cooker
with a cardboard support. Reduced spacing of top edges of flaps to 3" apart with
wire. Used
a step stool under the board for adjusting the angle to the sun. Angles were adjusted
about every twenty minutes.
11:10 am 71 F (Starting water temp.)
11:15 am 76 F
11:20 am 89 F
11:25 am 103 F, adjusted angles
11:30 am 117 F
11:35 am 129 F
11:40 am 140 F, adjusted angles
11:45 am 150 F
11:50 am 157 F
11:55 am 163 F
12:00 pm 168 F
12:05 pm 174 F, adjusted angles
12:10 pm 177 F
12:15 pm 180 F, Ended test.
Water heating test
Twin Cities, July 6, 2008
Clear sky, slight haze, slight breeze, outside temp. 80 F, one quart water
Changes - Changed distance between top edges of flaps to 4" (Increased angle
from vertical). Used two pieces of cardboard under pot ( 1/2" high instead of
1/4").
11:40 am 72 F (Starting water temp.)
11:45 am 75 F
11:50 am 86 F
11:55 am 100 F
12:00 pm 115 F
12:05 pm 127 F, adjusted angles
12:10 pm 139 F
12:15 pm 149 F
12:20 pm 157 F, adjusted angles
12:25 pm 164 F
12:30 pm 171 F
12:35 pm 177 F
12:39 pm 180 F
12:40 pm 181 F, Ended test.
Test to cook approx. 2/3 lb. ground beef patty in covered pot.
12:25 pm Start
1:15 pm Hamburger cooked well done
Heating up a couple of hot dogs
(Without any water) in the pot took about 15 minutes.
Sun was at highest point in the sky about 1:30 pm.
Water heating test
Twin Cities, July 8, 2008
Clear sky, slight haze, strong breeze, outside temp. 76 F, one quart water in
loosely covered black pot sitting on 1/4" cardboard insulator, reflector top
corner spacing at 4".
Changes - Put pot in a semi-transparent oven bag (Reynolds - large size),
very loosely sealed with a twist tie

11:30 am 70 F (Starting water temp.)
11:35 am 77 F
11:40 am 90 F
11:45 am 109 F
11:50 am 122 F
11:55 am 136 F, adjusted angles
12:00 pm 150 F
12:05 pm 162 F, bag half covered inside with condensation
12:10 pm 174 F
12:14 pm 180 F
12:15 pm 182 F
12:20 pm 188 F
12:25 pm 192 F, Ended test.
Summary
This solar oven worked much better than my original simple parabolic
(Solarcooker3.htm - That one only used one-half of the same size storage box).
The first test results also show the dramatic effect that even light clouds can
have on heating. Even in the summer, in the Twin Cities area there just isn't
the sunlight that would be available nearer to the equator. It looks like, with
good sun, the oven should be capable of raising the temperature of one quart of
water at an average rate of two degrees F / minute or better, up to 160-170
degrees. As the temperature gets hotter, the heat losses begin to increase,
especially with the lid loose. I tried adding an oven bag over the cook pot in
the last test. It dropped the time to reach 180 degrees (My target temp.) by
over 25%, so if you had access to oven bags they would be worth considering. I experimented with the
angles of the top sections and a four inch spacing between the top corners gave
the best results. At that angle, light reflected from the top panels went
directly to the center of the cooker bottom (Without anything in the cooker).
Figuring the cost of the cardboard box, glue, foil, and hardware, the price
ended up about $10.00. Buying materials in bulk, I'm guessing that figure could
be cut in half. As before, I've tried to avoid the necessity of using
"oven bags" to keep down the long-term cost of using the cooker, though an oven
bag does reduce the cooking time.
Again, the solar ovens I've made are designed on the assumption that someone
can always be made available for oven adjustments, at least on an hourly basis,
to compensate for changing conditions.
This design was easy to build and seemed to work well. The angle adjustment has been
simplified down to a board and something to prop up one end (Like a box) that
can be slid back and forth as needed. The cardboard reflectors could be attached
to the base and board permanently instead of using bolts (So I could lift off
the reflector section) like I did. It would work best
with little or no wind to rob heat and a tight cover on the pot.
From what I have learned, these are three simple rules for designing a
solar cooker:
1. The more sunlight you can reflect to the target area, the better.
2. Absorb and retain as much of that energy as possible.
3. Simple is better than complicated.
NEXT PAGE
PREVIOUS PAGE
HOME PAGE