Free Morse Reader App
|
Android - Morse reader app
|
Information and download page for my Android morse reader app.
It should be used with
caution as the app is still new, and therefore may act
unpredictably, especially on devices that it hasn't been tried upon
before.
The
app is designed to decode into plain text incoming audio morse, either
via the devices built in microphone, or via an interfaced
connection (similar to that used for digi-modes).
CAUTION:
NEVER CONNECT AN AUDIO SOURCE (such as your rig) TO AN ANDROID PHONE
HEADSET SOCKET USING JUST A SIMPLE CABLE AS IT IS LIKELY NOT TO WORK AND MAY WELL DAMAGE YOUR PHONE!
It
can also if desired, record the incoming audio for later playback. This
allows you to try different setting on the same audio for maximum
decode (sort of a training aid if you like). It is worth noting, that
as the app records unaltered whatever is presented at the mic/audio
input, that is could be used to record anything, remembering that as
the sampling rate is low, the recorded quality is not the highest.
There
is an inbuilt file selector that points into the devices storage area
where the apps recorded files are kept, allowing you to replay current and
older audio recordings. It also allows you to share the recorded files with other apps that can handle .wav format.
The
output audio recording is saved in WAV format, so it could be played
(or manipulated) by other apps, or even transferred to other devices
for replay/analysis/manipulation.
The
app itself has completed Alpha testing, Beta testing, and is now at Production release (via Google Play, and the link below).
NEWS FLASH - Now available from Google Play store (free of course). Search for 'Morse code reader' or 'RX Morse'
The procedure below is still valid though... but you may find it easier to use Google Play.
WARNING:
Please be aware that I have found the Android Chrome browser
does not react well to the download request (continuously opening new
tabs and I had to stop the browser app manually).
It does work ok with the standard 'Internet' browser built
into my
Samsung devices, the Firefox browser (which installed on my Nexus 7
from Google Play), and also via email attachment install.
To install this test version you may have to enable 'Unknown
sources' in your Android devices Security settings. I'd suggest
enabling, installing the app, and then disabling to be safe.
Note: There
are no
in App downloads, purchases, or any attempts to communicate with
anything external to the device it's installed upon i.e. once installed
the app is completely self contained.
Only permissions it requires are read/write to external storage so that
it can create/manage recording files, and Record Audio so that it can
access the mic input.
Ok, after all that scary stuff, if your still reading and
interested in downloading the app, here's the link to the latest release...
 Link
for G0HYN - RX Morse latest version APK file Link
for G0HYN - RX Morse latest version APK file
To help get you going, I've created a couple of short videos of Beta 1.1 and uploaded them to YouTube (Need to update really):
Link to quick start guide.
Release History:
Beta 1.0 - Initial build post Alpha testing
Beta 1.1 - Changed Graphic display to show Red bar when app believes it's 'in morse'
Beta 1.2 - Jan-2016 - Added 'Share' to playback options to allow
'sending' of recorded file via external Apps (DropBox, gMail,etc.)
Beta 1.3 - Jan-2016 - Amended 'Share' information to remove full path and use filename only
Beta 1.4 - Feb-2016 - Improved sensitivity of input (i.e. less volume needed from source without winding up the gain)
Beta 1.5 - 29-Feb-2016 - Added click actions to playback text field (single cycles font size, long-click clears text).
Also added single click to settings, stats, and file play fields to
invoke Filter Settings screen, Help screen, and Playback File selector
respectively
Beta 1.6 - 22-Oct-2016:
Change background colour to customborder.xml so that playback field can
be found easier for touch action
Change radius of corners in customborder.xml from 20 to 10
Added font cycling to help activity
Added lowercase/uppercase flip to main menu. Note only a...z flips to
A...Z (and back again)
Beta 1.7: 28-Oct-2016
Added AGC which adjust the main gain to achieve a target level, within a
tolerance range
Made
'standard' screen layout changes to get more text lines on Samsung
Galaxy Ace
Added AGC settings for Level, Speed, and Tolerance (including AGC
On/Off and reset to defaults)
Added invoke of AGC settings via single click in image field
Added AGC settings help text
Beta 1.8: 06-Nov-2016
Added playback file time remaining (elapsed obviously still used for
record)
Added 'All' settings screen to encompass Filter, AGC, and general
settings
Added save/restore of all adjustable parameters (on app stop &
start)
Added 'hide' of gain slider when AGC is active, plus recovery to manual
when AGC is switched off
Production 24-Nov-2016
Beta 1.8 promoted to production release.
Beta testing devices:
- Samsung Galaxy Ace
- Samsung Galaxy Trend 2 Lite
- Samsung Galaxy S3
- Samsung Galaxy S5
- Samsung Galaxy Tab 3
- Asus Nexus 7
Quick
start guide
On
start up the app has been designed to have all additional
features active, so if you simply want to try decoding some audio
morse that
is coming out of a radio's loudspeaker, then just position your Android
device next to the audio source ...
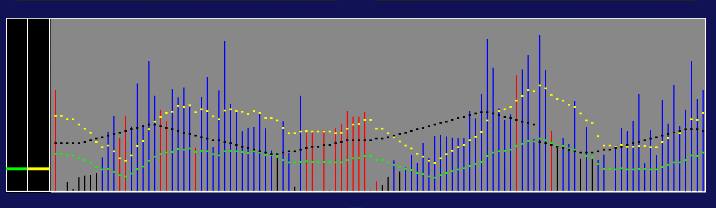
You
should hopefully see an amplitude representation of the audio source
appear in the graph area as a series of vertical lines moving
left to right.
Although the app will attempt to boost the incoming audio by applying Automatic Gain Control (AGC), if
the height of these lines is very low (i.e. the vertical lines are very
small), then I would suggest one of the following to 'boost' the
incoming:
- Move the device nearer the source (I put my phone on top of my Yaesu HF rig's speaker)
- Increase the volume of the source i.e. turn the radio volume up (but you don't want to annoy anybody by having it too loud)
- On
the app move the gain slider to the right (if you have AGC Off), and you should see the
signal size increase (be careful not to turn it up too much though i.e.
keep it less that full height of the display)
I'll
assume you have reasonable signal strength at this point...
What we are looking for is the green dashed horizontal line positioning
itself within the incoming audio height), you can of course
adjust the threshold level, but it needs to be above zero, and we don't
want it 'buried in the noise'.
You
will be able to tell when you are breaking the threshold level as the
vertical bars will be blue or red in colour for those above it.
To be honest, it's a lot easier to do, than it is for me to describe... :o)
So
if you have a signal that is going above the threshold, and it's not
just background noise, then the app will attempt to locate morse tones
and the morse 'digits' which make up each character.
If the app is finding morse, then you should see:
- Tone field displaying an approximation of the tone frequency that has trigger it
- Speed field changing as the app estimates the speed of the incoming morse
- Morse field displaying what the app is decoding in Dots and Dashes e.g. [-.-.]
And finally, if all is going well, the lower text field will be displaying the decoded morse in 'plain text' :o)
If
not, the first line of attack is to vary the signal strength and the
threshold level to see if there is a simple combination that produces
solid decode of the morse.
I
would certainly expect the app to react well to 'generated' code (i.e.
that coming from a practice generator of PC program), and have watched
it decode at 50wpm (generated by a 'turbo' version of my morse
teaching app), but live signals are another matter as they may have a
lot of background noise, so you may need to read on ...
Additional features:
So you've had a quick play, and now want to see what else the app can do...
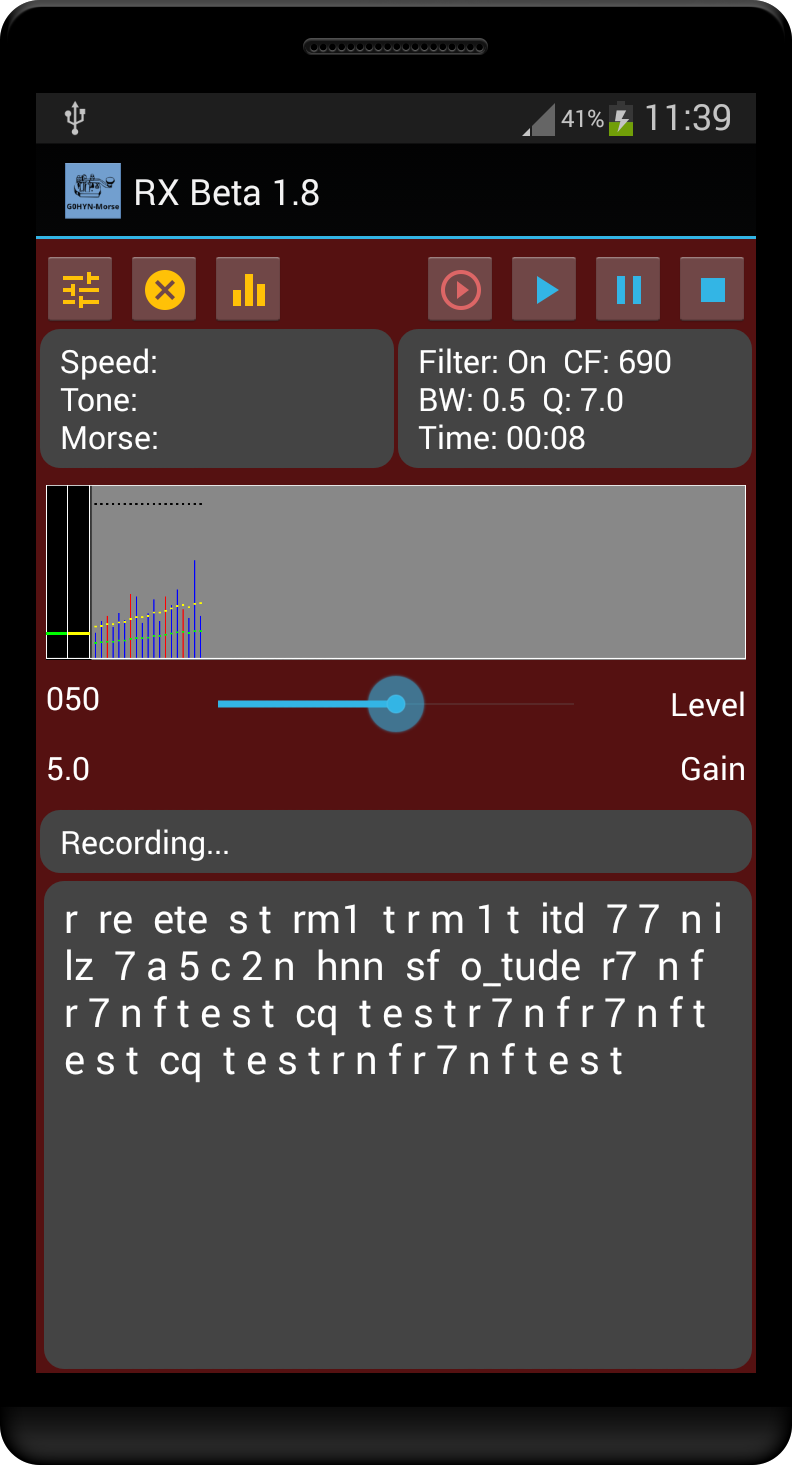
Record 
Pressing
from any mode will start the recording of the incoming audio. The
background colour will change to red to show the app is in record, and
the timer will increment to show the length of time recorded so far.
From record, you can press:
 To stop & save the recording, and immediately playback what you have just recorded (see playback for further details) To stop & save the recording, and immediately playback what you have just recorded (see playback for further details) To stop & save the recording, and go back into Listen mode To stop & save the recording, and go back into Listen mode
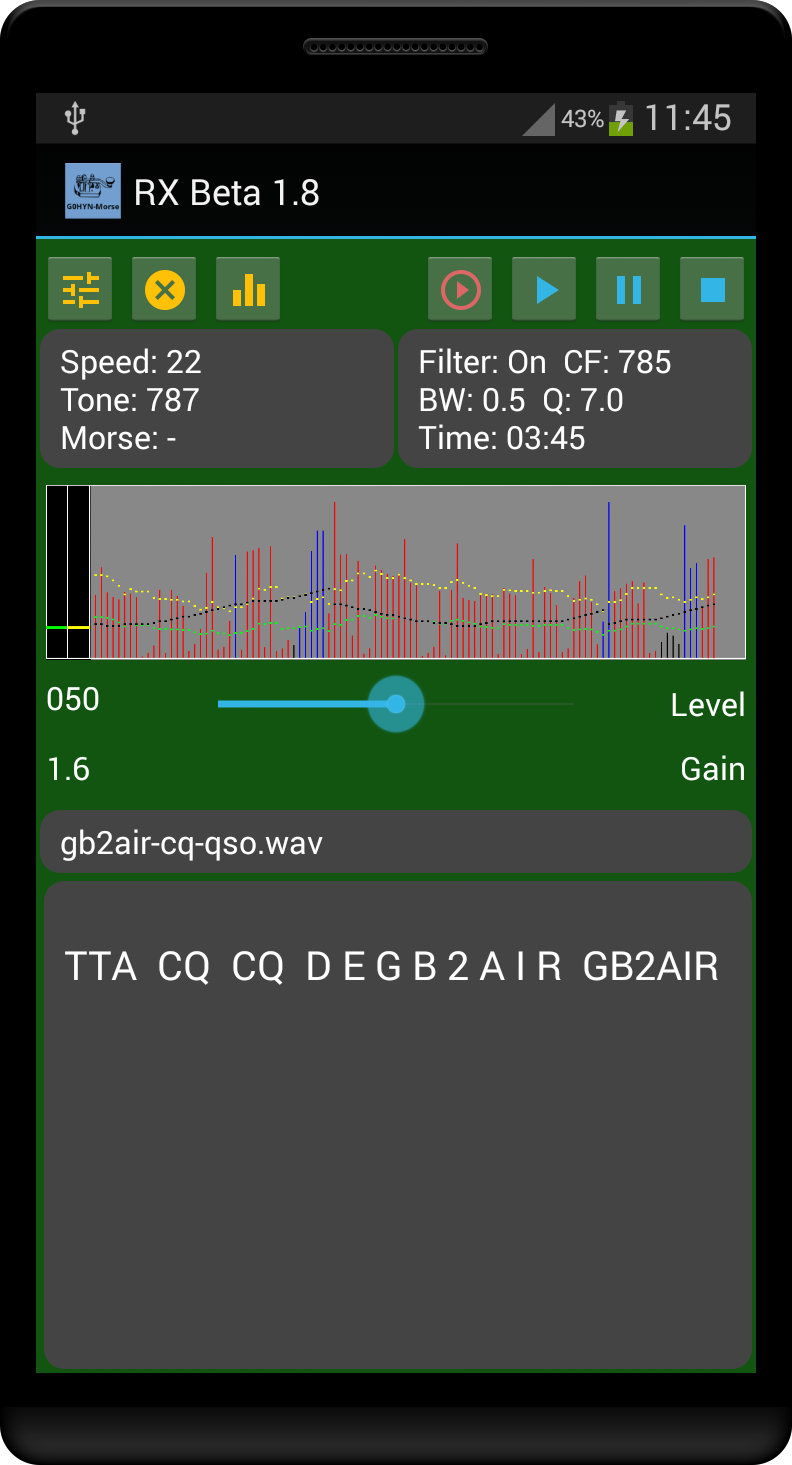
Playback
If you have just stopped recording, of have selected a previous recording, then pressing
will start the playback of the audio, the background colour will change
to Green to show app is in playback, and the timer will increment to
show the length of playback so far.
Record and playback share the
same control, so you can play the same file over and over with
different setting if desired to achieve maximum decode. The recorded
audio file remains unchanged.
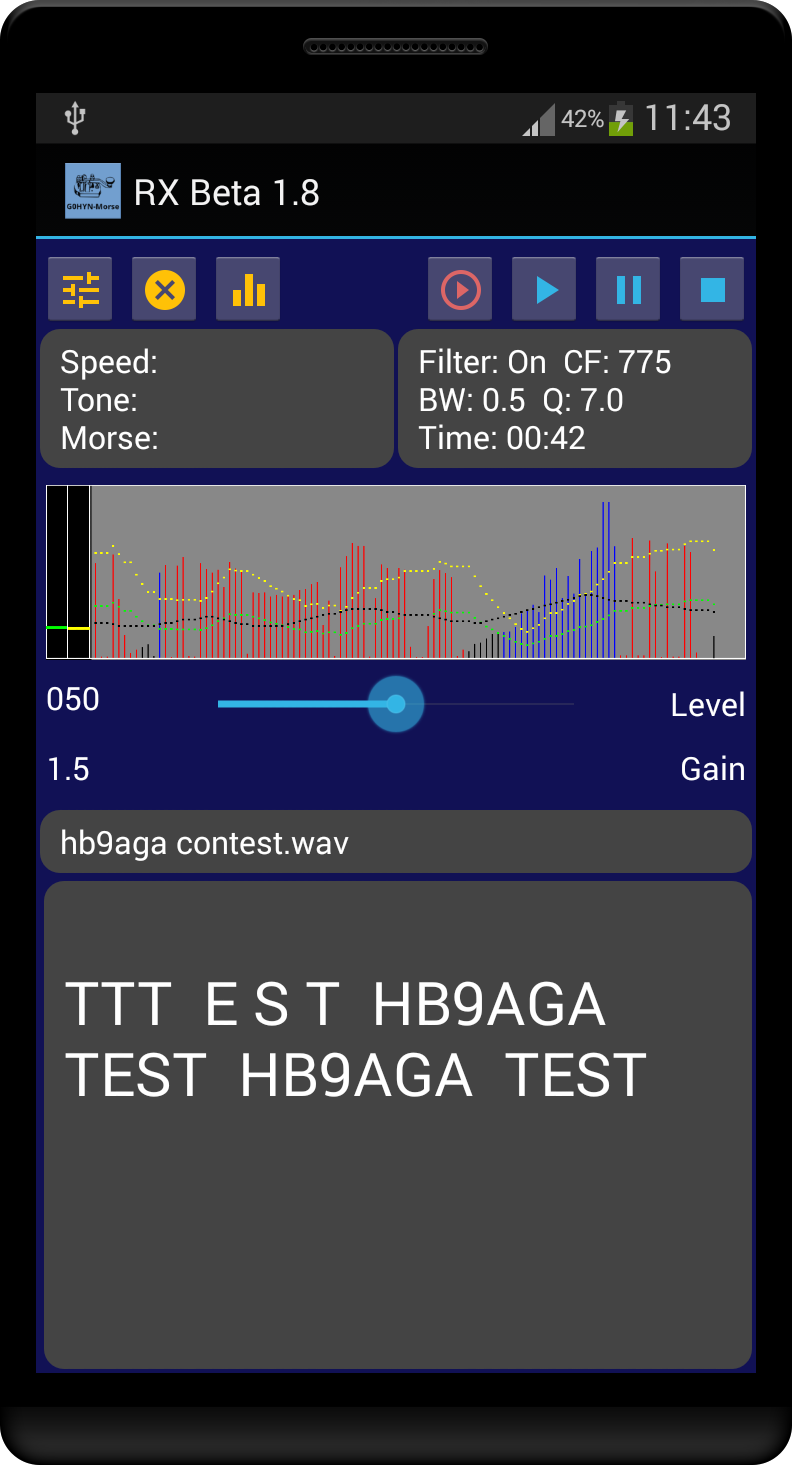
Pressing  during
playback 'pause' the audio, the background colour will change to blue
to show app is paused, and the timer will stop incrementing. Pressing again will recommence at the point it was paused playback.Pressing will halt playback, and switch the app back into listen mode.Pressing whilst already in playback will restart playback from the beginning of the file during
playback 'pause' the audio, the background colour will change to blue
to show app is paused, and the timer will stop incrementing. Pressing again will recommence at the point it was paused playback.Pressing will halt playback, and switch the app back into listen mode.Pressing whilst already in playback will restart playback from the beginning of the file
Auto Filter 
Although
the app tries to ignore 'false triggers' that result from a noisy
signal just happening to match a morse tone and be valid enough to make
it consider it to be a morse digit, there is a Bell band pass filter
included, and can be activated by pressing
The icon will change colour to (meaning active), and pressed again to deactivate the auto filter.
As
the aim of this filter is to boost the morse tone frequencies (center
of filter should automatically adjust itself to match the incoming morse tone), then you may find that the levels with this
range are raised so high as to exceed the maximum desired, and although
no harm can result, it can severely distort the manipulated signals
waveform (i.e. clipping). You can usually hear this as a change in
sound of the playback (not whilst recording).
If you think this is happening, you can either:
- Manually turn down the incoming audio at it's source e.g. the radio
- On the app move the gain slider
to the left, and you should see the signal size decrease
- Activate
the automatic gain limiter (see separate description) which will
incrementally decrease the gain (as long as it's greater than 1.0)
Gain Limiter  
To
help avoid the signal distortion (clipping) that can occur if the audio
signal is too high (i.e. trying to exceed the maximum height of the
display which represents the systems audio maximum), there is the
additional feature of an automatic Gain Limiter, which when activated,
monitors the audio and notes when it would exceed the maximum level
allowed without distortion. If it decided distortion is
happening, then it will keep incrementally turning done the gain until
the distortion stops.
The icon will change colour to (meaning active), and pressed again to deactivate the Gain Limiter.
Notes:
- If
the gain has reached 1.0, then it will not attempt to decrease it
further (if this is happening, then you most likely need to turn the
input audio down, or try turning of the filter, if active that is)
- To
avoid turning down the gain too much in response to short transients,
the monitor counts how many potential exceed there has been in a known
period, and it only take action when the tolerance limit has been
reached. That said, if you find it's forcing the gain down too much,
then you may have to switch this feature off, and manually adjust the
gain for best results...
Auto Threshold Level  
To help where the incoming audio is varying in strength, pressing will
activate the automatic threshold level function, which will monitor the
incoming audio strength and keep the threshold level the percentage of
that strength as set by the level slider.
So for example if you set the level slider to 50 and press then the fixed red threshold line will change to a varying green dotted track at 50% of the incoming audio. Pressingwill
deactivate auto level, and revert to the fixed percentage of maximum
volume. You may need to adjust the fixed threshold line to the
appropriate position for decode.
Automatic Gain Control (AGC)
To help maintain stable signal strength for decode, the app employs Automatic Gain Control (AGC).
AGC is active by default, but can be toggled Off/On is desired via the
AGC settings screen (see AGC settings under the menu section)
When AGC is active, addition indicators appear on in the graph area:
- Main Gain - Black dotted line which tracks the main gain level
- Input maximum average - Yellow dotted line which tracks the input max average
Note: These additional lines may be removed in the future, when the 'best' AGC parameters are determined
While AGC is active, the main gain slider is not updated (unless gain limiting occurs), but the main gain value is
Menu:
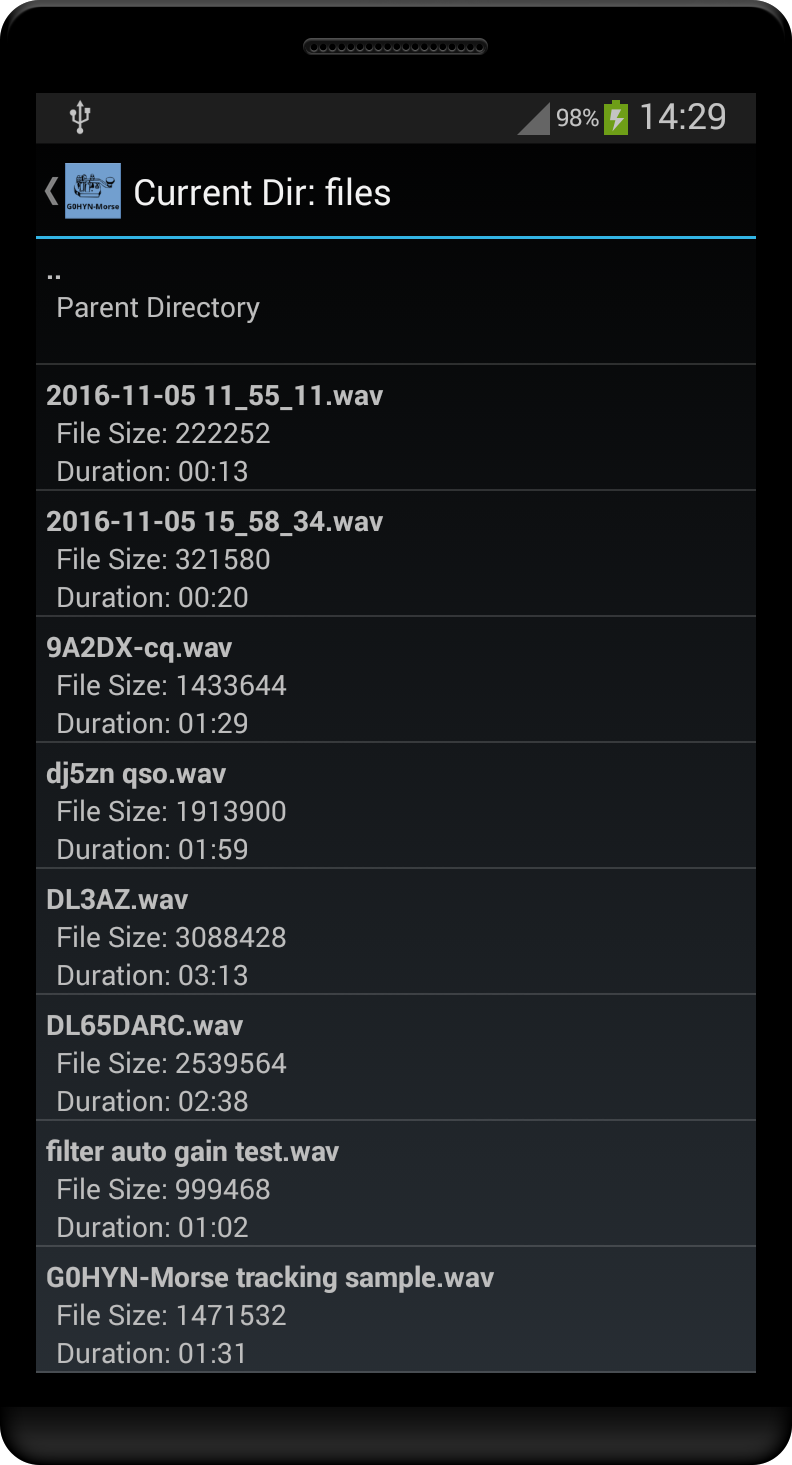
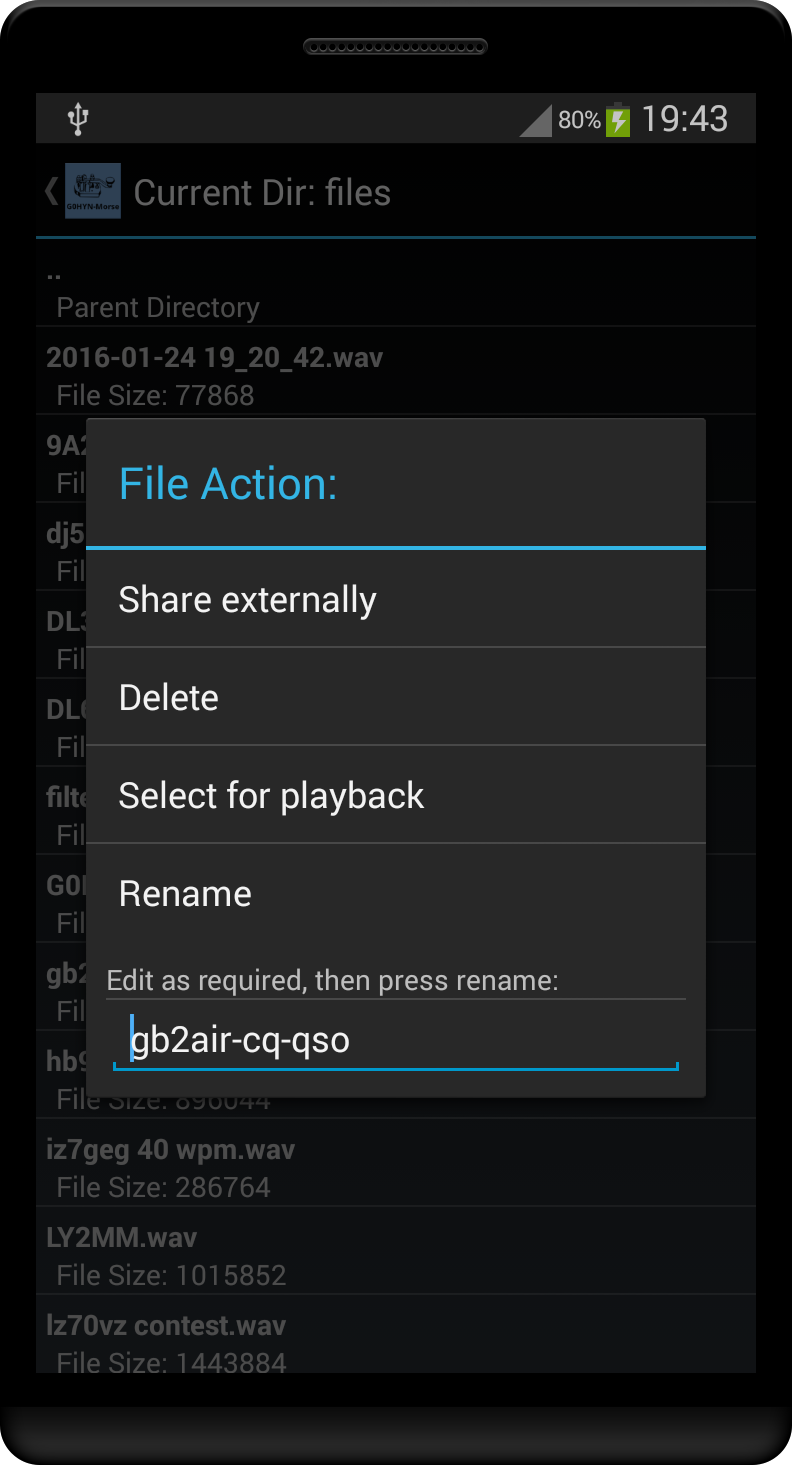
Playback file
Selection will bring up a file selector screen containing a list of your recordings:
Once the desired filename is pressed, a further dialogue is displayed with the options:
- Share externally - Allows sharing of record files via other Apps (Dropbox, Google Drive, Gmail, etc.). Upon return from external sharing, the file list is redisplayed
- Delete - Deletes the selected file from device storage, and the file list is redisplayed
- Select for playback - Selects the file for playback, and main screen redisplayed... press to start playback of the file
- Rename
- Allows renaming of recorded file to something more memorable e.g.
g0hyn-cq. Once the selected file is renamed, the file list is
redisplayed
To exit without making a selection, either press your Android back button, or <G0HYN-Current... (top left of screen)
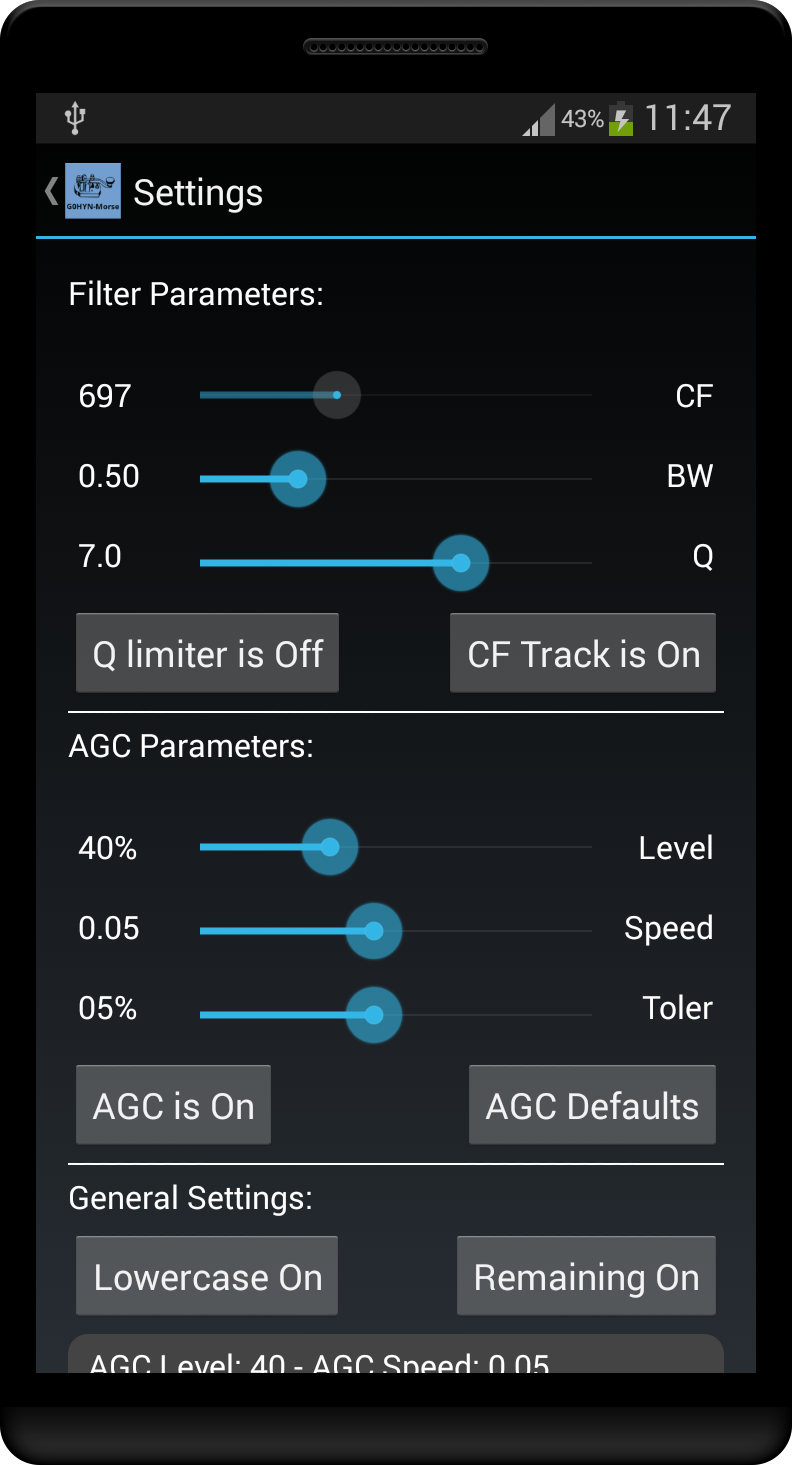
Settings:
From
Beta 1.8, all settings are combined onto one single screen (which is
scrollable if needed on smaller devices), and are separated into the
following:
Filter parameters
Filter parameters and controls:
Here you can use the slider control to set:
- CF
- The filter Center Frequency i.e. the frequency at which the filter
has the maximum effect. Note - Auto filter now automatically adjusts
the CF to match the incoming morse tone, but you can still force this
to a new starting point.
- BW - The Bandwidth of the filter. A smaller value will give a narrower range of effect
- Q - The gain of the filter. Higher equals more gain, but be careful not to introduce clipping...
You can also:
- Q Limiter is On/Off - Toggle the filter auto gain limiter On/Off (Beta 1.8 startup default now Off)
- CF Track is On/Off - Toggle filter center frequency tracking On/Off
The aim here is:
- To understand if the filter is useful, and if so,
- Do we need to have parameters that are user adjustable.
- What the useful values are
Note:
For testing, additional information may be displayed by the app in the
text field below the sliders. At present it at a minimum displays the
full file path of the last .wav file used (recorded or selected), which
should be a useful to find where on your specific device they are being stored (it varies from device to device I'm afraid...)
AGC parameters
Automatic Gain Control (AGC) parameters and controls:
Here you can use the slider control to set:
- Level -
Target level the AGC attempts to maintain. Expressed as a percentage of
maximum input level the devices input system can provide
- Speed -
Gain delta applied to the main gain, which effectively controls the
'speed' at which the AGC attempts to adjust the input levels i.e. the
larger the 'speed', the quicker the main gain is adjusted
- Tolerance
- Tolerance 'range' in which the AGC attempts to maintain. Expressed as
a percentage of the AGC level, the aim being to avoid constant
'hunting' to the main gain once the target level is within the
tolerance range
You can also:
- AGC is On/Off - Toggle the AGC On/Off. When the AGC is active additional indicators will appear on in the graph area:
Main Gain - Black dotted line, which tracks the main gain level
Input average - Yellow dotted line, which tracks the input max average
- AGC Defaults - Reset AGC parameters to their default (app start up) values:
AGC Level - 40%
AGC Speed - 0.05
AGC Tolerance - 5%
The aim here is:
- To understand if the filter is useful, and if so,
- Do we need to have parameters that are user adjustable.
- What the useful values are
Note:
For App testing and debug, there may also be app internal values displayed on this screen
General settings
Lowercase On/Uppercase On
The alpha characters of the decoded text can be displayed in either
lowercase (app default at start up), or uppercase'.
Switching between the cases is achieved via a button within general
settings, and will either display 'Lowercase On' or 'Uppercase On'.
Pressing the button simply switches between the two, so a-z
becomes A-Z and back if selected again (i.e. it flips between the
two).
Remaining On/Elapsed On
When playing back previously recorded files, the time displayed can either be:
- Time remaining to end of file (Remaining) - app default at start up
- Time elapsed from start of file (Elapsed)
Switching between the cases is achieved via a button within general
settings, and will either display 'Remaining On' or 'Elapsed On'.
To exit, either press your Android back button, or <G0HYN-Settings (top left of screen)
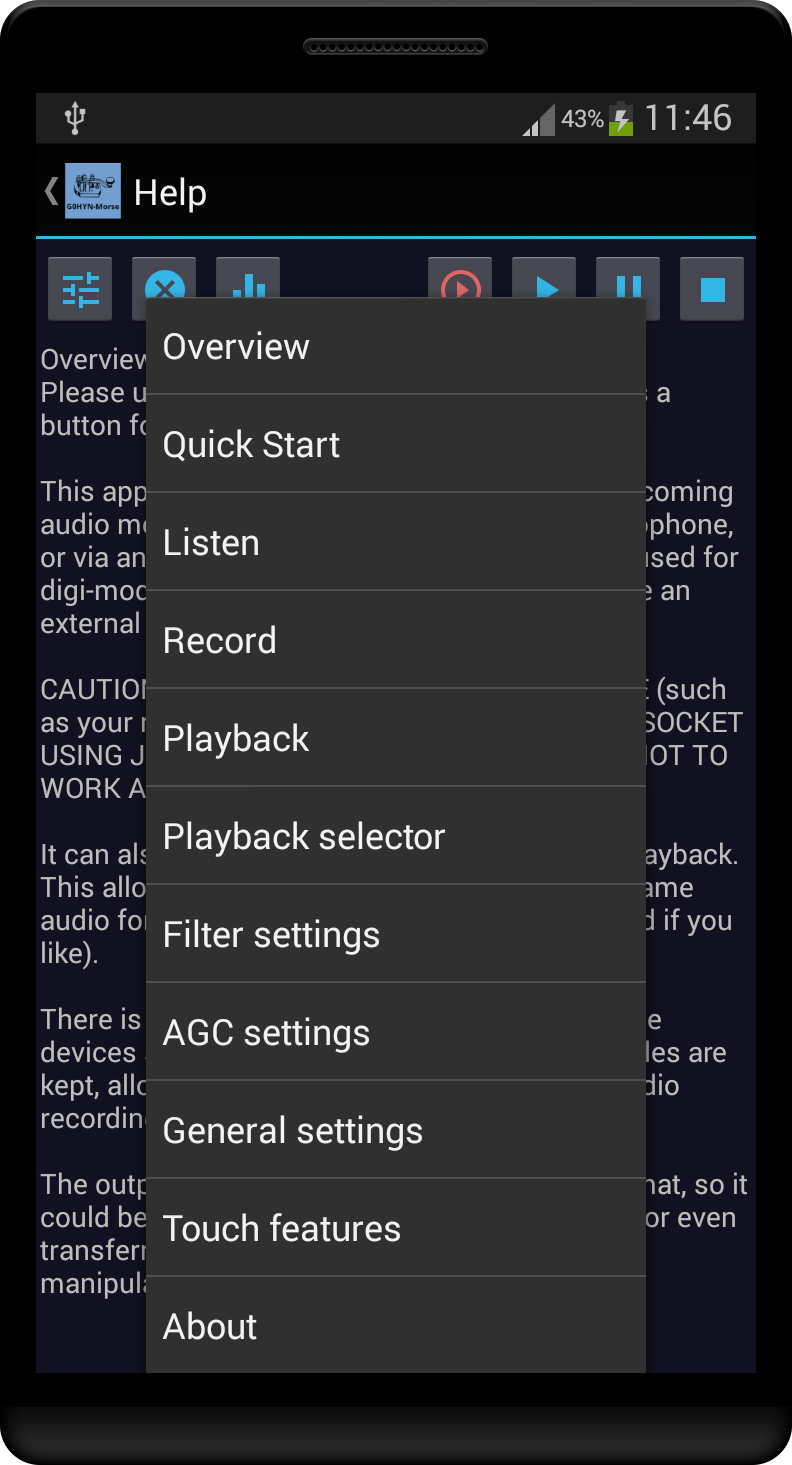
Help
When help is selected, the overview help screen will be displayed:
From the overview help screen, you can either:
- Select a topic from the help screen menu (see above screenshot), and the help text for that topic will be displayed
- Press one of the control buttons (see top of screenshot), and a description of it's usage will be displayed
To exit, either press your Android back button, or <G0HYN-Help (top left of screen)
Touch features:
The following 'touch' features allow you to:
Invoke the following screens, 'single touch' the associated area of the main screen (effectively menu shortcuts):
- All settings (filter, AGC, and general) - Filter/BW/Time or Graph
- Playback file - Playback filename
Aid readability, within the decoded text area:
- A 'single touch' cycles one step through a built-in
set of four character sizes. At start up the smallest is used, with
successive touches increasing the size, until it recycles back to the
smallest size.
- A 'long touch' clears the screen of all decoded text
- A 'touch & drag' allows scrolling through the
text if larger than the area available. Note: If in listen mode and a new
character is decoded, the text area will always 'jump' to the bottom of
the text decoded so far to display the new character.
email address: [email protected]
for any questions, feedback, issues found, or to request .apk file via
email.
Thanks, 73 Robbie G0HYN
|

|
|