An Experiment
in Solar Cooking - page 3
Unattended Cooking
I've read about cookers designed for unattended cooking. One problem is that a
solar oven that doesn't have to be adjusted towards the sun is also not going to
be very efficient. In the third world countries where these cooker/ovens are
shown being used, food and water are precious, and mean the difference between
life and death. I don't believe that in a practical, real world situation you'll
find many people leaving their food out for long periods with no one around to
watch it. There will always be someone waiting to "attend" to your food if you
don't. So, if someone is around to keep an eye on the food, then someone is
there to rotate the oven. In that case, there is no reason not to try to
maximize the efficiency. That's the premise I'm using for the cooker/ovens that
I'm experimenting with.
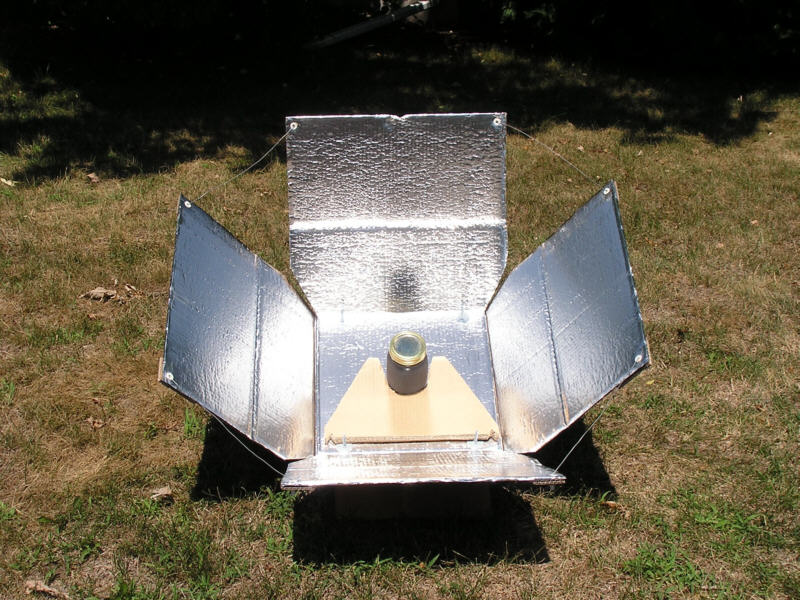
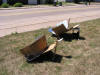
A simplified parabolic cooker
This simple cardboard and foil oven can be built in a few hours (Glue drying
time not included). The cooker uses the same 18"x18"x28" size 3M cardboard
storage box and heavy duty aluminum foil as before. Only 1/2 of the box was
used. I cut two identical pieces, about 47" long by 18" wide out of two sides,
brushed on white Elmer's glue-all (Diluted 2 parts glue to 1 part water), and
coated with foil. I poked holes in any large air bubbles with a needle and
pressed them out. When the pieces dried they took on a slight upward curve,
which isn't bad. Used 3" long #10 bolts and nuts up through a 1x12 board to
mount the cooker. The long bolts sticking up can be used to help hold the
cooking vessel in the center when the cooker is tilted. The board is used to
rotate and elevate the cooker. A wood dowel mounted vertically at the end of the
board makes a simple but effective aiming device. The 18" cardboard width is cut
down to 14" wide in the middle 14" of both pieces and tapered out for four
inches from there so the sides don't interfere when bent. The reflectors ended
up about 40 degrees from vertical at the bottom and about 30 degrees at the top
(The angle decreases the farther up from the base). I aimed the cooker at the
sun and used an small box covered with white paper in the middle of the cooker
as a visual aid to set the best angle for the reflectors. 18 gauge utility wire
was used to connect the sides.
WARNING - while the reflector panels are flat, not curved like a true
parabola, this cooker can reflect some concentrated sunlight upwards. I used
dark glasses while determining the reflector angles and operating it.


This oven was designed to be used with a dark vessel with a tight-fitting
lid, sitting on an insulating pad (Like a folded towel). An inverted clear bowl
or possibly a can (Painted black) over the vessel would help improve the
performance (Or a smaller covered pan, sitting on an insulator, inside a larger
covered pan on an insulator). Something to provide an insulating air layer to
hold in heat.
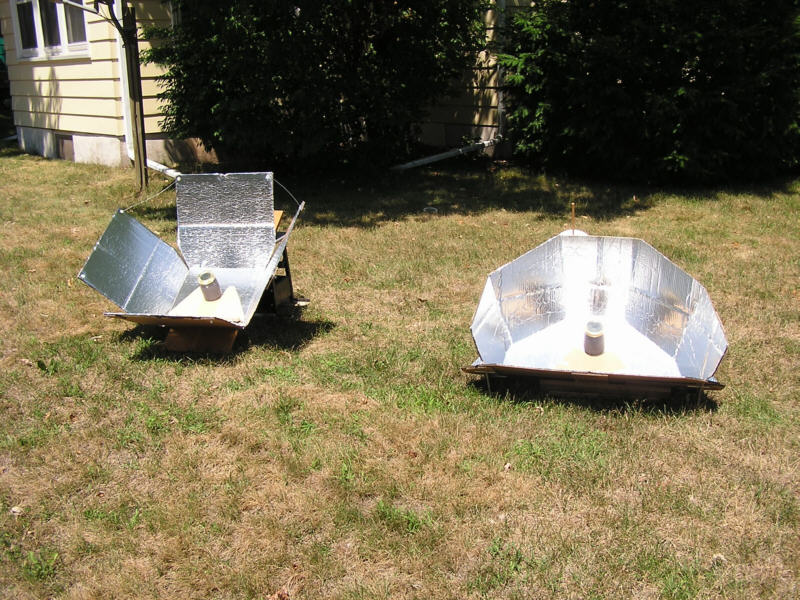
Water heating - comparison test
Twin Cities, July 19, 2007
No clouds, slight haze, light breeze, outside temp. 75 F
Heated 1 1/2 cups of water in a glass canning jar, outside painted flat black,
left lid slightly loose. No insulation. Jars just sat on the foil-covered cooker
bottom and were held in the center of each cooker with a cardboard support. I
built a test model of a popular design of cooker (Dimensions came from an
internet site) to have something for a comparison. The angle board from the
previous designs was used to align the base with the sun for a fair comparison.
Used a step stool under the board for adjusting mine. One jar held in the center
of each cooker. Temp. measured at the start and two hours later. Angles on both
were adjusted every half hour.
11:15 am 78 F (Starting water temp.)
11:45 am adjusted angles
12:15 am "
12:45 pm "
1:15 pm End test - read temps.
My cooker - 185 F (85 C)
Comparison cooker - 150 F (About 65 C)
Summary
There was a significant difference in the final temp. readings. It's more than
the 35 degrees. The heat loss would be greater in the hotter jar because of the
temperature differential between inside and outside. Unlike the cooler jar, the
outside of the jar was too hot to pick up with my hand, even briefly. The total
reflective area of my cooker was roughly 15% more than the comparison cooker,
but I believe that accounts for little of the difference in the result. The
comparison cooker was designed to work unattended, in a fixed position, while
mine was optimized for direct sunlight (Requiring occasional re-orientation). In
a situation where there was no one to make adjustments, the comparison cooker
might well have outperformed mine. Again, the solar ovens I've made are designed
on the assumption that someone can always be made available for oven
adjustments, at least on an hourly basis, to compensate for changing conditions.
This design was very easy to build, could be made larger or smaller, and
seems pretty efficient. The angle adjustment has been simplified down to a board
and something to prop up one end (Like a box) that can be slid back and forth as
needed. If the reflector sides had triangular corner sections added, like the
previous design, or were changed from straight to a trapezoid shape (Where the
reflector edges would meet), the reflector area could be increased without a
larger ground "footprint". The cardboard pieces could be glued or nailed to the
board instead of using bolts like I did. The reflectors could be made longer
(With a decreasing angle from vertical). Any increase in the size of the
reflector area will increase the energy captured. It would work best with little
or no wind to rob heat.
Revisions:
1. Lower cardboard piece doesn't have to be cut down in middle to clear top
piece.
2. Improved Alignment - aligned cooker with sun and placed white box (About
8"x8"x8") in center. Covered top sections of reflectors. Adjusted bottom
sections to focus about 3" from bottom of box. Wired lower sections in place,
just below fold, with 18 gauge steel wire (#12 or #14 copper wire would work).
Uncovered top sections. Adjusted angle of top sections to focus at same spot.
Wired in place at top of reflector.
From what I have learned, these are three simple rules for designing a
solar cooker:
1. The more sunlight you can reflect to the target area, the better.
2. Absorb and retain as much of that energy as possible.
3. Simple is better than complicated.
NEXT PAGE
PREVIOUS PAGE
HOME PAGE