144 MHz Halo Antenna

Construction and Analysis of a Low Cost Omnidirectional Horizontally Polarized Antenna for 144 MHz

by Dr. Carol F. Milazzo, KP4MD (posted 23 May 2012)
E-mail: [email protected]

The basic horizontally polarized antenna is a half-wave dipole. It has a radiation pattern that exhibits bidirectional lobes and two sharp nulls. The impedance at its feed point is 75 ohms in free space. In order to obtain a horizontally polarized antenna that radiates almost equally in all horizontal directions, we may bend the half-wave dipole to form an open circular loop. This configuration is known as an HO loop or halo antenna. Its impedance at the feed point is about 12 ohms in free space. The halo antenna requires a device such as a gamma match to efficiently couple its low impedance to 50 ohm coaxial cable. There is high RF voltage across the open ends of the halo loop, and these must not touch each other./p>


144 MHz
                      Halo Antenna

1. Here is one of the pair of 2 meter Halo antennas I built this week. I needed a horizontally polarized antenna for a 144 MHz WSPR propagation study and planned to stack these to increase omnidirectional gain. I will use it with my Elecraft XV144 transverter and amplifier with 100 watts peak output power and lower loss RG-8/U coaxial cable feed line. The materials for this one antenna cost about $6. Commercial versions cost about $50 or more.

144 MHz
                      Halo Antenna

2. The boom is an 18 inch (46cm) piece of the 1/2" (12mm) Carlon "Plus 40" Rigid PVC Conduit that my husband had in the garden shed. I bought the 10 foot roll of 1/4 inch (6mm) copper tubing for $9 at Home Depot. It comes coiled in nearly the required diameter. I cut a 41 inch (104cm) length of it and easily formed it into the 13-1/8 inch (33.3cm) diameter shape. The loop is continuous except for a gap between the open ends at the right end of the boom.

The resonant frequency of the antenna will vary with the distance between these open ends.  
After adjustment, UV resistant cable ties and a piece of 1/4 inch fiberglass rod on the open ends of the halo antenna secure the gap spacing.
The open end of the boom will later be weatherproofed with self-sealing silicone tape.

3. The resonant frequency of the antenna will vary with the distance between these open ends. After adjustment, UV resistant cable ties and a piece of 1/4 inch (6mm) fiberglass rod on the open ends of the halo antenna secure the gap spacing. The open ends of the boom will later be weatherproofed with self-sealing silicone tape.

Detail
                      of the 6-32 x 1" screw ready to be soldered
                      to the center pin of the SO-239 connector.

4. Detail of the 6-32 x 1" screw ready to be soldered to the center pin of the SO-239 connector.

144 MHz
                      Halo Antenna

5. The 6-32 x 1" screw is soldered to the center pin of the SO-239 connector.

The PVC
                      Boom is drilled for the SO-239 antenna connector.
                      The center pin is 1-7/8" away from the center
                      point of the copper tubing.

6. The PVC Boom is drilled for the SO-239 antenna connector. The center pin is 1-7/8" away from the center point of the copper tubing.

Several
                      #6 washers were placed under a #6 nut to securely
                      maintain its position and to prevent traction on
                      the solder joint when the mica trimmer capacitor
                      is secured onto the screw.

7. Several #6 washers were placed under a #6 nut to securely maintain its position and to prevent traction on the solder joint when the mica trimmer capacitor is secured onto the screw.

The
                      SO-239 antenna connector is secured to the PVC
                      boom with two 6-32 x 1½" screws.

8. The SO-239 antenna connector is secured to the PVC boom with two 6-32 x 1�" screws.

The
                      shell of the SO-239 connector is connected to the
                      copper tubing with 12 AWG bare copper wire which
                      is soldered to the tubing.

9. The shell of the SO-239 connector is connected to the copper tubing with 12 AWG bare copper wire which is soldered to the tubing.

The side of the boom behind the SO-239 antenna  connector.  The tab on one side of the Arco 462 10-80 pF mica compression trimmer capacitor is bent up to be in line with the body of the trimmer and secured with a 6-32 nut onto the 6-32 screw that is soldered to the center pin of the SO-239 connector.  The 7 inch gamma arm will be soldered to the other tab.

10. The side of the boom behind the SO-239 antenna connector. The tab on one side of the Arco 462 10-80 pF mica compression trimmer capacitor is bent up to be in line with the body of the trimmer and secured with a 6-32 nut onto the 6-32 screw that is soldered to the center pin of the SO-239 connector. The 7 inch gamma arm will be soldered to the other tab.

Close-up view of the mica compression trimmer
                      capacitor connected between the gamma match rod
                      and the screw on the center pin of the SO-239
                      antenna connector.

11. Close-up view of the mica compression trimmer capacitor connected between the gamma match rod and the screw on the center pin of the SO-239 antenna connector.

I
                      investigated several feed methods and selected a
                      gamma match with a 10-80 pF mica compression
                      trimmer capacitor (Arco 462 type) soldered to a 6
                      inch length of the ¼" tubing. At maximum
                      capacitance, it barely brought the impedance 50
                      ohms and zero reactance. The back-to-back
                      alligator clips are a temporary shorting bar.

12. I investigated several feed methods and selected a gamma match with a 10-80 pF mica compression trimmer capacitor (Arco 462 type) soldered to a 6 inch length of the �" tubing. At maximum capacitance, it barely brought the impedance 50 ohms and zero reactance. The back-to-back alligator clips are a temporary shorting bar.


Tuning the antenna requires three adjustments: the gap space, the shorting bar location and the capacitor, and these all interact.
The adjustments should be performed outdoors, away from objects, and at a comparable height above ground. (I raised the antenna for SWR measurement after lowering it for each adjustment.)

  1. Set the capacitor at mid range and the shorting bar about 6 inches from feed point.
  2. Adjust the open end gap for lowest SWR at 144.5 MHz (or your desired center frequency).
  3. Alternately adjust the capacitor and move the shorting bar position for lowest SWR.
  4. Repeat steps 2 and 3 until finding the 'sweet spot' where 1:1 SWR is achieved at the center frequency.
  5. Solder the shorting bar in place.
  6. Protect the feed point and capacitor preferably with a UV resistant cover.

The original ¼ in. tubing
                gamma match arm was replaced with a 7

13. The original � in. tubing gamma match arm was replaced with a 7" length of 10 AWG bare copper wire spaced 1-7/8" from the radiator element. This decreased the capacitance required to achieve the non-reactive 50 ohms impedance match.

20 May
                      2012 - The 144 MHz halo antenna was mounted at 80
                      inches (1 λ) above the roof and fed with Belden
                      8214 foam type RG-8/U coaxial cable. At first, the
                      antenna resonance was unstable and sensitive to
                      the routing of the feed line until 5 turns of it
                      were wound to form a 8 inch diameter choke balun.
                      The standing wave ratio was then measured as 1:1
                      at 145.0 MHz.

14. 20 May 2012 - The 144 MHz halo antenna was mounted at 80 inches (1 λ) above the metal roof and fed with Belden 8214 foam type RG-8/U coaxial cable. At first, the antenna resonance was unstable and sensitive to the routing of the feed line until 5 turns of it were wound to form a 8 inch diameter choke balun. The standing wave ratio was then measured as 1:1 at 145.0 MHz.

A
                      closer view of the 144 MHz halo antenna. The
                      entire antenna was weatherproofed with clear
                      acrylic spray paint. The open ends of the boom and
                      the PL-259 connector were sealed with a self
                      sealing silicone tape called Rescue Tape. Both
                      open ends of the copper loop were outside the boom
                      with approximately 1.5" gap distance for
                      resonance at 145 MHz.

15. A closer view of the 144 MHz halo antenna. The entire antenna was weatherproofed with clear acrylic spray paint. The open ends of the boom and the PL-259 connector were sealed with a self sealing silicone tape called Rescue Tape. Both open ends of the copper loop were outside the boom with approximately 1.5" gap distance for resonance at 145 MHz.

Close
                      up view of the PL-259 antenna connector sealed
                      with Rescue Tape. The open spaces between the boom
                      and the SO-239 connector were sealed with GOOP
                      Plumbing contact adhesive and sealant, selected as
                      it does not release corrosive acetic acid during
                      curing.

16. Close up view of the PL-259 antenna connector sealed with Rescue Tape. The open spaces between the boom and the SO-239 connector were sealed with GOOP Plumbing contact adhesive and sealant, selected as it does not release corrosive acetic acid during curing.

144 MHz
                      Halo antenna NEC model calculated SWR vs.
                      Frequency.

17. 144 MHz Halo antenna NEC model calculated SWR vs. Frequency.

144 MHz
                      Halo antenna measured SWR vs. Frequency. The SWR
                      measured at the feed point was 1.3:1 or less over
                      the 144.0 to 146.4 MHz range.

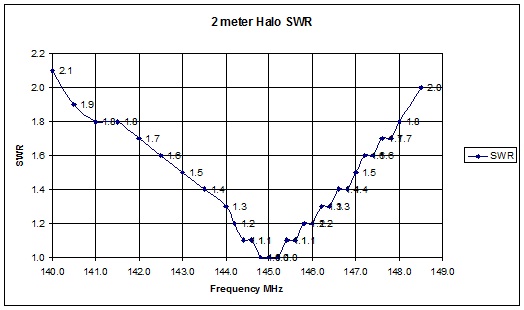
18. 144 MHz Halo antenna measured SWR vs. Frequency. The SWR measured at the feed point was 1.3:1 or less over the 144.0 to 146.4 MHz range.

144 MHz
                      Halo Antenna 4nec2 Calculations using the
                      high-pass L-network to simulate the gamma match.

19. 144 MHz Single Halo Antenna 4nec2 Calculations.  As the gamma match is not amenable to accurate NEC modeling1, I used the high-pass L-network under the RLC matching function (F10) of 4nec2 when generating the frequency sweep curves in Figures 17 and 20.

144 MHz
                      Halo antenna NEC Model calculated Resistance and
                      Reactance vs. Frequency.

20. 144 MHz Halo antenna NEC Model calculated Resistance and Reactance vs. Frequency.

144 MHz
                      Stacked Halo antennas Resistance and Reactance vs.
                      Frequency measured with a miniVNA Pro vector
                      network analyzer.

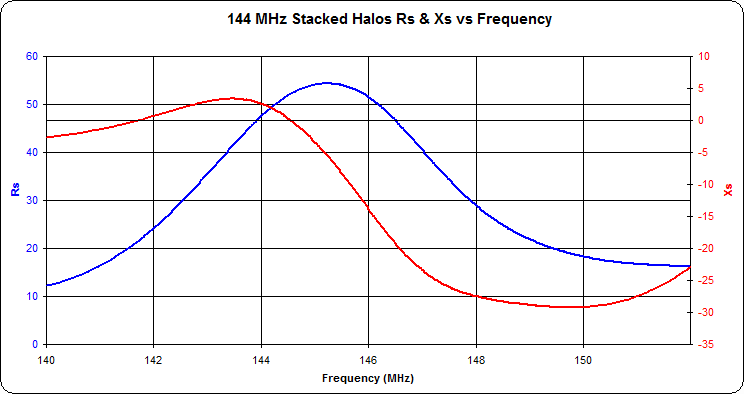
21. 144 MHz Stacked Halo antennas Resistance and Reactance vs. Frequency measured with a miniVNA Pro vector network analyzer.

144 MHz
                      single Halo Antenna azimuth pattern calculated by
                      NEC Model.

22. 144 MHz single Halo Antenna azimuth pattern calculated by NEC Model.

144 MHz
                      single Halo Antenna elevation pattern calculated
                      by NEC Model.

23. 144 MHz single Halo Antenna elevation pattern calculated by NEC Model.

144 MHz
                      single Halo Antenna 3D Radiation Pattern
                      calculated by NEC Model.

24. 144 MHz single Halo antenna 3 dimensional radiation pattern calculated by NEC Model.

144 MHz
                      2 stacked Halo Antennas azimuth pattern calculated
                      by NEC Model.

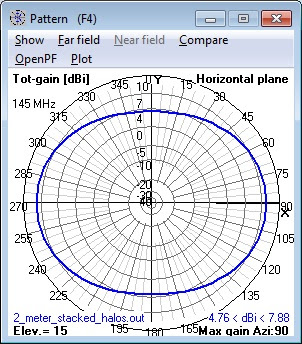
25. 144 MHz 2 stacked Halo Antennas azimuth pattern calculated by NEC Model.

144 MHz
                      2 stacked Halo Antennas elevation pattern
                      calculated by NEC Model.

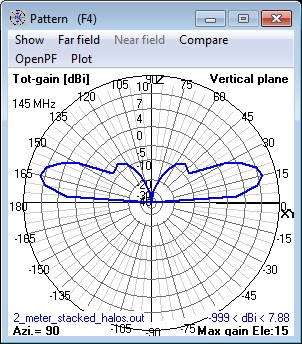
26. 144 MHz 2 stacked Halo Antennas elevation pattern calculated by NEC Model.

144 MHz
                      2 stacked Halo Antennas 3D Radiation Pattern
                      calculated by NEC Model.

27. 144 MHz 2 stacked Halo Antennas 3 dimensional radiation pattern calculated by NEC Model.

144MHz
                      2 stacked Halo Antennas 4nec2 Calculations.

28. 144 MHz 2 stacked Halo Antennas 4nec2 Calculations.

CM 144 MHz Halo Antenna NEC model by Carol F. Milazzo, KP4MD
CM Horizontal orientation (using GH command)
CM Frequency = 145.000 MHz
CM Impedance 50 ohms
CM 26-side polygon (40 inch loop with 1.5 inch gap)
CM Simulated good ground
CM Use the high-pass L-network to simulate the gamma match
CE
SY frq=145    'frequency MHz
SY cir=40.00758    'Input loop circumference inches (loop + gap)
SY r=0.5*cir/3.1415926    'Calculate loop radius
SY dia=0.25    'Input loop wire dia. inches
SY rad=0.5*dia    'Calculate loop wire radius
SY n=26    'Input n-side polygon of loop + gap
SY h=81.74    'Input height to loop inches
SY g=1.5    'Input gap size in inches
SY gseg=int(n*g/cir+0.5)    'Calculate gap length in segments
GH    1    n-gseg    1e-300    1e-300*(n-gseg)/n    r    r    r    r    rad
GM    0    0    0    0    gseg*180/n    0    0    h    0
GS    0    0    0.0254
GE    1
LD    5    0    0    0    58000000    '1/4 inch copper tubing
GN    2    0    0    0    4    0.01
EK
EX    0    1    (n-gseg)/2    0    1.    0    0    'Feed point
FR    0    0    0    0    frq    0
EN

29. 144 MHz Single Halo Antenna NEC model.

CM 144 MHz 2 Stacked Halo Antennas at 40 and 80 inches NEC model by Carol F. Milazzo, KP4MD
CM Horizontal orientation (using GH command)
CM Frequency = 145.000 MHz
CM Impedance 50 ohms
CM 26-side polygon (40 inch loop with 1.5 inch gap)
CM Simulated good ground
CE
SY frq=145    'frequency MHz
SY cir=40.21493    'Input loop circumference inches (loop + gap)
SY r=0.5*cir/3.1415926    'Calculate loop radius
SY dia=0.25    'Input loop wire dia. inches
SY rad=0.5*dia    'Calculate loop wire radius
SY n=26    'Input n-side polygon of loop + gap
SY h=81.74    'Input height to loop inches
SY g=1.5    'Input gap size in inches
SY gseg=int(n*g/cir+0.5)    'Calculate gap length in segments
GH    1    n-gseg    1e-300    1e-300*(n-gseg)/n    r    r    r    r    rad
GM    0    0    0    0    gseg*180/n    0    0    h/2    1
GM    1    1    0    0    0    0    0    h/2    1
GS    0    0    0.0254
GE    1
LD    5    0    0    0    58000000    '1/4 inch copper tubing
GN    2    0    0    0    4    0.01
EK
EX    0    1    (n-gseg)/2    0    0.5    0    0    'Feed point
EX    0    2    (n-gseg)/2    0    0.5    0    0    'Feed point
FR    0    0    0    0    frq    0
EN

30. 144 MHz 2 stacked Halo Antennas NEC model.

Two
                      identical 0.75 λ lengths of RG-11/U 75 ohm coaxial
                      cable were prepared for the stacking harness.
                      After trimming to achieve zero ohms reactance over
                      144 to 145 MHz, each of my cables measured exactly
                      40.25 inches from tip to tip. This measurement may
                      vary slightly due to variations in the velocity
                      factors among different batches and manufacturers
                      of cable.

31. Two identical 0.75 λ lengths of RG-11/U 75 ohm coaxial cable were prepared for the stacking harness. After trimming to achieve zero ohms reactance at 145 MHz, each of my cables measured exactly 40.25 inches from tip to tip. This measurement may vary slightly due to variations in the velocity factors among different batches and manufacturers of cable.

The two
                      lengths of RG-11/U cable are joined with a UHF Tee
                      connector to form the stacking harness. When
                      measured from either end of the assembled stacking
                      harness, the SWR analyzer should indicate zero
                      ohms reactance and over 300 ohms resistance at 145
                      MHz. When erected, the free end of each RG-11/U
                      cable will be connected to a halo antenna and the
                      50 ohm feed line connected to the center of the
                      Tee connector.

32. The two lengths of RG-11/U cable are joined with a UHF Tee connector to form the stacking harness. When measured from either end of the assembled stacking harness, the SWR analyzer should indicate zero ohms reactance and over 300 ohms resistance at 145 MHz.  When erected, the free end of each RG-11/U cable will be connected to a halo antenna and the 50 ohm feed line connected to the center of the Tee connector.

The
                      lower halo is mounted at 40 inches height (0.5 λ)
                      above the roof and the upper halo is mounted 40
                      inches above it (1 λ). The gamma match sections
                      should be oriented on the same side of both halo
                      antennas.  All the connectors are wrapped with self-sealing silicone tape.

33. The lower halo is mounted at 40 inches height (0.5 λ) above the roof and the upper halo is mounted 40 inches above it (1 λ). The gamma match sections should be oriented on the same side of both halo antennas. All the connectors are wrapped with self-sealing silicone tape.

Durable weather shields are made from weather resistant 2 inch black vinyl caps.  Its purpose is to protect the feed points and the gamma match capacitors from rain and the elements.

34. Durable weather shields are made from weather resistant 2 inch black vinyl caps. Its purpose is to protect the feed points and the gamma match capacitors from rain and the elements.

A weather shield was secured over the feed point of each halo antenna. The spaces in and around the mating
                      surfaces of all the connectors were filled with petroleum jelly, the connectors wrapped with self-sealing silicone tape, and open spaces sealed with silicone plumbing sealant.

35. A weather shield was secured over the feed point of each halo antenna. The spaces in and around the mating surfaces of all the connectors were filled with petroleum jelly, the connectors wrapped with self-sealing silicone tape, and open spaces sealed with silicone plumbing sealant.

The blue line indicates the standing wave ratio for
                      the stacked 2 meter halo antennas is less than 1.4:1 over the 144 through 146 MHz frequency
                      range, measured with a miniVNA Pro vector network analyzer.

36. The blue line indicates the standing wave ratio for the stacked 2 meter halo antennas is less than 1.4:1 over the 144 through 146 MHz frequency range, measured with a miniVNA Pro vector network analyzer.

NOTES ON HALO ANTENNA STACKING

  • Figure 30.  The separation distance of stacked halo antennas can be optimized for either gain or radiation pattern. Using my NEC model analysis, a 48 inch separation yielded 8.7 dBi gain at 15� elevation angle and a -8 dBi minor lobe at 90� elevation. The 40.5 inch separation yielded 7.9 dBi gain at 15� elevation and a -40 dBi sharp null at 90� elevation.  I selected the latter model to optimize the signal to noise ratio through both maximizing the gain toward the horizon while minimizing the gain toward noise sources from the undesired higher elevation angles.
  • Figure 31.  One method to determine the velocity factor of a coaxial cable is to attach one end of the cable to an antenna analyzer with the far end open, and to find the lowest frequency at which the measured impedance is zero. Then divide the cable length by the free space length of a quarter wave.  My RG-11/U coaxial cable's measured velocity factor was 0.66. I used this calculated velocity factor to cut each of my 75 ohm stacking harness sections to slightly longer than 3/4 wavelength at 145 MHz. With one end of each section attached to the antenna analyzer, I trimmed the far end until the analyzer read zero ohms reactance at the 145 MHz frequency with the PL-259 attached on both ends.  To account for the additional conductor length inside the Tee connector, the analyzer should read zero ohms reactance and over 300 ohms resistance when measuring from either end of the assembled stacking harness.  Fedler demonstrated an alternative method using an oscilloscope and function generator.8
  • Figure 33.  The proximity of each halo antenna to the other affects the tuning of both. With each of my halos mounted in its final location on the mast on the roof, I tuned each individually for minimal SWR at 145 MHz. When I then connected both of the antennas to the stacking harness, the SWR was 1.3:1 or lower from 144 MHz through 146 MHz (Figure 36) and no further adjustment was necessary.
    Alternate method with the stacking harness attached: Disconnect the top halo, attach a 50 ohm terninator to its disconnected harness cable, then adjust the lower halo for lowest SWR. Reconnect the harness to the top halo, then repeat the procedure to tune the top halo with the 50 ohm terminator on the bottom harness cable.
  • Figure 33.  My RG-11/U stacking harness only allowed a single turn loop at the feed point of each halo, so my choke balun consisted of several turns of the 50 ohm coaxial cable at the Tee connector. The choke balun decouples the antenna from the feed line and stabilizes the tuning of the antenna that otherwise would be affected by any movement and the proximity of the feed line to other structures.

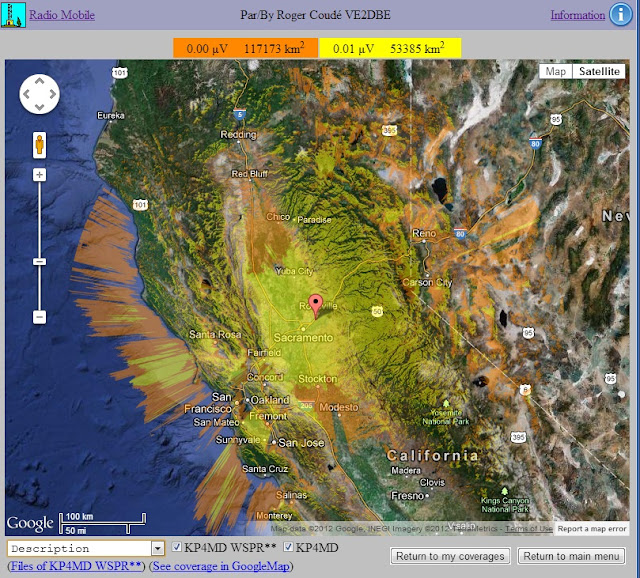
Radio
                      Mobile predicted line of sight signal strength for
                      stacked halo antennas at KP4MD station in Citrus
                      Heights, CA. Signal strength (0.004 µV) -30 dB to
                      -20 dB SNR in orange area, greater than -20 dB SNR
                      in yellow area. Transmitter power 50 watts,
                      antenna height 6 meters.

37. Radio Mobile Online predicted line of sight signal strength for stacked halo antennas at KP4MD station in Citrus Heights, CA. Limit of WSPR reception at signal strength (0.004 �V) -30 dB to -20 dB SNR in orange area, greater than -20 dB SNR in yellow area. Transmitter power 50 watts, antenna height 6 meters.

COMPARISON OF J-POLE VS. SINGLE AND STACKED HALO ANTENNAS

  • Figures 19 and 22 through 24 show the expected performance with a single halo antenna at 80 inches (1 λ) above the metal roof (effective ground).
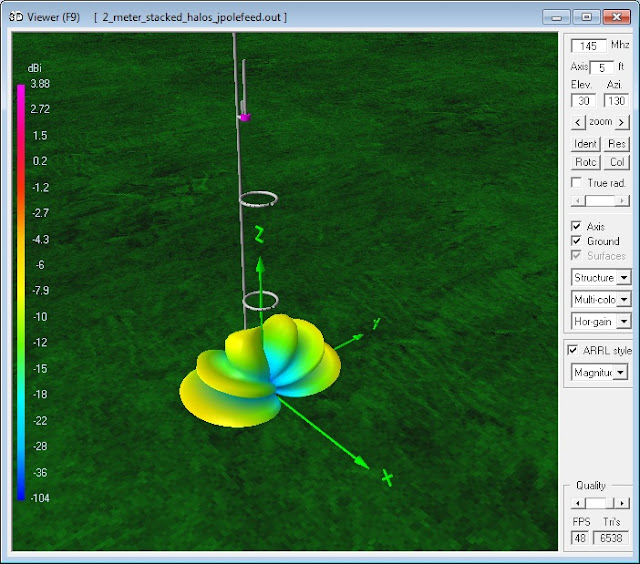
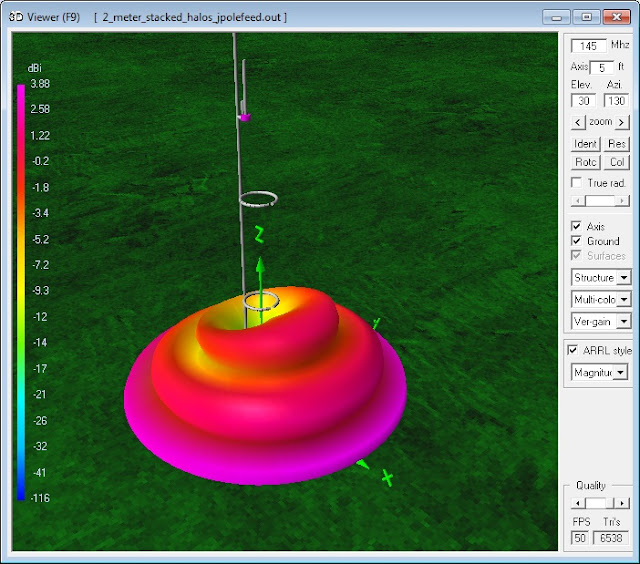
  • Figures 25 through 28 and 39 through 41 show the expected performance with two stacked identical halo antennas, one at 40 inches (� λ) and the other at 80 inches (1 λ) above the metal roof (effective ground).
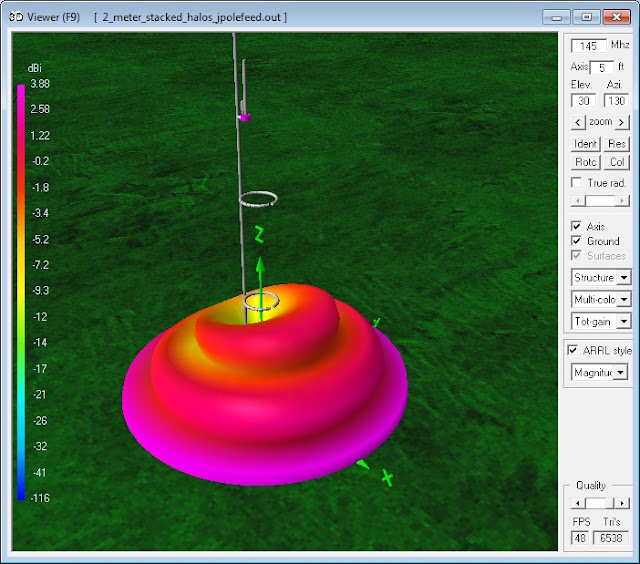
  • Figures 42 through 44 show the predicted radiation patterns of the J-pole antenna.
  • The video clips at Figure 38 demonstrate the effect on received signal strength when antenna polarization is matched or mismatched.
  • The predicted increase in RDF (receiving directivity factor), the increased gain at 15� elevation and the suppression of the radiation lobes at 45� with the stacked halo antennas did improve the overall performance over the single halo antenna.

  • Test signal source - horizontally polarized beacon station KJ6KO/B on Bald Mountain, CA
  • Compared a vertically polarized J-pole antenna vs. the horizontally polarized single and dual stacked halo antennas
  • Arrow OSJ 146/440 J-pole antenna at 20 feet - Signal to noise ratio (SNR) = 23 dB
  • Single halo antenna at 18 feet with major lobe oriented 90� away from KJ6KO/B - SNR = 38 dB
  • Two stacked halo antennas at 18 feet with major lobe oriented 90� away from KJ6KO/B - SNR = 40 dB
  • Two stacked halo antennas at 18 feet with major lobe oriented toward KJ6KO/B - SNR = 44 dB

38. Video clips comparing noise floor and received signals from KJ6KO/B on 144.283 MHz on Bald Mountain, CA.

144MHz
                      2 stacked Halo Antennas 3D Radiation
                      Patterncalculated by NEC Model.

39. 144 MHz 2 stacked Halo Antennas 3 dimensional radiation pattern calculated by NEC Model.  Composite of horizontal and vertical polarization components.

144 MHz
                      2 stacked Halo Antennas 3 dimensional radiation
                      pattern calculated by NEC Model. Horizontal
                      polarization component only.

40. 144 MHz 2 stacked Halo Antennas 3 dimensional radiation pattern calculated by NEC Model.  Horizontal polarization component only.

144 MHz
                      2 stacked Halo Antennas 3 dimensional radiation
                      pattern calculated by NEC Model. Vertical
                      polarization component only

41. 144 MHz 2 stacked Halo Antennas 3 dimensional radiation pattern calculated by NEC Model.  Vertical polarization component only.

144 MHz
                      Arrow OSJ 146/440 J-Pole Antenna 3 dimensional
                      radiation pattern calculated by NEC Model

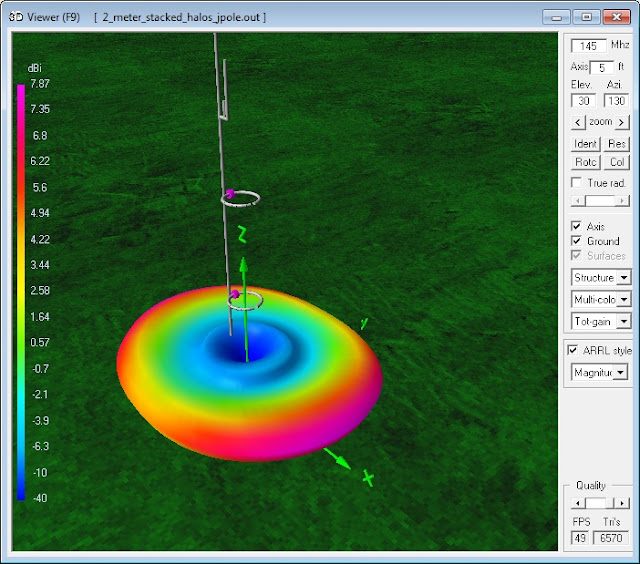
42. 144 MHz Arrow OSJ 146/440 J-Pole Antenna 3 dimensional radiation pattern calculated by NEC Model.  Composite of horizontal and vertical polarization components.

144 MHz
                      Arrow OSJ 146/440 J-Pole Antenna 3 dimensional
                      radiation pattern calculated by NEC Model.
                      Horizontal polarization component only

43. 144 MHz Arrow OSJ 146/440 J-Pole Antenna 3 dimensional radiation pattern calculated by NEC Model.  Horizontal polarization component only.

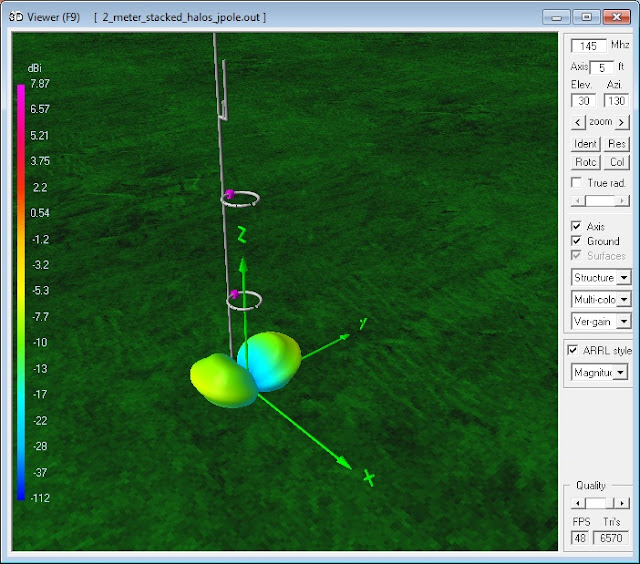
144 MHz
                      Arrow OSJ 146/440 J-Pole Antenna 3 dimensional
                      radiation pattern calculated by NEC Model.
                      Vertical polarization component only

44. 144 MHz Arrow OSJ 146/440 J-Pole Antenna 3 dimensional radiation pattern calculated by NEC Model.  Vertical polarization component only.

REFERENCES

  1. Some Preliminary Notes on the Gamma Match, Cebik, LB, W4RNL
  2. Horizontally Polarized Omni-Directional Antennas: Some Compact Choices, Cebik, LB, W4RNL
  3. Stacking 2 Meter Halo Antennas, Fedler M., N6TWW
  4. A Tree Friendly 2 Meter Halo Antenna, Krist, A., KR1ST
  5. Mobile 2-Meter 144 MHz SSB/CW "Halo", Merrill S., KB1DIG
  6. 50 MHz Halo Antenna, Milazzo CF, KP4MD
  7. Stacking with Coax Cables as Transformation Lines, Steyer M., DK7ZB
  8. A 144 MHz Halo, Vallejo, Miguel A., EA4EOZ
  9. 2 Meter Halo Antenna Part 12 -- "Phasing Harness understanding & calculations", Fedler M., N6TWW
  10. 2 Meter Halo Antenna Project Video Series Parts 1-14, Fedler M, N6TWW

APPENDIX: NEC Model Files

  1. 144 MHz Halo Antenna 4nec2 Model
  2. 144 MHz 2 Stacked Halo Antennas  4nec2 Model
  3. 144 MHz 2 Stacked Turnstile Antennas  4nec2 Model
  4. Arrow OSJ 146/440 J-Pole Antenna  4nec2 Model

LINKS

  1. 144 MHz Halo Antenna Photo Album
  2. 144 MHz Halo Antenna Test Videos
  3. 144 MHz Omnidirectional Horizontal Antennas - NEC Model Comparisons of Stacked Halo, Turnstile and Eggbeater Omnidirectional Horizontally Polarized Antennas for 144 MHz
  4. Building the Elecraft XV Transverter Kit
  5. 144 MHz WSPR Propagation Study
Return to KP4MD Home Page
Top