Hello - Czesc - Hej - Bonjour - Dia Dhuit - Kon'nichiwa - Koa - Hola - sawubona - Ciao
When I started rebuilding my station in late 2019, I found a box containing a few items that survived "The Great Sell Off of 2011". In that box was, amongst other things, two J-38 straight key copies. From memory they cost me about $5 each about 15 years ago.
I already had an Australian WWII straight key, so I didn't really need two more. What I didn't have was a Paddle. So I decided to make one from the two J-38 copies. It's no Begali by any stretch, but for casual CW contacts, it works just fine.
|
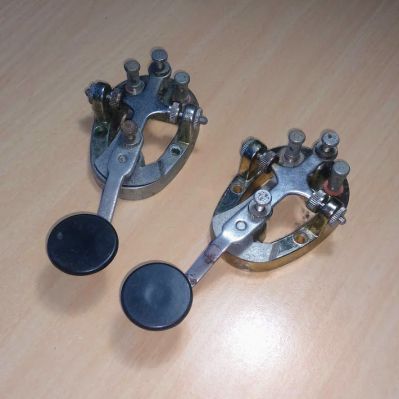
The Original J-38 Copies I Had On Hand. |
Parts List
2 x J-38 Straight Keys - $5.00 each (Hamfest)
1 x Piece of (broken/ jagged) marble - $2.00 (Local reclamation yard).
4 x M4 x 50mm stainless steel hex head bolts, nuts &; spring washers - $5.40 (Pack of 6 from Bunnings Hardware).
4 x M6 x 60mm stainless steel hex head bolts, nuts &; spring washers - $6.50 (Pack of 6 from Bunnings Hardware).
1 x 70mm x 40mm x 1.6mm aluminium angles about 300mm long - Free (Local reclamation yard).
1 x Roll of non slip rubber mat (sized to suit the marble base) - $5.00 (The $2.00 Shop).
1 x Selleys 50ml Shoe Fix Contact Adhesive - $6.95 (Bunnings Hardware).
1 x 3mm thick plastic (or timber) about 100mm square will be plenty - Free (Local reclamation yard).
1 x aerosol paint - matt black, 250g - $4.95 (Super Cheap Auto).
1 x 6mm stereo male plug - $2.95 (Jaycar Electronics).
1 x 3 Core Screened Professional Microphone Cable - $3.45 per meter (Jaycar Electronics).
1 x Small Cable Clips - $5.00 (Pack of 12 from Bunnings Hardware).
3 x Ring eye terminals - $2.75 (Pack of 8 from Jaycar Electronics).
Pricing is correct 2019.
|
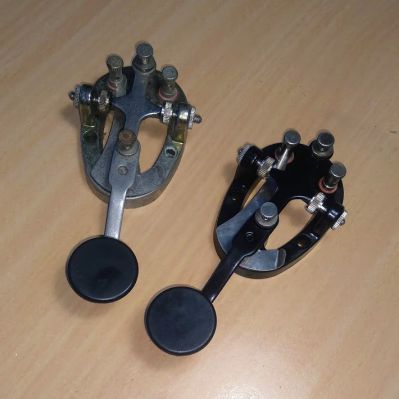
One Key Cleaned & Painted, One To Go. |
Tools Needed
Small open ended spanners or shifter to suit nuts & bolts.
Electric hand drill.
4mm drill bit.
6mm drill bit.
12mm drill bit or counter sink tool.
6mm masonry drill bit.
Centre punch.
100mm angle grinder with stone/ masonry cutting blade.
Smooth file.
Fine sand paper.
Pencil or fine marking pen.
Ruler or tape measure.
Hack Saw.
Stanley knife.
Cutting board.
Cleaning solvent or soapy water.
Clean up rags.
Lubricant/ fine oil or grease
Soldering Iron and Solder.
Heat Shrink.
Multi-meter.
|
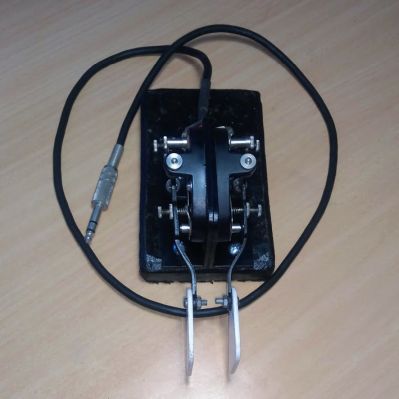
The Completed Iambic Paddle. |
Safety First
I know you will do this, but I'll say it anyway.
Make sure you wear Personal Protective Equipment (PPE) while constructing this project. Steel cap boots, safety glasses, hearing protection and long sleeve shirt and pants may seem like over kill, but when you get a bit of swarf in your eye or drop something on your foot, you'll wish you'd have taken precautions.
Step By Step
Begin by dismantling the keys. Ensure that each keys components are kept separate as they will need to go back in the same place and on the same key they came from.
Clean all components thoroughly and remove any surface rust that may be present. DO NOT use a file to clean the contacts at this point (or ever for that matter).
Lightly scuff each component with fine sand paper, remove excess dust, then paint the components and allow to dry. Remember, at least two light coast is better than one heavy coat.
Mark out and cut the marble to your preferred size. Mine is around 150mm x 100mm. Clean up the edges with a file. Marble is soft, so file lightly.
Measure the length of the key bases and cut the 70 x 40 aluminium angle around 20mm longer than the bases.
Round off the corners and remove all sharp edge of the angles.
Using the key base as a template, mark and drill the mounting holes in each of the 70mm legs of the aluminium angle. Note the key arms should point down towards your desk slightly and be centred on the aluminium angles (10mm overhang back and front). You may need to mock up the keys and angles on the marble base to get it to your preferred operating postilion.
Mark, centre punch and drill the holes in the aluminium angle. The M4 bolts are for the key base to the 70mm leg of the aluminium angle and the M6 bolts are for the aluminium angle to the marble base. There is no hard and fast rule for the aluminium angle to marble base set out, but I would allow at least 15mm in from the edges.
Mount both keys to the angles and position the assembly on the marble base.
Using the holes in the 40mm leg of the aluminium angle, mark the positions of the M6 holes on the marble base and drill the holes, being careful not to go to hard at it. You don't want to crack the marble.
On the underside of the marble base, countersink the holes so the nut sits flush with the bottom of the marble.
Disassemble everything.
Lightly scuff the aluminium angles with fine sand paper, remove excess dust, then paint the angles and allow to dry. Remember, at least two light coast is better than one heavy coat.
Solder the 3 core screened wire to the 6mm stereo plug ensuring there are no electrical shorts. Cut the 4th wire short on each end of the cable as its not needed. Refer to you radio handbook for the correct wiring schematic for the plug.
Solder or crimp the ring eye terminals to the other end of the 4 core cable ensuring you insulate the bare metal with heat shrink. Make sure you leave enough insulated wire exposed from the main casing to spread around the back of the keys and connect to the terminals on the keys.
Cut the plastic (or timber) to your preferred thumb piece shape. Mine are triangular in shape but they can be what every you are comfortable with.
Drill a 4mm hole in each of the plastic thumb pieces and remove all sharp edges with a file or sand paper. Note you could use the original thumb pieces that came with the keys if you wanted to, instead of making new ones.
Install the thumb pieces onto the key arms
Assemble the key onto the aluminium angles and marble base
Cut some non slip rubber mat about 10mm bigger all around than the marble base.
Ensure all components are assembled correctly and all fasteners are tight.
Glue the non slip rubber mat in place and allow to dry.
Remove the excess non slip rubber mat using a sharp knife.
Attach the cable to the key, referring to your radio owners manual for the correct wiring.
Adjust the keys to your preferred way of keying.
That's it you're done.
Some Observations
To clean the contacts of any key or paddle DO NOT use a file or sand paper. Use a strip of paper between the contacts instead
Paper is quite abrasive and can be used to clean up key or paddle contacts with ease. No muss no fuss.
Simply put a strip of paper between the contacts and depress the key lightly.
Dragging the the paper between the contacts a few times should be enough remove any debris or light corrosion from the contacts.
Now, pull up a pew, fire up the radio and go chase some DX.
Cheers