Hello - Czesc - Hej - Bonjour - Dia Dhuit - Kon'nichiwa - Koa - Hola - sawubona - Ciao
Back in March 2019 my whole work/ life experience changed over night. COVID 19 was inflicted on the world and I found myself commuting to the office via the kitchen rather than via the highway.
As a result my “shack” became my office and all of sudden bench space became precious. So I decided to replace the HM-219 hand microphone that came with my Icom IC-7300 with a Heil-ICM microphone. The idea was to put the Heil on an arm and keep it off the desk to free up space and in theory, this was a good option.
The microphone came with all the wiring, microphone clip and an microphone adaptor to suit my radio, right down to the PTT line plug for a foot switch. I soon found, however, that buying a microphone arm and shock mount was going to be silly expensive as was the foot switch. Together they would cost almost as much as the microphone. So I decided to make a boom arm with a shock mount and a Simple Foot Switch for my self and save a few dollars in the process.
|
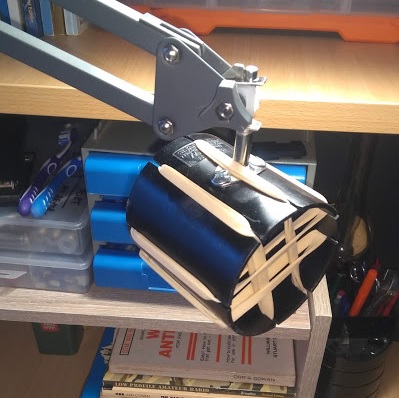
The Shock Mount. |
Parts List
1 x TERTIAL work lamp, black – $14.99 (Ikea).
1 x Holman 65mm PVC DWV straight coupling - $3.50 (Bunnings Hardware).
2 x M4 x 15mm zinc plated round head bolts, nuts & spring washers - $3.56 (Pack of 18 from Bunnings Hardware).
8 x No.64 rubber bands (87mm x 6mm) - $3.96 (100 gram pack from Office Works).
4 x 100mm x 2.5mm black cable tie - $1.20 (Pack of 25 from Bunnings Hardware).
1 x aerosol paint - matt black, 250g - $4.95 (Super Cheap Auto).
Pricing is correct 2020.
|
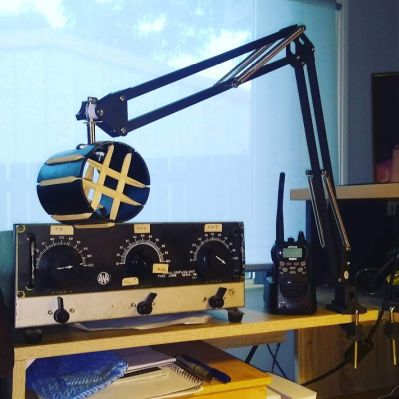
The completed boom arm. |
Tools Needed
Flat blade screwdriver.
Phillips head screwdriver.
Small open ended spanner or shifter to suit nuts.
Hack Saw.
Electric hand drill.
Stanley knife.
Side cutters.
Smooth file.
Fine sand paper.
Pencil or fine marking pen.
Ruler or tape measure.
|
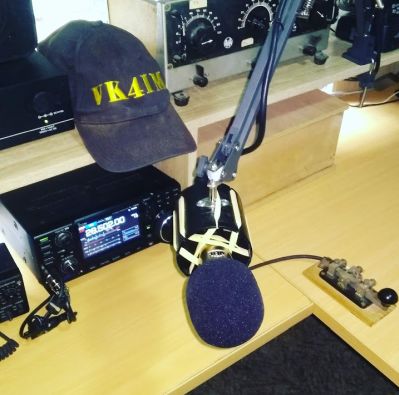
Heil-ICM, boom arm and shock mount in service. |
Safety First
I know you will do this, but I'll say it anyway.
Make sure you wear Personal Protective Equipment (PPE) while constructing this project. Steel cap boots, safety glasses, hearing protection and long sleeve shirt and pants may seem like over kill, but when you get a bit of swarf in your eye or drop something on your foot, you'll wish you'd have taken precautions.
Step By Step
Begin by stripping the head off the work lamp and discard it. Make sure you retain the pivot clip that attaches to the end of the arm though, because you'll need it later.
Carefully remove the power cable and discard it.
With a hacksaw or other similar cutting implement, cut eight slots about 15mm deep in each end of the straight coupling. You will end up with 16 slots in total, eight at each end. Note they all need to line up end to end. The spacing is not critical but keep in mind that the rubber bands need to “grip” the microphone. I made mine 25mm apart.
Using a file remove any sharp edges from the coupling. If you don't do this the rubber bands will break prematurely.
Drill two M4 clearance holes into the coupling half way between each end. Use the pivot clip as guide for the hole spacing.
Paint the coupling black and allow to dry. At least two light coast is better than one heavy coat. Sand lightly between coats
Once dry assemble the coupling onto the pivot clip being careful not to over tighten the nuts. Remember the nut turns, the bolt stays put.
Allow two rubber bands per slot. Install the rubber bands as shown in the photos.
Feed the microphone through the rubber bands being sure its centred correctly.
Route the cable along the arm and loosely cable tie it in place making sure there is enough slack to allow for the arm to be re-positioned without putting strain on the cable.
Tighten the cable ties.
That's it you're done.
Some Observations
Being able to free up the work bench its the main reason I did this project. Being able to have the radio on during my work day is a bonus too.
The best part is I can set the radio to VOX (or foot switch in my case) and never need to touch the microphone when I work that rare DX station from Botswana on 10m
The rubber bands work well as a shock mount and are cheap. However, if I were to make this again, (or when I run out of rubber bands) I would use black hair ties instead of rubber bands. The hair ties are... well... black, and they wont perish as quickly as the rubber bands.
In all, the microphone arm & shock mount works as it should and has served me well since the beginning of "The Great COVID 19 Lock Down of March 2020". The only thing you may need to do is put a bit of Loctite on the adjusting nuts/ bolts of the IKEA arm as they can work loose if you reposition the microphone quite a bit like I do.
Now, pull up a pew, fire up the radio and go chase some DX.
Cheers