Introduction To This Project
I have a reasonably healthy interest in archæology, and since moving onto the Blackdown Hills in East Devon, UK, the history of whetstone mining in and around the Blackborough area has caught my attention. The miners extracted a type of sandstone from which they carved high quality scythe stones; the stones from this region had a reputation for their superior quality and become known as Devonshire Batts.
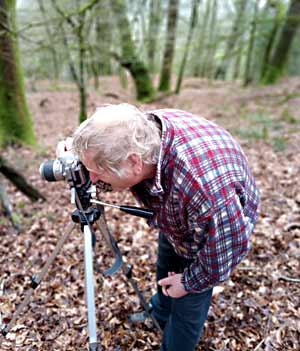
Me
My research into this little-documented mining industry is still ongoing, and has involved a fair number of site visits; despite the advancing years and the gout I've taken the trouble to do the legwork. I've slipped up, slipped down, got covered in mud, been bruised, cut, scratched, stung and have dragged reluctant companions kicking and screaming through what seemed like miles of brambles, fallen trees and tick-ridden bracken, but I've finally succeeded in visiting all the whetstone mining sites, where I've had permission to do so.
Trying to take meaningful photographs in the middle of a thicket proved painful, technically challenging and generally futile, but I have done my best to record some of the remains of the old whetstone mines; the least inept of my photographic attempts appear in the Visiting The Sites section near the bottom of the page.
Little was written about the whetstone mines locally, but some information was recorded by geologists of the time who visited this region of the Blackdown Hills to examine the geology, made possible by the whetstone miners' tunnels.
Many of these historic texts are now available on the Internet, but they can take a fair bit of digging to find; where I've quoted from such texts, I have done so verbatim to preserve context, rather than trying to reword them for the sake of it and have provided the name of the author and date of publication. Links to available texts are listed at the bottom of the page which generally go into far more detail than I have provided.
As you've possibly found this page by doing a web search, I'd like to recommend two excellent texts written in modern times which go into far more detail than I've written here:
Devonshire Batts: The Whetstone Mining industry and community of Blackborough, in the Blackdown Hills
R. G. F. Stanes (1993)
The Devonshire Association Volume 125, pages 71 - 112
Devon's Non-metal Mines
Richard A. Edwards (2011)
Published by Halsgrove
Please drop me an e-mail if you have any comments, or anything to add.
What Is A Whetstone?
A whetstone is an abrasive stone of suitable composition and shape, used to sharpen or 'whet' steel blades.

Beneath the western side of the Blackdown Hills in Devon, United Kingdom, was found an abrasive sandstone which lent itself superbly to the job of sharpening scythes. Initially, suitable stones would probably have been found in ground disturbed by the uprooting of a tree or perhaps protruding from the banks of storm streams high up on the hills, but at some point demand led to attempts to mine the stone directly.
Whetstones originating from this area proved to be of exceptional quality and the market for them increased accordingly, creating the economic climate for whetstone mining to flourish here. The finished product was a high quality scythe stone, possibly millions of which were manufactured during the life of the mines. These Devonshire Batts as they became known, were distributed around the south of England and beyond, with many known to have been exported to the colonies in Australia.
It is generally accepted that whetstone was mined around the western side of the Blackdown Hills from the 1600s onwards, but by the late 1800s most of the mines had been worked out.
"The whetstone pits are now nearly exhausted, and only two or three remain open."
- Downes (1880).
A well-used, but surviving Devonshire Batt. Reproduced with permission: Hemyock Castle
Horse-drawn reaper-binders were becoming available around the late 1800s which were replacing the man & scythe for grain harvesting work, and in the early 1900s, artificial whetstones made of carborundum started to appear, reducing the need to search for further sources of this natural abrasive at a time when the mines were, in any case, almost depleted.
A Little Geology
The Blackdown Hills in Devon, England consist of a plateau which rises to around 900 feet above sea level in the west, cut through by streams and rivers which have left many deep valleys. In the simplest terms, the hills are composed of a substrate of Triassic mercia mudstone, overlain with a deposit of Cretaceous upper greensand formation, finally topped with a thin layer of clay-with-flints, all that remains now of a chalk deposit which once capped the greensand.
Some texts suggest the upper greensand deposit is around 100 feet thick, but I feel in some areas, specifically Rhododendron Wood, the height from the hill top to the spring line is closer to 200 feet or more, yet in others the deposit thins to almost nothing, so the thickness is highly variable.
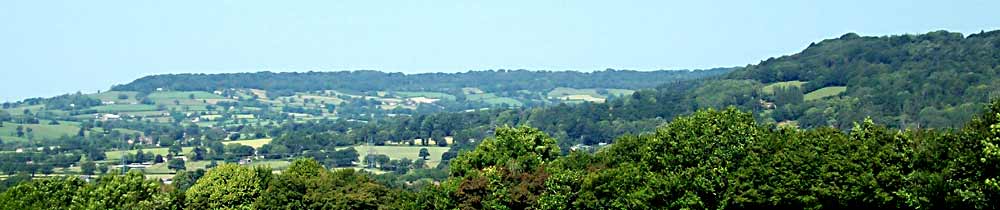
The upper greensand layer is responsible for the characteristic flat top of the region, with the edges of the formation sometimes exhibiting a steep escarpment; below these often wooded escarpments the ground levels out somewhat and generally gives way to pasture land.
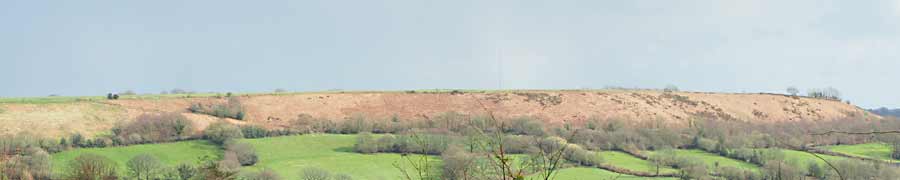
The brown region (dead bracken) indicating the Upper Greensand deposit
It's the upper greensand formation that's of particular interest here, as it is within this deposit that siliceous concretions occur, these being a particular type of fine-grained, hard but porous sandstone consisting of a framework of crystalline silicates in a matrix:
"The stone is a quartz-muscovite-tourmaline grit"
- Moore (1978).
Certain layers of sandstone within the greensand became highly prized for making superior quality scythe stones, these being the Devonshire Batts of the Blackdown Hills.
In 1836, Dr. William Henry Fitton published the following observation about the beds to be found within the greensand and the thickness of the deposits:
Dr. FITTON on the Strata below the Chalk.
From pages 236 & 237
The following is a sectional list of the beds in one of the principal sithe-stone pits at Punchey Down, which, I was informed, was a fair representative of the whole:
1. Reddish sand rock, extending upwards to the top of the hill.
2. "Fine vein"; Concretions of firmer consistence; the best for sithe-stones. 0' 2" to 1' 0"
(Shells are found in all the strata here, but abound remarkably in this one, and in the "rock" beneath it.)
3. "Top sand rock"; sand with irregular concretions; of no use . 3' 0" to 4' 0"
4. "Gutters"; concretions of stone in 4 or 5 courses, in the sand. 3' 0" to 5' 0"
This bed is that most commonly used for sithe-stones.
5. "Burrows"; stone and sand of the same kind, but used only for building. 2' 0" to 3' 0"
6. "Bottom stone"; a range of concretions, affording excellent sithe-stones. 0' 2" to 0' 6"
(These concretions sometimes extend downwards, even to 5 feet, in the sand.)
7. "Rock sand"; chiefly sand, with fewer concretions; of no use. 4' 0"
8. "Soft vein"; concretions which afford excellent sithe-stones. 0' 2" to 0' 6"
The strata below are not known to the workmen. The total thickness, therefore, of the strata which furnish the material for sithe-stones, including the rejected sand and rubbish, is from 12 to 18 feet, the whole of which is removed in cutting the drifts or galleries.
- Fitton (1836)
The Geological Bench
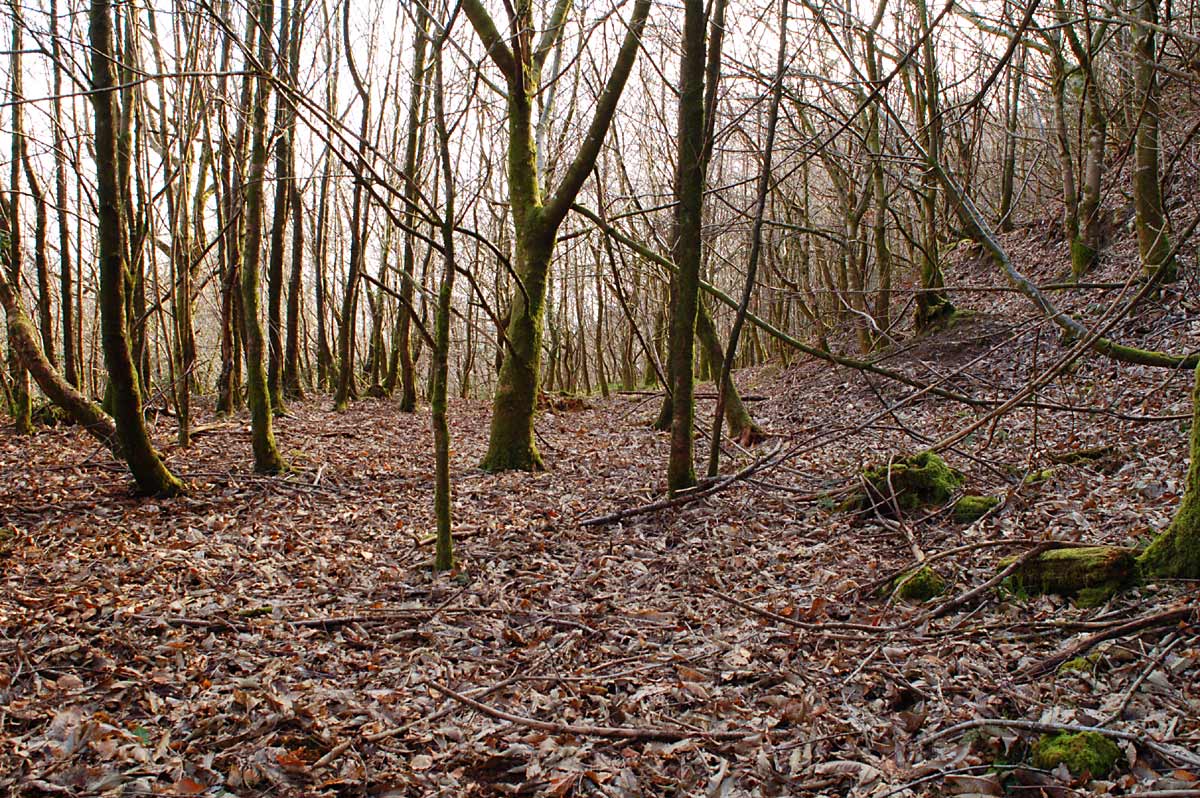
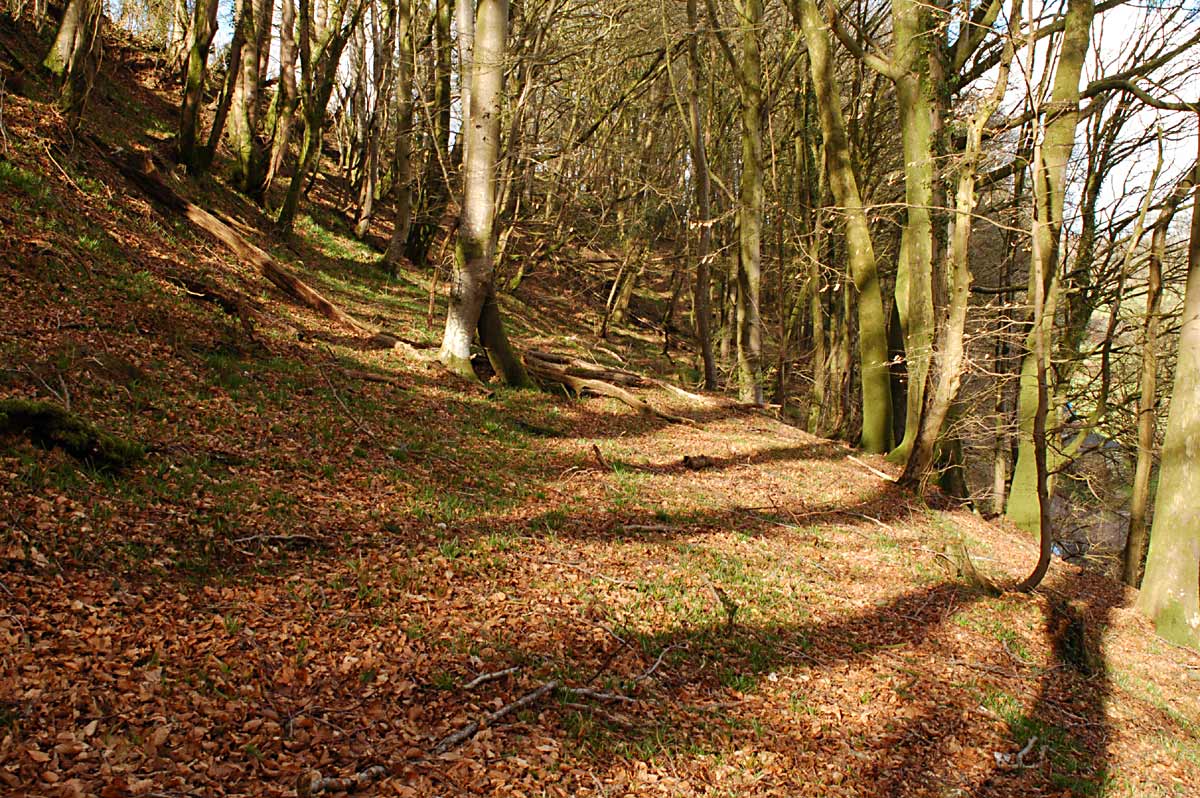
At locations where a moderately steep escarpment is present, an intermediate shelf or 'bench' can sometimes be seen which occurs at a variable height but typically 10 to 30 metres or so below the top of the plateau, which appears to have been created by differences in erosion resistance.
This intermediate flat zone or 'bench' may appear to be a man-made pathway following the contour and indeed, it is often used as such but it is, in many cases, a natural occurrence. Such benches were often bulldozed to improve the pathway for access to the woodlands by forestry companies making their natural origin less obvious, this being the case with the path through Rhododendron Wood, Kentisbeare, for example.
Simplified cross-section of a Blackdown Hills escarpment
Dumping mine waste over the side of such a bench would eventually increase its width, sometimes dramatically as has happened at Blackborough and North Hill, creating a wide terrace the miners called the 'sandbeds'. The spoil heaps in areas devoid of a natural bench tend to occur at varying levels and therefore don't create a single level region; such an area can be seen east of the road at Hembury Fort.
I'm surprised that no mention has been made of these benches by geologists; the whetstone mines were generally driven into the hill from such a bench so it would seem that the presence of one was an indicator to the miners that raw whetstone may be present and at what level to begin digging their tunnels. The flat platform also of course provided a useful pathway to access the mines with the waste material being conveniently dumped over the side.
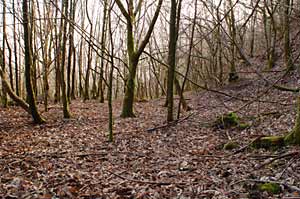
Photo 1 |

Photo 2 |
The pair of images above show nice virgin geological benches which haven't been molested by whetstone miners or bulldozers. The bench in photo 1 is fairly wide at this point with the escarpment rising to the top of the hill to the right, and falling away steeply to the left. The bench in photo 2 runs around the contour for quite some distance, then as the escarpment turns outwards, the bench turns inwards, disappearing into the hillside as can be seen.
Upper Greensand Fossils
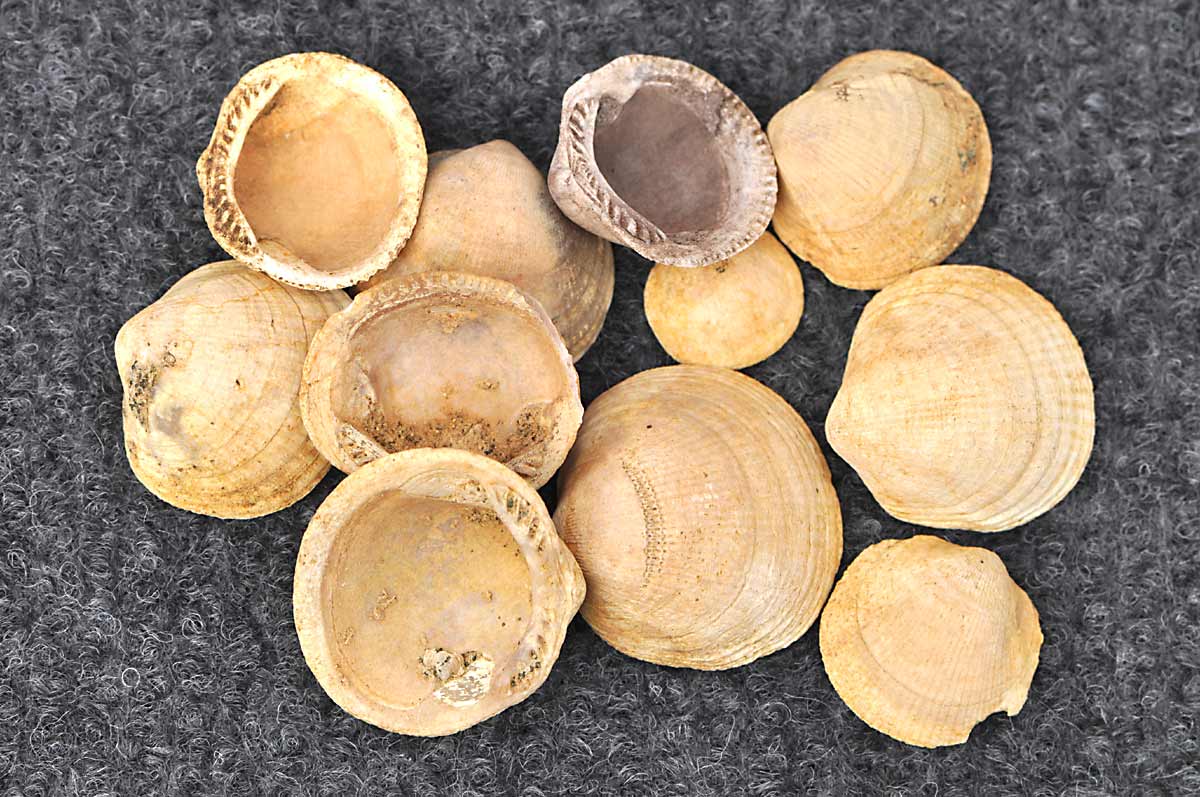
The Upper Greensand (UGS) deposit of the Blackdown hills is presumed to be somewhat over 100 million years old, and laid down in the mid to late Albian stage of the Lower Cretaceous period, although some disagree and debate is ongoing. In any case, many fossils have been recovered from the deposit over the years, mostly uncovered by the whetstone miners and sold to visiting geologists, providing a useful additional income. The shells are finely preserved in beekite (a form of silica) which has completely replaced the original carbonate.
Below are examples of some fossils I've recovered.
|

|
|
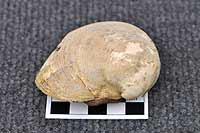
Fossil 1: a large fossil bivalve shell around 7cm across, originating from the upper greensand. Surface find, collected from the North Hill area.
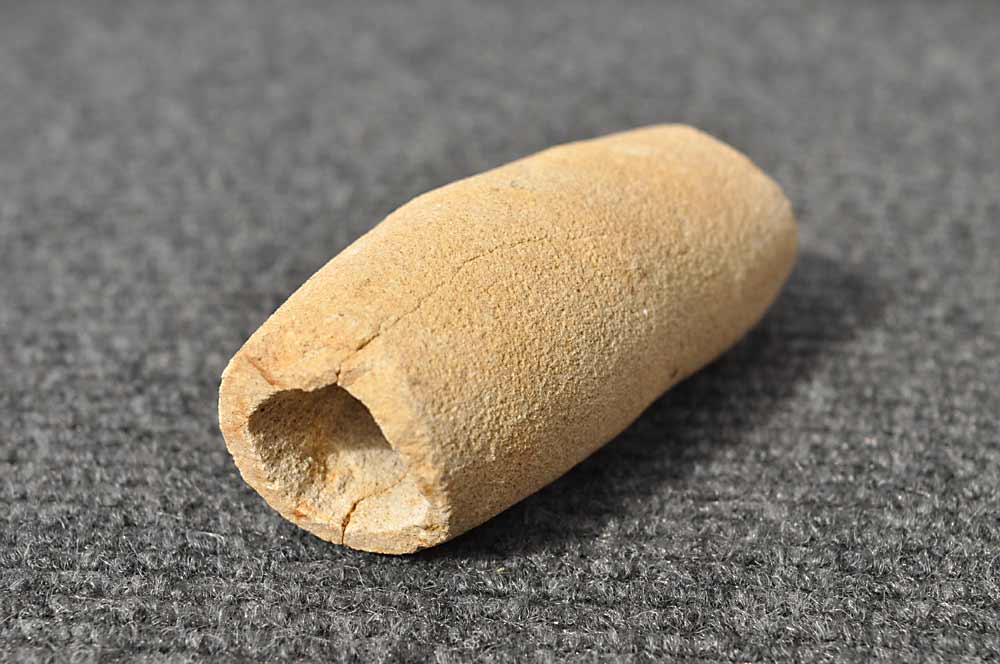
Fossil 2: an odd tubular fossil of unknown identity, 6cm long and 3cm at the widest point; appears to be made of greensand concretion, so possibly a trace fossil? Collected from a UGS exposure at Blackborough.
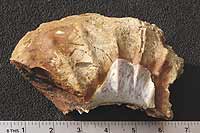
Fossil 3: part of a fossil ammonite; I'd estimate this specimen would have been about a foot across if complete. Collected from a UGS exposure at Blackborough.

|
|
|
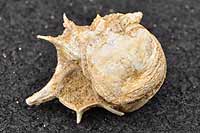
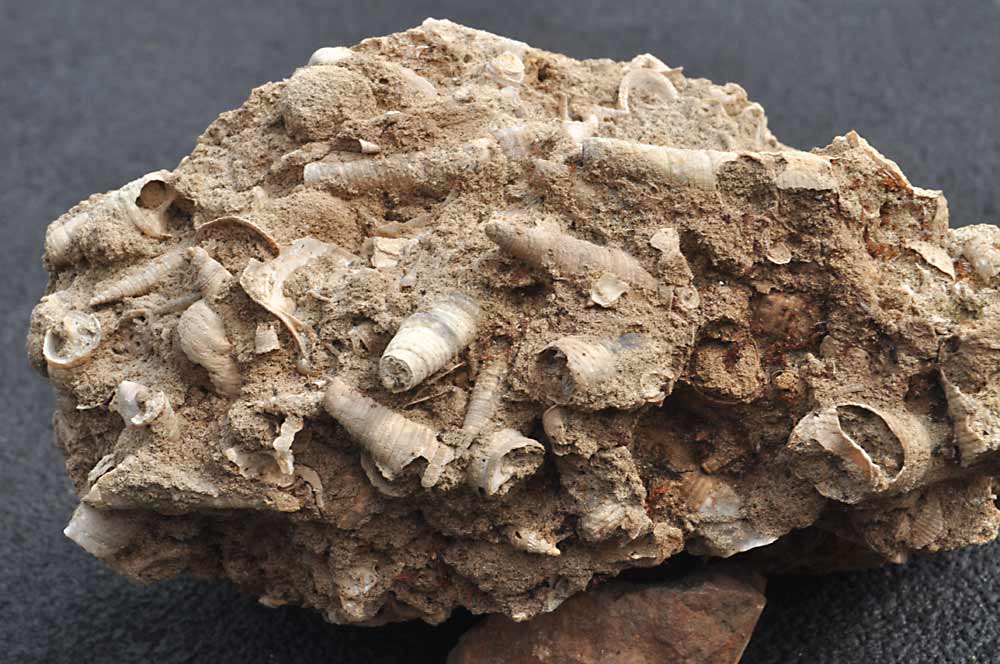
Fossil 4: a cluster of fossil gastropod shells around 4 inches across, originating from the upper greensand. Surface find, collected from the North Hill area.
Fossil 5: a small fossil of what I believe to be a murex calcar, a predatory gastropod, about 15mm across. It is firmly attached to the shells of 2 small bivalve molluscs and I dare not try to remove them in case I damage the specimen. Collected from a UGS exposure at Blackborough.
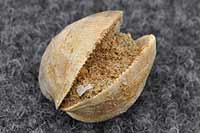
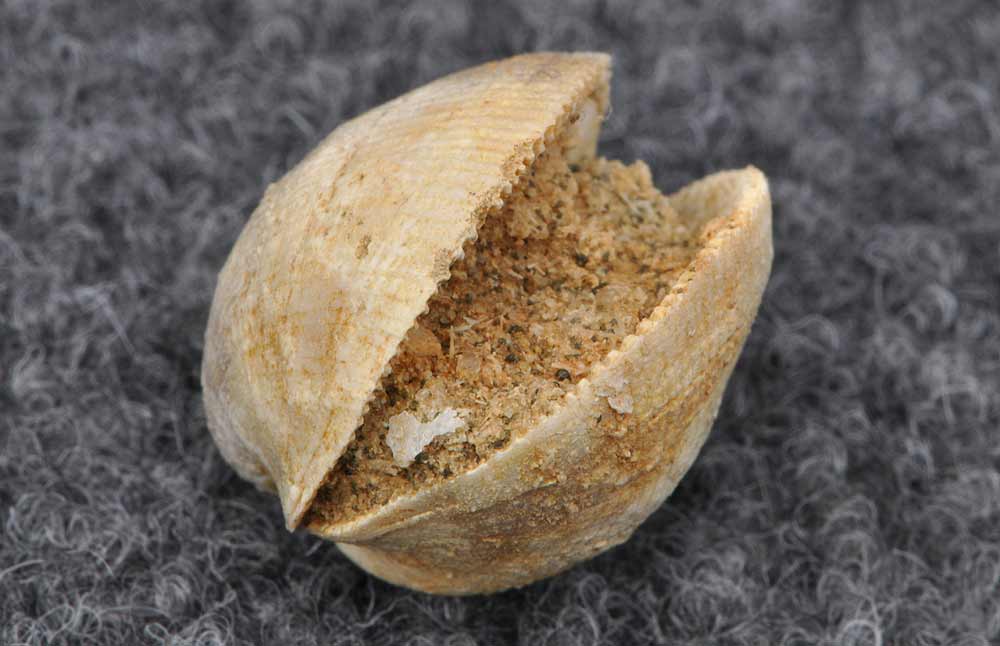
Fossil 6: A single small fossil bivalve shell about 12mm across, unusually with both halves still joined, suggesting the prehistoric sea in which it lived was calm. In the hi-res photo, there appear to be some sponge spicules among the sand grains within the shell. Collected from a UGS exposure at Blackborough.
|

|

|
Fossil 7: A collection of small fossil bivalve shells, the largest being about 20mm across. Collected from a UGS exposure at Blackborough.
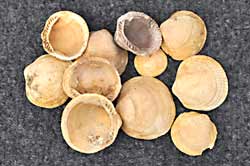
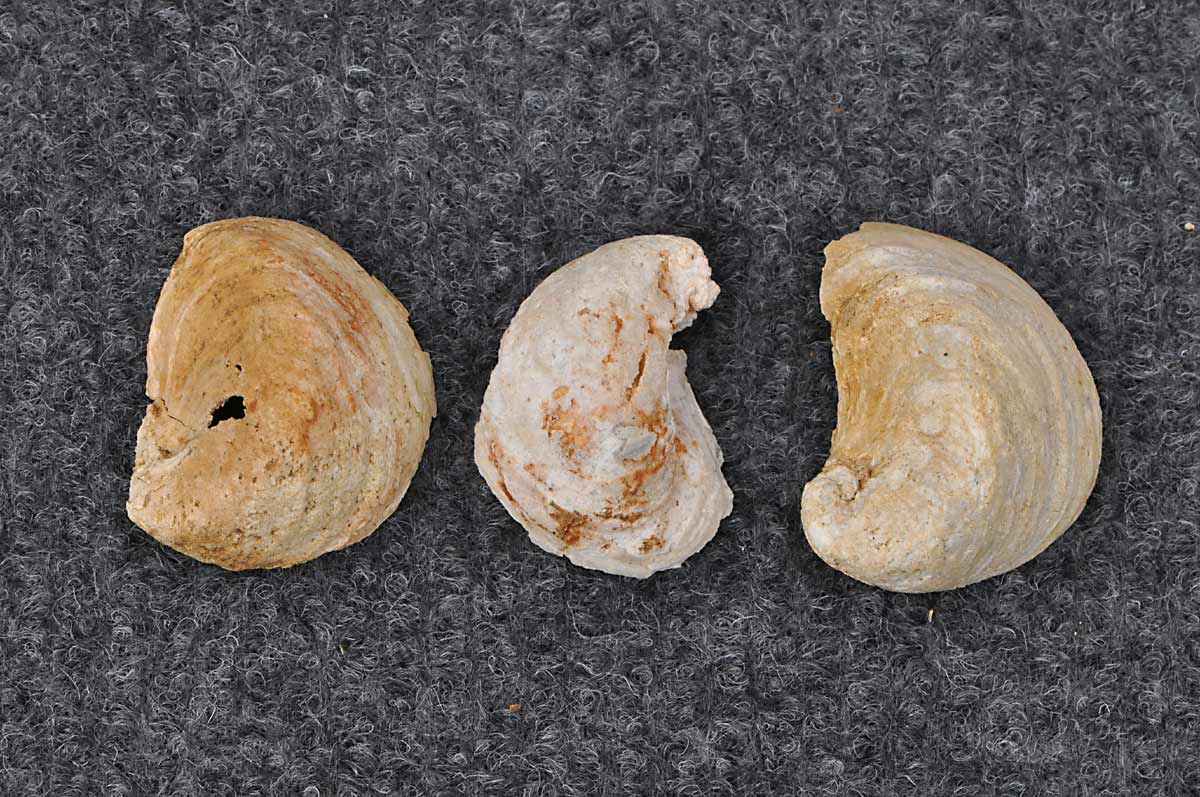
Fossil 8: Three unidentified fossil mollusc shells, possibly examples of exogyra oysters. The flatter opposing valve can be found but tend to be very fragile. Collected from a UGS exposure at Blackborough.
Fossil 9: A pair of what appear to be worm burrows preserved in the sandstone. Found in a heap of waste rock on one side of a mine entrance, North Hill.
Mining For Whetstone
In order to mine for whetstone, the prospectors would have started by choosing a suitable location and arranging a lease agreement with the landowner for the right to mine there, or renting an existing mine.
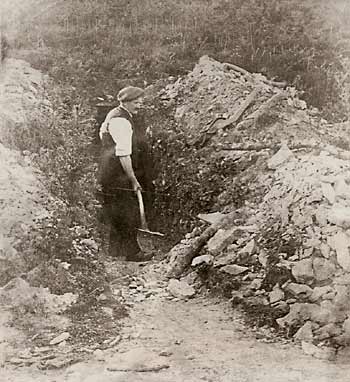
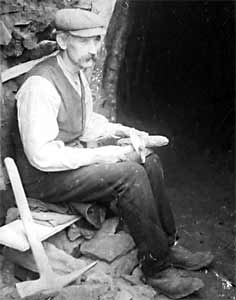
Photo 3
A typical whetstone mine entrance
Photo 3 shows a whetstone miner outside his mine, believed to be a Mr Radford. He's shown here shovelling material up onto the sides of the entrance cut, presumably the waste resulting from a whetstone carving session; the makeshift seat he'd use for this is just visible on the right.
Reproduced with permission:
Tiverton Museum of Mid Devon Life
A few mines were owned by individuals, others by a consortium of people or families and the remainder owned by whetstone dealers, who would have let out the rights to work the mines or employed labourers to do so. It is understood that entire families would often work a mine, with perhaps three generations working together.
The mining operation itself would begin by digging a horizontal cut into the side of the hill, producing a trench or gully, the sides of which increased in height as the cut went into the hillside; once there was enough height at the 'face', the tunnelling operation could begin creating what is known as an adit or level (whetstone miners referred to them as pits), dug horizontally into the hillside to allow the sandstone concretions to be found and extracted.

The mines were driven into a sandy material known as Upper Greensand, which although not loose like beach sand, was still quite soft: you could dig at it with a pencil, for example. The miners employed basic hand tools such as picks and shovels to work with, as there were no power tools or explosives used in these mines and there were no trolleys on rails; movement of material was by wooden wheelbarrow.
I've seen little mention of the lighting the miners used, but for certain they would have used candles made of tallow as used by other miners of the period; although a candle doesn't emit much light, two or three placed around the work area would have been adequate once the miner's eyes had become accustomed to the low light level.
Opinions on whetstone mine tunnel length vary according to the source, but most are in reasonable agreement: Peter Orlando Hutchinson was told that one tunnel extended for 300 yards; Fitton suggested 300 yards as a maximum and Chalk mentioned that some of the galleries were two or three hundred yards in length. Although the larger mines (which would have been the ones most likely visited) may have attained such lengths, I don't believe this was typical of the majority.
Sinkhole evidence suggests to me that many mines ran for barely 50 yards, this being supported by their relatively small spoil heaps; some mines however have vast spoil heaps associated with them, suggesting they were among the principal mines in the area and were driven into the hill for a much greater distance, possibly approaching the 300 yards suggested.
Charles Vancouver made this observation on the way the mines were worked:
"The manner of working these quarries is by driving a road or level into the side of the hill to the distance of 3 or 400 yards, about 3 feet wide, and five feet and a half high; when the hill has been penetrated to this distance the usual practice is to work out all the loose sandstones within eight or ten yards of the road, leaving pillars at first to support the roof of the mine, but afterwards gradually working them out, and suffering the whole excavation to fall in and fill up after them."
He also commented on the typical size of the sandstone concretions to be found:
"The size of these stones seldom exceeds the size of a horse's head..."
- Vancouver (1808)
It seems fairly clear from this that the miners would begin extracting sandstone concretions from the far end of the mine, gradually working their way back towards the entrance, allowing the worked-out chambers and galleries to collapse behind them once the supporting pillars and timbers had been removed.
At first this may seem an odd way to work, but it would have allowed the exhausted parts of the mine to be backfilled with waste material, meaning that not all of it had to be barrowed out to the entrance to be dumped. Whether this manner of working was typical or simply related to the particular mine Vancouver visited is unknown.
Most of the waste material was sand; basic wooden barrows were used to wheel the waste sand out of the mines and onto the spoil heaps. Considering that a tunnel may have been driven into the hill for a considerable distance, repeatedly wheeling the sand out by hand must have been exhausting work so any work practice which reduced this requirement would no doubt have been very welcome.
The larger mines may have employed more than one labourer to drive the barrows, so it would have been useful to ensure that barrows could pass each other underground; I've seen suggestions that the entire tunnel would have been cut wide enough for this, but that would have involved a lot of unnecessary work. It makes sense that widened passing places would have been excavated at certain points for this purpose; life as a whetstone miner was difficult enough as it was, they certainly wouldn't have worked any harder than they needed to.
The smaller whetstone mines may well have been worked by a single person, but where several labourers were employed, their duties and skills fell into one of three basic categories, although no doubt there would be some overlapping of skills.
The Miner
He'd work with a pick and shovel underground, driving the tunnel forward to locate and extract the raw whetstone, while bracing the sides and roof with timber supports.
The Sand Drivers
These were usually young lads, employed to push the wheelbarrows. They'd load up the sand the miner had loosened and wheel it out of the mine to be dumped down over the spoil heap, and bring out any pieces of suitable rock for further processing.
The Cutter
He was probably the more skilled of the workers and would carve whetstones from the rock brought out to him. The whetstones he'd produce would be unfinished and rough-cut at this stage, as the final dressing and 'rubbing' was typically performed away from the mine by the wives and daughters of the families.
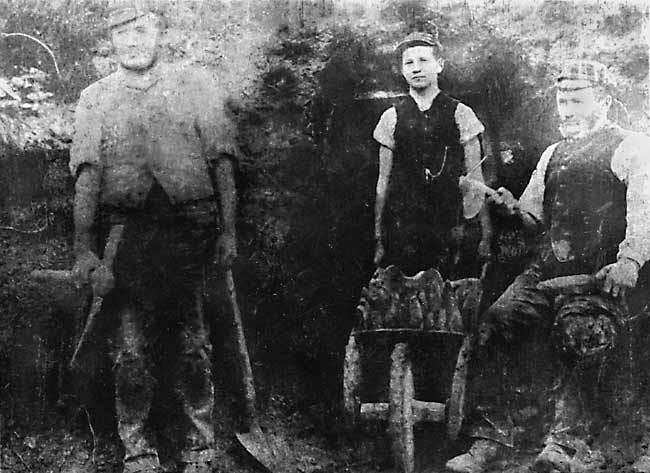
Photo 4
Three whetstone workers: the miner, sand driver and cutter
Photo 4 shows three whetstone workers in front of their mine, with the miner on the left posing with his pick and shovel. Centre is a young lad, the 'sand driver', with a barrow of what appear to be rough-cut whetstones with a basing hammer resting on top of them. On the right is the 'cutter', responsible for carving the whetstones, posing with his basing hammer and a whetstone. The familial resemblance between these workers is striking, suggesting that they represent three generations of this particular family.
This is my reproduction of a small photograph of a framed photograph hanging on a wall, and according to Rev. Richard Chalk, an inscription on the back of the photo by Jamie M. Foster indicated it was once in the possession of his father, Murray Toogood Foster, Cullompton archaeologist 1867 - 1953.
This photo appears to have been taken professionally and the frame bears the name of W. R. Little of Palace Gate Studio, 30 South Street, Exeter. It is unknown if this print or the original glass plate is still extant but for now I've run out of leads looking for them. An annotation suggests the photo was taken around 1860 - 1870 and may be the only photo of a Blackdown whetstone mining team to exist.
Reproduced with permission:
South West Heritage Trust (document 3269Z/1)
As the tunnel was driven into the hillside, the sides and roof would have required supporting to prevent them collapsing; this was accomplished using a series of support structures consisting of a pair of timber poles, one each side of the tunnel with a third tightly wedged across the top of them to brace the roof. The distance between the supporting structures would have depended on how poor the ground was, varying from continuous timbering near the entrance where the sand was loose to perhaps every foot or two in firmer ground, and probably also depended on the courage or foolhardiness of the miner concerned.
The vast amount of timber required would have been heavily competed for, both for use in other mines and for firewood, so it would be reasonable to expect this to have been a substantial expense. This cost had to be delicately balanced against safety, as continuous timbering throughout the mine would have been an expensive luxury; therefore I would expect the props to be spaced apart somewhat as in the photos below, to economise on the use of timber. Unfortunately, all too often this allowed a sudden massive fall of sand to occur within the tunnel which could crush the miner, or suffocate him before he could be rescued.
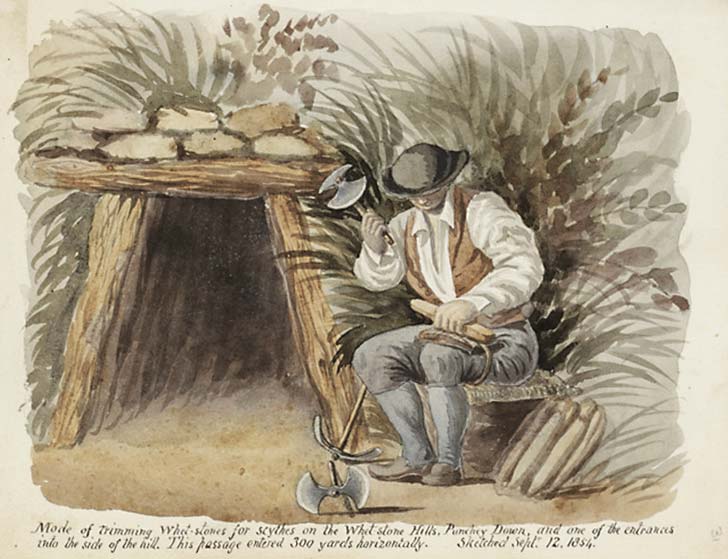
Photo 5 |
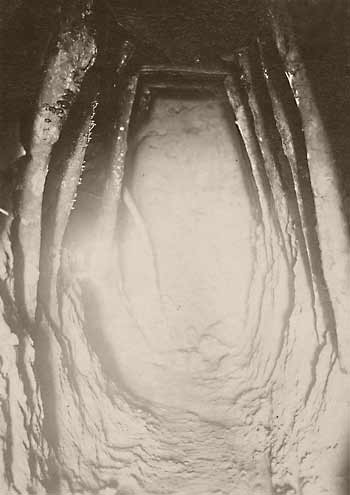
Photo 6 |
Photo 5 is a copy of a magic lantern slide by William Weaver Baker. It shows a miner, presumed to be John Rookley, posing for the photograph at the mouth of one of his mines holding an unfinished whetstone in his left hand, and a specialised tool (a basing hammer) used for carving them in his right. (Date unknown.)
Reproduced with permission:
Royal Albert Memorial Museum & Art Gallery, Exeter
Photo 6 shows the interior of a whetstone tunnel, nicely illustrating the timbering used to help secure the walls and roof. Although we seem to be looking at the end of the tunnel, I believe it turned sharply to the left judging by the wheel rut worn in the floor. Date and photographer unknown.
Reproduced with permission:
South West Heritage Trust (document 3269Z/1)
The similarly styled timbering in the above photos suggests to me that this was the same mine, and the angle of the shots suggests that both were taken by the same photographer, most likely on the same visit.
Although the entrances to these tunnels were fairly narrow and low, the miners opened them out significantly in width and height further in as they searched for and extracted the sandstone. The raw whetstone concretions tended to occur in random clumps within a particular layer rather than as a continuous seam, so finding them tended to involve a certain amount of chance and the removal of a lot of sand.
Dr. FITTON on the Strata below the Chalk.
From pages 236 & 237
The strata which afford the whet-stones are about eighty feet below the top of the hill, to which they are parallel. The mines (or 'pits' as they are called) are driven in direct lines into the hill almost horizontally, and in some cases to considerable distances. The stoney masses from which the sithe-stones are cut, are concretions of very irregular figure, imbedded in looser sand, and though very irregular in shape, marks of the stratification of the sand can be traced on their outside.
The masses of which the sithe-stones are made, vary from six to eighteen inches in diameter, and the beds which afford them would form a total thickness of about seven feet, of which about four are fit for that purpose; the looser stone at the top and bottom being employed for building.
The sithe-stone men take from the owners of the soil the privilege of digging for stones, leaving forty yards on each side between the drifts (or 'pits' as they are called). There is no limitation as to depth, and the drifts are commonly pushed to about 300 yards inwards, greater distances not repaying the labour of bringing out the sand.
- Fitton (1836)

The 'cutter' had the job of carving whetstones from the rock brought out to him, and did so using a specialised tool known as a basing hammer. It is well-documented that the sandstone was damp and fairly soft when first brought out so was easy to carve, but later, when exposed to the air it would slowly harden as it dried, a process known as 'seasoning' or 'case hardening'.
"The hardening which seasoning brings to a stone may be attributed to the movement, in solution or suspension, of small amounts of siliceous, calcareous, clay or iron-rich material."
Source: Building stones of Edinburgh.

A cutter may have worked for some considerable time in the same spot; at most sites they chose to work at the entrances to their mine tunnels, meaning they needed to regularly shovel the chipped rock and sand resulting from the carving up over the sides of the entrance cut to keep the way clear; this formed a pronounced ridge on the sides of the cut over time, evidence of which can still be seen in many places. If a cutter chose to work a little away from the entrance, the waste chipped rock and sand was left where it fell and would eventually form a noticeable mound, evidence of which can be seen in some places.
It would seem that the theft of tools or whetstones from the mines was a bit of a problem, and this risk appeared to have been addressed by fitting locking doors to some of the mine entrances and probably also any storage sheds associated with the mines.
"Tunnels in use had, latterly, carefully locked doors."
- Stanes (1993).
To illustrate the problem, we have this report from 1835:
"Robert Ware, 22, Committed by John Clarke, clerk, charged with having broken and entered into a whetstone pit, in the parish of Kentisbeer, and stolen therefrom a quantity of whetstones, the property of John Cording. Warrant dated 8th June, 1835."
Source: GENUKI
The "broken and entered" part of the charge does indeed suggest a locked door was fitted at John Cording's mine in 1835, and would probably have been normal practice for the larger mining operations.
Making The Whetstones
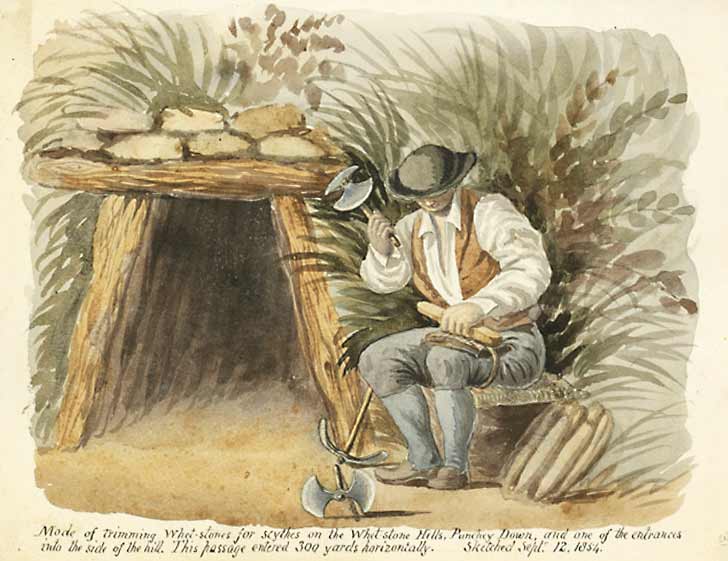
Watercolour painting by Peter Orlando Hutchinson, dated 1854
Reproduced with permission:
South West Heritage Trust & East Devon AONB
It was usual practice to rough-shape the stones at the mine, which sensibly reduced the weight of material which needed to be wheeled away in barrows; the final shaping and dressing of the stones tended to be done elsewhere, often it seems, at the family home, usually by the women of the families. This process involved more accurately shaping the whetstones and then smoothing their surfaces by rubbing them on a larger piece of sandstone, this part of the process being done in water.
The following text is quoted directly from Dr. Fitton's book published in 1836, and being such a detailed description of whetstone production, it leaves nothing for me to add.
Dr. FITTON on the Strata below the Chalk.
From pages 237 & 238
When first taken out, the stone is greenish and moist, and can be chopped with ease. The tools employed are a sort of axe or adze with a short handle (fig. 2.) called a "basing-hammer" which is ground to a sharp edge. These are made at the adjacent village of Kentisbeare. The other tools are picks without any peculiarity of structure, and "hollowing-shovels" (fig. 1.) for digging the masses of stones out of the sand.
For the purpose of cutting the stones, a vertical post of wood, or 'anvil' is so fixed in the ground as to stand between the knees of the workman, who sits upon a sort of bench built of stone, with some strong pieces of old leather attached as a defence to his left knee.
He first, with the edge of his 'basing-hammer' splits from the blocks upon his knee, long portions approaching to the shape of the sithe-stones; and then cuts or chops them down nearly to the required size, upon the anvil and his knee, just as a carpenter cuts timber with an adze. After thus being rudely shaped, the stones are hewn to the proper dimensions with a large 'hammer', and then rubbed down by women, on a large stone of the same kind; and when dried they are fit for sale.
The stones when finished vary from about ten to twelve inches in length; some have the shape of a portion of an almond, with the ends and sides cut square, and about two inches by one and a half in thickness; others are almost cylindrical, but smaller at each end, with the sides a little curved; the diameter in the middle about two inches.
A good workman can cut out of the blocks about seven dozen of the stones per day. They are sold by the makers chiefly to one merchant at Honiton, who supplies the retail dealers. The prices (in 1825) varied from 2s. per dozen for the finest stones, eleven to twelve inches long, down to 8d. a dozen for the coarsest, ten inches in length.
- Fitton (1836)
It has been suggested that at the period of peak output of the mines, perhaps as many as 10,000 of the sharpening stones were produced by the mines in a week, but this does seem rather a lot as that amounts to half a million stones a year. (Source: Blackdown Hills National Landscape).
Let's analyse this: we can read that,
"At the height of the trade there were about twenty-four pits in working."
- Rev. Edwin S. Chalk (1910).
For the sake of argument let's assume no-one worked on a Sunday and that the miners worked elsewhere, harvesting perhaps, for around 40 days a year. That would require the mines to produce an average of around 77 scythe stones per mine each working day to reach that half million stones a year.
That's a lot of whetstones but it does seem possible going by the information given by Dr. Fitton earlier, but I have to agree with Robin Stanes' statement that "even half that figure is considerable." I'm surprised that an industry of this magnitude didn't leave a bigger dent in history as it now seems to have been all but forgotten, despite there being over four miles of continuous, easily-visible earthworks remaining around the hill.
By the late 1800s most of the readily accessible rock had been mined out despite much reworking of old ground to locate more of the rock. Trying to re-open an old worked-out collapsed mine would have been dangerous and pretty pointless, so new tunnels were dug a short distance away from the old collapsed tunnels and driven in beside, above or occasionally below them, to hopefully find new ground that hadn't been fully exploited.
It would seem that the reworking of old ground was already well underway by the end of the 1700s:
"The stratum of sand in which it (concreted sand) is formed, is not confined to any particular depth from the top of the hill; as the workmen are now, in many places, driving fresh pits over those which have been already worked."
- Polwhele (1793).
Evidence of reworking can be seen in many areas and in some locations I've seen as many as six entrance cuts next to each other, indicating that multiple levels were dug parallel to each other to improve the chances of finding virgin ground. In most cases it seems the reworking operations were fairly unsuccessful, as the spoil heaps associated with the later tunnels tend to be small; this suggests the miners either encountered a lot of open space underground due to cutting across old workings or simply found the operation to be uneconomical, with the mine being abandoned at an early stage.
A Risky Business
The ground the mines were driven into was sandy in nature and although easily dug, the tunnels required substantial timbering to prevent them from collapsing; despite careful attention to the supports, it would seem that falls within the mines were commonplace.
The most dangerous work was considered to be digging at the face where timbering was not yet in place, the miners constantly at risk of being killed by many tons of sand 'ruising' in upon them. Surprisingly though, there seem to be very few coroners' reports of deaths caused by collapsing tunnels.
Here's part of the report of an inquest held on 28th of August 1845 as published in the North Devon Journal on the death of Moses Rookley which sadly illustrates the dangers only too well:
The North Devon Journal
4th September 1845
On Wednesday last the deceased was at work, with his son and daughter, in a pit which he rented of Mr Francis Broom, of Uffculm. About 12 o'clock he was posting up the roof of the pit, about 100 yards from the entrance, when suddenly the earth, sand and stones, fell in on him and covered him entirely as he stood upright; his daughter (aged 20) was knocked down and also covered therewith.
The daughter was not in so far in the pit as the deceased, and the brother, a fine little boy about 12 years of age, who was nearer the entrance of the pit, ran to rescue her, and after half an hour's severe labour, succeeded in removing the earth with his hands from her head and face, so as to prevent suffocation, and then went for further assistance. Whilst he was gone, the daughter called to her father, and asked him if he was buried; the deceased replied, "Yes, I am just dead, and shall never speak to you any more."
After that some more earth fell down on him, and she heard him groan and subsequently heard him talking to himself (as she expressed it), as though he was praying, but she could not understand what he said. As soon as the little boy (the brother) returned with some other whetstone men, they proceeded to extricate the daughter and then searched for the deceased, and in about an hour found him about five to six feet further in, standing in an upright position, with his arms uplifted, covered with earth and stones, but it took another hour before the body was got out.
Source: GENUKI
The risk of being crushed or suffocated underground wasn't the miners' only problem; whetstone miners were reasonably well paid compared to the local farm workers, earning perhaps triple their income but the extra money came at a cost to health due to exposure to silica dust. The very fine dust which resulted from the shaping of the whetstones and the dust thrown up while digging in the mine itself was known to be particularly problematic, with the health implications well-understood and yet it seems few chose to protect themselves from it. As a result, most of the miners suffered from silicosis to some degree or another.
"A considerable number of men lost their lives through the sand "ruising" in upon them, but many more died before they reached the age of fifty by the "smeech" or fine powder from dressing the stones."
- Chalk (1910).
Silicosis is a disease of the lungs caused by the inhalation of very fine silica dust (known as respirable crystalline silica), and is a well-documented hazard familiar to those who work with stone. Silica is a non-toxic and completely inert mineral found in most rocks, but when microscopic particles are inhaled, they can find their way deep into the lungs and into the alveoli where they cannot be removed by mucociliary action or the body's coughing reflex. As the mineral has near-zero biosolubility, it cannot be broken down within the body and so persists in the lungs.
The presence of these microscopic sharp fragments of silica within the lungs results in scarring of the lung tissue due to direct trauma compounded by the inflammation response of the body, which over time reduces the lung's efficiency. This would result in the general breathlessness and persistent cough which was reported among the whetstone miners, with the disability getting more severe as time went on.
Although this condition would be severely debilitating in its later stages, it alone may not necessarily prove fatal; however, when coupled with an attack of tuberculosis which was common at the time, death would be the likely outcome.
The whetstone mines were regarded as a dangerous place to work and rightly so, but in my opinion it seems that most of the deaths within the mining community were as a result of lung disorders brought about by the working conditions, rather than accidents within the tunnels as is commonly assumed.
The Last Whetstone Miner
John Rookley outside his mine
Although whetstone mining in the Blackdown Hills was big business for a good 200 years, by the late 1800s mining had all but ceased, as the mines had become worked-out with little new stone to be found despite much reworking of old ground. By the early years of the 1900s there were probably only two or three solitary miners still working the hills.
The newly available artificial carborundum stones had by now mostly replaced the Devonshire Batt as the tool of choice for sharpening blades, and considering that the scythe was by now 'old tech', natural scythe-stones had become pretty much obsolete.
Rookley's basing hammer
With permission: RAMM
Despite this, a solitary miner, John Rookley, kept digging for sandstone for a few more years after the others had given up the trade, continuing the production of natural scythe-stones for those still adhering to the old methods of harvest; he finally gave up his mine lease in 1929 and retired from mining, being in his mid to late sixties.
After John Rookley's death, Rev. Edwin S. Chalk obtained his tools from his relatives, and deposited them in Exeter Museum, it is believed some time during the 1930s.
The following is my transcript of a column which appeared in the Waverly Dispatch in January 1926.
The Waverly Dispatch Volume 34, Number 3
15 January 1926
Old English Industry Now Practically Dead
The whetstone or scythestone industry, which formerly existed at Blackborough and Sainthill, on the Blackdown range, Devon, England, 800 feet above the sea, is now almost extinct.
Founded nearly two hundred years ago, the industry used to provide employment for large numbers of men, women and youths. Now only one worker remains and his attachment is so strong that, despite the loneliness of his calling and the health-impairing nature of the work, he cannot divorce himself from the "dear old hills".
This solitary whetstone craftsman is John Rookley, who, although more than sixty years old, still burrows under the hills and unearths, shapes and dresses the stones which are regarded as unequaled for the sharpening of steel.
The demand for whetstones has diminished astonishingly of late years. Crops are no longer reaped with the scythe; carborundum from the United States is used extensively, and small Welsh stones are compressed for use as sharpeners.
Source: Library Of Virginia.
Where Was John Rookley's Mine?
I believe it is fair to deduce that John Rookley, as well as a possible relative James Rookley worked either together or alone in a number of short-lived, short-tunnelled mines during the early 1900s; mining activities over the previous couple of centuries had pretty much depleted the main sources of raw whetstone making a single large mine uneconomical. Unfortunately no-one in living memory saw these mines in operation, and those who can recall stories told by their parents are now very few in number.
John Rookley is a somewhat celebrated figure locally, as he was considered to be the last miner to work the hills. However, there seems to be some disagreement locally as to where Rookley's mines may have been located, this possibly due to there having been several of them; research suggests that he was living at The Old Manse, Saint Hill in 1931 before later moving to Wales, and up until he retired in 1929 it seems he worked mines in two distinct areas, both of which I've dealt with below.
Evidence For North Hill
Evidence suggests that Rookley worked mines in the North Hill area. Recalling the early 1900s, the Rev. Edwin S. Chalk was of the opinion that all the mines around Blackborough were worked out, "for the only pits in operation were on North Hill, beyond Broad Road and thus actually in Broadhembury parish."
There are references to a James 'Jas' Rookley in material by the Chalks; could this have been a relative of John who also worked mines at that time? Rev. Richard Seymour Chalk wrote, "I remember my father taking Hal Gundry, with my brother and myself to visit Jas Rookley's pit about 1917-8. No one was working at the time, so we did not go inside. The site was on North Hill."
"On a later occasion (perhaps about 1925-6) a friend and I were walking over North Hill when we heard a rhythmical sound, as of a pick-axe, below ground not far from us. We realised it was the last scythe-stone worker still plying his trade. Naturally we were very careful not to walk over his head or anywhere near, knowing how soft was the green-sand soil."
The comment, "the last scythe-stone worker" suggests this was John Rookley.
The above quotes thanks to SWHT (3269Z/1)
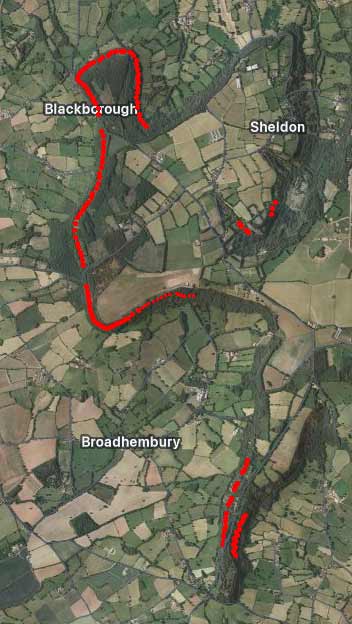
North Hill encompasses a large area of mines, stretching continuously for about a mile from Broad Road right around the hill past what was once known as Upcott Pen and onwards east, south of the gliding club airfield, so we have a lot of old workings which could be candidates. However, a close look at the area on an old 25 inch OS map, dated 1892-1914 shows what appear to be only 2 mines in operation, indicated by the red rectangles on the map below; the many other far larger disused mines have only their spoil heaps indicated.
I have provided grid references for both locations in the interest of completeness, but please note that both sites are on private property. I would like to thank Triratna Buddhafield for allowing me to access the site around mine No.1 and to take photographs as part of my ongoing investigations into whetstone mining in the area, but they ask that no-one visits without prior permission.
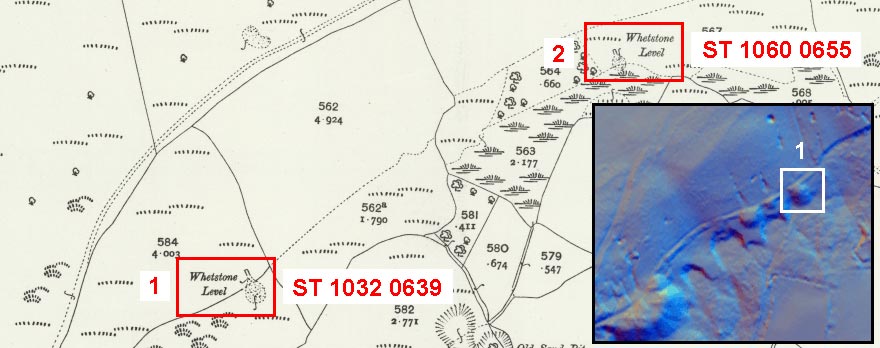
Map showing the last known whetstone mine workings?
I believe these two mines must have been in operation at the time of the map's publication, as I see no other reason for the detail: the entrance cuts are marked, as is the extent of what I assume to be the land leased by the miner for dumping waste material. Going by the date of the map, these may well be among the very last areas to be worked and Rookley may have been involved.
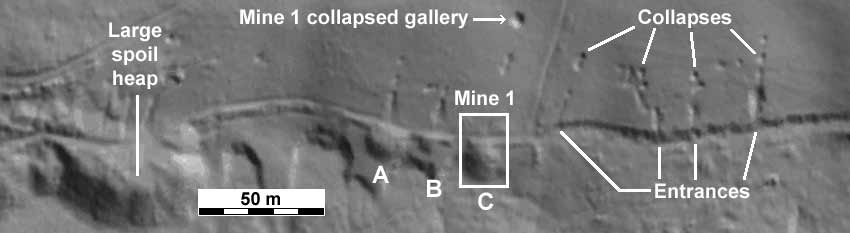
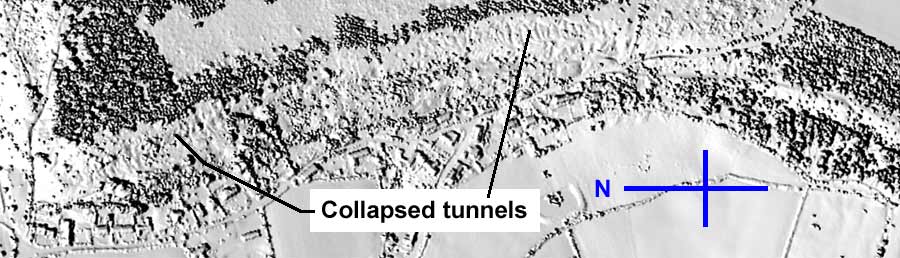
LiDAR image of the Bowerwood area
The above LiDAR image shows good evidence of mining activity in this area. The spoil heaps at points A, B & C are small in comparison with most others in the whetstone mining areas, and so are interpreted as short-lived, one-man operations; site 'C' is mine No. 1 on the old map above.
The line the tunnels took underground can be traced by looking at the collapsed ground above them, but note in particular the evidence of collapsed ground on the right side of the image, indicating that four more small mines operated there. Judging by the short distance the surface collapses extend up the hill, the tunnels were of limited length, around 30 - 40m at best, although oddly there are no discernable spoil heaps associated with these, either on LiDAR or visual examination, but it's possible these were levelled when the track was cut through the area.
Looking again at the LiDAR, note the way in which two of the tunnels appear to turn sharp left around 10 - 15m in, judging by the pattern of collapsed ground: the mine at location B and the second one in of the group of 4 on the right. The tunnel featured earlier in photo 6 also appears to suddenly turn left, going by the wheelbarrow wheel rut in the floor; it's possible this photo could have been taken here, but I have no way of confirming this.
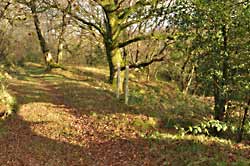
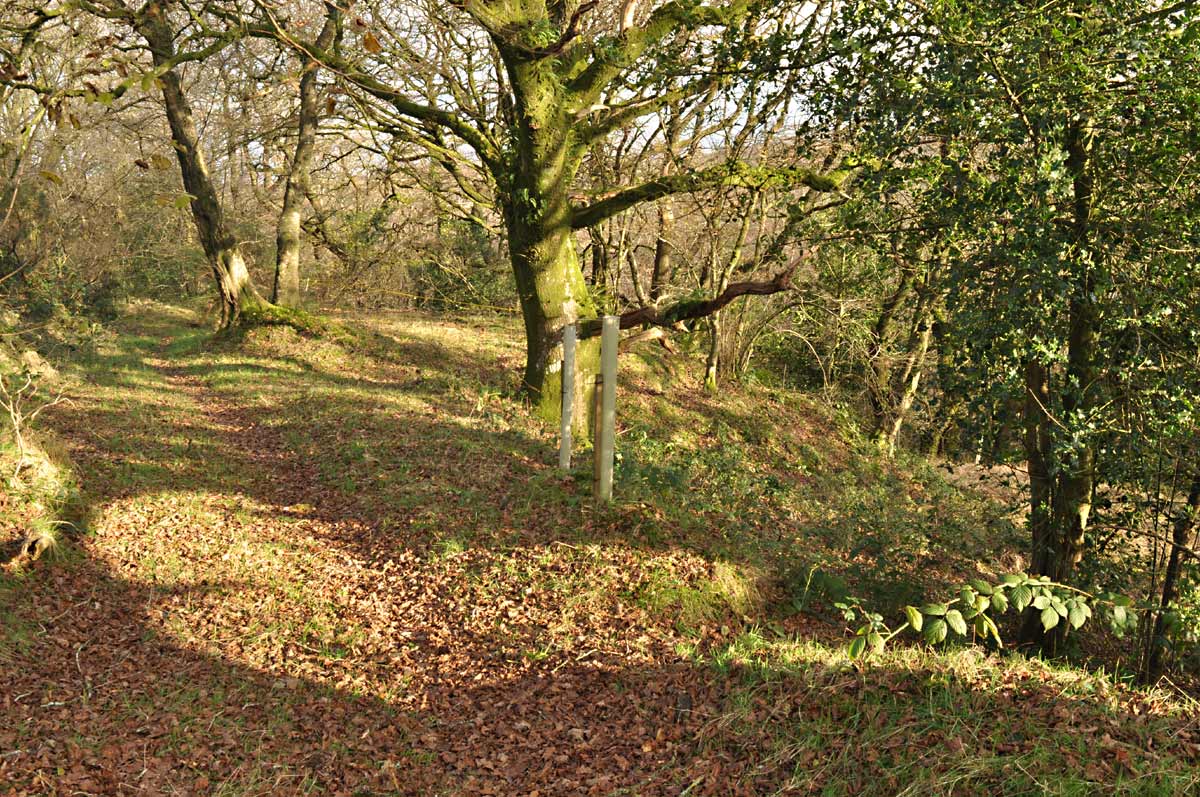
Photo 7 |

Photo 8 |
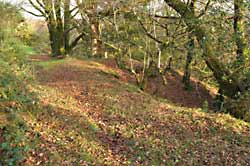
Photo 9 |
The above photos are 'record shots' to show the spoil heaps for locations A, B & C as they appeared in 2024, the only features which now remain of these smaller mines apart from those important and revealing depressions in the ground above the tunnels, where they have partially collapsed. When the track was bulldozed through the woods, it cut through the remains of all the mine entrances which were once here, meaning there are no entrance cuts remaining to examine.
I suspect this site could be where John Rookley worked, and he may well have been responsible for at least some of the small workings to be seen here, his solitary work perhaps spanning 20 - 30 years at this location, among others.
It's been written that Rookley regularly pushed his wheelbarrow, laden with whetstones, for around 2 miles from his mine to where he lived in Sainthill, and that is roughly the distance to these mines, which is rather interesting.
More evidence came to light in April 2026 in the form of some discarded rubbish found buried in mining waste, which positively dates from later than 1913; the location was on the south-west corner of North Hill, so is highly likely to be a site where John or James Rookley worked. (See artefact 14 in the Associated Finds section.)
Evidence For Rhododendron Wood
Local information suggests Rookley also worked a mine or mines along the Blackborough end of Rhododendron Woods. We have the following information to refer to, thanks to Eric's replies to my enquiries on Social Media:
"My dad Wilf Bird was 99 when he died 9 years ago (as of 2024) so would have been walking to school past there in the 1920s when John was still mining along the Rhododendrons."
"My dad used to walk past his mine on the way to school (now the village hall) from Sainthill daily and would sometimes stop and talk with him. John was a staunch methodist as were all his family. My gran used to take whetstone on a pony and trap to Taunton for John."
"Dad would have walked up from Sainthill (they lived at Prospect House under the hill which later became derelict) to what I have always called the Rhododendrons along the path/bridleway and used to pass his mine along there, and then on down to school which is now the village hall. That is the only location he told me about."
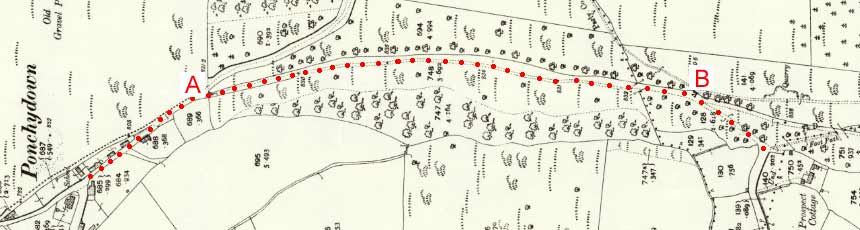
Old map of Rhododendron Wood, showing path
The old map above shows how the young Wilf would have got from Prospect Cottage to school in Ponchydown (as that part of Blackborough was then known), via the miners' path through Rhododendron Wood.
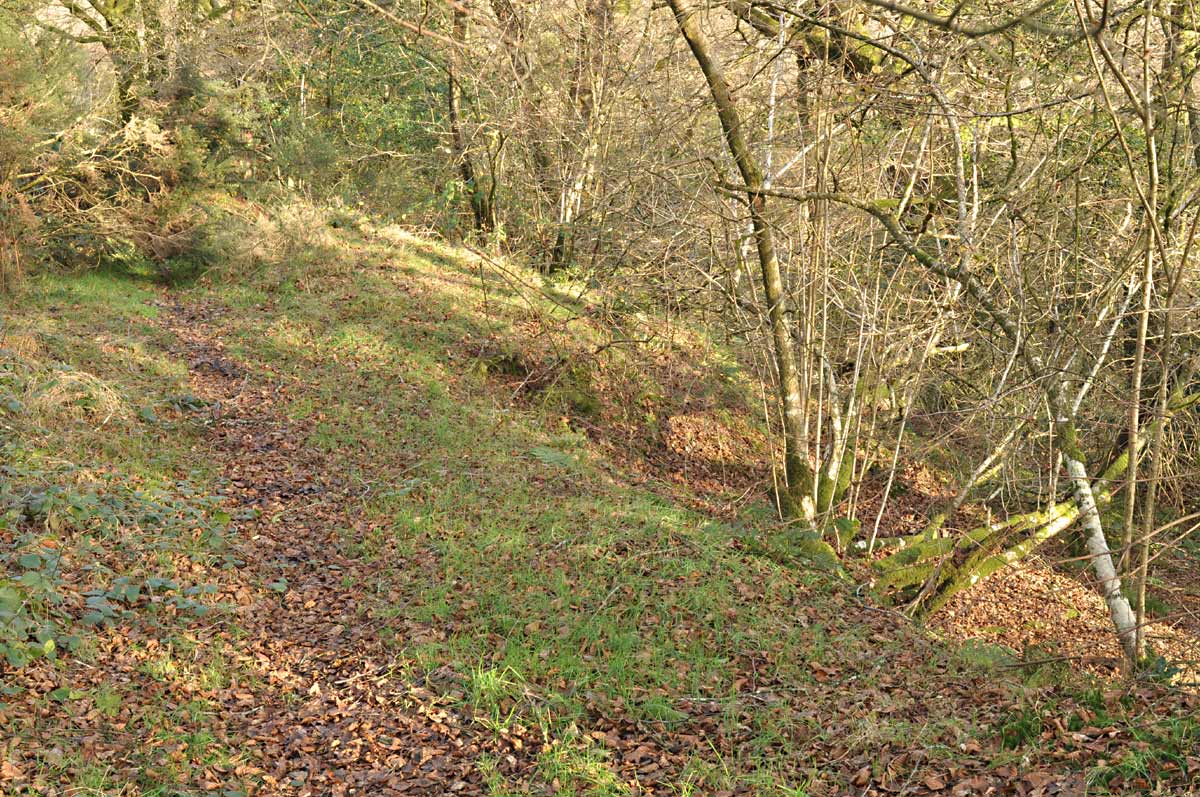
There are now more pathways through the woods than indicated on this old map, presumably tracks made to aid forestry work, but back in Wilf's day, it would appear that the marked path was the only route he could have sensibly taken. The section between points A & B is where his route took him along the track the miners used and where evidence of many old workings can be found; it would seem that John Rookley worked a mine somewhere between those points.
This region of Rhododendron Woods was extensively mined early on in the area's mining history, I'm guessing in the 1700s, so most of the entrance remains are barely visible, having merged back into the escarpment into which they were dug. At some point in the past but after the original mines were abandoned, a boundary bank was constructed using waste sand and rock from the mines. It was built along the side of the track at the base of the upper part of the escarpment, and across the old disused mine entrance cuts.
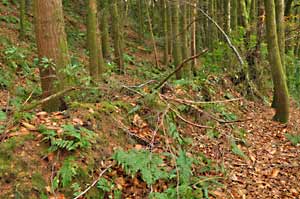
Photo 10 |
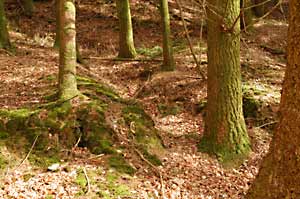
Photo 11 |
Photo 10 shows a section of the old boundary bank, construction date unknown but pre-1900 as it appears on old maps; it was built across the entrances to most of the mines here, so presumably they had long since been abandoned when the bank was built. Evidence of old mine entrance cuts can be seen going into the escarpment here, some just visible in the high resolution image.
Photo 11 shows the entrance cut of a mine which was worked some time after the building of the boundary bank, a gap being dug through it to allow level access to the mine for wheeling barrows in and out.
I have identified three locations between points A & B where mine entrances have been created after the building of the boundary bank, each mine entrance being cut through the bank so evidently post-dating it; any one of these could have been a site where Rookley worked, although the one shown above is by far the best preserved and so possibly the most recent. Mentioned in communication on Social Media, the location of one of John's mines was at "Blackborough end of Rhododendron woods near the lane down to Sainthill", which is exactly where this entrance is.
I'll continue to look into this fascinating aspect of local history and will update this section if more evidence comes to light.
The Whetstone Mines: Associated Finds
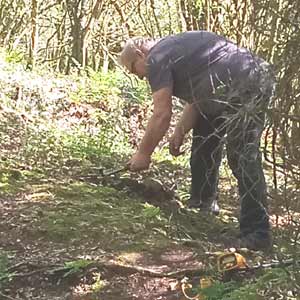
Me, digging
It's possible to find various artefacts left behind from the mining activities if you know how and where to look, but do get permission and remember that anything found belongs to the land owner even if there is public access to the area, so ask before you take it home.
This section details the artefacts I've found while examining certain mining areas, or ones that have come to light thanks to people getting in touch with me. It's highly unlikely that any artefacts found around the old mine workings would amount to treasure, but if you find something unusual perhaps contact the local Historic Environment Records officer as it could be of interest from a local history perspective.
Locations of any items I've excavated include a depth below the 'original sand surface'. In all areas there has been an accumulation of rotting organic matter since the miners left which is of variable thickness but can amount to several inches in places, so depths of finds have been measured once the variable organic layer has been removed to reveal that original sand surface left from the mining activity, this providing a reliable and meaningful reference level.
Unfinished & Broken Whetstones
Bits of broken, unfinished whetstones, although uncommon, are the most likely artefacts to be found around the mines; some whetstone pieces can look rather like random bits of sandstone, but their identity can be confirmed by shape and sometimes the presence of tool marks.
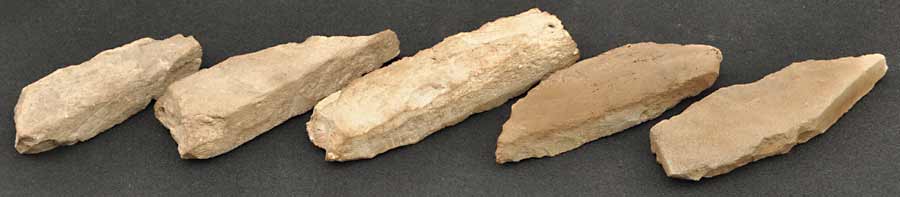
Photo 12
Selection of unfinished broken whetstones discarded by the miners
While the cutter was carving scythe stones, he'd produce lot of waste material consisting of sand and rock chippings, analogous perhaps to the debitage of a Mesolithic flint-knapper. This accumulated pile of waste I'll refer to as a 'cutter's pile', and such piles can be found a short distance from the mine entrance or on the sides of the entrance gully, depending on where that particular cutter chose to work.
Occasionally the cutter would accidentally break one of the soft stones he was carving, and no doubt after a bit of colourful language he'd throw the pieces down with the rest of the debris and begin work on the next piece. Only unfinished broken stones are found around the mining areas, occurring in various stages of completion but in all cases roughly-shaped, as any complete unbroken stones were of value and were taken away for final dressing, before being sold.
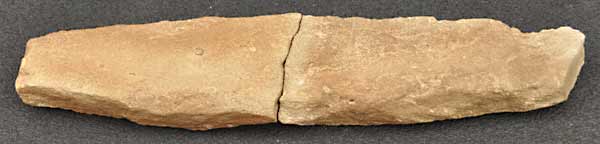
Photo 13
Both halves of a rough-hewn broken whetstone
Photo 13 is unusual in as much that I was able to recover both halves of this broken stone from a cutter's pile, which presumably broke early on in the carving process judging by the very rough shaping. It is uncommon to find both halves of a stone as the bits would have been casually thrown onto the waste pile or even down over the spoil heap, usually to end up some distance apart; in this case, the pieces were found around a metre apart and buried about 15cm under the chippings and sand of the pile which I had carefully excavated; when fitted together this unfinished stone is about 28cm long.
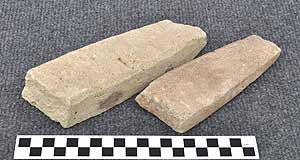
Photo 14 |
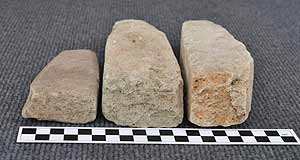
Photo 15 |
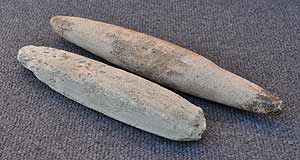
Photo 16 |
Photo 14 shows a couple of whetstone pieces which have had the surfaces dressed and have bevels on the corners, suggesting they were broken during final dressing. They originated from the site of an old demolished house immediately below the mines in Blackborough.
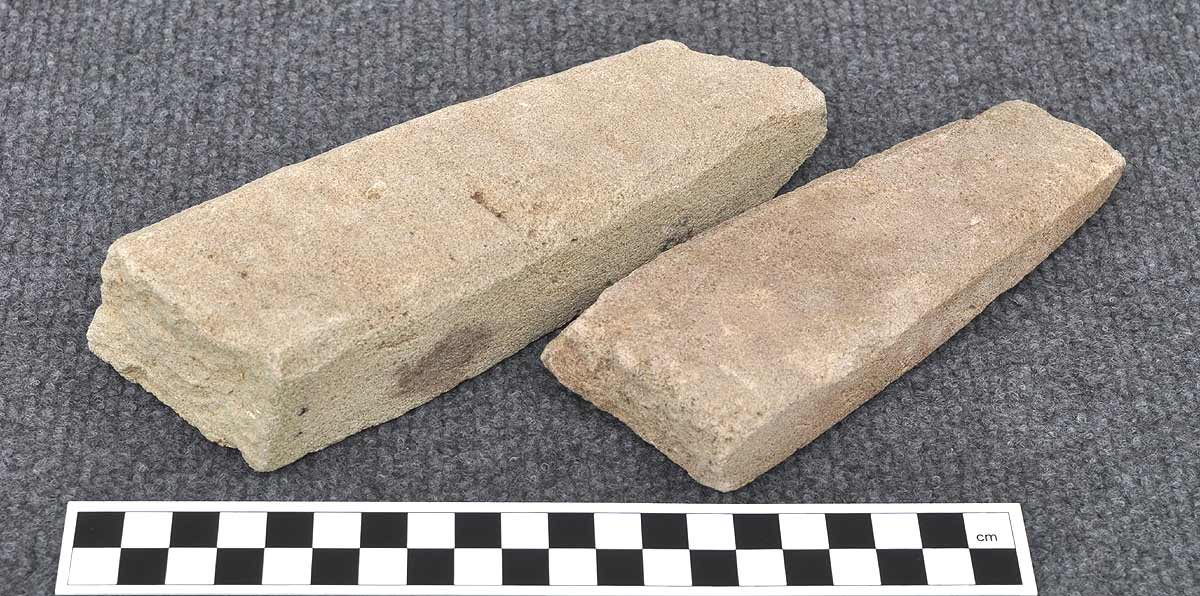
Photo 15 shows how the dimensions of the scythe stones vary. Some are almost square in cross-section, while others are rather flatter. It is assumed that only scythe stones where made here, but perhaps the thinner, lighter whetstones where sold for sharpening smaller tools such as sickles or even knives.
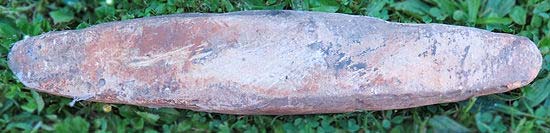
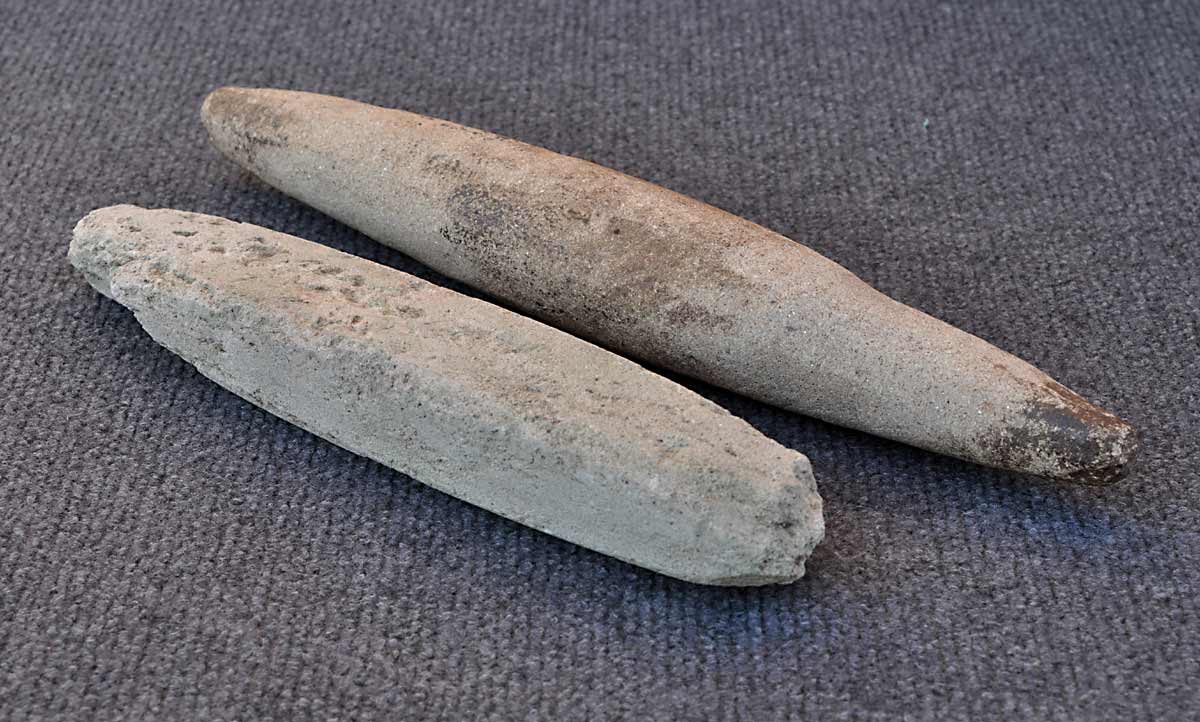
Photo 16 shows a pair of scythe stones; the shorter is a Devonshire Batt almost complete, made in the conventional rectangular style but possibly rejected late in the dressing process due to voids in the stone. The longer one is a cylindrical stone I acquired in the Honiton area, origin unknown. Fitton mentioned that some cylindrical stones were produced, but I've yet to find evidence of a broken part-finished cylindrical stone around the mines; all have been rectangular.

Photo 17 |

Photo 18 |

Photo 19 |
Photo 17 Tool marks can be seen on some of the whetstone pieces if viewed under the right lighting, produced as the stone was worked with a basing hammer; the marks are quite prominent on this example, showing how the cutter 'shaved' material off as he shaped the stone.
Photo 18 An unfinished whetstone showing a large void; voids are quite common in the sandstone from this region and the existence of a void would render the prospective whetstone worthless. A defect such as this would make the stone weak at that point, and it seems that many broke during the carving process because of such cavities or other flaws in the stone.
Photo 19 Occasionally fossils occur within the sandstone and may be revealed as the whetstone was carved, as was the case with this trace of an ammonite. Such an occurrence was undesirable and would result in the stone being rejected: only a smooth unblemished surface was acceptable for a Devonshire Batt.
Basing Hammers / Basing Axes
The basing hammer, sometimes referred to as a basing axe, is a specialised tool used for carving whetstones from the sandstone concretions. It's interesting to note that according to Stanes (1993), no tool like this seems to have been developed in other whetstone mining areas around the country, making this tool unique to the area and as such, an icon of the whetstone mining industry around the western side of the Blackdown Hills.
We have this account, which describes the tool quite well: " (whetstones) were finally shaped with a strange tool, like a stout hammer with a double head beaten into blades." - Rev. Edwin S. Chalk (1910).
Historic texts suggest there was more than one version of the basing hammer design. Fitton (1836) wrote these comments: "He first, with the edge of his 'basing-hammer' splits from the blocks upon his knee, long portions...". He also wrote in the same paragraph, "...the stones are hewn to the proper dimensions with a large 'hammer'."
This account clearly mentions two different tools for carving the whetstones, and no doubt there were variations on these as the designs evolved over time. It is documented that these tools (and probably all the others the miners used) were made in Kentisbeare, presumably by generations of local blacksmiths who would have no doubt done a brisk trade with the miners up on the hill.
An Unused Basing Hammer?

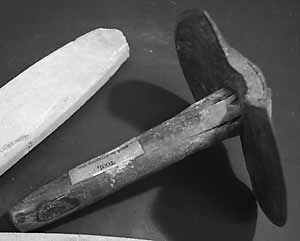
Photo 20 |
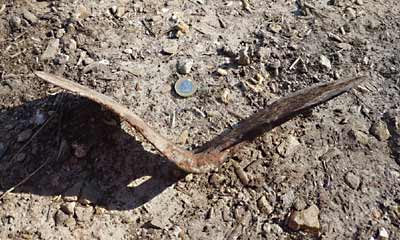
Photo 21 |
Photos 20 & 21 were supplied by Jon of Windy Smithy, and show what appears to be a design of basing axe or hammer, used by the miners to carve whetstone. This particular one is quite large measuring around 20cm across; this example, although evidently old, appears to have little or no wear.
This design is difficult to date, but the old photograph of the three miners featured earlier in photo 4 shows the cutter holding a basing hammer which appears to be very similar to this one, the date of the photo estimated as between 1860 - 1870.
It is unknown to me exactly where this tool came from but it came to light in the Blackborough area; judging by the type of rust, this had been kept in a dry shed or barn for a very long time and can now be seen in the display board by the churchyard in Blackborough village. If the right person reads this, I'd like to do a 3D scan of the tool and give it a coating of oil to halt any further rusting; please get in touch if you can help with this.
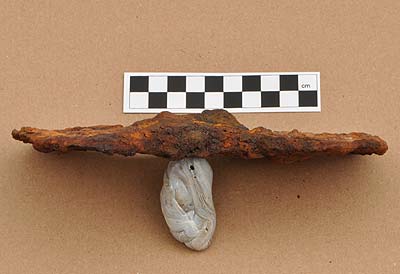
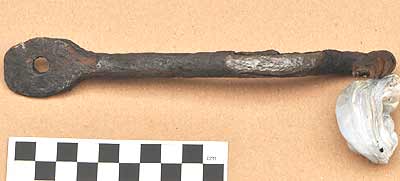
Small Basing Hammer
Artefact 1 |
Artefact 1 |
This tool was found about 15cm below the original sand surface of a cutter's pile, and what's left of it measures around 14cm at the widest point.

Detail of Rookley's basing hammer.
© RAMM
Note the broad iron wedge protruding from the underside which would have been driven into the wooden handle to secure it. In this case, the remaining wood around the wedge appears to have been replaced with iron compounds, a kind of fossilisation process if you like.
There was no evidence of a wooden handle when it was excavated, so it seems this tool was discarded when the handle broke; surprising really, as the head of the tool would have been the most expensive part by far.
As an observation, this tool appears to be of the same design and size as the one Rookley used, and even has the small seam in the metal near the handle hole, as Rookley's has which is pictured on the right; I believe it can be interpreted as the most recent of the basing hammer designs.
This artefact was carefully treated using electrolytic reduction for 10 days but there is little sound iron left in the blades so it is very fragile; it will probably remain in an anti-rust fluid for the foreseeable future to protect it.
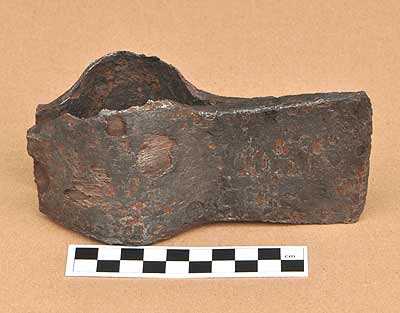
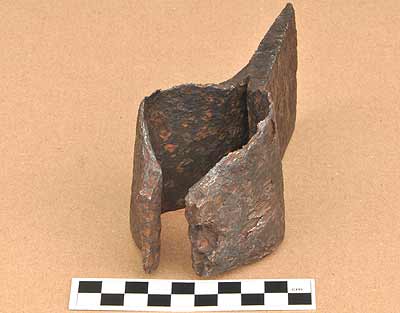
Flat Basing Hammer
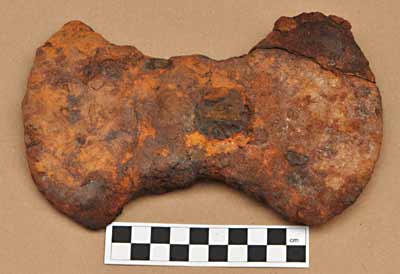
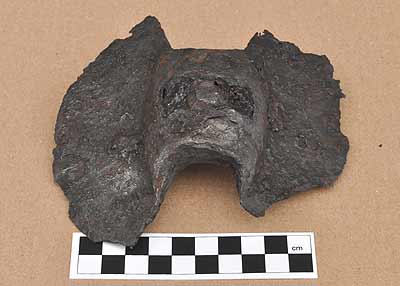
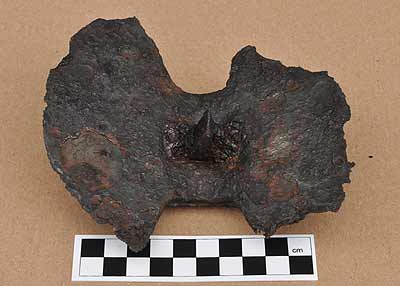
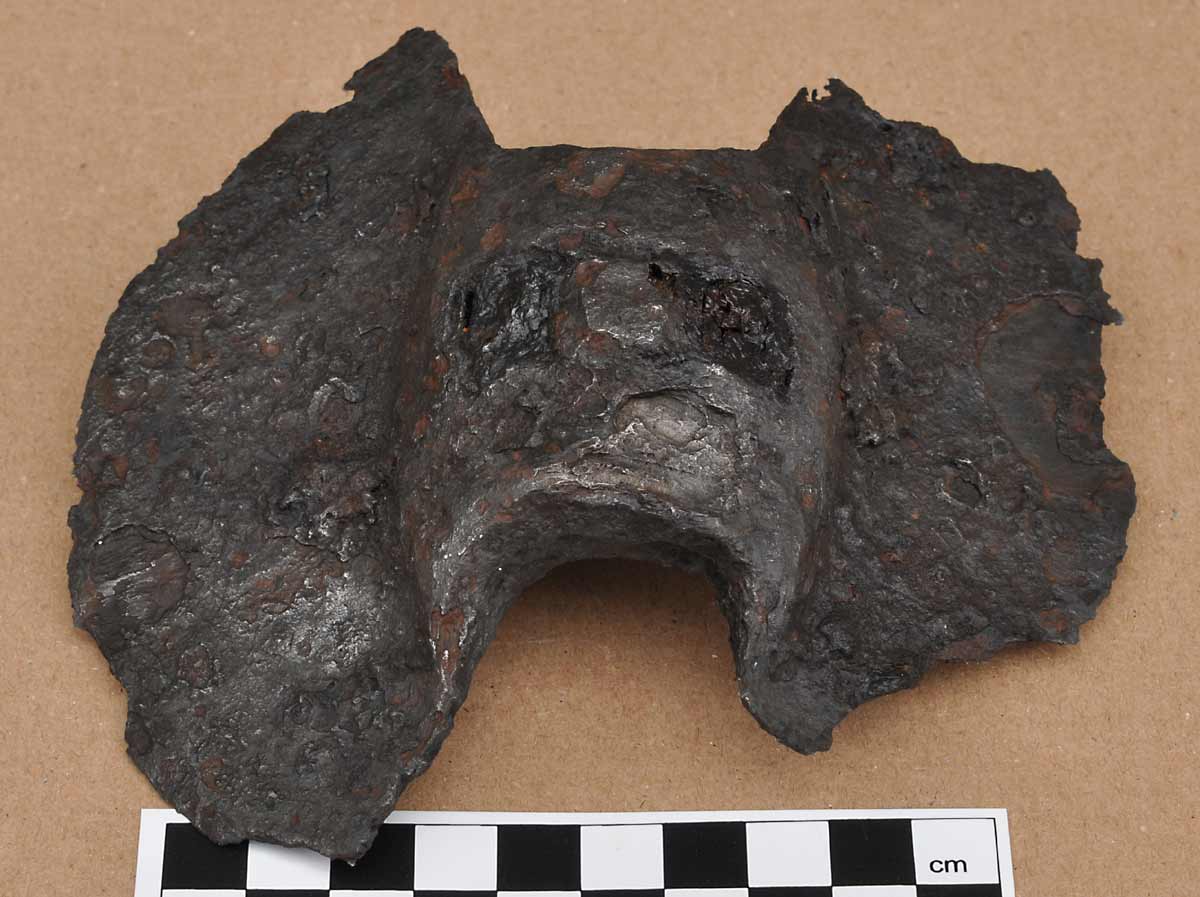
Artefact 2 |
Artefact 2 |
This badly corroded artefact appears to be the head of another basing hammer, of a different design to the previous ones; this one measures around 19cm across and the side view shows the tool is flat, without the slight downward curve seen in the previous examples. Although similar in shape to a double-headed wood axe, in this case the handle would have been fitted perpendicular to the flat surface.
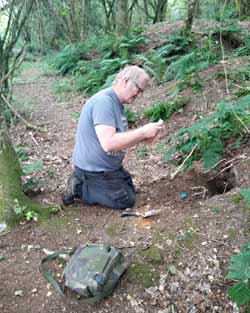
Me taking a soil sample
This artefact was found at a depth of around 25cm under a heap of dumped sand to one side of a mine entrance, with a significant 'halo' of rust-coloured sand surrounding it. It would appear from examining the area that when the mine was first being dug, a few barrow-loads of waste sand were dumped to one side of the entrance before the main spoil heap location was established, and it was in this heap that this tool was found, suggesting it dated from around the time of the opening of the mine and is of considerable age.
This design of basing hammer doesn't appear in any drawings or photographs I'm aware of, suggesting it may date from the early 1800s or before, the badly corroded state seemingly confirming this. I did test a sample of the sand this basing hammer was buried in, which had a pH of around 4·5; iron artefacts don't do well in such acidic environments, but the corrosion on this tool is far more advanced than any other ferrous artefacts I've recovered, suggesting it is by far the oldest.
This artefact is extremely fragile, and while gently cleaning off the adhering sand and loose rust a piece broke away showing that there is no iron left at all in the blades, they are composed entirely of corrosion products. Gentle magnet tests showed there is some iron remaining in the central part, but that's all. I have attempted to preserve it by soaking to remove salts, thoroughly drying it and impregnating it with an anti-rust compound; only time will tell if this is enough to stabilise it.
Many hundreds, perhaps thousands of basing hammers must have been made over the time the mines were operational, and yet I only know of four examples: the two badly corroded ones in my care, the one in the Blackborough notice board and the one in Exeter Museum, so where are they all? No doubt many became worn or damaged and were discarded, to be buried under tons of waste sand; however, many must still survive, perhaps unrecognised and rusting in sheds and barns around the area.
If you happen to have, or know the whereabouts of anything that could be a basing hammer or basing axe, please get in touch so I can arrange to have a look, take measurements and photos of it and record it as another surviving example.
Mining Picks

A pick is a tool often associated with mining, and whetstone mining was no exception. The design of pick used in these mines seems to be rather smaller than the two-handed pick usually seen today, and I suspect the smaller size would have made it suitable for one-handed operation should the miner choose to use it that way, and for use in confined spaces.
The broken picks so far recovered seem to have been forged in a similar way: I have been informed that the hole for the handle was likely made by the blacksmith splitting the middle of the bar of iron he was working with, and gradually forging that split into a hole of suitable dimensions for the handle. The artefacts recovered so far show evidence of this method of manufacture.
Pointed Blade of a Miner's Pick
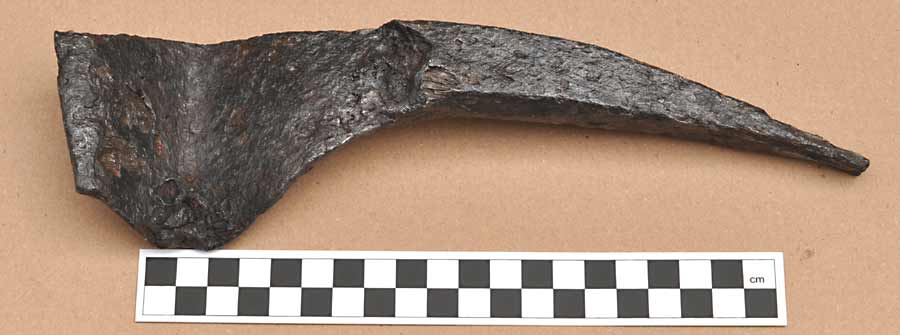
Artefact 3
Part of a miner's pick
This is half of a miner's pick measuring 26cm in length, and not only has one end broken off, but it's taken half of the handle hole with it; the way it has broken gives us clues as to how the blacksmith may have formed the tool. Looking at where the iron has broken also suggests this had a vertical blade on the missing half.
I saw part of this protruding from a cutter's pile and after careful excavation was able to withdraw it; unfortunately metal detecting the area didn't recover the other half. This item spent just over a week being carefully treated in an electrolysis cell to recover as much of the artefact as possible, with excellent results.
Vertical Blade of a Miner's Pick
Artefact 4 |
Artefact 4 |
This is another part of a miner's pick, this time the short vertical blade without the spike; unfortunately the missing part of this wasn't found either but it's reasonable to assume it had a pointed pick at the missing end judging by the fracture detail. This part is about 14cm long and again shows how the blacksmith may have made the tool.
This artefact was discovered at a depth of around 20cm below the original sand surface, on the top of the bank on one side of an entrance's access gully. The tool's location suggests that the miner broke the tool and threw it up over the side and over time it got buried by waste thrown over it as the access gully was being kept clear.
This tool was treated for a week in an electrolysis cell with good success, as it had a lot of metal remaining; the handle cavity was filled with sand when it was excavated, with no trace of wood.
Miscellaneous Finds
This section deals with any finds, metallic or otherwise, which don't fall into the above categories.
Possible Forged Nail Or Wedge

Artefact 5 |

Artefact 5 |
Not the most exciting of artefacts perhaps, but this square-sectioned spike was left behind by the miners and was found around 8cm below the level sand surface outside the entrance to one of the mines. This component has no head, is also curved slightly and rather than tapering to a point, thins only in one plane, leaving a chisel-like tip; this suggests the possibility that this may have been a small wedge for some purpose.
Forged iron nails were made by the local blacksmith and would have been used in most of the wooden structures made by the miners, such as sheds and doors to the mines, and iron wedges would have been used to secure wooden handles to iron tools. It is unknown what this particular artefact was used for as there was no evidence of wood associated with it, but it was evidently dropped or discarded at the time the mines were in operation, and ended up embedded in the trackway as mining continued.
This small artefact was treated in the electrochemical cell for 5 days at a very low current of 5mA, and cleaned up reasonably well considering how corroded it was.
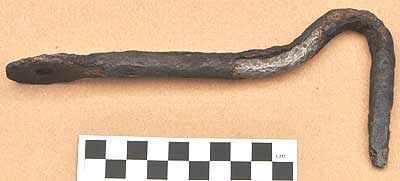
Retaining Latch
Artefact 6 |
Artefact 6 |
This iron component was dug out from the flat-topped area of a spoil heap from a depth of around 15cm below the original sand surface so was 100% contemporary with the mining activity. It was buried almost vertically with the flattened end upwards, which may have been because it was originally discarded or lost down over the slope of the spoil heap, to be later buried as further waste was dumped, which over time increased the extent of the spoil heap beyond the point where the artefact was deposited.

Maybe a latch for this purpose?
My first thought was that this could have been a field gate latch and nothing to do with the mines, but the flattened end with the hole is in the wrong plane for that, and in any case such a gate latch would usually have been formed by bending the iron around onto itself, forming a loop which would have been stapled to the gate.
At least some of the mines, it seems, had locked doors to prevent theft, and presumably also any sheds used to store tools and produce.
These mine doors would have needed a way to keep them open during use, as would the doors of any sheds the miners built, so perhaps this was used to secure them in the open position. The flattened end could have been slipped over a small bent spike driven into a wooden stake near the entrance, and the hook engaged with a loop on the door itself, very similar to the way doors are held open now.
This artefact was treated using electrolysis but didn't respond as well as hoped, as there appeared to be no conversion of the black rust layer in this case; in some areas this layer became detached, exposing the iron core but the original dimensions can still be determined. As with all the recovered iron artefacts here, this will now be kept coated in an anti-rust compound.
Mine Worker's Dumped Rubbish
While metal detecting along a substantial 130cm high ridge of sand and rock dumped to one side of a mine entrance on North Hill, I detected the presence of ferrous material. Around 12cm below the original sand surface there was a pocket of discarded rubbish around 20cm wide, extending a further 15cm or so into the sand, as if a hole had been dug and the rubbish placed in it, to be later buried as further sand and rock was dumped on the ridge as mining work continued.
The rubbish was made up of several flattened tin cans, many bits of broken bottles and jars, a small amount of broken flat glass and pieces of a single china plate, apparently heat damaged. I've not discovered discarded rubbish anywhere else around the mines, so the contents were carefully excavated, cleaned and examined to see if it had a story to tell, and if a date could be determined.

Artefact 14a |

Artefact 14a |

Artefact 14b |
The left-hand photo shows the only bottle which was still intact, identifiable as an ink bottle. It measures about 60mm high, with a diameter of around 44mm.
The middle photo shows the embossing on the base of the ink bottle, which reads SWAN INK MABIE TODD & Co Ltd. Useful information on the Internet is scant these days, but the bottle seems to fit with the WW1 or interwar years. Why would a miner take ink, and by extension a pen and paper, to the mines with him? I can only assume it was to keep records of some kind.
The right-hand photo shows the base of a piece of broken glassware, around 70mm across; it has a distinctive FMF logo moulded into it, which stands for the Food Manufacturers Federation. This organisation was founded in 1913 so from this we can at least determine that the rubbish was discarded some time after this date, with the mine having evidently been worked for a while after the rubbish was dumped.
Quite why this lot was dumped in one place and apparently at the same time is unclear; perhaps one day the miner decided that a messy mine entrance should be cleaned up. The mine appears to have been short-lived, but we know from this evidence that it must have been in operation some time after 1913; I believe it was a late reworking attempt, and judging by the relatively small spoil heap, was not particularly successful or long-lived, and must have been one of the last attempts to mine whetstone.
A Collection Of Lead
A piece of solidified lead, shown in the photos below and weighing 907g, was found at the same mine as the rubbish above, but in this case it was buried around 10cm below the original sand surface at the outer end of the entrance cut, apparently discarded, with mining operations evidently continuing for a while afterwards.

Artefact 15 |

Artefact 15 |
It appears that someone decided to melt some lead in a used tin can, presumably on a bonfire, as the underside of the mass clearly shows the shape of the tin. The mass measures about 72mm in diameter, the same as a standard modern tin can, and ranges in thickness between 15cm and 25cm including the thick layer of surface slag, suggesting the tin was slightly tilted when the lead solidified. The source of the lead is unknown, as is the reason for melting it.
However, near the centre on the upper surface is what appears to be the remnant of a small baked clay plug as fitted in the rear cavity of some lead bullets of the 1800s, suggesting it was bullets that were melted down. Bullets could indeed have been recovered from the spoil heaps above the historic Broadhembury rifle range, a couple of hundred metres north-west of this location.
One possible explanation for the presence of the lead is that the miner, struggling to make money by carving whetstones from the almost-depleted sandstone at a time when demand was falling anyway, decided to see if collecting bullets for their lead may offer a small additional income; it appears he abandoned the idea and discarded what little he'd collected.

Photo 22
Recovered bullets; 1cm graph paper for scale
Photo 22 shows a selection of the less damaged bullets I've recovered while metal detecting around the mine entrances above the rifle range, all badly corroded.
The top row has six large calibre unjacketed bullets, which although suffering from substantial corrosion have no signs of cannelures, so are most likely the .577 calibre bullets fired from a Pattern 1853 Enfield rifle musket.
The middle row shows what appear to be two handgun bullets, the first probably 9mm. The next two are unidentified round-nosed bullets, and the final three are steel jacketed bullets, probably .303 British, now badly rusted.
The bottom row shows a large .50 BMG bullet on the left. The next three are probably .303 British rounds, with the rest unidentified, the last two being of the boat-tail design.
Many of the bullets recovered had steel jackets such as the three shown; they gave a ferrous signature, exactly what I was looking for as I hunted for discarded tools, so each detection had to be dug, which proved tiresome after a while.
The large calibre lead bullets such as those in the top row in the photo weigh about 32g when complete, so nearly 30 intact bullets would have been required to make the amount of lead in this artefact, and they would have taken a fair bit of time and digging to find. I can only assume they were found directly behind the targets, wherever they may have been, as the chance of finding 'flyers' in the old spoil heaps without a metal detector would have been vanishingly small.
Visiting The Sites

A Bit Of A Warning
As the miners searched for the raw whetstone, they often excavated large galleries underground and once those areas became exhausted, the timber props were removed for re-use which allowed that part of the mine to partially collapse. In some places the collapsing voids have worked their way to the surface resulting in depressions and sinkholes in the ground above the mines.
Most mine collapses happened a long time ago and are probably stable; however, many cavities must still exist below ground and some are still in the process of collapsing, resulting in new sinkholes appearing from time to time; one such hole appeared overnight next to a caravan in 2024. It's wise to be careful when exploring these areas and to take someone with you because if you were to slip into one of these cavities, you may not be able to get out unaided and no-one would know you were there.
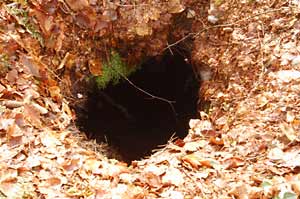
Photo 23 |

Photo 24 |
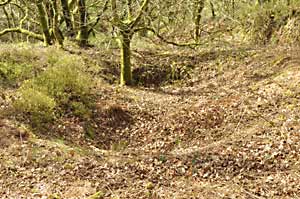
Photo 25 |
Photo 23 shows a hole open to the surface which was around a foot or so across and could pass for a badger hole, but when I stuck my head down it, I could see a cavity which appeared to be large enough to bury a small car, end up. The only reason the cavity wasn't fully open at the surface was because of the network of tree roots, which were supporting the soil and leaves: a perfect trap for the unwary.
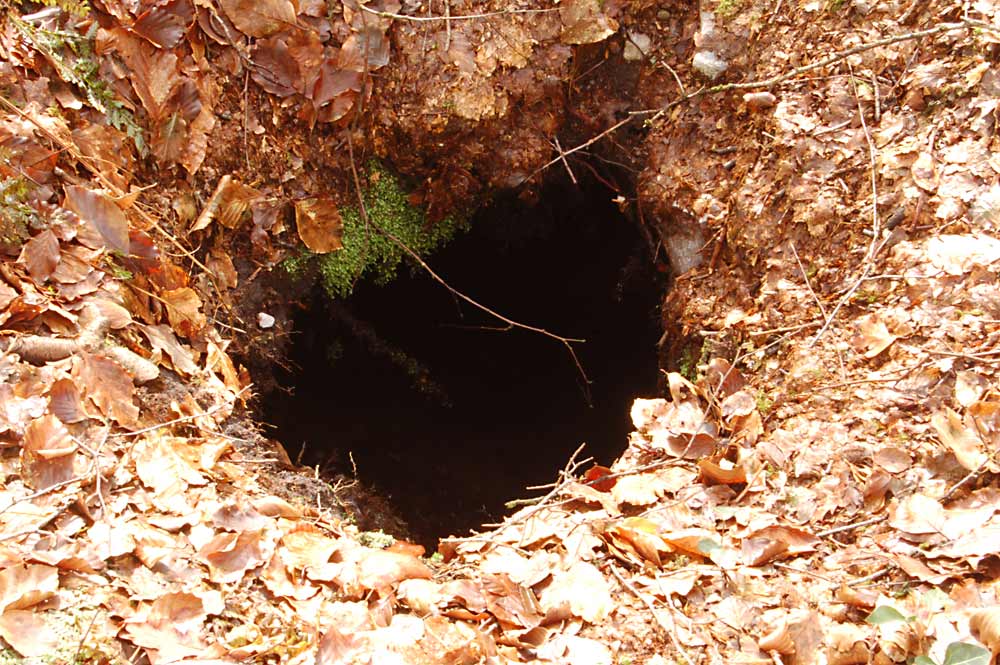
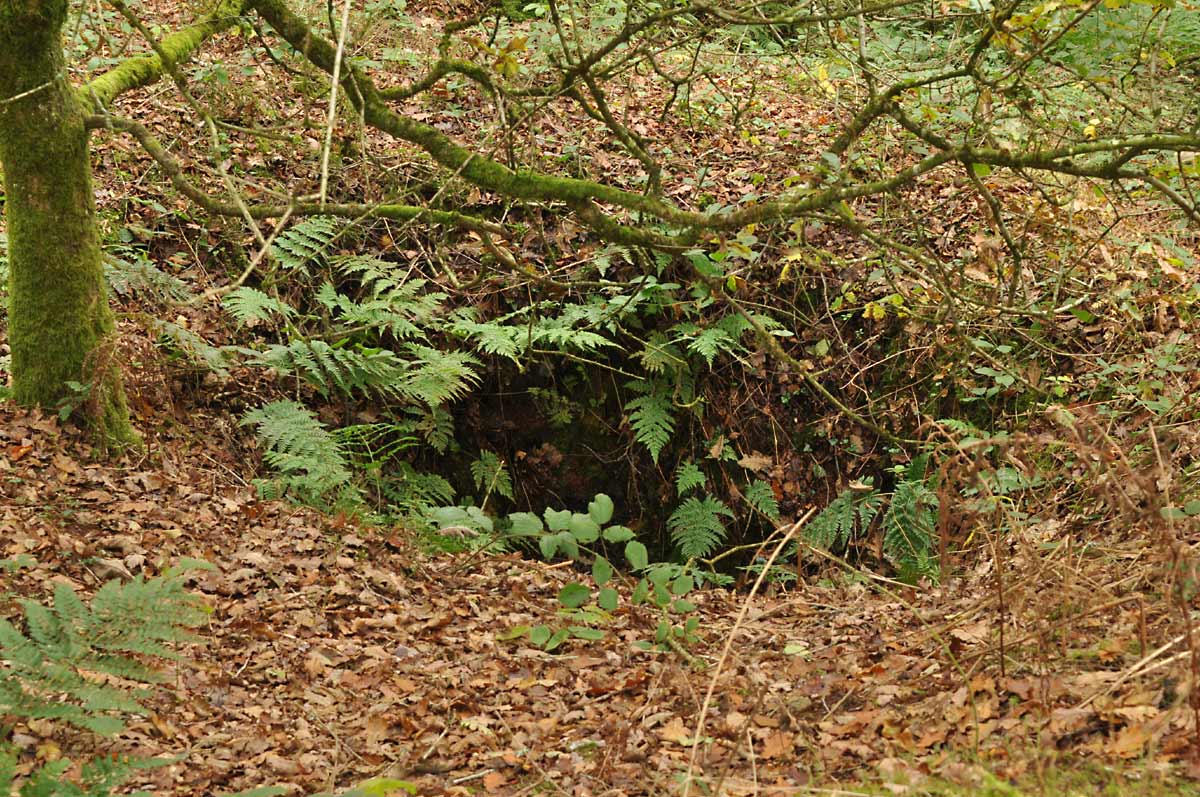
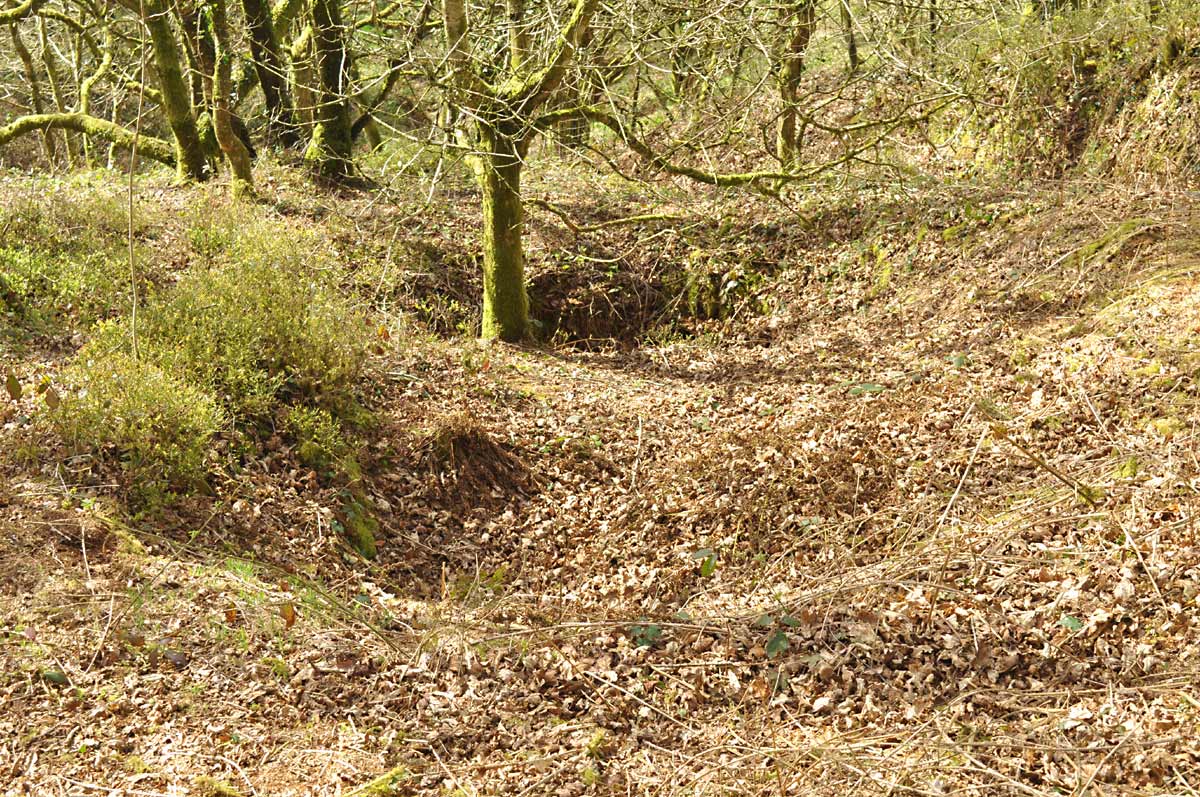
Photo 24 shows a large sinkhole, measuring around 10 feet across and a good 6 feet deep. Sinkholes like these occur in lines following the mine tunnels beneath, the result of collapsed galleries 80 - 100 feet below the surface; they are generally historic and are probably stable but you can't be sure, so areas like this are best treated with caution.
Photo 25 shows a larger area of sunken ground, evidence of the large mine cavities that once existed below.
The General Locality, And What To Look For
Whetstone mine locations
As far as I can determine, almost all of the whetstone mining occurred on the western escarpment of the Blackdown hills in an area stretching from the eastern side of Blackborough Common near Bodmiscombe continuously around the hill past Sainthill to North Hill and beyond, and intermittently around Broadhembury as far as the Hembury Fort spur, both sides of which were mined; the approximate areas of mining currently known to me are marked on the map in orange.
It has been reported that mining activity around this region was once so intense that the spoil heaps were visible from the Cullompton to Honiton road and the Exeter to Bristol railway as an almost continuous white line high up on the hill, and were "suggestive of a railway embankment" - Downes (1880). Looking at the mining locations on the map, the spoil heaps would certainly have been visible from the west and did, it is written, attract visitors who were keen to find out what was going on.
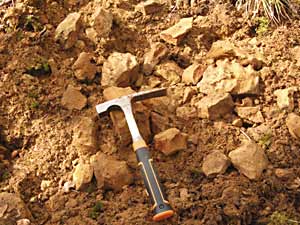
Freshly exposed spoil heap material
These spoil heaps are by far the most obvious evidence of whetstone mining to be found now; the material they are composed of is a light-brown rusty colour when freshly exposed due to the iron compounds resulting from the oxidation of glauconite.
However, when exposed to the elements over an extended period of time, the colour gets washed out, leaving a light grey sandy material which sparkles slightly in the sunlight due to the tiny crystals present within it; such spoil material would certainly have stood out on the hillside. These days the spoil heaps are covered with a good layer of dead organic matter, undergrowth, or both, meaning that the material they are composed of cannot readily be seen without a bit of work.
The tunnels cut into the greensand required extensive timbering to prevent them from collapsing but when a mine was abandoned, the timbering (a valuable resource) was removed for re-use and the tunnel allowed to fall into disrepair.
"No open entrance to the mines survives, they were deliberately collapsed according to local opinion."
- Stanes (1993).
The idea of intentional collapse could have arisen due to the methodical removal of the timbering, making the collapses seem intentional although it is possible that the collapsing of a tunnel entrance was hastened to make it safe, preventing accidents befalling curious children, for example.
Although the tunnel entrances have long since collapsed, in most areas the lead-in cuts for the tunnel entrances can still be made out although they are in a generally poor condition and some are now represented by little more than slight depressions in the ground.
These lead-in cuts are important features of the mine remains and pinpoint where the mine entrance was; trying to explain what I mean by a 'cut' isn't easy, so I've prepared the two following photos to illustrate the feature, by way of a 'then' and 'now' illustration.
|
Photo 3 (from earlier) |

Photo 26 |
Photo 3 is repeated again here as this particular photo nicely shows the horizontal cut going into the rising ground leading to the tunnel entrance proper, behind the miner; this is typical of a whetstone mine entrance.
Reproduced with permission:
Tiverton Museum of Mid Devon Life
Photo 26 shows a North Hill mine entrance where the cut is now all that remains, partially obscured by material which has fallen in over the sides, and where the ground immediately above the entrance has slumped down when the entrance supports were removed.
About The LiDAR Images Used Here
The following sections use images generated using LiDAR data, gathered by firing a laser at the ground from an aircraft, and measuring the time taken for the light to return from the target to determine the height of the surface at that point. This technology has proved to be invaluable to archaeologists, and has proved useful in my research into these old mines.
LiDAR data © Environment Agency copyright and/or database right 2022. All rights reserved.
Screenshots thanks to the National Library of Scotland
Mining Above Blackborough
Directions & Access
The best way to access the mines in this area is to park by the churchyard in Blackborough at grid reference ST 0943 0923, but be aware that this isn't a car park as such, so park considerately. Go up the track on the opposite side of the road which is a public right of way, then take the fork to the right to access the mines above the village. If you carry on up the hill instead, forking left by the wooden fence, this will take you past more workings to the north and east of the common, but be aware that although the track seems to get a lot of use, it's not a right of way and therefore you should get permission before entering.
LiDAR image of the Blackborough area
Details
Blackborough is generally accepted as being where whetstone mining began in this area, many of the miners and their families having lived in the houses in this hamlet once known as Ponchy Down. This was a busy mining area and the workings continue in both directions away from the village for a considerable distance.

Photo 27 |
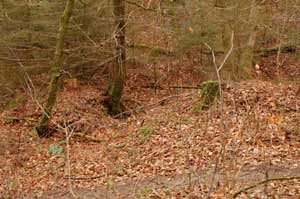
Photo 28 |
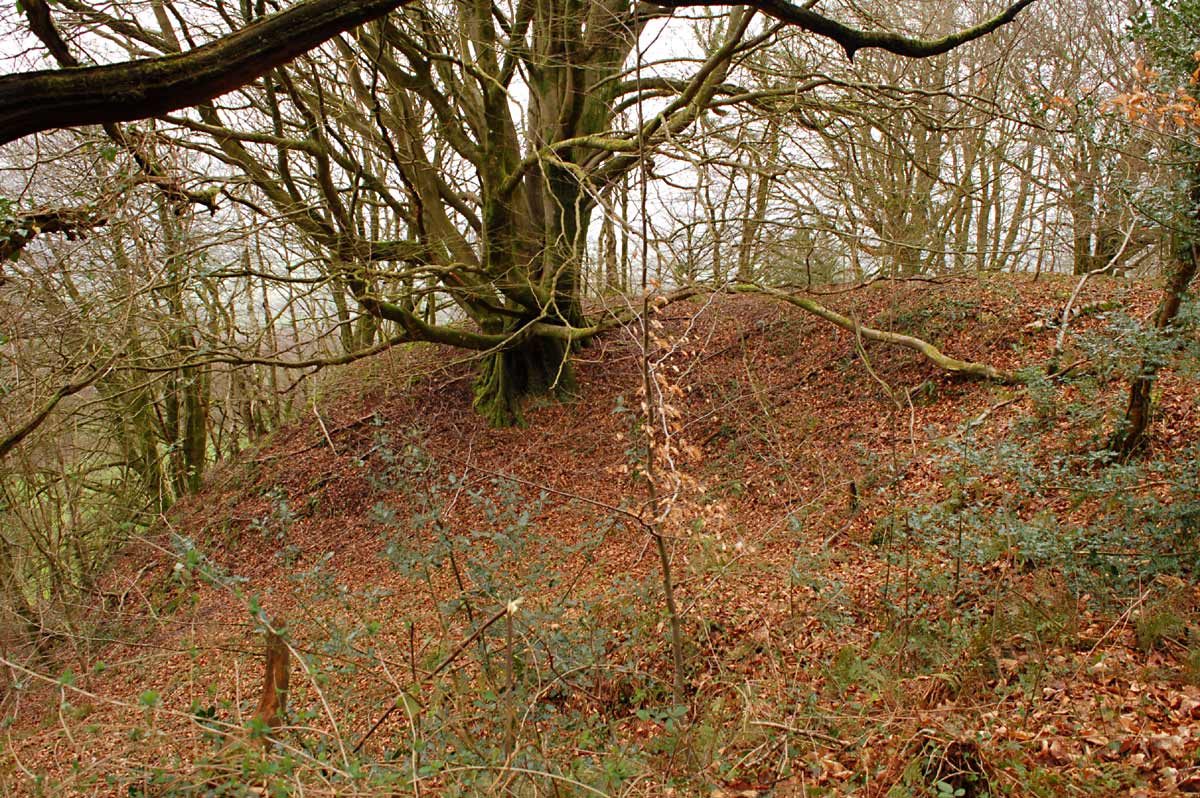
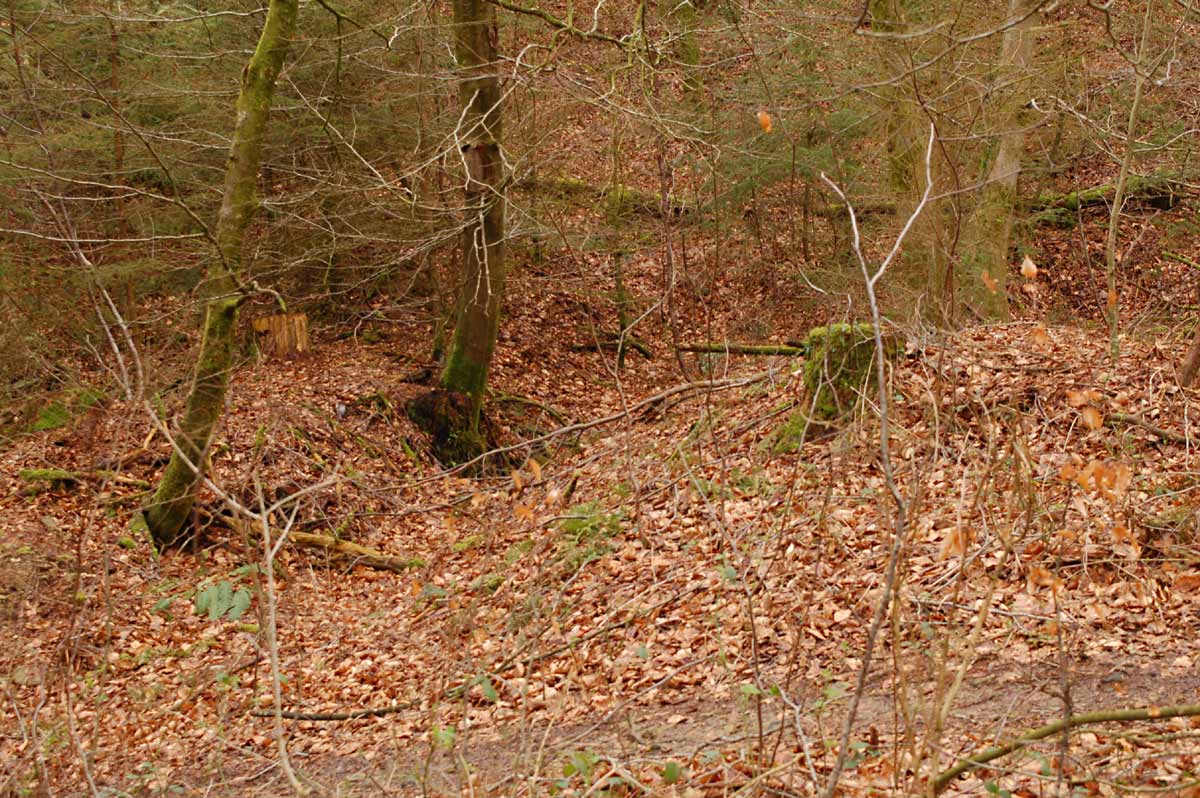
Photo 27 shows a particularly large spoil heap above Blackborough. There are several of this size up here, with the mature beech tree giving some sense of scale; considering all this material was dumped over the side using just a barrow, the amount of work this represents is mind-boggling.
Photo 28 shows a single lead-in cut for a mine entrance, the sides of which are easily visible; the tunnel proper would have entered the rising escarpment to the rear.
Mining In Rhododendron Wood
Directions & Access
The best way to access Rhododendron Wood is probably to park in the small car park (circled red on the LiDAR image below) at grid reference ST 0955 0686, which allows easy access to the bridle path through the woods which goes all the way through to Blackborough. The first half of the woods is owned by the Woodland Trust, the other half is in private ownership.
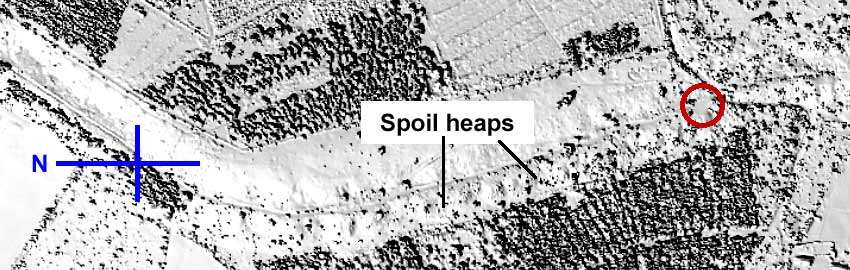
LiDAR image of the southern end of Rhododendron Wood
Details
There is good evidence of a geological bench here, but the track has been bulldozed to allow easy access for machinery and now provides a pleasant, level woodland walk, although in some places the track has been cut several feet lower than the original surface, leaving tunnel entrances and spoil heaps sitting quite a bit higher than the more recently cut track. A boundary bank has been constructed which blocks the mine entrances, so although it is old, the mines had been abandoned when it was built.
The remains to be seen here are generally in a very overgrown condition so are difficult to examine, although a few examples of the old entrance cuts can be seen towards the car park end. There is also evidence of secondary workings driven in below the original levels, evidenced by several collapses; this must have been a work of desperation, as the miners would have first had to tunnel through the old miners' waste heaps before reaching undisturbed ground, and the minor spoil heaps suggest they had little success. Perhaps it was a case of try, or risk becoming destitute due to lack of work and income.

Photo 29 |
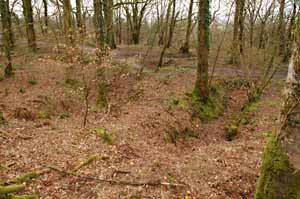
Photo 30 |
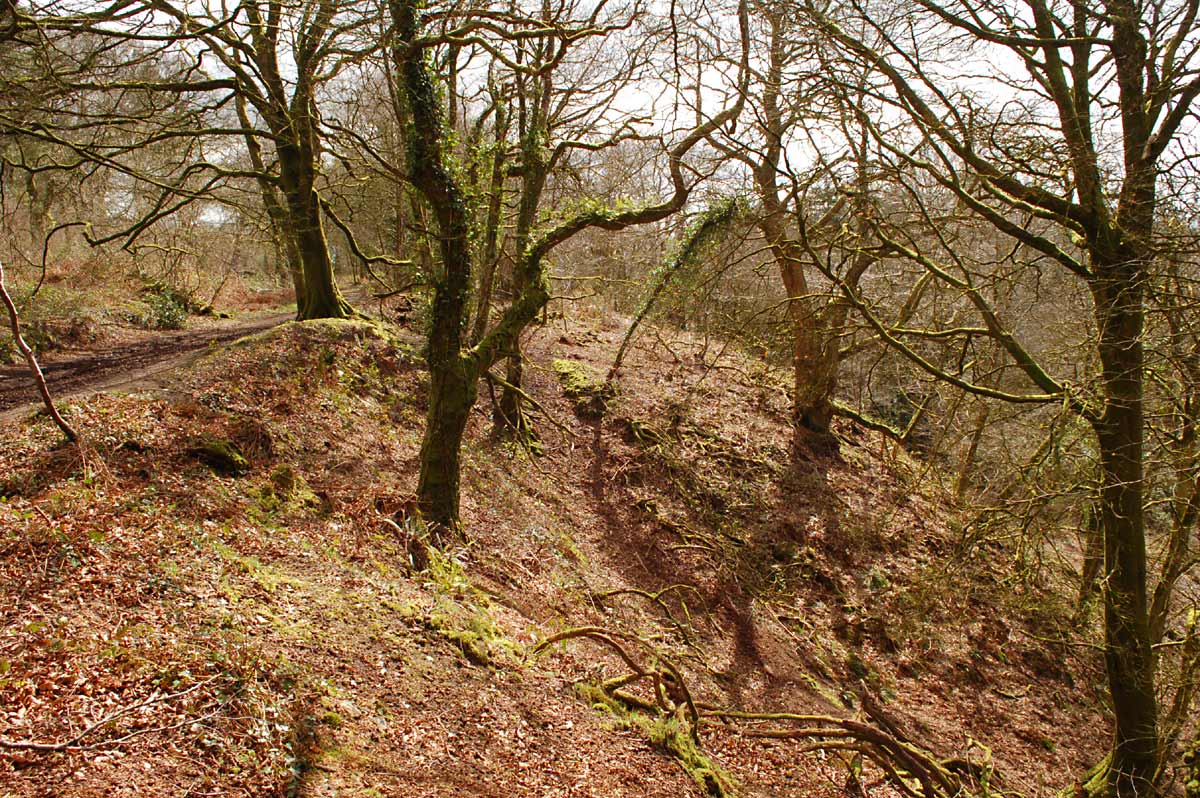
Photo 29 shows one of the spoil heaps, this one being fairly large. Mining activity seemed a bit sporadic along this path, as many of the spoil heaps are fairly small compared to those in other areas, suggesting less of the whetstone rock was to be found here.
Photo 30 shows the remains of a pair of tunnel entrances in reasonable condition, the sides of the cuts illustrating the presence of a level bench at this point. The entrances would have entered the escarpment near where I was standing, and an old boundary bank was built across the other ends after the mines were abandoned.
Mining Around North Hill
Directions & Access
North Hill is the name given to the large headland north of Broadhembury, most of which has evidence of having been mined. The best way to access a particularly interesting part of this area is to park in the small car park circled in yellow at grid reference ST 0971 0690, or park in the Rhododendron Wood car park (circled red) and walk a short distance up the road to this car park and take the bridle path going roughly south.
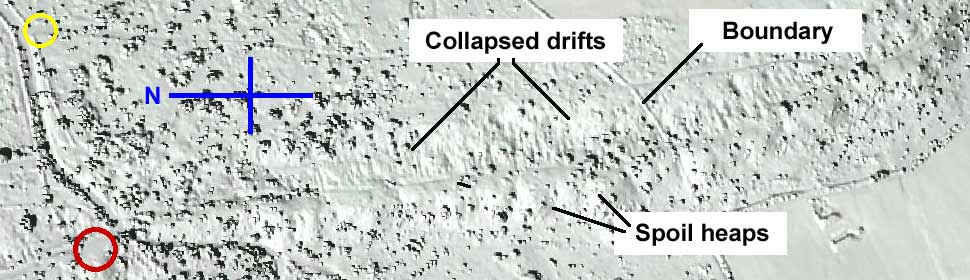
LiDAR image of the western escarpment of North Hill
Details
This area of woodland is bisected by a boundary hedge, with the northern part listed as common land, and the southern half owned by the Devon & Somerset Gliding Club.
From the car park, the wide bridle path goes roughly south which first takes you above the level of the workings in the northern end. Being common land, this implies that you can go down through the woods to examine the mine workings, but respect that the land is private owned.
The path continues on through the gate set in the ancient boundary bank at which point you enter the DSGC's property; permission is required to access this area, so stick to the bridle path. It drops down through the mining remains in the southern end where the earthworks can be seen without leaving the path, along with many areas of collapsed ground visible on both sides. The path finally climbs again, exiting the woods onto the DSGC's airfield.
This area of woodland is moderately overgrown and it seems no-one has used the old miners' track since the mining ceased, although it is marked as a footpath on old maps, presumably the legacy of a couple of century's use by whetstone miners. The remains of many tunnel entrances and spoil heaps can be seen here which seem to be generally well-preserved and many don't appear to have been disturbed since the mining days. Some of the best preserved entrance cuts can be found near the boundary bank, but some are difficult to see due to a good crop of bracken and brambles which cover them.
Throughout this region is an almost continuous line of mines and spoil heaps which roughly follow the 260m contour, but later reworking at the southern end has confused the area somewhat as many of the later mines had been opened above the old, and the spoil heaps from these, although not as big, tend to spill over the older workings. The creation of the bridle path in this area has also damaged evidence of some of the higher level entrances.
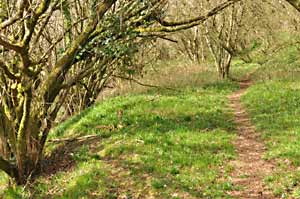
Photo 31 |

Photo 32 |
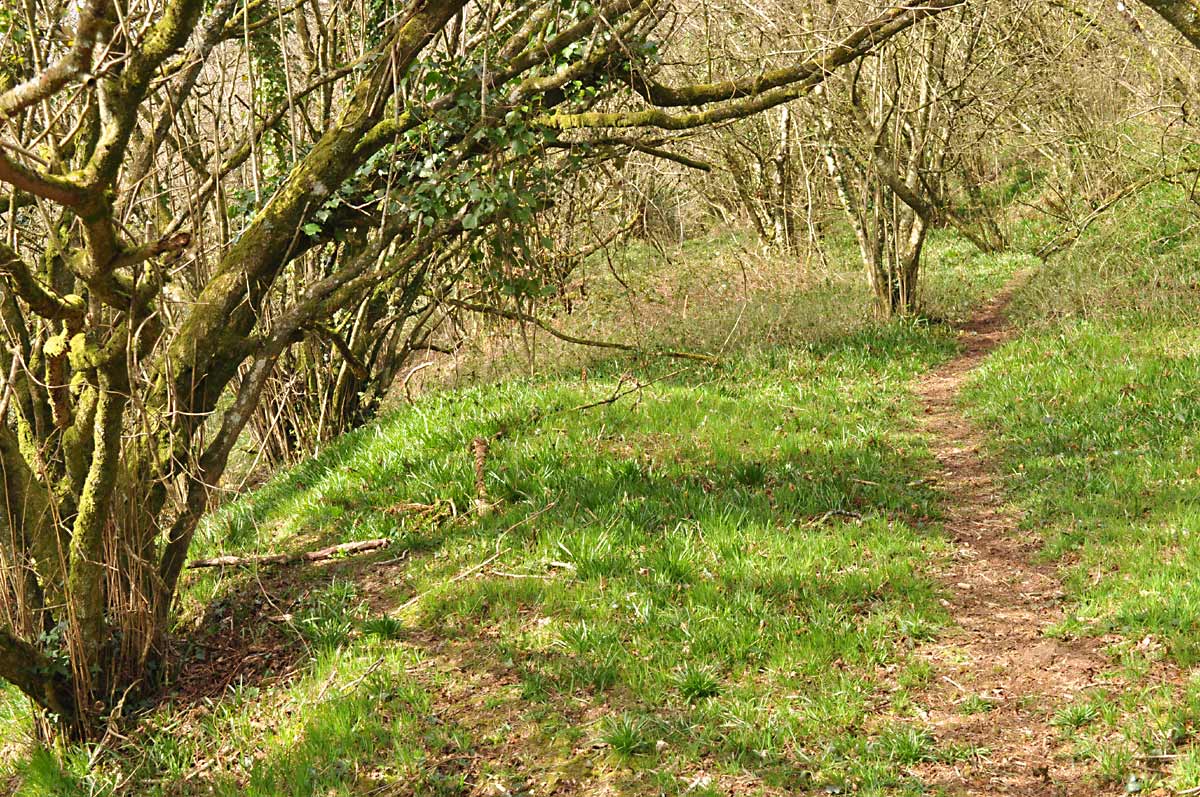
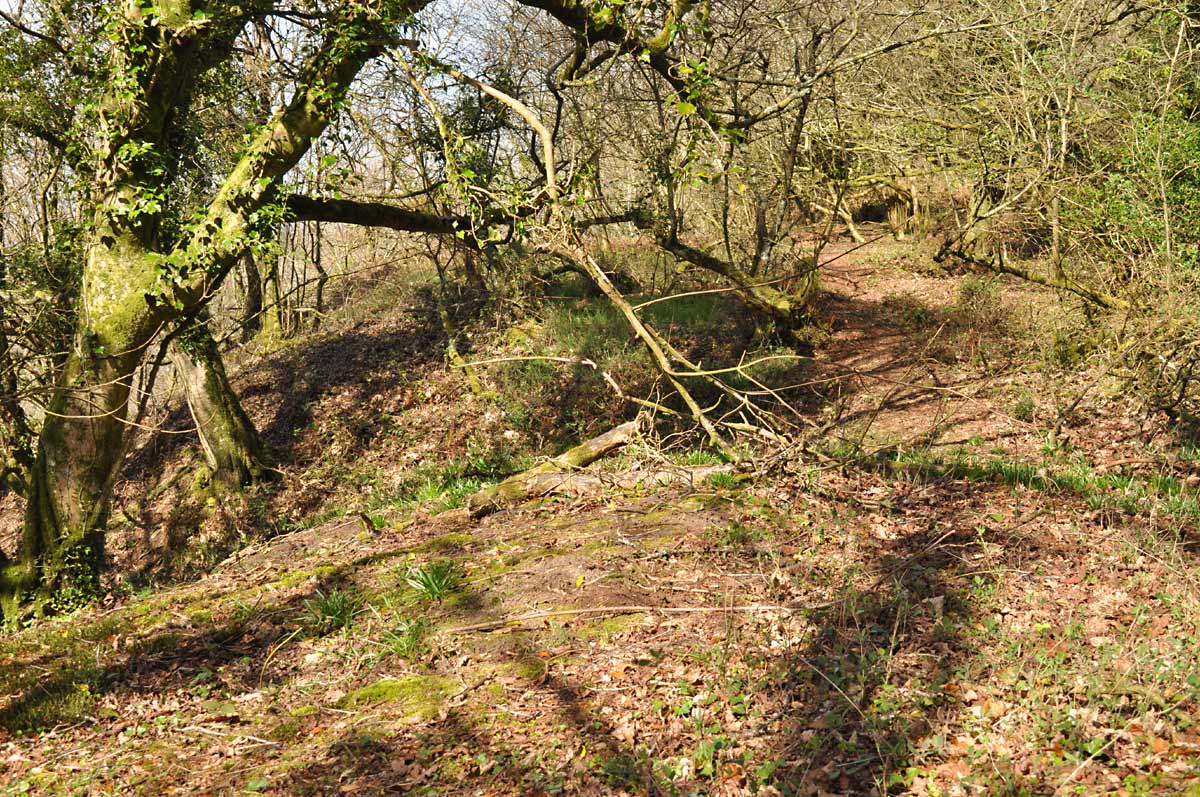
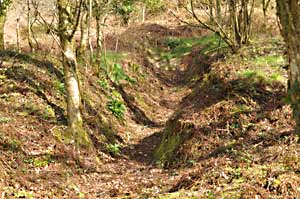
Photo 33 |

Photo 34 |
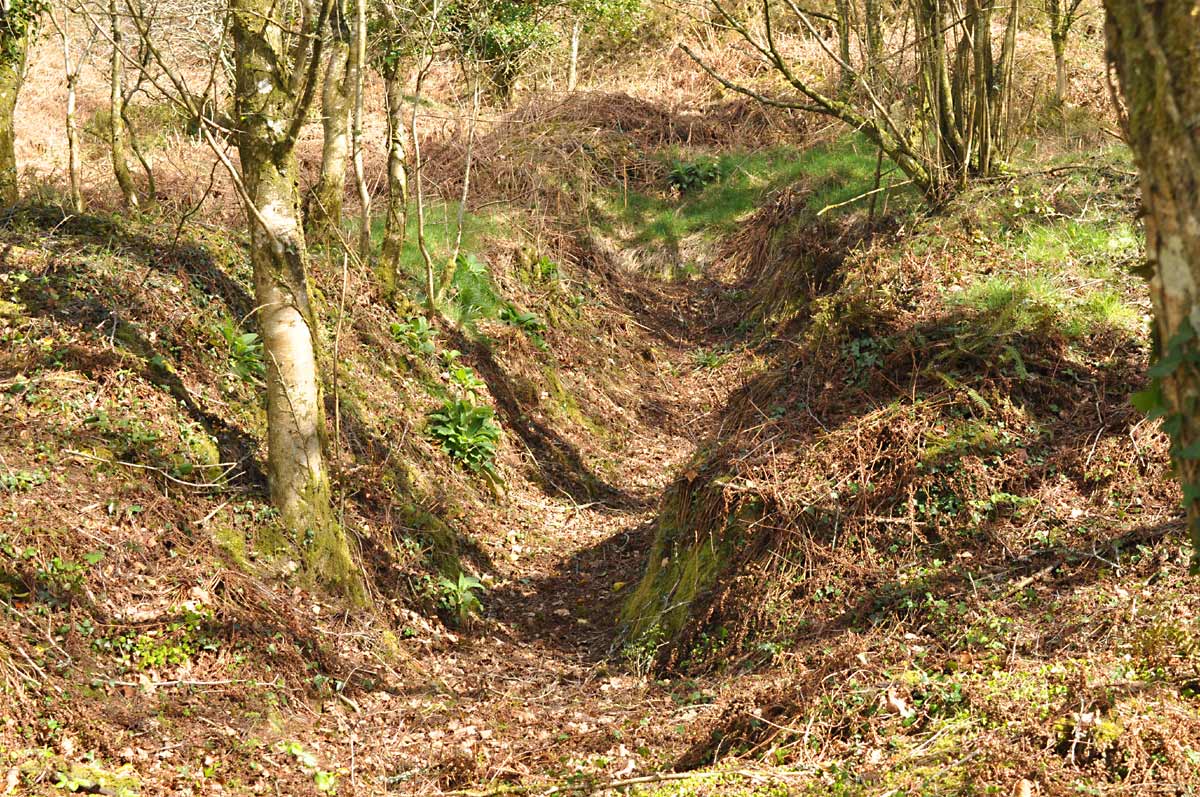
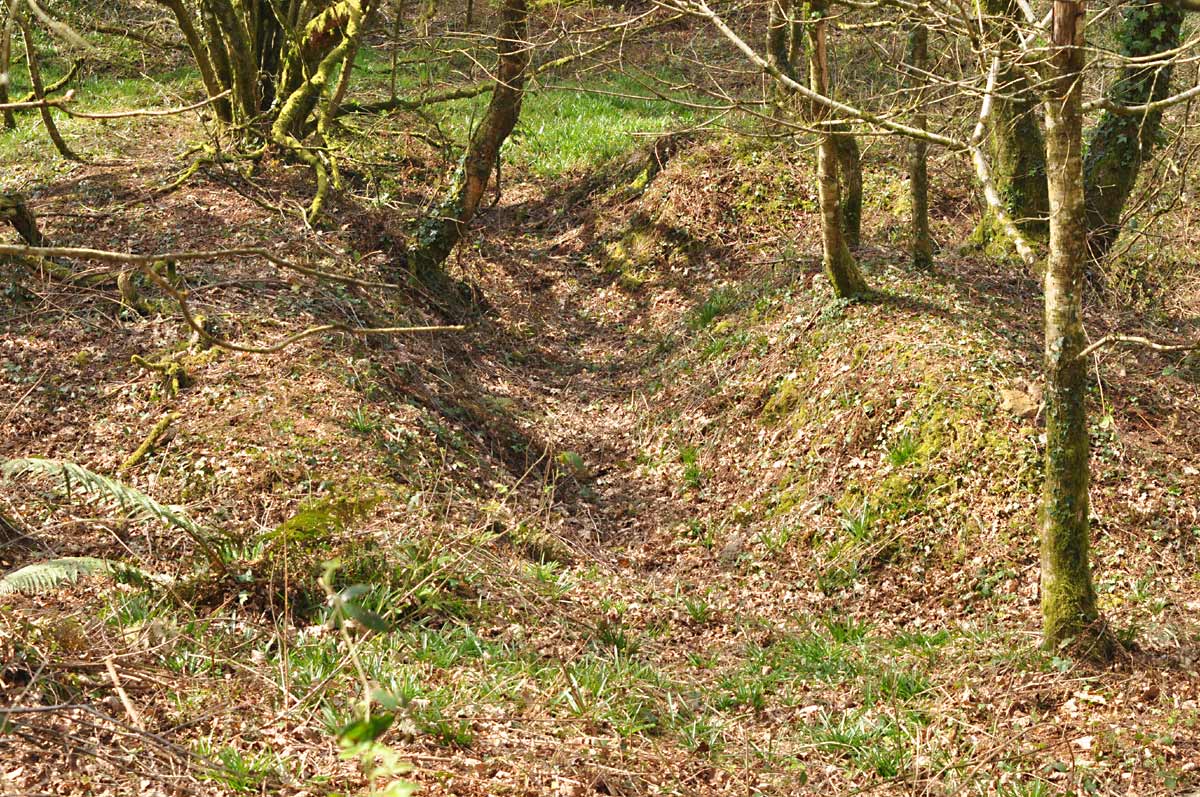
Photos 31 & 32 are shots along the 'sandbeds', the mine entrances being to the right and the spoil material dumped down over to the left. Although now pleasantly overgrown, when the mines were active, the dumped sand all around the hillside had no vegetation growing on it and was highly visible at a distance from the west.
Photos 33 & 34 show two of the many adit entrances, with the left-hand one being particularly well preserved. The entrances proper would have been at the far end of the cuts, but once the timber supports were removed, the ground immediately above the tunnel entrances slumped down into the cut, effectively closing off the mine.
Mines Around Hembury Hillfort Spur
Directions & Access
Park in Witness Moor car park at grid reference ST 1126 0352. There is an information board there with a route marked out, and by following this you can see some spoil heaps and if you look carefully, evidence of collapsed adit entrances can be seen; this all being to the west of the road.
If you cross the road and go down through the woods you can access the mining area to the east of the road, where the mining remains are much more in evidence; as far as I know there isn't public access to this part, but people do walk their dogs down there and I haven't heard of anyone getting shot as yet, but as always, I recommend you get permission.

LiDAR image of the Hembury Fort area
Details
Looking at the LiDAR map above, evidence of quite a bit of mining activity can be seen on both sides of the road with a few smaller workings continuing on the western side towards the right of the image.
Commenting on the line of spoil heaps visible: "More interrupted lines may also be seen in the escarpment facing Broadhembury, and the continuance of the same concretions may be traced by the refuse heaps in several other places." - De La Beche (1839). This presumably refers in part to the workings to the west of the road at Hembury Fort, and the date suggests many of the mining areas were worked concurrently.
Workings west of the road
This region features a fairly steep escarpment, and although there is a track through the woods, I don't believe there was a naturally occurring geological bench here. Although the few spoil heaps are fairly easy to spot, the mine entrances are in a rather poorer condition and easily confused with areas where the ground has sunk due to collapses.
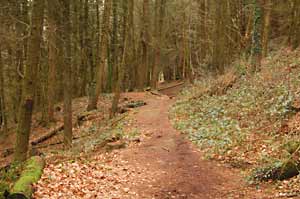
Photo 35 |

Photo 36 |
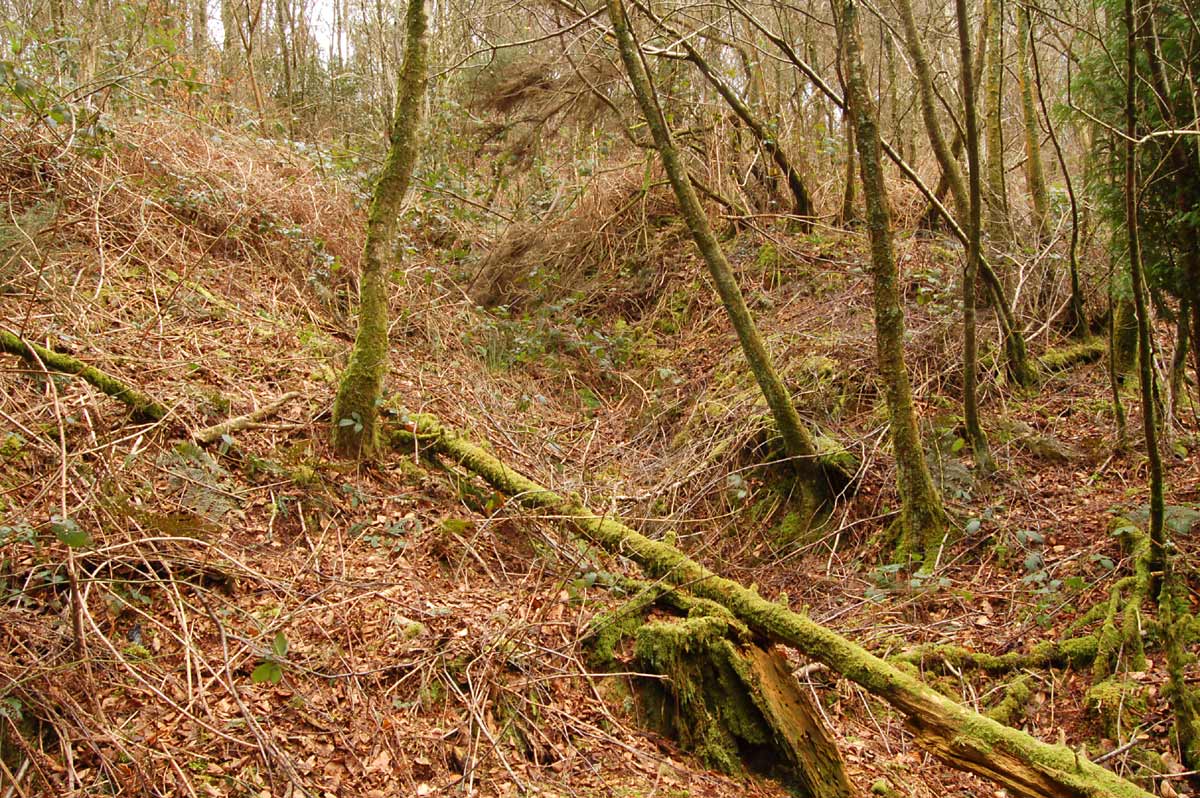
Photo 35 shows the track through the woods, with a spoil heap in the middle distance to the left of the track. Mines entered the hill on the right, but the remains are difficult to discern as due to the steeply rising escarpment, the lead-in cuts would have been short.
Photo 36 shows evidence of a tunnel entrance going into the hill, in this case being dug just below the track level as several are here. The associated spoil heap is small, as are most in this area, suggesting most of these mines were relatively minor operations.
Workings east of the road
This area shows evidence of a considerable number of workings, with many collapsed mine entrances indicating they worked the ground at two levels here; there appears to be no indication of a geological bench at this location and the slope of the ground is far gentler than the escarpment on the other side of the road.
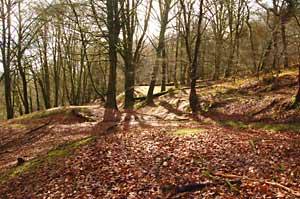
Photo 37 |
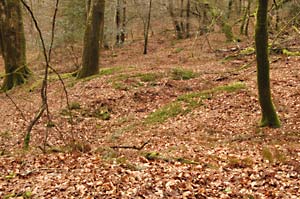
Photo 38 |
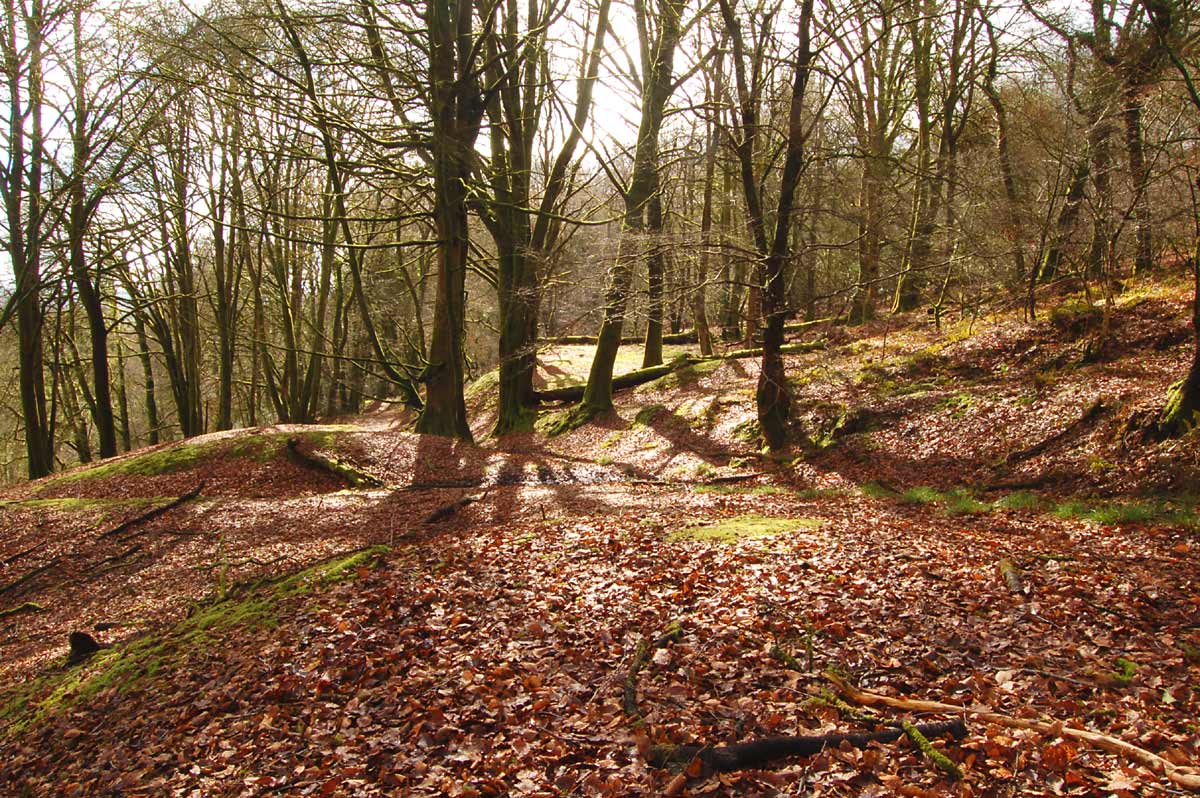
Photo 37 shows a shot through the woods, with several spoil heaps in evidence to the left, with the tunnels entering the hill on the right. There is a minimal accumulation of organic material in this area, meaning that in some places the spoil heap material can be seen on the surface, without the need to remove the moss and rotting organic matter first.
Photo 38 shows evidence of a collapsed mine entrance, with just the lead-in cut in the hillside remaining; this is typical of the condition of most of the whetstone mine entrances.
Workings Within The Ramparts Of Hembury Hillfort
Hembury Hillfort is an impressive iron-age structure, and since 2022 has been in the ownership of the Devon Archaeological Society. There is considerable evidence of attempts to mine whetstone within the fort's ramparts themselves, particularly the outer slope of the middle bank on the western side, taking the form of decayed entrance cuts and small spoil heaps.
The small workings here seem somewhat haphazard, lacking the organisation and scale of other workings in the area; I'm tempted to think that these attempts to mine whetstone were not the work of the original mining community of the Blackborough area, but rather local opportunists who fancied having a go at making some scythe stones, either for themselves or in the hope of earning a little money.

1874 sketch of Hembury Fort |

LiDAR image of Hembury Fort |
Referring to the 1874 sketch above, Peter Orlando Hutchinson wrote in his diary on August 24th 1874:
"The heaps and inequalities on the western side of the hill, at C and D, Miss Venn said, were where attempts had been made to dig scythe stones, as they do in the Blackdown hills above Kentisbeare. She mentioned the case of a man who took a year's lease for £10, of her late father, and luckily for him, (the man) he struck a good vein of stone, and took out £40 worth of scythe stones in a week."
Sketch and text reproduced with permission:
South West Heritage Trust & East Devon AONB
Evidence of the mining activity can be seen on the LiDAR image above right; judging by the minimal spoil heaps associated with the entrances, it would appear that the tunnels were very short, perhaps just a few metres at best, although there were a good many of them with perhaps as many as twenty individual excavations concentrated in the south-west quadrant of the fort's ramparts.
In other whetstone mining areas, the mines had to first be dug through a considerable amount of material which had been deposited down over the side of the hill resulting from many millions of years of erosion, before the miners were finally able to access undisturbed strata and the sandstone they sought.
In the case of Hembury Hillfort, the hard work had already been done during the construction of the fort's ramparts during the Iron Age, meaning that the sandstone could probably be dug directly from the bank of those ramparts, with little tunnelling required. It is possible that the outer slope of the middle rampart was completely denuded in this area, as the miners searched for seams of sandstone to excavate.
In addition to the numerous small excavations within the ramparts, I was able to identify the possible sites of four small mining attempts with minimal spoil heaps just outside the fort boundary, the tunnels, if any, extending inwards below the ramparts for a short distance. These are located broadly around the area marked 'D' on Hutchinson's sketch.

Photo 39 |

Photo 40 |
Photo 39: a moderate amount of debris appears to have been dumped in the fort's ditch in relatively modern times, this being interpreted as the waste material resulting from digging for whetstone in the slope of the rampart to the right, evidence of which remains and can be seen on LiDAR. This location is just north of the western entrance.
Photo 40: detail of the spoil heap material; any digging here is most likely punishable by death (or worse), but luckily the material which makes up these waste heaps is visible at the surface in places and can be seen to consist of some sand mixed with many sandstone chippings, typical of whetstone mine waste.

Photo 41 |

Photo 42 |
Photo 41 shows a very obvious accumulation of waste material filling what would otherwise have been a smoothly contoured bank and ditch at the south-west corner of the site. This material is interpreted as having come from the multiple small excavations in the rampart to the left, evidence of which can still be seen at the site and on LiDAR imagery.
Photo 42 shows an area of the outer ditch where the ground appears to have sunk slightly, along with part of the rampart; there is evidence of a collapsed mine entrance outside the outer bank at this location suggesting its collapsed tunnel may be responsible for this feature. This is around the area marked 'C' on Hutchinson's sketch.
Mines South Of DSGC Buildings
Directions & Access
This area of woodland has within it some smaller scale workings centred around grid reference ST 1080 0658. Note that this is on private property, and requires permission to access and certain restrictions must be adhered to if permission is granted.

LiDAR image of the eastern part of North Hill
Details
The image above shows LiDAR topography with five distinct spoil heaps being visible; each heap would have had its own tunnel entering the hill and there is evidence of collapsed ground further in following the lines of the tunnels. There are more workings immediately to the west and east, but these were outside the area I had permission to examine.
A point of interest is that the mines seem to have been worked in sequence, each time moving further west and higher up the hill judging by the way the later spoil heaps spill over the earlier ones; perhaps the miners learnt from the geology and adjusted location accordingly.
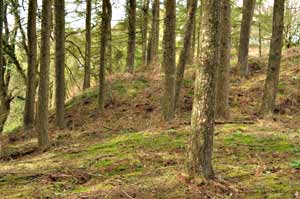
Photo 43 |

Photo 44 |
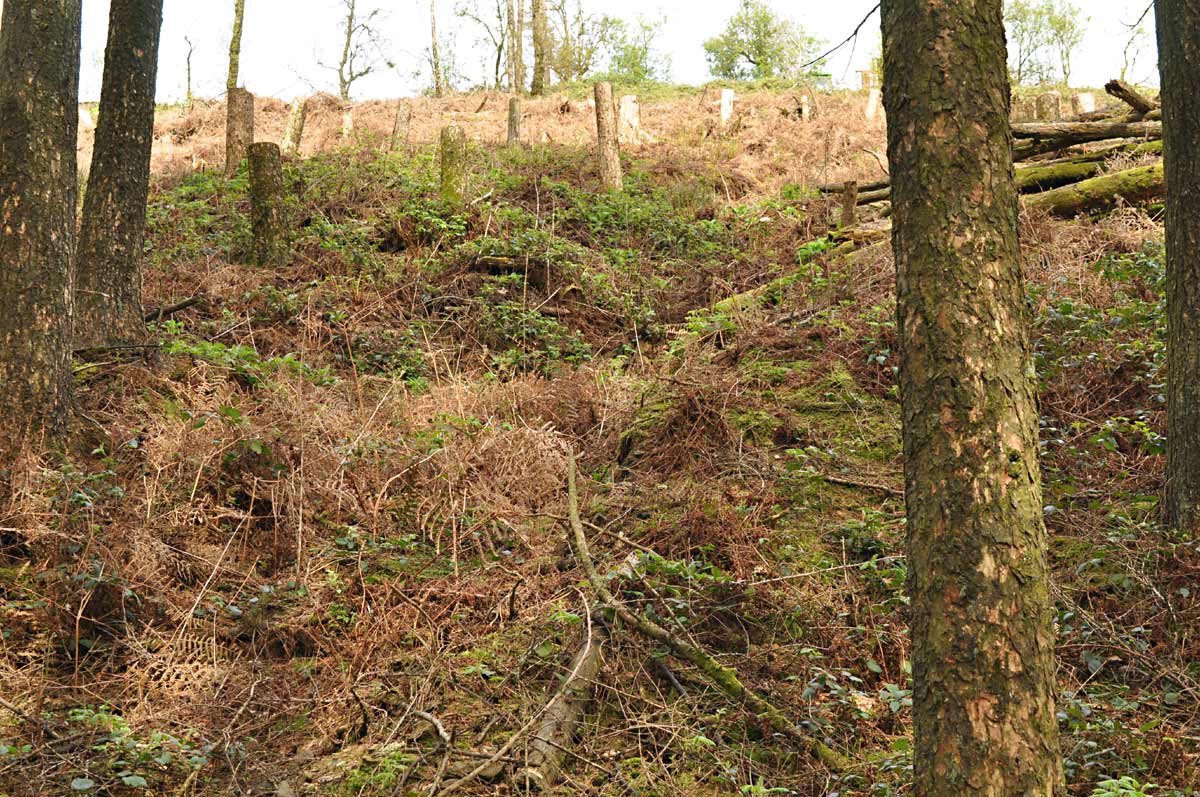
Photo 43 shows spoil heap 4 as viewed from the flat top of spoil heap 3. Much vegetation is in evidence, making it difficult to examine the contents of the heaps in detail, although the sand and sandstone concretions are typical of that found on other whetstone spoil heaps. The heaps here are relatively small compared to ones in other areas suggesting that the mines weren't particularly productive and were relatively short-lived.
Photo 44 shows where the entrance to mine 2 was located, the sides of the cut being visible. Other tunnel entrances were less distinct, with evidence of entrances 1 & 5 having been destroyed in more recent times by woodland management activities. I did (with permission) excavate a small part of the material thrown up onto the side of this cut in the hope of finding some unfinished broken whetstones, but none were found.
Mining in Sheldon Forest, sites A & B
Directions & Access
These mines are located in Sheldon Forest and can be accessed by parking in the small car park at grid reference ST 1127 0707. Go down the track, past the point where it passes the stream at the bottom, then after another 100 yards or so take the path up on the left; one of the spoil heaps of site 'A' will be visible to the left of the path. Site 'B' involves a hike through the undergrowth and is more difficult to get to, so is better suited to the more enthusiastic explorer.
This area of woodland is fully open to the public which implies it's OK to go off the prepared trackway to examine these workings; I didn't see any heads on pikes, which is always a good sign.
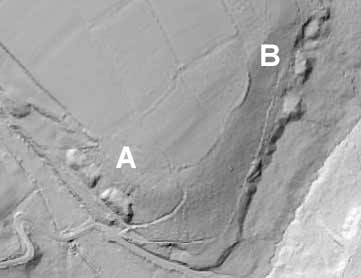
LiDAR image of the mines in Sheldon Forest
There is no evidence of collapsed ground above the entrance sites suggesting that these tunnels may be largely intact underground. There is also no evidence of re-working as appears to have happened in other areas.
Site 'A' - grid reference ST 1158 0731
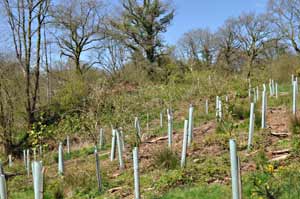
Photo 45 |
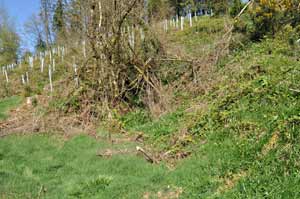
Photo 46 |
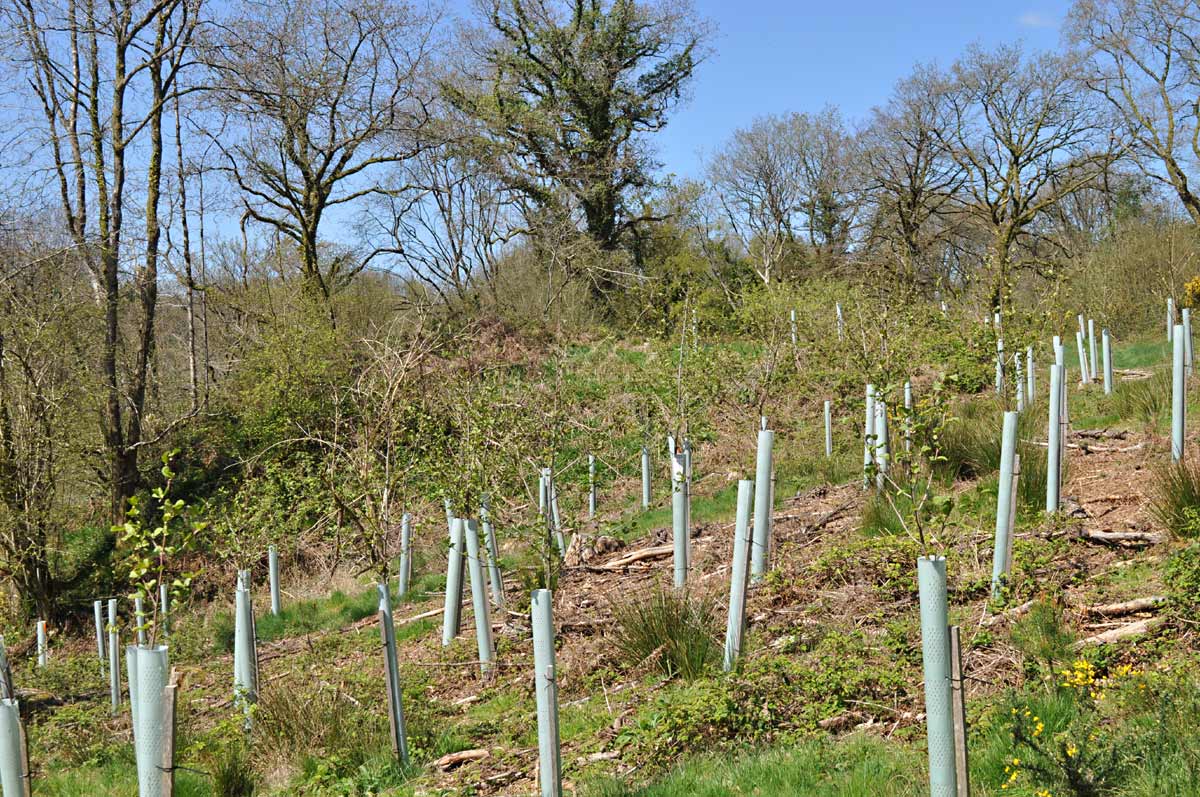
Photo 45 shows one of the two large spoil heaps at this location, and despite a good covering of trees and brambles, it's still possible to get an idea of its size especially in the higher resolution version of the image. This shows the spoil heap end-on, but both of them are a good 50 yards long or more and so consist of a large amount of waste material.
Photo 46 shows where one of the adits was, and it seems that many years ago a bloke with a digger got interested in this bit and dug a fair bit of the entrance out. Whether he found an opening is unknown, but none exists now. There is good evidence of at least two adits for each spoil heap; there may have been more but due to forestry work disturbing the ground I can't be sure.
Site 'B' - grid reference ST 1180 0746
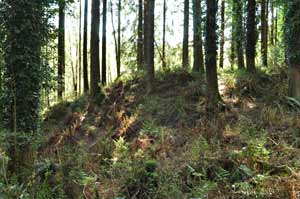
Photo 47 |
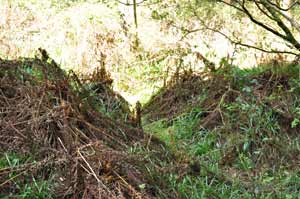
Photo 48 |
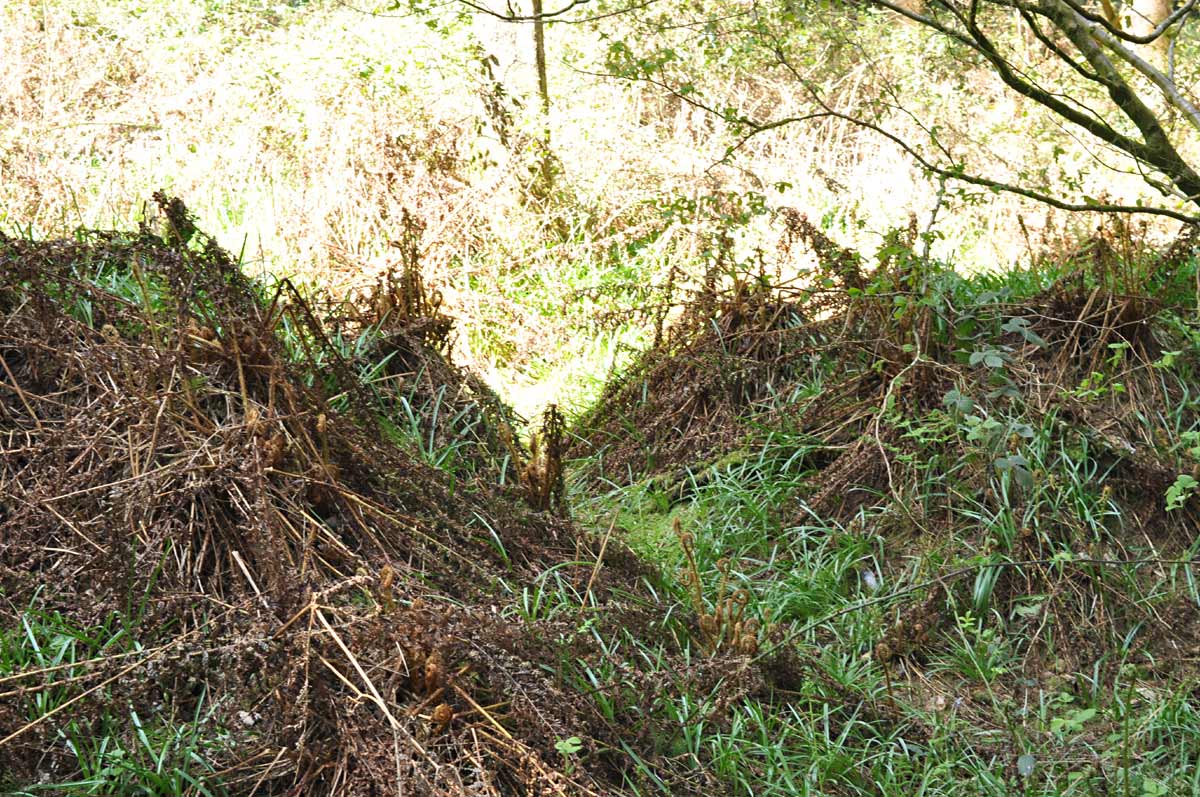
Photo 47 shows one of the three large spoil heaps at this location although it proved difficult to get a meaningful photo due to excessive treeage, as you can see. The heaps are covered with a lot of dead organic matter and the only places where the spoil material could be examined was where badgers had dug it out.
Photo 48 shows the possible site of an adit; there were several possibilities for adit entrances at this site, but as the ground had been severely disturbed during past forestry work, I couldn't confirm that that's what any of them actually were.
This is a work in progress and I have a lot more visits to the mining areas planned during 2026. As and when I have more information, I will update this page accordingly. If you have any information to add, own any land with mines on it or have found what may have been a tool used by the miners, please get in touch.